取扱説明書
AXC25/35
はじめに
本ガイドは、本製品の設置と使用をできるだけ簡単に行えるように作成しています。本書の情報は印刷時点で正確性を慎重に確認しています。ただし、Cambridge Audio は継続的な改良を方針としています。そのため、設計と仕様は予告なく変更する場合があります。
This guide is designed to make installing and using this product as easy as possible. Information in this document has been carefully checked for accuracy at the time of printing; however, Cambridge Audio’s policy is one of continuous improvement, therefore design and specifications are subject to change without prior notice.
本書は著作権で保護された専有情報を含んでいます。すべての権利を留保します。本マニュアルのいかなる部分も、製造元の書面による事前の許可なく、機械的・電子的その他の手段でいかなる形式でも複製できません。すべての商標および登録商標は、それぞれの所有者に帰属します。
This document contains proprietary information protected by copyright. All rights are reserved. No part of this manual may be reproduced by any mechanical, electronic or other means, in any form, without prior written permission of the manufacturer. All trademarks and registered trademarks are the property of their respective owners.
© Copyright Cambridge Audio Ltd 2022
© Copyright Cambridge Audio Ltd 2022
このマニュアル内の画像の一部は、元の PDF から自動生成されたものです。自動処理の都合上、製品の細部や配線図などが実際と異なる場合があります。正確な形状・寸法・配線は、実機および製品ページの写真、同梱の正規マニュアル(英語版)をあわせてご確認ください。
AXC25/35 の同梱品
AXC25/35 の箱には以下が同梱されています。
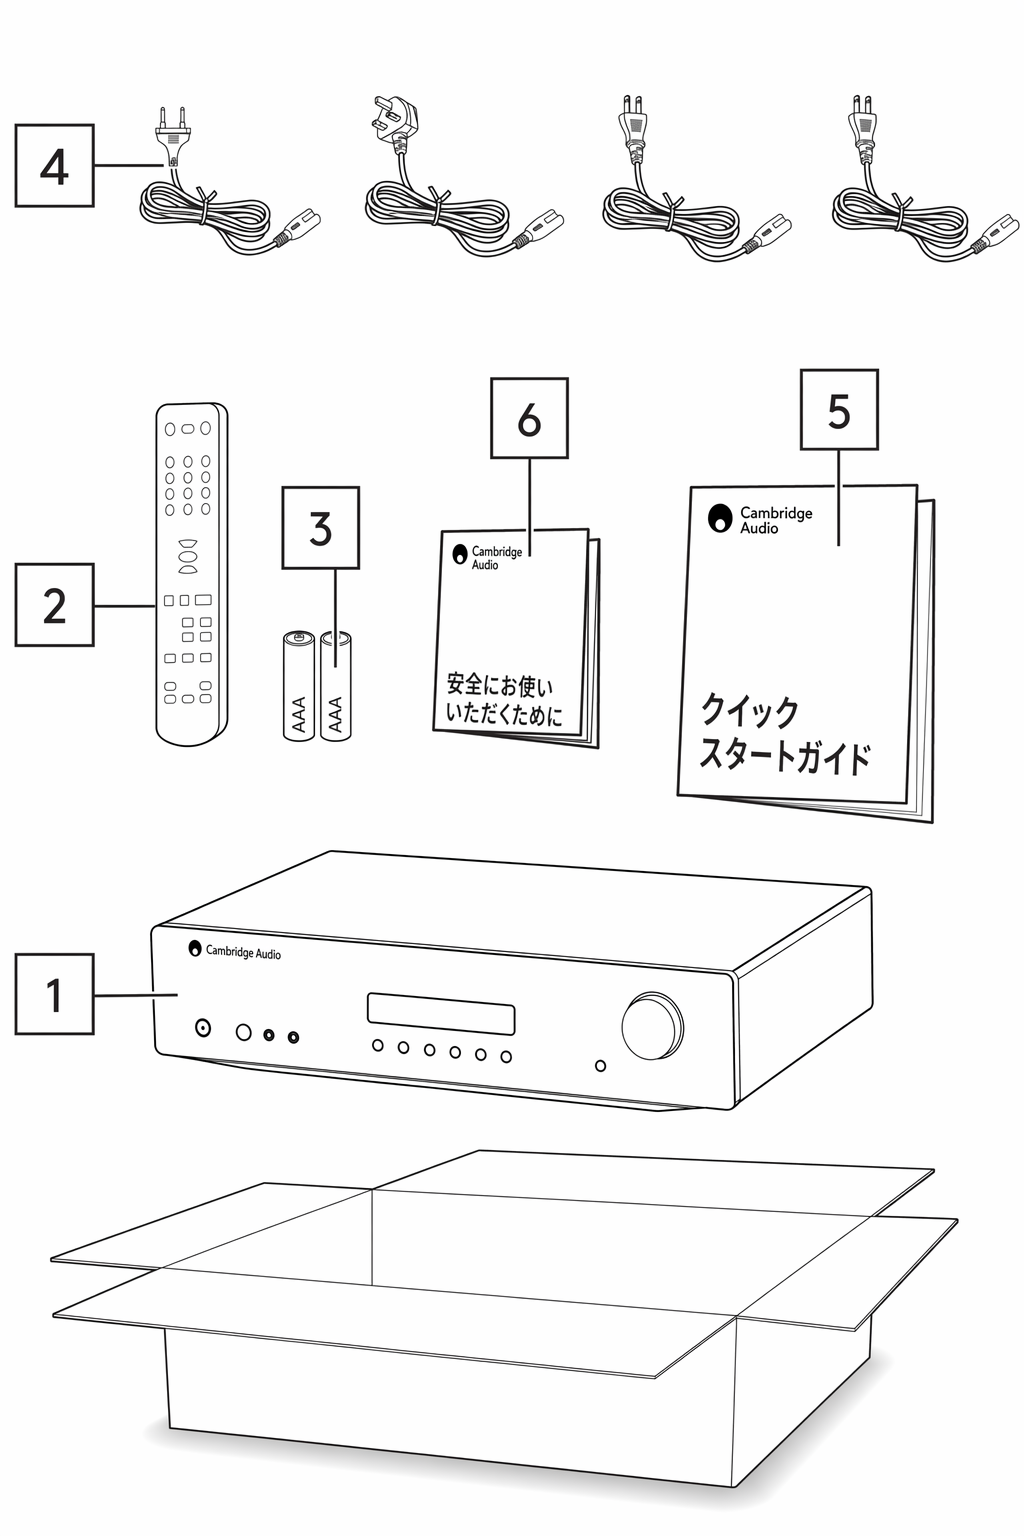
1. AXC CD プレーヤー。2. リモコン。3. 単 4 電池 2 本。4. UK 用電源コード(AXA35 の購入国により異なります)。EU 用電源コード(AXA35 の購入国により異なります)。CU 用電源コード(AXA35 の購入国により異なります)。JP 用電源コード(AXA35 の購入国により異なります)。5. クイックスタートガイド。6. 安全ガイド。
1. AXC CD player.2. Remote control.3. 2 x AAA batteries.4. UK mains lead (Depending on which country the AXA35 was bought).EU mains lead (Depending on which country the AXA35 was bought).CU mains lead (Depending on which country the AXA35 was bought).JP mains lead (Depending on which country the AXA35 was bought).5. Quick start guide.6. Safety guide.
フロントパネルの操作
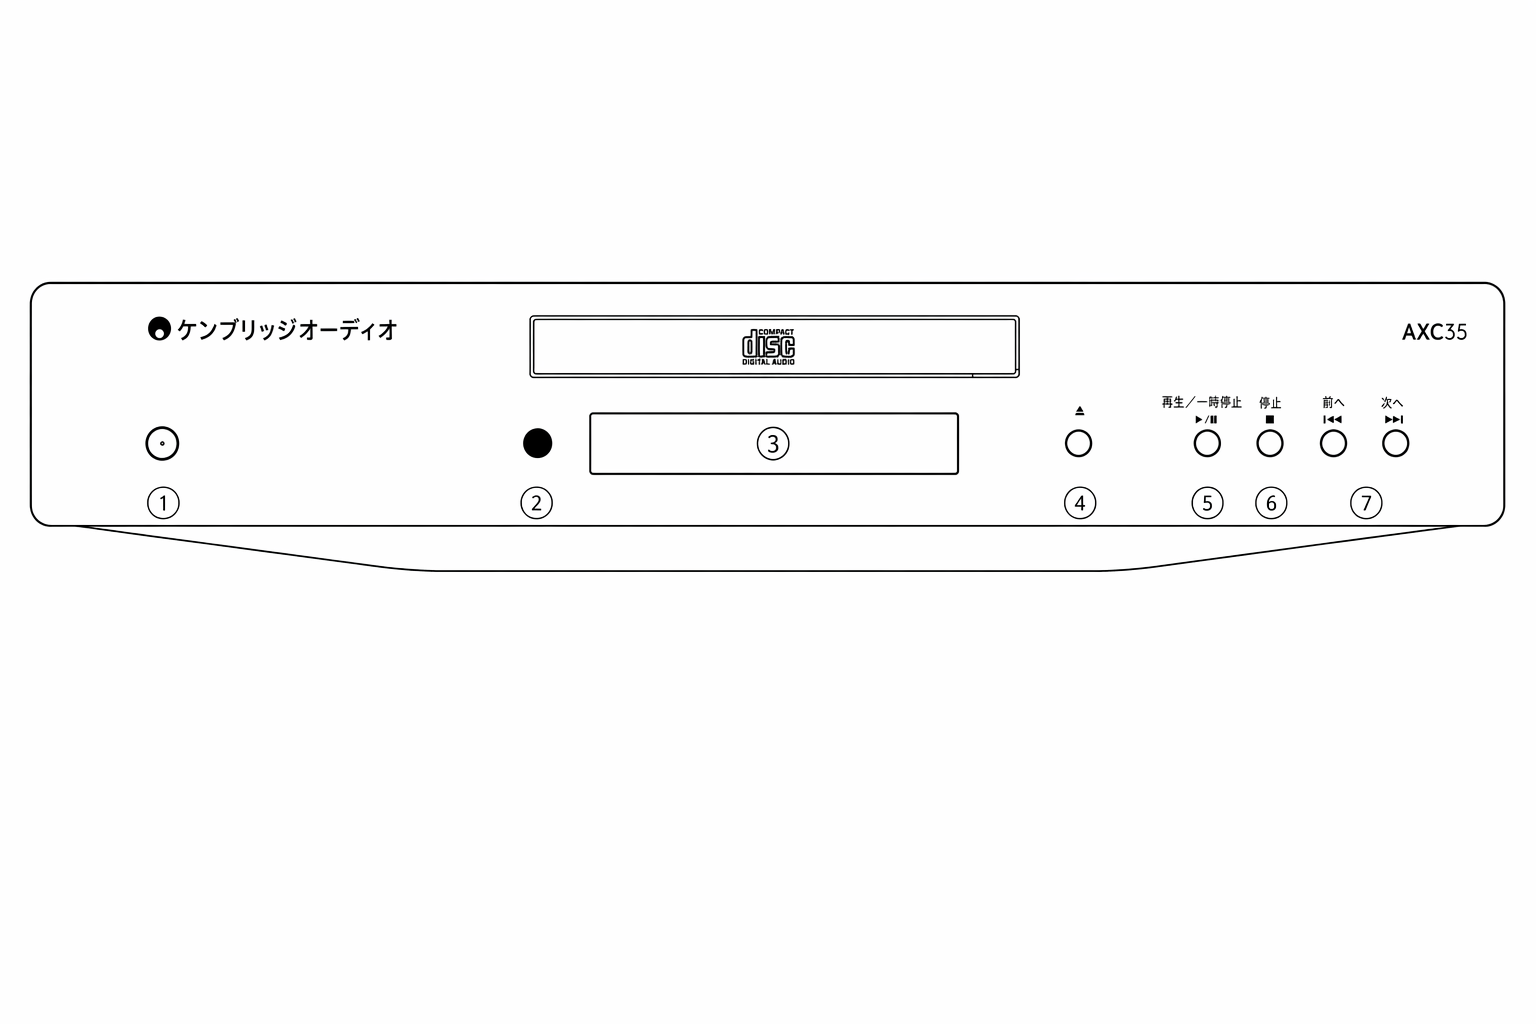
1. 電源ボタン - 本機をスタンバイモード(電源 LED が暗く点灯)とオン(電源 LED が明るく点灯)に切り替えます。スタンバイモードは消費電力が 0.5W 未満の低電力モードです。本製品は APD(オートパワーダウン)が初期設定で有効になっています。20 分間操作がないと、自動的にスタンバイに移行します。
1. Power button - Switches the unit between Standby mode (indicated by dim power LED) and On (indicated by bright power LED). Standby mode is a low power mode where the power consumption is less than 0.5 Watts. This product has APD (Auto Power Down) enabled as default. After inactivity of 20 minutes, the product will automatically switch to Standby.
オートパワーダウン(APD) 本機の APD 設定は有効・無効を切り替えできます。電源ボタンを LED が連続して点滅するまで長押しして設定します。
Auto Power Down (APD) You can enable and disable the unit’s APD setting. This can be adjusted by pressing and holding the Power button until the LED flashes in sequence.
以下の 2 つのパターンで、どちらが選択されているかを確認できます。
The two options below show which option is selected.
スタンバイ LED が 5 回点滅 - APD 無効
Standby flashes 5 times - APD disabled
スタンバイ LED が 10 回点滅 - APD 有効
Standby flashes 10 times - APD enabled
注:APD 機能を変更する前に、本機の電源がオンになっていることを確認してください。
Note: Make sure the unit is On, before making changes to the APD function.
2. 赤外線センサー - 付属のリモコンから IR コマンドを受信します。リモコンとセンサーの間に遮る物がないようにしてください。
2. Infrared sensor - Receives IR commands from the supplied remote control. An unobstructed line of sight between the remote control and the sensor is required.
3. ディスプレイ - 英数字で再生情報を表示します。ディスクを挿入すると、CD プレーヤーは数秒かけてディスクから TOC(目次)情報を読み取ります。その後、ディスプレイには CD のトラック数と総再生時間が表示されます。
3. Display - Alpha-numeric characters which display playback information. On inserting a disc, the CD player will take a few seconds to read the Table of Contents (TOC) information from the disc. The display will then show the number of tracks on the CD and the total length of the CD.
4. オープン/クローズ - ディスクトレイを開閉します。トレイに CD を置いた後、オープン/クローズを押してトレイを閉じます。
4. Open/Close - Allows you to open and close the disc tray. After placing a CD in the tray, press Open/ Close to close the tray.
5. 再生/一時停止
5. Play/Pause
6. 停止 - CD の再生を停止します。
6. Stop - Stops the CD playing.
7. スキップ/スキャン - トラック間の移動とトラック内の検索を行います。短く押すとトラックをスキップします。長押しするとトラック内をスキャンします。
7. Skip/Scan - Enables you to skip between and search within tracks. Press briefly to skip a track. Press and hold to scan through a track.
リアパネルの接続
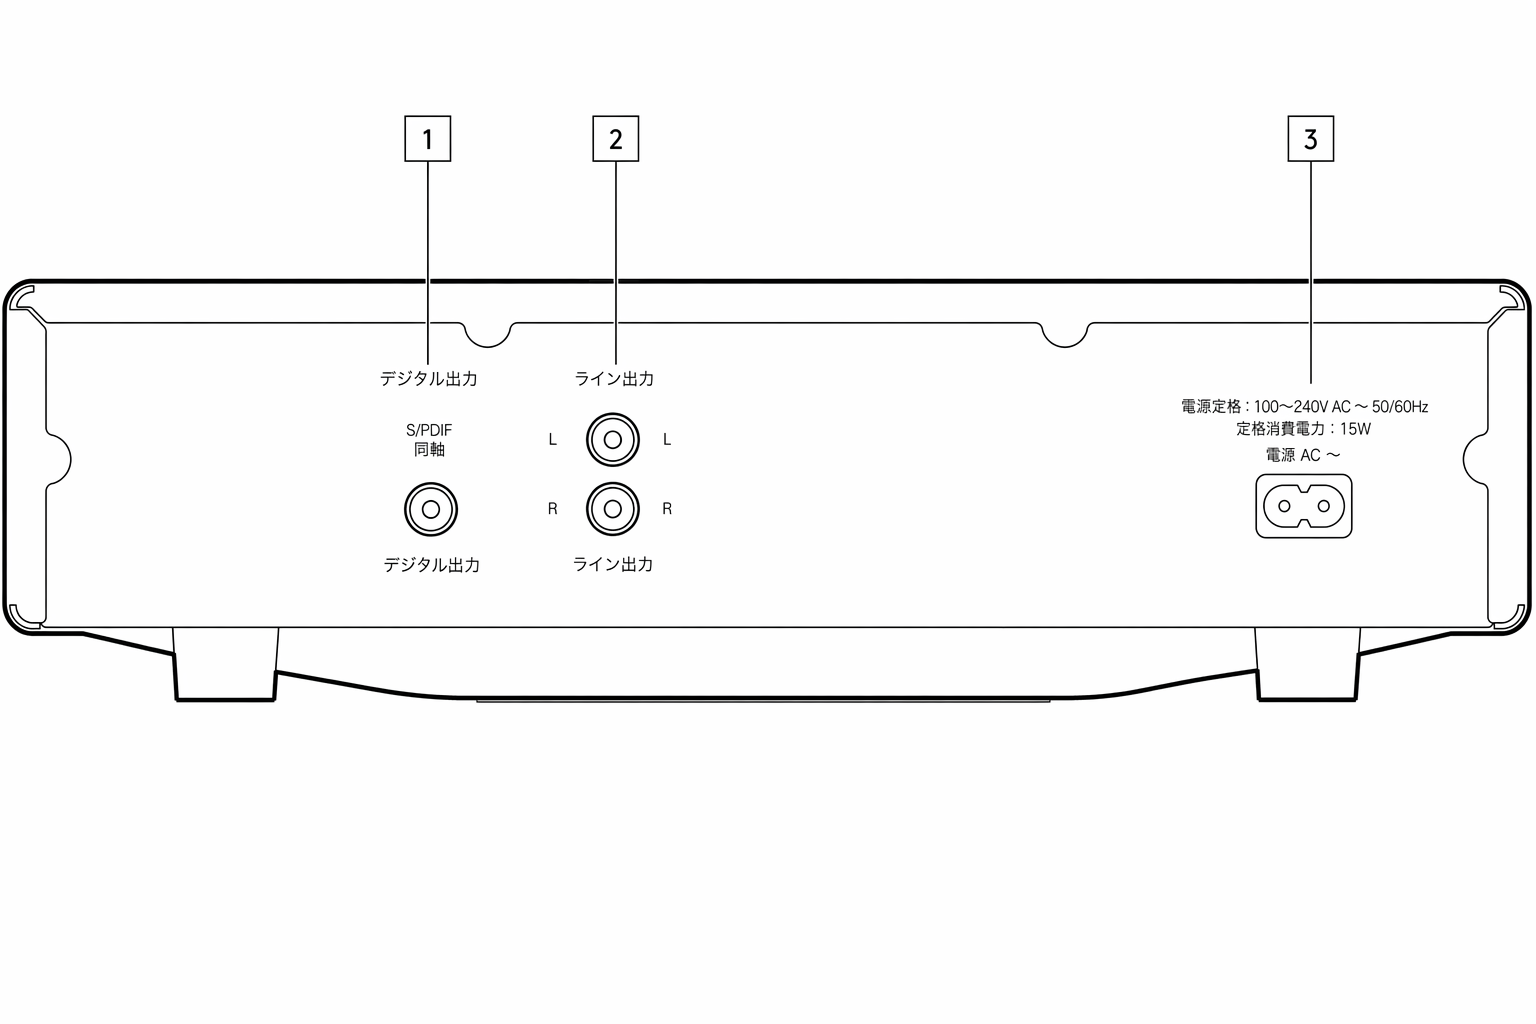
1. S/PDIF 同軸デジタル出力(AXC35 のみ) - 外部 DAC やデジタル録音機器への入力に使用します。最良の結果を得るには、高品位な 75Ω のデジタル RCA インターコネクトケーブルを使用してください(通常のオーディオ用ケーブルは不可)。
1. S/P DIF CO-AXIAL DIGITAL OUTPUT (AXC35 ONLY) - For input to a separate DAC or digital recording machine. To obtain best results, use a high quality 75 Ohm digital RCA interconnect cable (not one designed for normal audio use).
2. ライン出力 - 高品位なインターコネクトケーブルで、本端子からアンプのライン入力に接続します。最良の結果と性能の適合を得るために、Cambridge Audio のアンプへの接続を推奨します。
2. LINE OUTPUT - Use good quality interconnect cables from these sockets to any line level input on your amplifier. For best results and matched performance, we recommend connection to a Cambridge Audio amplifier.
3. AC 電源ケーブル - アンプへのすべての接続が完了したら、AC 電源ケーブルを適切な電源コンセントに差し込み、本機の電源をオンにします。これで CD プレーヤーの使用準備が整います。
3. AC POWER CABLE - Once you have completed all connections to the amplifier, plug the AC power cable into an appropriate mains socket and turn the unit on. Your compact disc player is now ready for use.
リモコン
| AXC25 および AXC35 には本機を操作するリモコンが付属しています。リモコンを使用する前に、付属の単 4 電池を入れてください。 1. 電源ボタン - AXC35/AXC25 をオンと低消費電力のスタンバイモードに切り替えます。 2. オープン/クローズ - ディスクトレイを開閉します。 3. 数字トラック選択 - 再生したいトラックの番号を押します。トラックの先頭から自動的に再生します。 4. PROG - 最大 20 トラックの独自の再生順序をプログラムできます。詳しくは本マニュアルの「操作方法」のセクションを参照してください。 5. PROG CLEAR - プログラムした再生順序を消去します。本マニュアルの後述のセクションを参照してください。 6. 一時停止/停止/再生 - 該当するボタンを押して、CD の一時停止、停止、再生を行います。 7. スキップ 右スキップ - CD のトラックを 1 つ進めます。左スキップ - CD のトラックを 1 つ戻します。 8. スキャン - 長押しで選択中のトラック内をスキャンします。右ボタンで早送り、左ボタンで巻き戻しになります。 9. ランダム、リピート、REMAIN - これらのボタンの機能については、本マニュアルの「操作方法」のセクションを参照してください。 AXA35 リモコン上の以下のボタンは AXA35 の操作専用です。 10. 音量 - 本機の音量を上下します。低音、高音、バランス設定の選択時にもレベル変更に使用します。 11. MENU - 低音、高音、バランスのオプションを切り替えます。音量ボタンで選択したオプションのレベルを変更します。 12. ソースボタン(CD、BD/DVD、MP3/AUX、TUNER、PHONO) - 該当するボタンを押して再生したい音楽ソースを選択します。 13. ミュート - AXA35 の出力をミュートします。注:これらのボタンは AXA35 でのみ動作し、Cambridge Audio Azur アンプ/レシーバーや他メーカーの機器には対応しません。 |
|---|
接続
ライン出力の接続
ライン出力はアンプのライン入力への接続に使用します。下の図はアンプとの接続例を示しています。
The line outputs are for connecting to the line level inputs on an amplifier. The diagram below shows a connection to an amplifier.
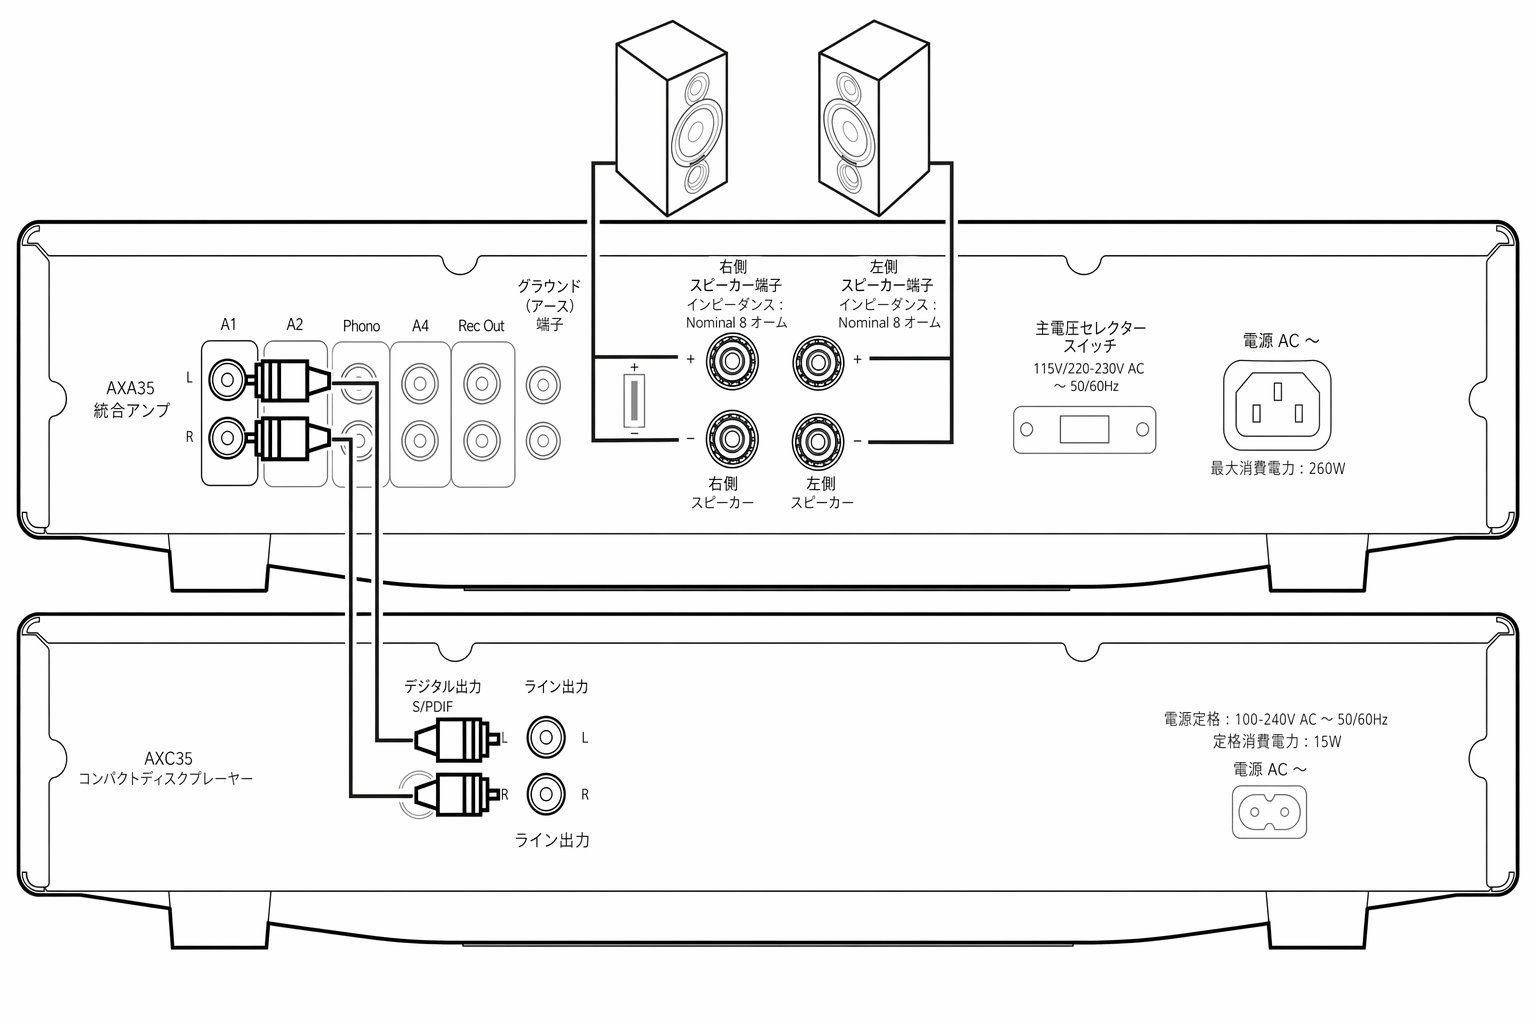
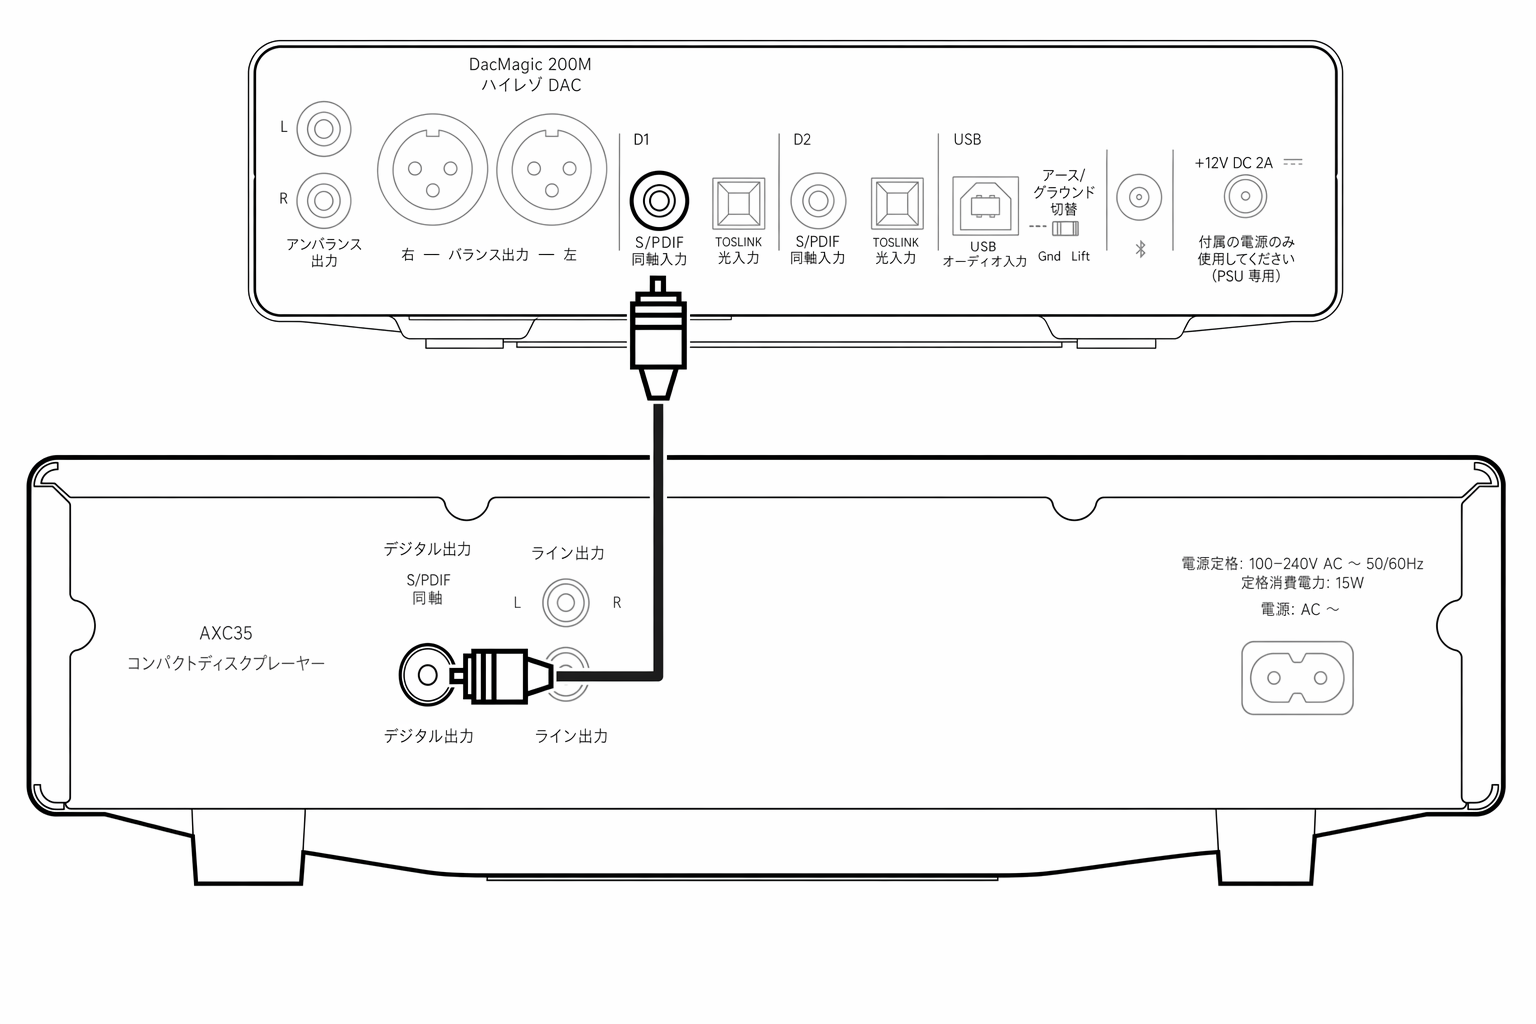
S/PDIF 同軸デジタル出力の接続(AXC35 のみ)
S/PDIF 出力は、D/A コンバーター(DAC)やデジタル録音機器などの外部デジタル機器の入力への接続に使用します。下の図は外部 DAC との接続例を示しています。
The S/P DIF output is for connecting to the input of a separate digital device, such as a DAC or digital recording machine. The Diagram below shows a connection to an external DAC.
操作方法
AXC25/35 は以下のディスクのみ再生できます。
- コンパクトディスク
- 記録可能 CD(CD-R)
- 上に示した識別ロゴが付いた書き換え可能 CD(CD-RW)
注:CD-R/CD-RW ディスクを再生するには、TOC(目次)情報が正しく記録されている必要があります。
Note: The CD-R/CD-RW discs should contain properly recorded TOC (Table of Contents) information so that they can be played back.
AXC25/35 は、音楽再生用の CDDA フォーマットで録音されたディスク、または MP3 や WMA ファイルを含むディスクのみ再生できます。PC 用データ CD-ROM など、それ以外のデータが入ったディスクを本機で再生しないでください。
The AXC25/35 can only play the discs recorded in the CDDA format designed for music reproduction or those containing MP3 or WMA files. Do not attempt to play a disc on this unit containing other data, such as a data CD-ROM for PCs.
ディスクの出し入れ
1. フロントパネルまたはリモコンの「オープン/クローズ」ボタンを押して、ディスクトレイを開きます。
1. Using the front panel or remote control, press the ‘Open/Close’ button to open the disc tray.
2. ディスクトレイが完全に開いたら、ラベル面を上に向けてディスクを慎重にトレイに置きます。
2. Once the disc tray has fully opened, carefully place a disc into the tray with the label side facing upwards.
3. 「オープン/クローズ」ボタンをもう一度押して、ディスクトレイを閉じます。トレイが完全に閉じると、AXC25/35 はディスクを読み取り、内容情報を表示します。
3. Close the disc tray by pressing the ‘Open/Close’ button again. When the tray has fully closed the AXC25/35 will read the disc and display the content information.
4. 再生中はいつでも、フロントパネルまたはリモコンの「オープン/クローズ」ボタンでディスクトレイを開けます。ディスクトレイが完全に開いてからディスクを取り出してください。
4. The disc tray can be opened at any time during playback using either the front panel ‘Open/Close’ button, or the one located on the remote control. Only remove an inserted disc after the disc tray has fully opened.
重要な情報:
Important Information:
- 機構を損傷する恐れがあるため、コンパクトディスク以外のものをディスクトレイに入れないでください。
- 開閉動作中にトレイを手で無理に動かさないでください。
- 機構内部にほこりや汚れが入らないよう、未使用時はディスクトレイを閉じてください。
- 傷や汚れがひどいコンパクトディスクは、プレーヤーが読み取りや再生できない場合があります。
- ディスクトレイに複数のディスクを同時に入れないでください。
通常のディスク再生
1. アンプの電源をオンにし、入力セレクターを正しい位置に設定します。音量を最小にします。
1. Switch on your amplifier and set its input selector to the correct position. Adjust the volume control to a minimum.
2. オープン/クローズボタンを押してディスクトレイを開き、ディスクをセットします。
2. Press the Open/Close button to open the disc tray and load a disc.
3. オープン/クローズボタンをもう一度押してトレイを閉じます。CD プレーヤーがディスクを読み取ります。
3. Press the Open/Close button again to close the tray. The CD player will read the disc.
4. 再生を開始するには、再生ボタンを押します。
4. To begin playback, press the Play button.
5. 最後のトラックの再生が終わると、ディスプレイは TOC(目次)に戻ります。
5. When the last track has finished playing, the display will return to Table of Contents (TOC).
6. 任意のタイミングでディスクを停止するには、「停止」ボタンを押します。一時停止するには「一時停止」ボタンを押します。再生を再開するには、「再生」ボタンをもう一度押します。
6. To stop the disc at any point, press the ‘Stop’ button. To pause the disc, press the ‘Pause’ button. Playback can then be resumed by pressing the ‘Play’ button again.
再生中に特定のトラックを選ぶ
1. 「スキップ/スキャン」ボタン(前方向)を 1 回短く押すと、CD の次のトラックの先頭にジャンプします。必要に応じて繰り返してください。
1. A single short press of the forward ‘Skip/Scan’ button will take you to the beginning of the next track on the CD. Repeat as necessary.
2. 「スキップ/スキャン」ボタン(後方向)を 1 回短く押すと、前のトラックの先頭に戻ります。
2. A single short press of the reverse ‘Skip/Scan’ button will take you to the beginning of the previous track.
停止中に特定のトラックを選ぶ
1. 「スキップ/スキャン」ボタン(後方向・前方向)を 1 回短く押すと、それぞれの方向にトラックを移動できます。
1. A single short press of the reverse ‘Skip/Scan’ and forward ‘Skip/Scan’ buttons will skip between tracks in their relative directions.
2. 「再生」を押すと、選択したトラックから再生を開始します。
2. Press ‘Play’ to start playback from the selected track.
ディスクとトラックのリピート
1. ディスクがセットされていることを確認します。
1. Ensure that the disc is loaded.
2. 特定のトラックをリピートするには、リモコンのリピートボタンを押します。ディスプレイに「RPT ONE」が表示されます。「再生」を押すと、機能をオフにするまで選択したトラックをリピートします。あるいは、リピートボタンを押してからリモコンの数字ボタンで対象のトラックを選び、「再生」を押します。
2. To repeat a specific track, press the Repeat button on the remote. ‘RPT ONE’ will appear on the display. Press ‘Play’ and the selected track will now repeat until the function is turned off. Alternatively, press the Repeat button, select the chosen track using the numerical buttons on the remote control and press ‘Play’.
3. リモコンのリピートボタンを 2 回押します。ディスプレイに「RPT ALL」が表示されます。「再生」を押すと、機能をオフにするまでディスク全体をリピートします。
3. Press the Repeat button twice on the remote control. ‘RPT ALL’ will appear on the display. Press ‘Play’. The whole disc will now be repeated until the function is turned off.
4. リピート機能をオフにするには、再生前または再生中にリピートボタンを押し、ディスプレイに「RPT OFF」が表示されるまで操作します。
4. To turn the Repeat function off, press the Repeat button either before or during playback until ‘RPT OFF’ appear on the display.
トラックをランダム順で再生する
1. ディスクがセットされていることを確認します。
1. Ensure that a disc is loaded.
2. リモコンのランダムボタンを押します。ディスプレイに「RAN ON」が表示されます。
2. Press the Random button on the remote control. ‘RAN ON’ will appear on the display.
3. 「再生」を押します。CD プレーヤーはディスク全体をランダム順で再生します。再生中にランダムボタンを押して、ランダム順で聴くこともできます。
3. Press ‘Play’. The CD player will now play the entire disc in random order. It is also possible to press the Random button during playback to listen to tracks in random order.
4. ランダムボタンを押すと、ランダム再生を終了します。ディスクは正しい順序で最後まで再生を続けます。
4. Press the Random button to exit. The disc will continue playing to the end in the correct order.
5. 「停止」ボタンを押すと、いつでもディスクを停止できます。
5. Press the ‘Stop’ button at any time to stop the disc.
注:「RPT ONE」選択中に「ランダム」モードを選ぶと、「RPT ONE」モードは自動的に解除されます。
Note: Selecting ‘Random’ mode when ‘RPT ONE’ has been selected will automatically cancel ‘RPT ONE’ mode.
REMAIN 機能の使い方
1. ディスクが再生中であることを確認します。
1. Ensure that the disc is playing.
2. リモコンの Remain ボタンを 1 回押すと、再生中のトラックの残り時間を表示します。
2. Press the Remain button on the remote control once to display the time remaining for the track playing.
3. Remain ボタンを 2 回目に押すと、ディスク全体の残り時間を表示します。
3. Pressing the Remain button the second time will show the total remaining disc time.
4. 再生前または再生中に Remain ボタンをもう一度押すと、通常再生モードに戻ります。
4. Press the Remain button again either before or during playback to return to normal play mode.
プログラム再生
AXC35/AXC25 では、聴きたいトラックだけを任意の順序で再生するようにプログラムできます。
It is possible to program the AXC35/AXC25 to play back in any order only the tracks you wish to listen to.
1. ディスクがセットされていることを確認します。ディスプレイに TOC データが表示されているはずです。
1. Ensure that a disc is loaded. The display should show the TOC data.
2. リモコンの「Prog」ボタンを押します。ディスプレイにプログラム設定画面が表示されます。
2. Press the ‘Prog’ button on the remote control. The Program set-up will appear on the display.
3. 「スキップ/スキャン」ボタン(後方向・前方向)を使用するか、最初にプログラムしたいトラック番号を入力します。
3. Use the reverse ‘Skip/Scan’ and forward ‘Skip/Scan’ buttons or enter the track number that you want to program as your first track.
4. リモコンの「Prog」ボタンを押します。これで目的のトラックがプログラムされます。次の入力のために、プログラム番号は自動的に 1 つ増えます。
4. Press the ‘Prog’ button on the remote. The desired track is now programmed. The program number automatically increases by one for the next entry.
5. 目的のトラックをすべて入力するまで、手順 3 と 4 を繰り返します。最大 20 トラックまでプログラムできます。
5. Repeat steps three and four until all your desired tracks are entered. A maximum of 20 tracks can be programmed.
6. 「再生」ボタンを押すと、プログラム再生を開始します。
6. Press the ‘Play’ button to begin programmed playback.
7. リモコンの「Prog Clear」ボタンを押すと、プログラムしたすべてのトラックを消去します。
7. Press the ‘Prog Clear’ button on the remote to clear all programmed tracks.
トラブルシューティング
電源が入らない
There is no power
- AC 電源コードがしっかり接続されていることを確認してください。
- プラグが壁面コンセントに完全に挿入され、電源がオンになっていることを確認してください。
プレーヤーがディスクを読み取らない
The player will not read the disc
- ディスクが裏返しにセットされていないか確認してください。
- ディスクに大きな傷や汚れがないか確認してください。
- ディスクの種類が AXC25/35 に対応しているか確認してください(マニュアルの「操作方法」のセクションを確認してください)。
音が出ない
There is no sound
- アンプの設定が正しいか確認してください。
- インターコネクトケーブルが正しく挿入されているか確認してください。
ディスクが飛ぶ(スキップする)。
The disc is skipping.
- ディスクに大きな傷や汚れがないか確認してください。
- プレーヤーが安定した台に置かれ、振動の影響を受けていないか確認してください。
リモコンが動作しない。
The remote will not function.
- 電池が消耗していないか確認してください。
- リモコンセンサーを遮る物がないか確認してください。
- リモコンの「AXA35 専用」のボタンで AXC を操作していないか確認してください(マニュアルの「リモコン」のセクションを確認してください)。
技術仕様
AXC25:
AXC25:
D/A コンバーター(DAC):
D/A Converter:
Wolfson Microelectronics WM8524
Wolfson Microelectronics WM8524
フィルター:
Filter:
2 次バターワースフィルター
2 -pole Butterworth filter
周波数特性(±0.4dB):
Frequency response (+/-0.4dB):
20Hz - 20kHz
20Hz - 20kHz
全高調波歪率(THD)@ 1kHz 0dBFs:
THD @ 1Khz 0dBFs:
<0.006%
<0.006%
THD @ 1kHz -10dBFs:
THD @ 1Khz -10dBFs:
<0.015%
<0.015%
SN 比(A 特性):
S/N ratio, A weighted:
> 93dB
> 93dB
クロストーク @1kHz:
Crosstalk @1kHz:
<-95dB
<-95dB
クロストーク @20kHz:
Crosstalk @20kHz:
<-95dB
<-95dB
出力インピーダンス:
Output impedance:
<50Ω
<50 ohms
ギャップレス再生:
Gapless Playback:
対応
Yes
最大消費電力:
Maximum power consumption:
15W
15W
スタンバイ時消費電力:
Standby power consumption:
<0.5W
<0.5W
外形寸法:
Dimensions:
75 × 430 × 305mm(3.0 × 16.9 × 12.2 インチ)
75 x 430 x 305mm (3.0 x 16.9 x 12.2”)
重量:
Weight:
4.3kg(9.5lbs)
4.3kg (9.5lbs)
AXC35:
AXC35:
DAC:
D/A Converter:
Wolfson Microelectronics WM8524
Wolfson Microelectronics WM8524
フィルター:
Filter:
2 次バターワースフィルター
2 -pole Butterworth filter
周波数特性(±0.4dB):
Frequency response (+/-0.4dB):
20Hz - 20kHz
20Hz - 20kHz
THD @ 1kHz 0dBFs:
THD @ 1Khz 0dBFs:
<0.006%
<0.006%
THD @ 1kHz -10dBFs:
THD @ 1Khz -10dBFs:
<0.01%
<0.01%
SN 比(A 特性):
S/N ratio, A weighted:
> 95dB
> 95dB
クロストーク @1kHz:
Crosstalk @1kHz:
<-98dB
<-98dB
クロストーク @20kHz:
Crosstalk @20kHz:
<-95dB
<-95dB
出力インピーダンス:
Output impedance:
<50Ω
<50 ohms
S/PDIF 出力インピーダンス:
S/PDIF output impedance:
<75Ω
<75 ohms
ギャップレス再生:
Gapless Playback:
対応
Yes
最大消費電力:
Maximum power consumption:
15W
15W
スタンバイ時消費電力:
Standby power consumption:
<0.5W
<0.5W
外形寸法:
Dimensions:
75 × 430 × 305mm(3.0 × 16.9 × 12.2 インチ)
75 x 430 x 305mm (3.0 x 16.9 x 12.2”)
重量:
Weight:
4.3kg(9.5lbs)
4.3kg (9.5lbs)
よくある質問(FAQ)
AXC25 と AXC35 の違いは何ですか?
AXC35 は S/PDIF デジタル出力を備えています。これにより、AXC35 を外部の DAC に接続して音質を向上させることができ、柔軟性が高まります。
The AXC35 contains an S/P DIF digital output. This offers extra flexibility as you can connect the AXC35 to an external DAC for improved sound quality.
AXC25/35 はギャップレス再生に対応していますか?
はい、AXC25/35 はギャップレス再生に対応しています。
Yes, the AXC25/35 does support gapless playback.
AXC25/35 に音量調整機能はありますか?
AXC25/35 自体に音量調整機能はありません。アナログ出力およびデジタル出力(AXC35 のみ)は、いずれもライン出力レベルです。
The AXC25/35 does not have a volume control of its own. The analogue and digital output (AXC35 only) are both line level.
音量は、接続先のアンプまたは DAC で調整してください。
You will need to control the volume via your connected amplifier or DAC.