
取扱説明書
CXA61/81/81 Mk II
はじめにIntroduction
このガイドは、本製品の設置と使用をできるだけ簡単にするためのものです。本書の情報は印刷時点で正確であるよう慎重に確認されていますが、Cambridge Audio は継続的な改善を方針としているため、設計および仕様は予告なく変更される場合があります。
This guide is designed to make installing and using this product as easy as possible. Information in this document has been carefully checked for accuracy at the time of printing; however, Cambridge Audio’s policy is one of continuous improvement, therefore design and specifications are subject to change without prior notice.
本書には、著作権で保護された専有情報が含まれています。すべての権利を留保します。本マニュアルのいかなる部分も、製造元の書面による事前の許可なく、機械的、電子的またはその他の手段により、いかなる形式でも複製することはできません。すべての商標および登録商標は、それぞれの所有者に帰属します。
This document contains proprietary information protected by copyright. All rights are reserved. No part of this manual may be reproduced by any mechanical, electronic or other means, in any form, without prior written permission of the manufacturer. All trademarks and registered trademarks are the property of their respective owners.
Bluetooth® のワードマークおよびロゴは、Bluetooth SIG, Inc. が所有する登録商標です。Audio Partnership Plc によるこれらの商標の使用は、ライセンスに基づいています。その他の商標および商品名は、それぞれの所有者に帰属します。
The Bluetooth® word mark and logos are registered trademarks owned by the Bluetooth SIG, Inc. and any use of such marks by Audio Partnership Plc is under license. Other trademarks and trade names are those of their respective owners.
Qualcomm は Qualcomm Incorporated の商標であり、米国およびその他の国で登録されています。許可を得て使用しています。aptX は Qualcomm Technologies International, Ltd. の商標であり、米国およびその他の国で登録されています。許可を得て使用しています。
Qualcomm is a trademark of Qualcomm Incorporated, registered in the United States and other countries, used with permission. aptX is a trademark of Qualcomm Technologies International, Ltd., registered in the United States and other countries, used with permission.
Qualcomm aptX は Qualcomm Technologies International, Ltd の製品です。
Qualcomm aptX is a product of Qualcomm Technologies International, Ltd
© Copyright Cambridge Audio Ltd
© Copyright Cambridge Audio Ltd
今後の製品に関するニュース、ソフトウェアアップデート、限定オファーを受け取るには、https://www.cambridgeaudio.com/register で製品を登録してください。
For upcoming news on future products, software updates and exclusive offers, make sure you register your product at https://www.cambridgeaudio.com/register
このマニュアル内の画像の一部は、元の PDF から自動生成されたものです。自動処理の都合上、製品の細部や配線図などが実際と異なる場合があります。正確な形状・寸法・配線は、実機および製品ページの写真、同梱の正規マニュアル(英語版)をあわせてご確認ください。
CXA61/81 の同梱品What’s included with the CXA61/81?
CXA の箱には以下のものが同梱されています:Inside the box of your CXA you will receive:
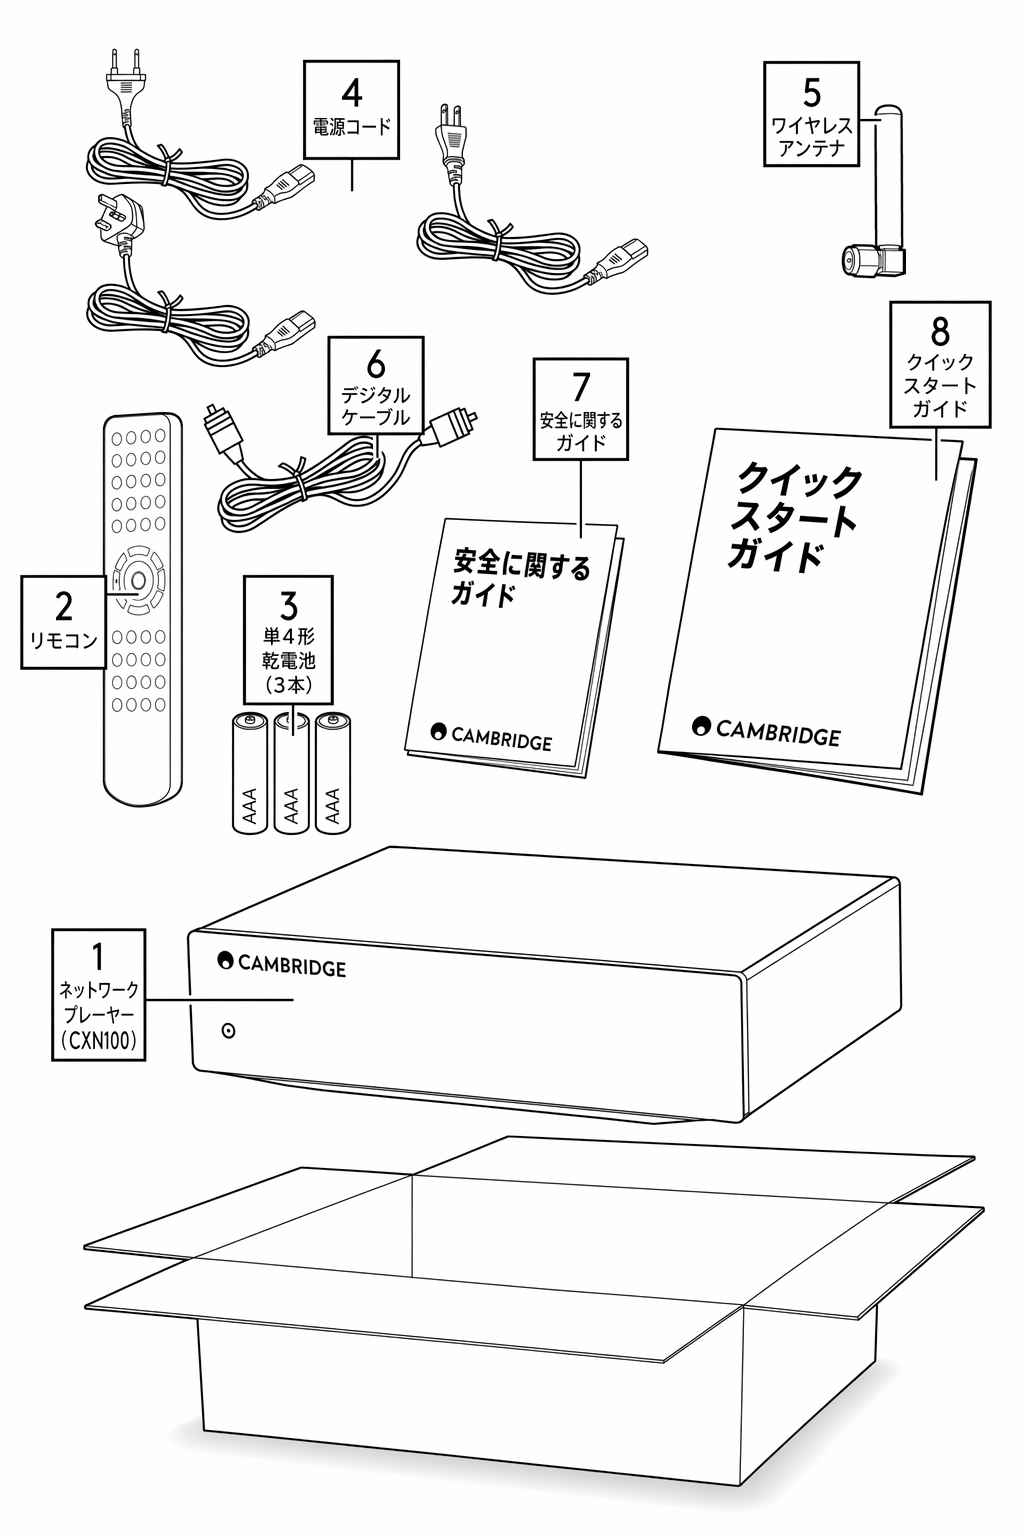
- CXA プリメインアンプCXA Integrated Amplifier
- リモコンRemote Control
- 単4形乾電池 × 33 x AAA Batteries
- UK 電源コード(5A ヒューズ付き)(CXA61/81 の購入国により異なります)、EU 電源コード(CXA61/81 の購入国により異なります)、CU 電源コード(CXA61/81 の購入国により異なります)UK power cord (5A fused) (Depending on which country the CXA61/81 was purchased in), EU power cord (Depending on which country the CXA61/81 was purchased in), CU power cord (Depending on which country the CXA61/81 was purchased in)
- Bluetooth アンテナBluetooth Antenna
- オレンジ色のコントロールバスケーブルOrange Control Bus Cable
- 安全ガイドSafety Guide
- クイックスタートガイドQuickstart Guide
フロントパネルの操作部Front panel controls
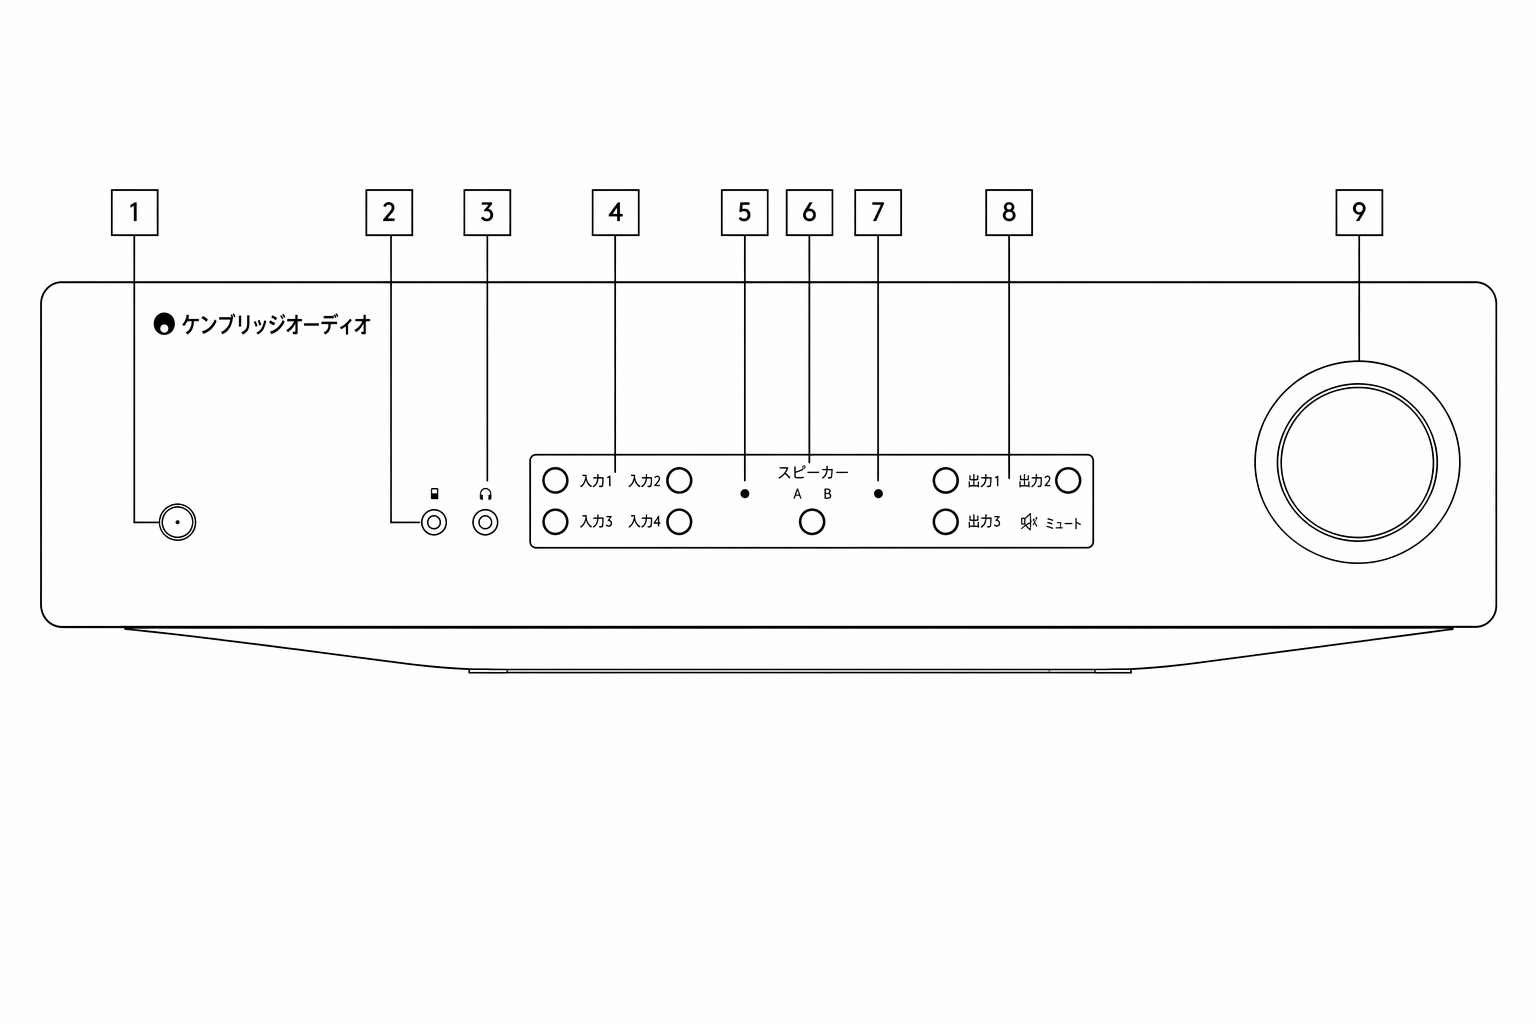
1. Standby/On - 本機をスタンバイモード(電源 LED が暗く点灯)とオン(電源 LED が明るく点灯)の間で切り替えます。スタンバイモードは低消費電力モード(0.5W)です。使用しないときは、本機をスタンバイモードにしておいてください。
1. Standby/On - Switches the unit between Standby mode (indicated by dim power LED) and On (indicated by bright power LED). Standby mode is a low power mode (0.5 Watts). The unit should be left in Standby mode when not in use.
CXA では Auto Power Down(APD)が初期設定で有効になっており、20 分間操作がないと本機は自動的にスタンバイに切り替わります。詳細については「セットアップメニュー」セクションを参照してください。
The CXA has Auto Power Down (APD) enabled by default, and the unit will automatically switch to standby after 20 minutes of inactivity. See the 'Setup menu' section for further details.
2. MP3 input(CXA61 のみ) - 3.5mm ステレオジャックを使用して、スマートフォンなどのポータブルオーディオ機器を本機の前面に直接接続できます。
2. MP3 input (CXA61 only) - Allows you to connect a portable audio device, such as a smart phone, directly into the front of the unit using the 3.5mm stereo-jack.
注:MP3 入力は、ジャックが挿入されている場合にのみ選択できます。ジャックソケットに機器を接続すると、MP3 入力が自動的に選択されます。ジャックを挿入した状態で A4 ボタンを押すと、A4 と MP3 入力が切り替わります。MP3 入力は、A4 がオレンジ色に点灯することで示されます。
Note : The MP3 input can only be selected when a jack is inserted. Plugging in a device into the jack socket automatically selects the MP3 input. With the jack inserted pressing the A4 button will toggle between A4 and MP3 inputs. The MP3 input is shown by A4 being lit orange.
3. Headphones - 3.5mm ジャックプラグを備えたステレオヘッドホンを接続できます。インピーダンスが 8 〜 600Ω のヘッドホンを推奨します。
3. Headphones - Allows for the connection of stereo headphones with a 3.5mm jack plug. Headphones with an impedance of between 8 and 600 ohms are recommended.
注:ヘッドホンを接続すると、スピーカー、プリアウト、およびサブ出力が自動的にミュートされます。
Note : Plugging in headphones will automatically mute the loudspeaker, pre-out, and sub outputs.
4. アナログソース選択ボタン - 適切な入力選択ボタンを押して、希望するソースを選択します。
4. Analogue source select buttons - Push the appropriate input selection button to select the source you want.
注:
Notes:
- CXA81 では、A1 入力選択ボタンを押すと、バランス入力とアンバランス入力が切り替わります。バランス入力は A1 がオレンジ色に点灯することで示され、アンバランス入力は A1 が青色に点灯することで示されます。On the CXA81, pressing the A1 input selection button will toggle between balanced and unbalanced. The balanced input is shown by A1 being lit orange, while the unbalanced input is shown by A1 being lit blue.
- 正しい入力ボタンが選択されていない場合、アンプから音が出ません。たとえば、オーディオソースをバランス入力に接続している場合は、A1 入力のランプがオレンジ色に点灯していることを確認してください。There will be no sound from the amp if the correct input button isn’t selected. If an audio source is connected to the balanced input, for example, ensure that the A1 input light is lit orange.
5. 保護インジケーター - 詳細については「CAP5」セクションを参照してください。
5. Protection indicator - See the 'CAP5' section for further details.
6. Speaker A/B - 背面パネルのスピーカー端子に接続されたスピーカーセット(A、B、または A と B)を順に切り替えるには、このボタンを押します。別の部屋にある追加のスピーカーセットで聴く場合に使用できます。詳細については「接続」セクションを参照してください。
6. Speaker A/B - Press to scroll through the speaker sets connected to the loudspeaker terminals on the back panel (speaker sets A, B or A and B). This can be used for listening to an extra set of loudspeakers in another room. See the 'Connections' section for further details.
7. Mute インジケーター - ライトが点滅し、出力がミュートされていることを示します。
7. Mute indicator - The light will flash to show the outputs are muted.
8. デジタルソース選択ボタン - 適切な入力選択ボタンを押して、聴きたいソースを選択します。
8. Digital source select buttons - Push the appropriate input selection button to select the source that you wish to listen to.
注:
Notes:
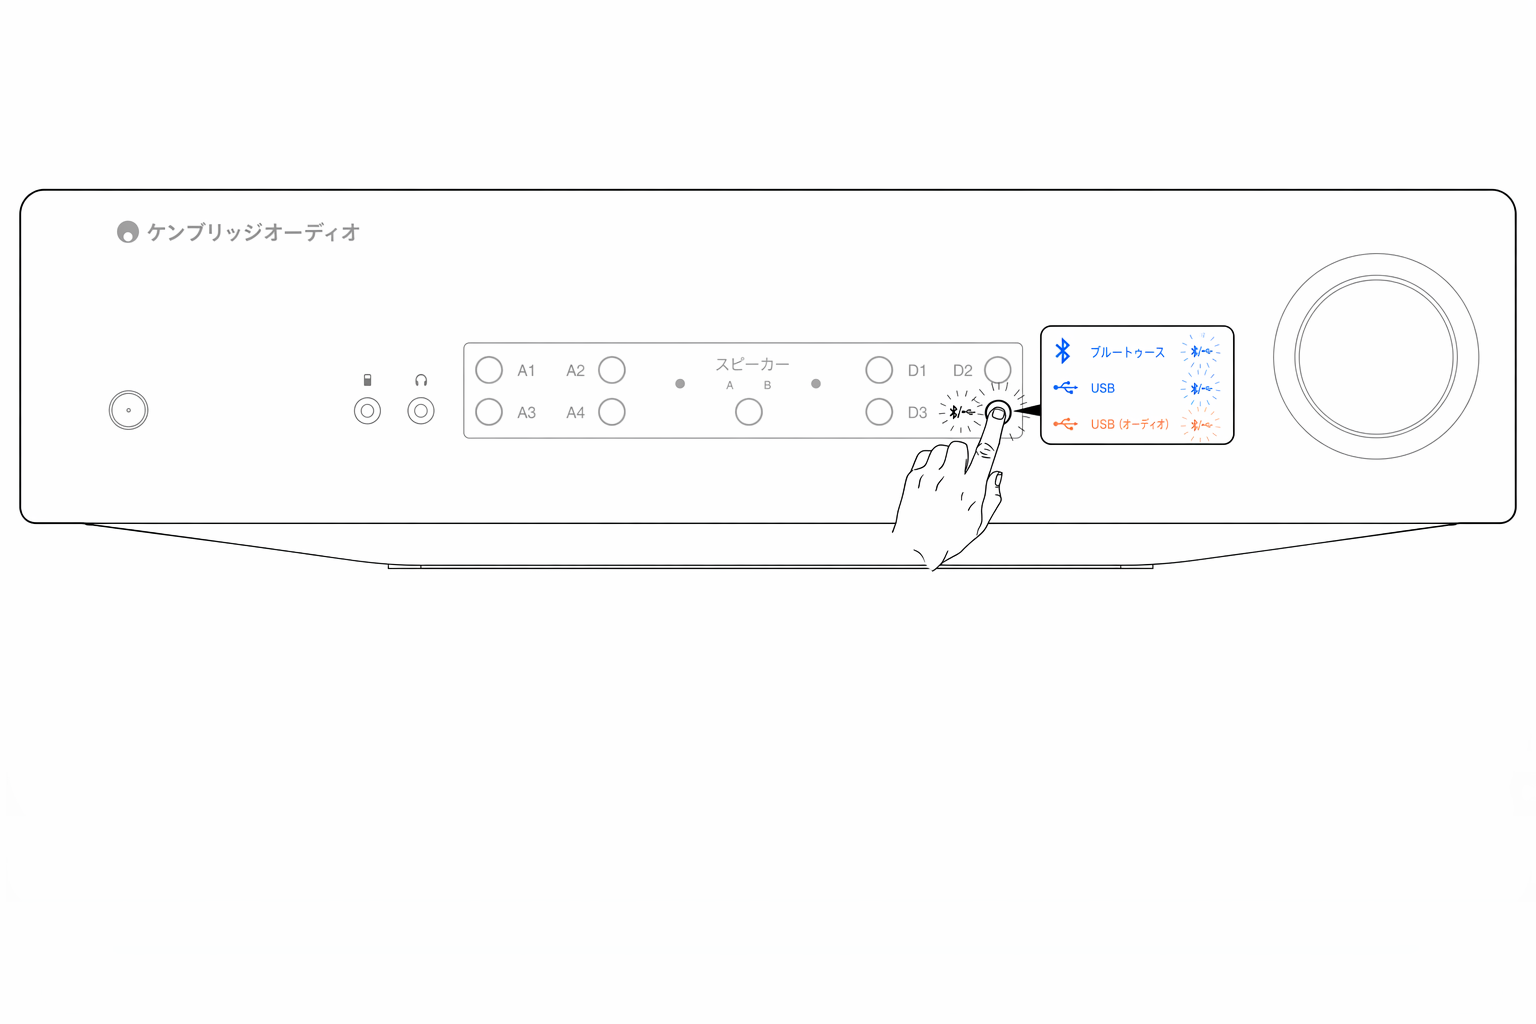
- Bluetooth/USB ボタンを押すと、2 つの入力が切り替わります。USB Audio はシンボルがオレンジ色に点灯することで示され、Bluetooth ソースはシンボルが青色に点灯することで示されます。Pressing the Bluetooth/USB button will toggle between the two inputs. The USB Audio is shown by the symbol being lit orange and the Bluetooth source is shown by the symbol being lit blue.
- 正しい入力ボタンが選択されていない場合、アンプから音が出ません。たとえば、オーディオソースを USB Audio 入力に接続している場合は、Bluetooth/USB ボタンがオレンジ色に点灯していることを確認してください。There will be no sound from the amp if the correct input button isn’t selected. If an audio source is connected to the USB Audio input, for example, ensure that the Bluetooth/USB button is lit orange.
9. Volume - アンプの出力からの音量レベルを上げたり下げたりするために使用します。このコントロールはすべての出力のレベルに影響します。
9. Volume - Use to increase/decrease the level of the sound from the outputs of the amplifier. This control affects the level of all outputs.
リアパネルの接続Rear panel connections
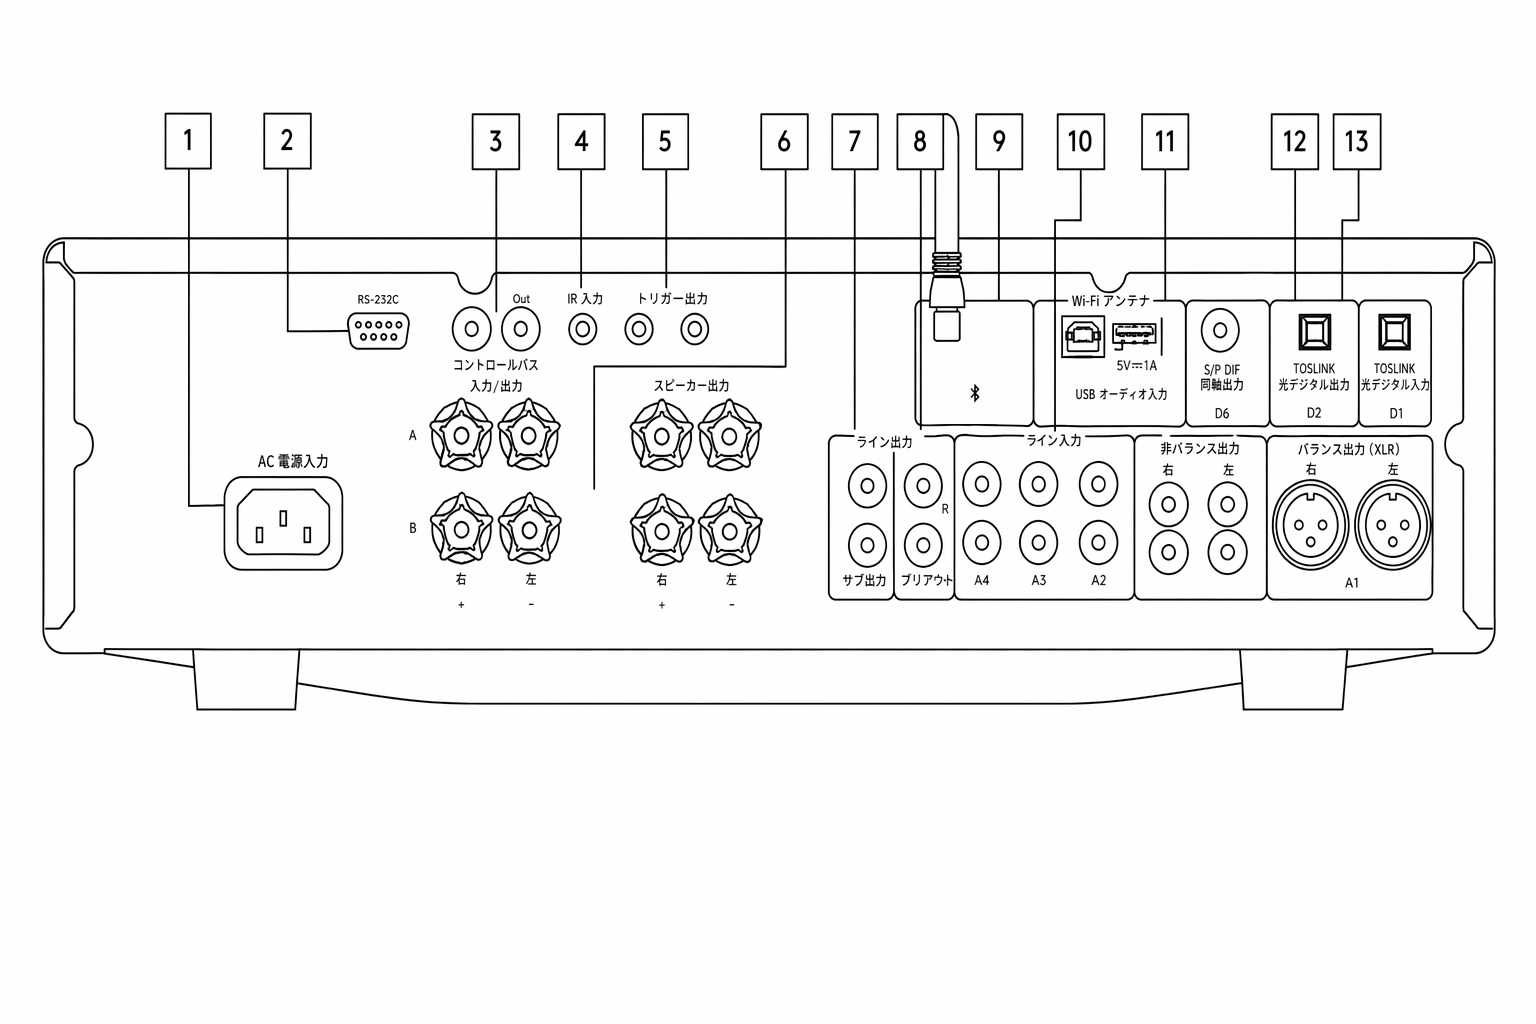
1. AC power socket - アンプへのすべての接続が完了したら、AC 電源ケーブルを適切なコンセントに差し込み、電源をオンにします。これでアンプを使用する準備が整いました。
1. AC power socket - Once you have completed all connections to the amplifier, plug the AC power cable into an appropriate mains socket then switch on. Your amplifier is now ready for use.
2. RS232C - RS232 は標準的なシリアルデータ通信プロトコルであり、RS232 をサポートする機器がホームオートメーションシステムの一部として相互に通信できるようにします。
2. RS232C - RS232 is a standard serial data communication protocol, which allows devices that support RS232 to communicate with each other as part of a home automation system.
カスタムインストール制御 - CXA 用の完全なプロトコルは、弊社 Web サイトのこちらで入手できます。
Custom install control - a full protocol is available for the CXA on our website here .
3. コントロールバス - 接続された他の CX シリーズ製品との間で電源および音量コマンドを送受信するために使用する RCA ソケットです。コントロールバスの詳細については、「コントロールバス」セクションを参照してください。
3. Control bus - RCA sockets used to send and receive power and volume commands from other connected CX Series products. For more information on the Control Bus, see 'Control Bus' section.
4. IR 入力 - IR リピーターまたはカスタムインストールシステムからの変調 IR コマンドをアンプで受信できます。IR 入力ソケットで受信したコマンドは、コントロールバスからループアウトされません。
4. IR in - Allows modulated IR commands from an IR repeater or custom install systems to be received by the amplifier. Commands received by the IR In socket are not looped out of the Control Bus.
注:IR 入力は電力を供給しないため、この入力に接続する機器には独自の電源が必要です。
Note: The IR input doesn’t provide any power, so any device connected to this input will need to have its own power source.
5. Trigger in/out - CXA をホームオートメーション機器のトリガー制御出力に接続して、CXA の電源状態を制御できます。入力レベルは 12V である必要があります。
5. Trigger in/out - The CXA can be connected to the trigger control output of home automation equipment to control the power state of the CXA. The input level should be 12V.
Trigger out は連続した 12v を供給し、CXA の電源がオンの間はアクティブになります。Trigger in を備えた他の機器の電源をオンにするために使用できます。
The trigger out provides a continuous 12v, this is active while the CXA is powered on. This can be used to turn on other equipment that has a trigger in.
6. スピーカー端子
6. Speaker terminals
注:バナナプラグを使用する場合は、プラグを挿入する前にスピーカー端子が完全に締め付けられていることを確認してください。
Note: When using a banana plug, make sure the speaker terminals are completely tightened before inserting the plug.
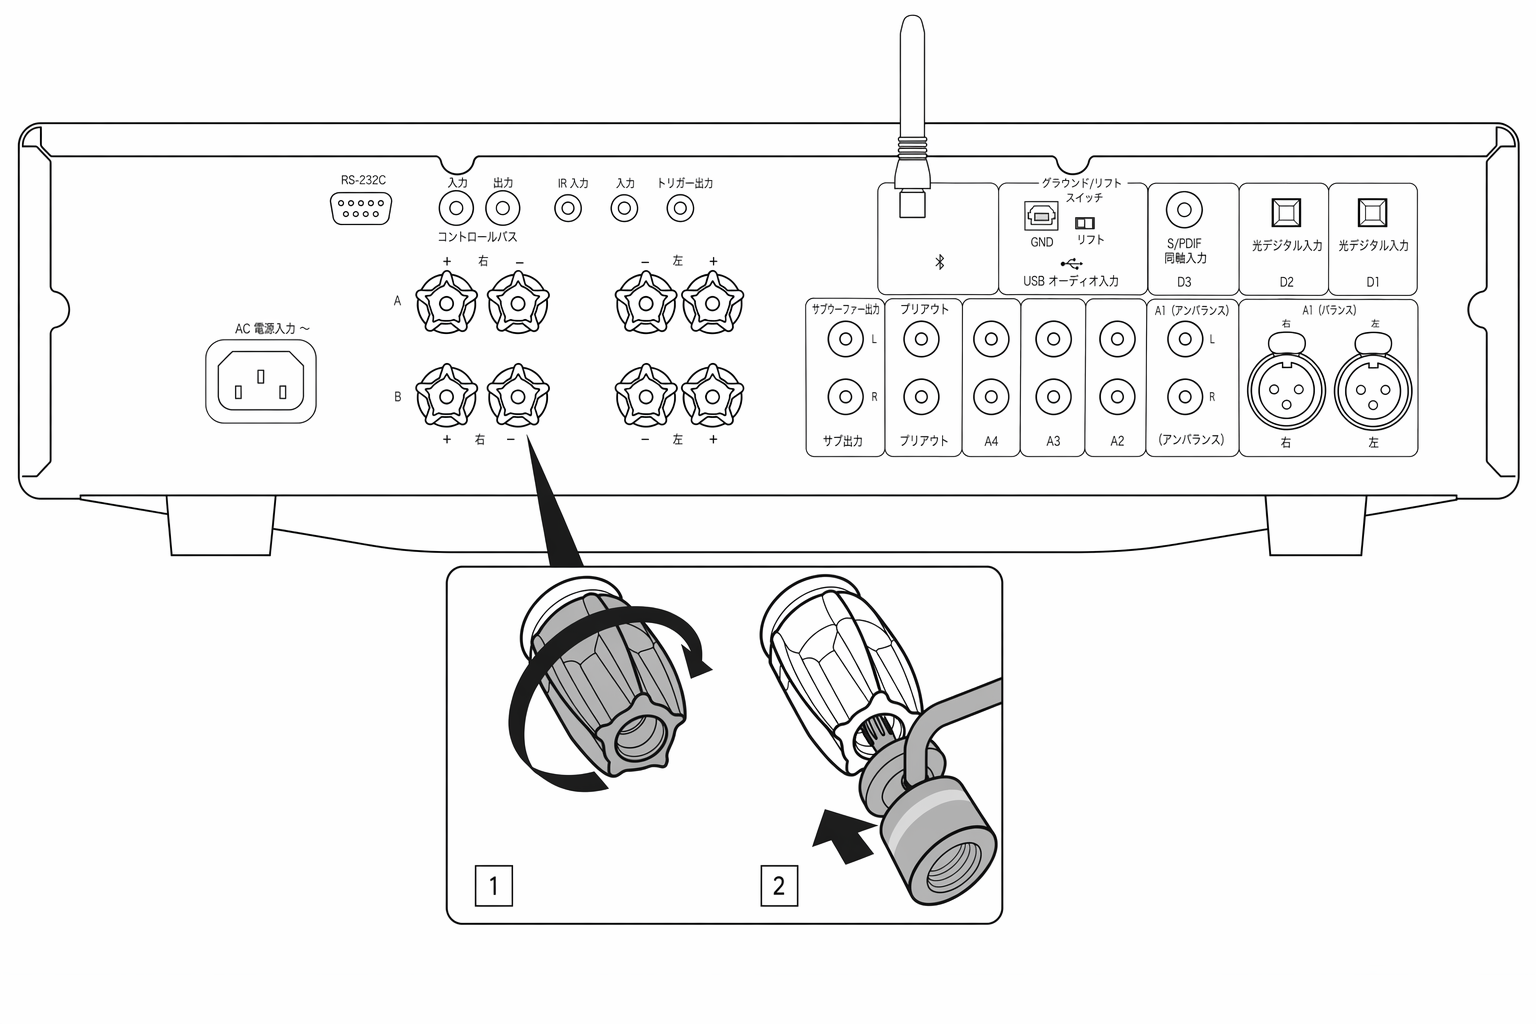
スピーカー端子は 2 系統あります:
Two sets of loudspeaker terminals are available:
A(メインのスピーカー端子)
A (main loudspeaker terminals)
および
and
B(セカンダリのスピーカー端子)。
B (secondary loudspeaker terminals).
左チャンネルスピーカーのワイヤーを CXA の左端子に接続し、右チャンネルスピーカーのワイヤーを CXA の右端子に接続します。
Connect the wires from your left channel loudspeaker to the left terminals on the CXA, and the wires from your right channel loudspeaker to the right terminals on the CXA.
アンプのプラス側がスピーカーのプラス側に接続され、アンプのマイナス側がスピーカーのマイナス側に接続されていることを、必ず確認してください。
Always ensure that the positive connection on the amplifier is connected to the positive connection on the speaker and the negative connection on the amplifier is connected to the negative connection on the speaker.
赤い端子がプラス出力です。
The Red terminal is the positive output.
黒い端子がマイナス出力です。
The Black terminal is the negative output.
ほつれた導線がスピーカー出力を短絡させないようご注意ください。良好な電気的接続を得るため、スピーカー端子は完全に締め込んでください。
Care should be taken to ensure no stray strands of wire short the speaker outputs together. Please ensure that the loudspeaker terminals have been tightened completely to provide a good electrical connection.
ネジ端子が緩んでいると、音質に影響することがあります。
It is possible for the sound quality to be affected if the screw terminals are loose.
注:スピーカー端子にバナナプラグを差し込むには、先に端子の丸いピップを外す必要があります。
Note: The speaker terminals will need to have the round pips removed before you can insert a banana plug into them.
7. サブウーファー出力 - 必要に応じてアクティブサブウーファーの入力に接続します。
7. Sub out - Connect to the input on an active subwoofer, if required.
注:Sub Out には約 2.3 kHz のローパスフィルターが適用され、2.3 kHz を超える周波数は、この出力に接続されたサブウーファーに送信されません。これは、Sub Out の周波数帯域で CXA が加える位相を最小限に抑えるためです。
Note: There is a low pass filter of approximately 2.3 kHz applied to the Sub Out, no frequencies above 2.3 kHz will be sent to a subwoofer connected to this output. This is so that there is minimal phase added by the CXA at the Sub Out frequencies.
クロスオーバー周波数はサブウーファー側で調整できます。
The crossover frequency can be adjusted on the Subwoofer itself.
8. Pre-out - パワーアンプやアクティブサブウーファーのアンバランス入力に接続するための出力です。
8. Pre-out - For connection to the unbalanced inputs of a power amplifier or active subwoofer.
注:Pre-Out にはローパスフィルターが適用されていません。そのため、Pre-Out に接続したサブウーファーには全周波数帯域が送信されます。
Note: There is not a low pass filter applied to the Pre-Out, so the full frequency range will be sent to a subwoofer connected to the Pre-Out.
9. Bluetooth アンテナ - Bluetooth オーディオストリーミングに使用します。詳細は「Bluetooth」の項目をご参照ください。
9. Bluetooth antenna - Used for Bluetooth audio streaming. See 'Bluetooth' section for details.
10. アナログ入力(A1 アンバランス、A2、A3、A4) - CD プレーヤー、DAB チューナー、FM/AM チューナーなど、ライン入力レベルの機器に対応します。
10. Analogue inputs (A1 Unbalanced, A2, A3 and A4) - Suitable for any 'line level' source equipment such as CD players, DAB or FM/AM tuners etc.
これらの入力はアナログ音声信号専用です。CD プレーヤーやその他のデジタル機器のデジタル出力は接続しないでください。
These inputs are for analogue audio signals only. They should not be connected to the digital output of a CD player or other digital devices.
注:バランス XLR 入力は、ピン 1 がグランド、ピン 2 がプラス、ピン 3 がマイナスです。
Note: For the balanced XLR inputs, pin1 is ground, pin2 is positive and pin3 is negative.
11. USB オーディオ入力 - Microsoft Windows または Apple Mac OS X を搭載したコンピュータからの音声再生に対応する USB Type B ソケットです。一部の Linux ディストリビューションにも対応します。
11. USB audio in - A USB B type socket to enable the playback of audio from a computer running either Microsoft Windows or Apple Mac OS X operating systems. Some builds of Linux are also suitable.
注:
Notes :
- USB Hi-Speed 認証を受けた高品質な USB ケーブルを使用してください。3m を超える USB ケーブルは、音声性能が不安定になる場合があります。Always use a high-quality USB connection cable certified as USB Hi-Speed. USB cable connections longer than 3m may result in inconsistent audio performance.
- USB 入力のケーブルを抜き差しするとき、および PC/Mac を起動・終了するときは、必ず音量を最小にするか、別の入力に切り替えるか、CXA の電源を切ってください。Always turn the volume to minimum, switch to another input or turn the CXA off before plugging/unplugging cables to the USB input or whilst booting up/shutting down your PC/Mac.
Ground/Lift スイッチ - このスイッチで、USB インターフェースのアースを CXA の信号グランドに接続するか切り離すかを選べます。USB 入力選択時にスピーカーから電気的なハム音が聞こえる場合は、アースを切り離す(Lift)と改善することがあります。それ以外のときは Ground 位置のままにしてください。
Ground/Lift switch - The Ground/Lift switch enables the USB interface earth to connect or disconnect the CXA signal ground. Disconnecting (lifting) the earth can be useful if electronic hum is heard through the speakers when the USB input is selected. The switch should otherwise be left in the Ground position.
12. デジタル入力(D1、D2、D3) - TOSLINK および S/PDIF 同軸デジタル入力です。
12. Digital inputs (D1, D2 AND D3) - TOSLINK and S/P DIF co-axial digital inputs.
同軸 – 高品質な 75 ohm のデジタル RCA Phono インターコネクトケーブルを使用してください(通常のオーディオ用ではないものを選んでください)。この入力は 16-24 bit のコンテンツに最大 192kHz まで対応します。
Coaxial – Use a high quality 75 ohm digital RCA Phono interconnect cable (not one designed for normal audio use). This input is suitable for 16-24 bit content up to 192kHz.
TOSLINK 光 – オーディオ専用に設計された高品質な TOSLINK 光ファイバー・インターコネクトケーブルを使用してください。この入力は 16-24 bit のコンテンツに最大 96kHz まで対応します(TOSLINK は 192kHz のサンプリングレートでは推奨されません)。
TOSLINK optical – Use a high quality TOSLINK fibre optic interconnect cable designed specifically for audio use. This input is suitable for 16-24 bit content up to 96kHz (TOSLINK is not recommended at 192kHz sampling rates).
注:システム本来の性能を引き出すには、高品質な Cambridge Audio のインターコネクトケーブルのみを使用することを推奨します。これにより、設計どおりの音をお楽しみいただけます。詳細は販売店にお問い合わせください。
Note: To obtain the best results from your system we recommend using only high-quality Cambridge Audio interconnects. This will ensure that you hear your system as we designed it. Please ask your dealer for details.
13. A1 入力
13. A1 inputs
注:バランス(XLR)入力は CXA81 のみに搭載されています。
Note: Balanced (XLR) is available on the CXA81 only.
A1 入力はアンバランス(phono/RCA)またはバランス(XLR)接続に対応しています。バランス接続の方が高品位です。対応機器と組み合わせれば、ケーブル上のノイズや干渉を除去できます。
A1 inputs feature either unbalanced (phono/RCA) or balanced (XLR) connections. The balanced connection is the higher quality option and can reject noise and interference in the cable when used with other equipment that supports this function.
XLR コネクターの結線は、ピン 1 がグランド、ピン 2 がホット(同相)、ピン 3 がコールド(逆相)です。
An XLR connector is wired Pin 1 - Ground; Pin 2 - Hot (in-phase); Pin 3 - Cold (phase-inverted).
リモコンRemote control
CXA のリモコンは、フロントパネルの操作機能を再現し、他の CX シリーズ製品も操作できます。リモコンを使用する前に、付属の AAA 電池を取り付けてください。リモコンの各ボタンは以下のように機能します:
The CXA remote control handset duplicates the front panel control functions and is also able to control other CX series products. The supplied AAA batteries must be fitted before the remote control can be used. The handset buttons function as described below:
| 1. Brightness - CXA の表示 LED の明るさを変更します。明るさは 2 段階で、バックライトをオフにするオプションもあります。注:CXA の表示 LED をオフに設定していても、いずれかの機能を選択すると、変更内容を示すために LED が一時的に点灯します。2. Mute - 押すとスピーカー出力、Pre-Out、Sub、ヘッドホン出力をミュート/ミュート解除します。出力がミュート中は本機前面の LED が点滅します。3. Standby/On - CXA を On と Standby モードで切り替えます。4. Sources - 入力ソースを選択します。注:CXA81 の A1 ボタンは、バランス A1 入力またはアンバランス A1 入力を選択する二重の機能を持ち、2 回押すと 2 つの入力を切り替えます。MP3 ソースは、入力にジャックが接続されている場合のみ選択できます。5. Volume up/down - 音量を調整します。注:リモコンが動作しない場合は、電池が切れていないか、フロントパネルの IR 受光部が遮られていないかを確認してください。1. Brightness - Alters the brightness of the CXA display lights. There are two brightness levels and an option to switch off the backlight. Note : When the CXA display lights are selected to be off, selecting any of the functions will briefly switch on the lights to show the change. 2. Mute - Press to mute or unmute the loudspeakers, pre-out, sub, and the headphone outputs. The light will flash on the front of the unit to show the outputs are muted. 3. Standby/On - Switches the CXA between On and Standby mode. 4. Sources - Used to select the source inputs. Note : For the CXA81, the A1 button has the double function of selecting the balanced or unbalanced A1 input, and will toggle between the two inputs when double pressing. The MP3 source can only be selected when there is a jack connected to the input. 5. Volume up/down - Volume level adjustment. Note : If the remote control will not function, please check that the batteries have not expired, and that there is nothing blocking the front panel IR receiver. |
|---|
接続方法Getting connected
Cambridge Audio のアンプは、システムをさまざまな方法で接続できるように設計されています。Pre-Out や Speaker B などの端子を備えているため、用途に応じて柔軟にシステムを組めます。
When designing our amplifiers, we include features that allow you to connect your system in various ways. The inclusion of features such as Pre-Out and Speaker B connections mean that you can flexibly configure your system depending on your requirements.
注:バナナプラグを使用する際は、プラグを差し込む前にスピーカー端子を完全に締め込んでください。
Note: When using a banana plug, make sure the speaker terminals are completely tightened before inserting the plug.
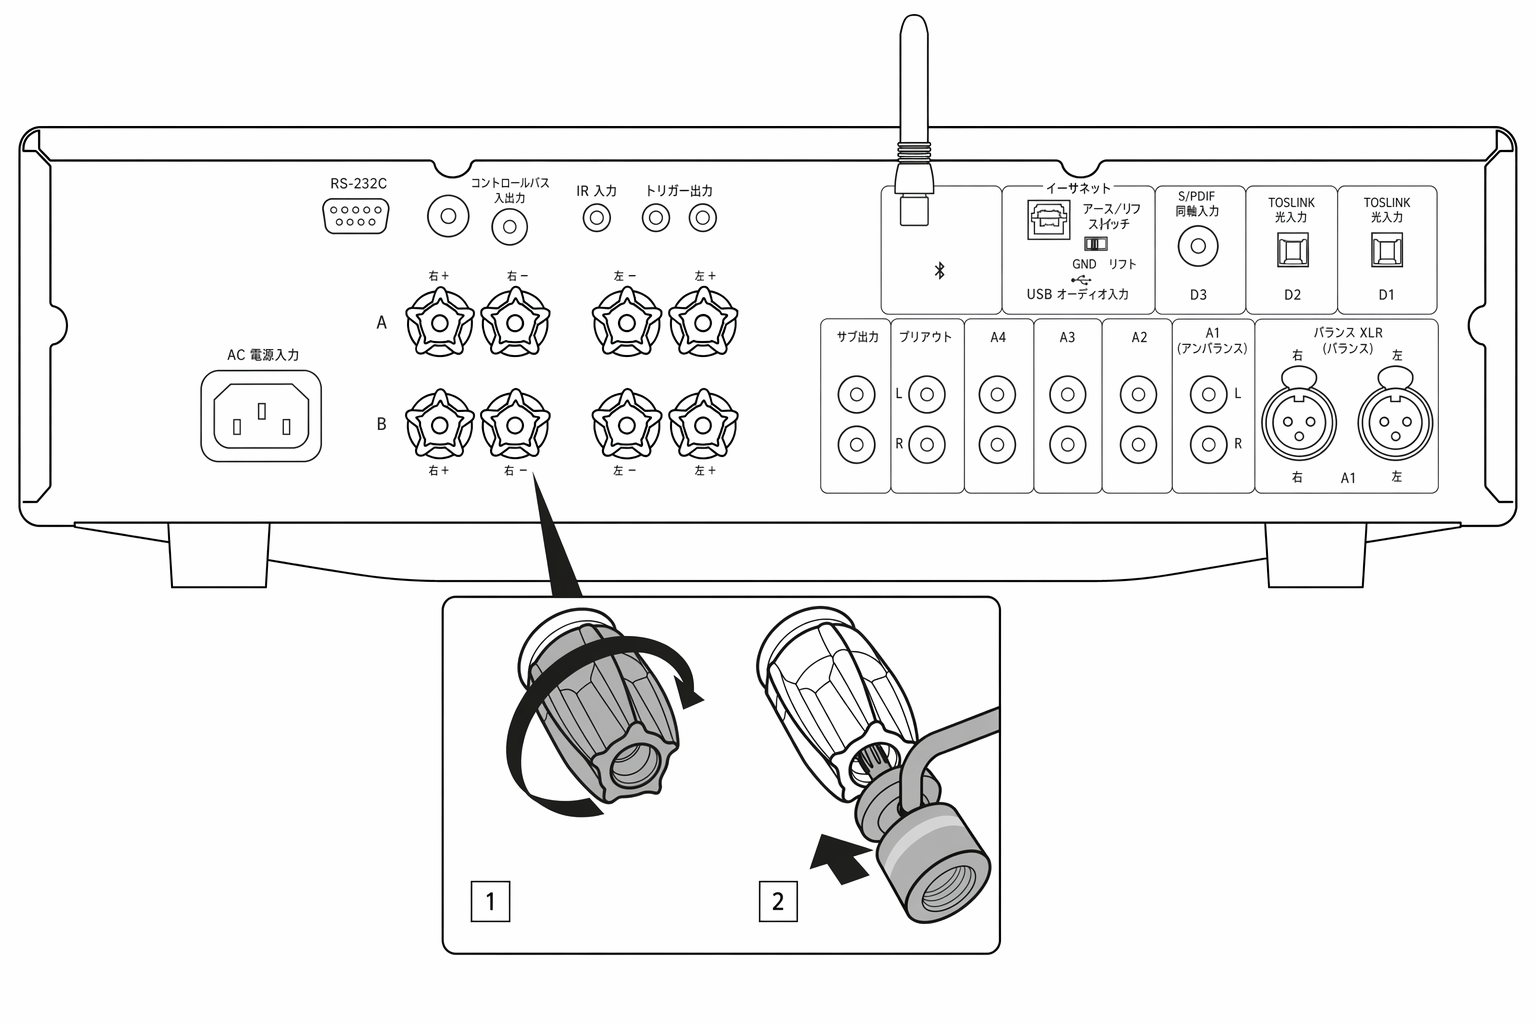
基本的な接続Basic connections
以下の図は、D3 同軸デジタル入力ソースを使用して、アンプを CD プレーヤーと 1 組のスピーカーに接続する基本的な方法を示しています。
The diagram below shows the basic connection of your amplifier to a CD player using the D3 coaxial digital input source and a pair of loudspeakers.
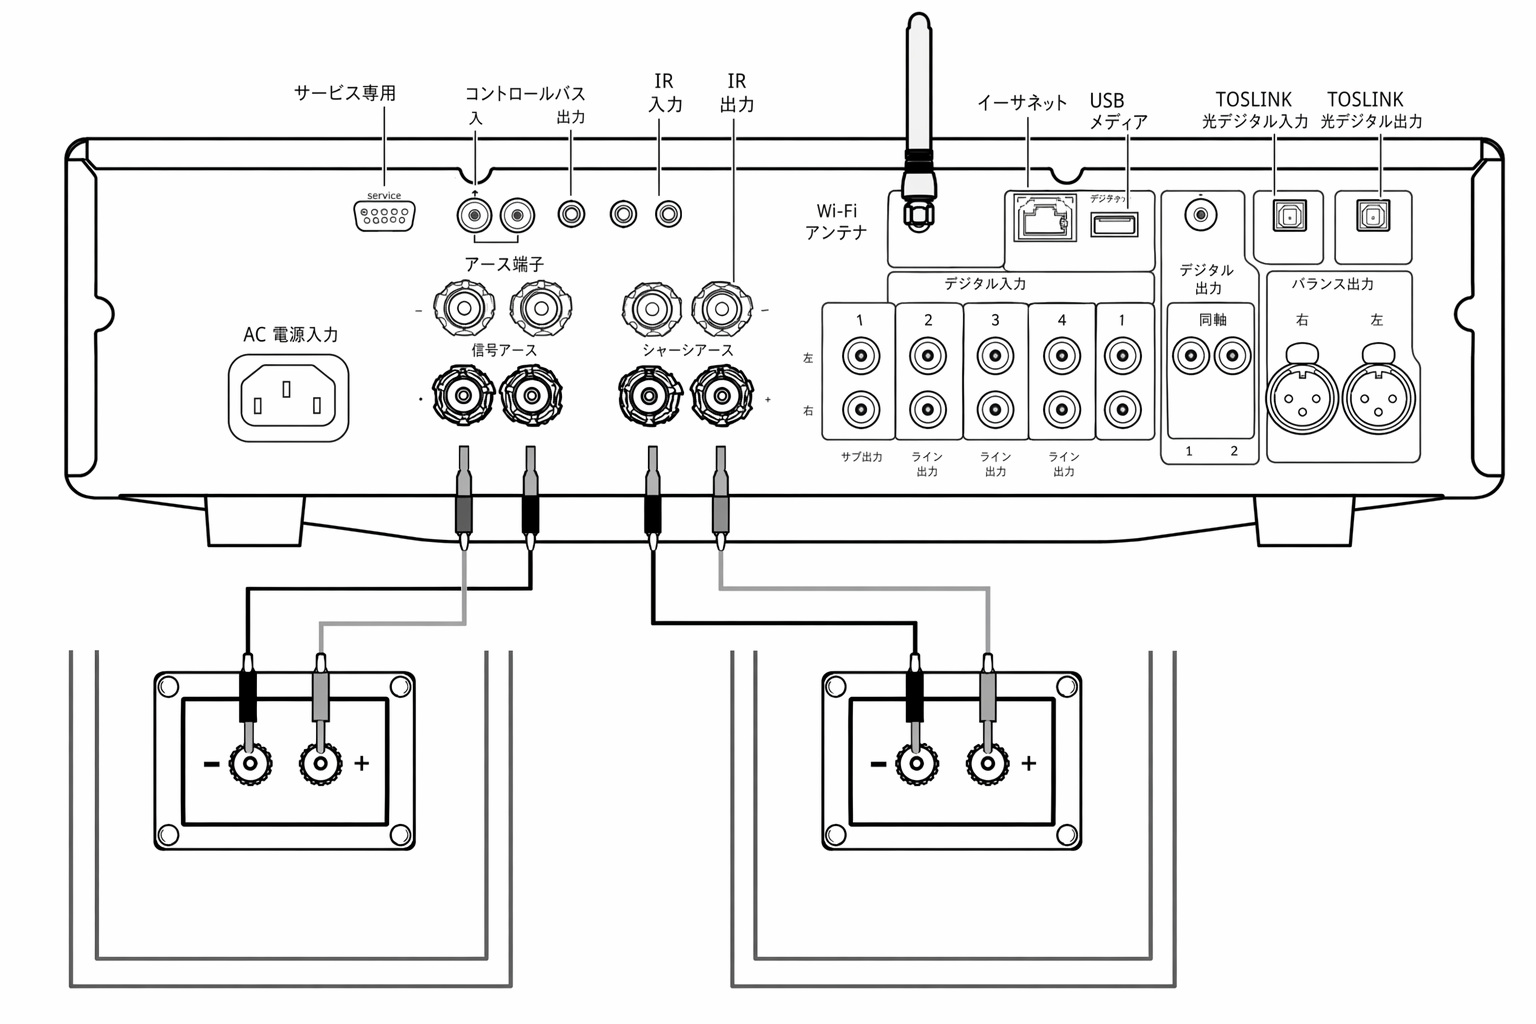
Speaker B の接続Speaker B connections
アンプ背面の Speaker B 端子は、2 組目のスピーカー(例えば別室に設置したスピーカー)を使用できるようにします。フロントパネルの Speaker A/B ボタンを押すと、スピーカー A のみ、スピーカー B のみ、スピーカー A と B の同時使用を切り替えられます。
The Speaker B connections on the back of the amplifier allow for a second set of speakers to be used (i.e. speakers located in another room). The Speaker A/B button on the front panel scrolls through the selection of speaker A only, speaker B only, and speaker A and B together.
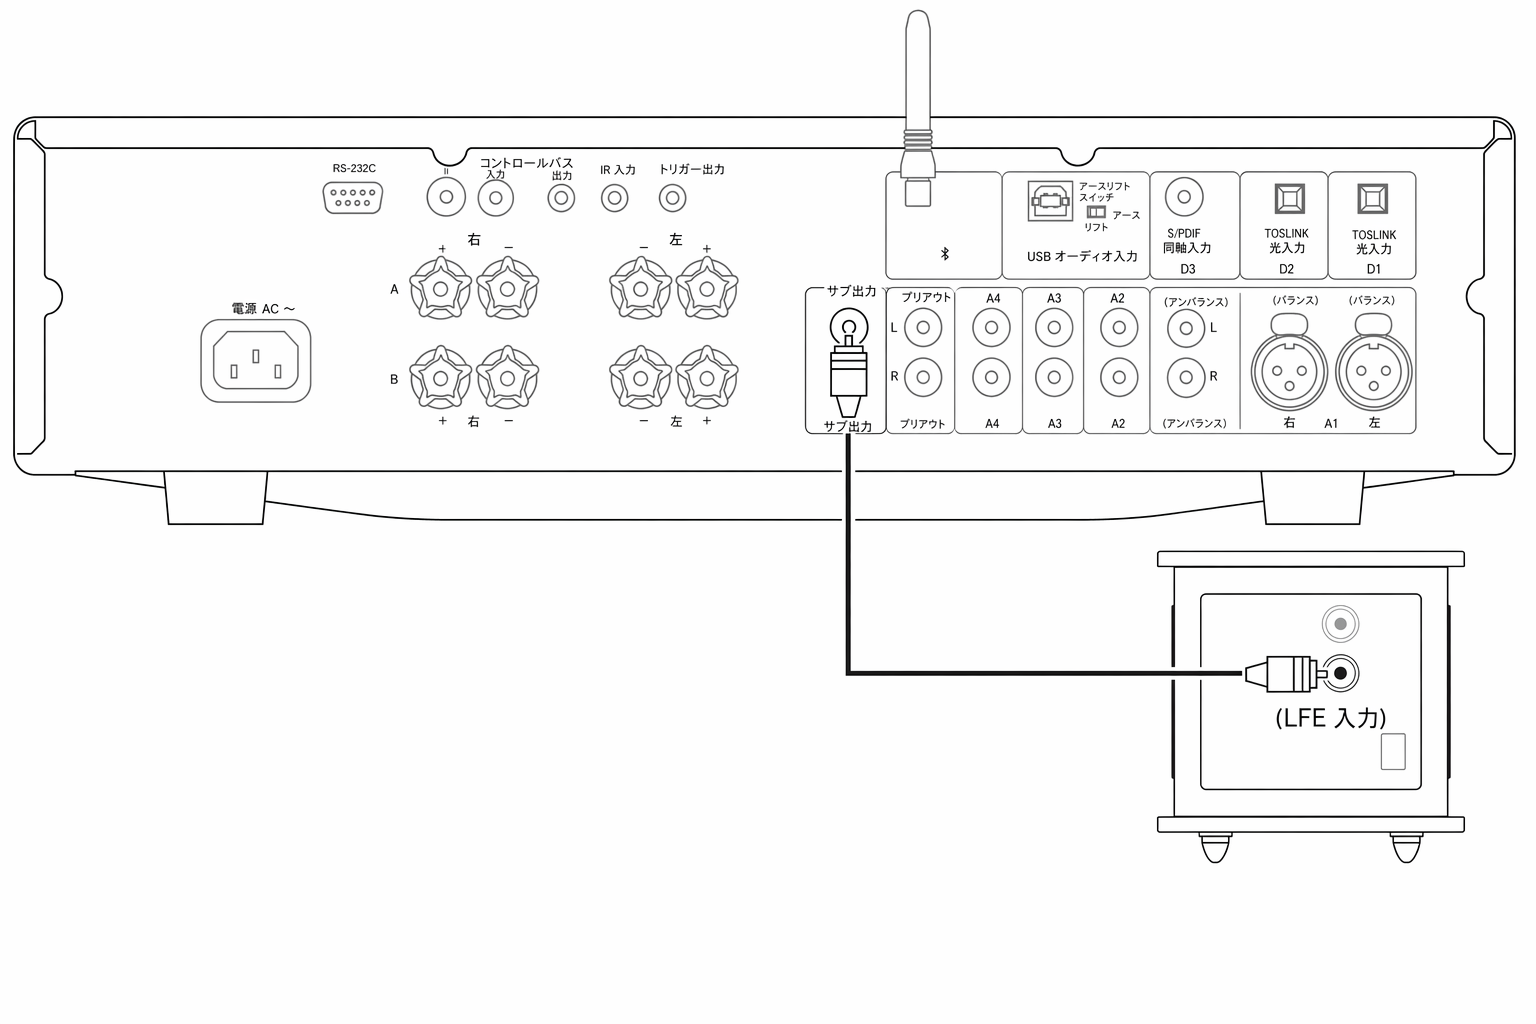
サブアウトの接続Sub out connections
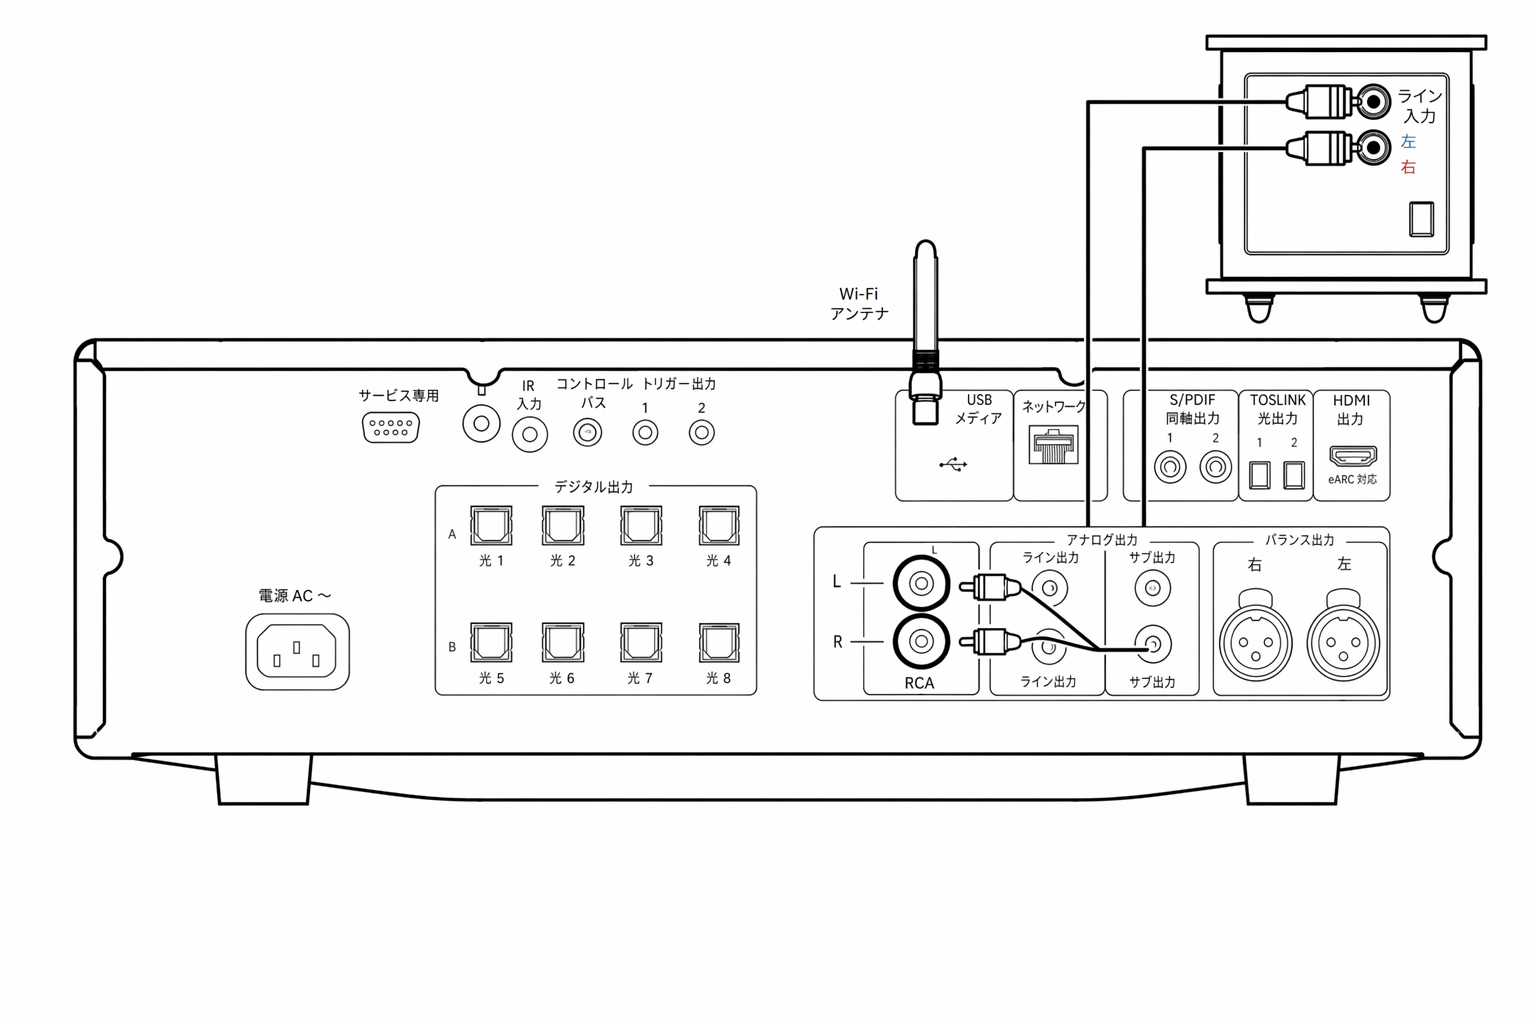
Sub Out は、アクティブサブウーファーの LFE/Sub 入力に接続するための端子です。以下の図は、サブウーファーの LFE/Sub 入力を介してアンプをアクティブサブウーファーに接続する方法を示しています。
The Sub Out is for connecting to the LFE/Sub input of an active subwoofer. The diagram below shows how to connect the amplifier to an active subwoofer via the LFE/Sub input on the subwoofer.
プリアンプアウトの接続Preamp out connections
Preamp Out 端子は、パワーアンプまたはアクティブサブウーファーの入力端子に接続するための端子です。以下の図は、サブウーファーの Line In 入力を介してアンプをアクティブサブウーファーに接続する方法を示しています。
The Preamp Out sockets are for connecting to the input sockets of a power amplifier or active subwoofer. The diagram below shows how to connect the amplifier to an active subwoofer via the Line In inputs on the subwoofer.
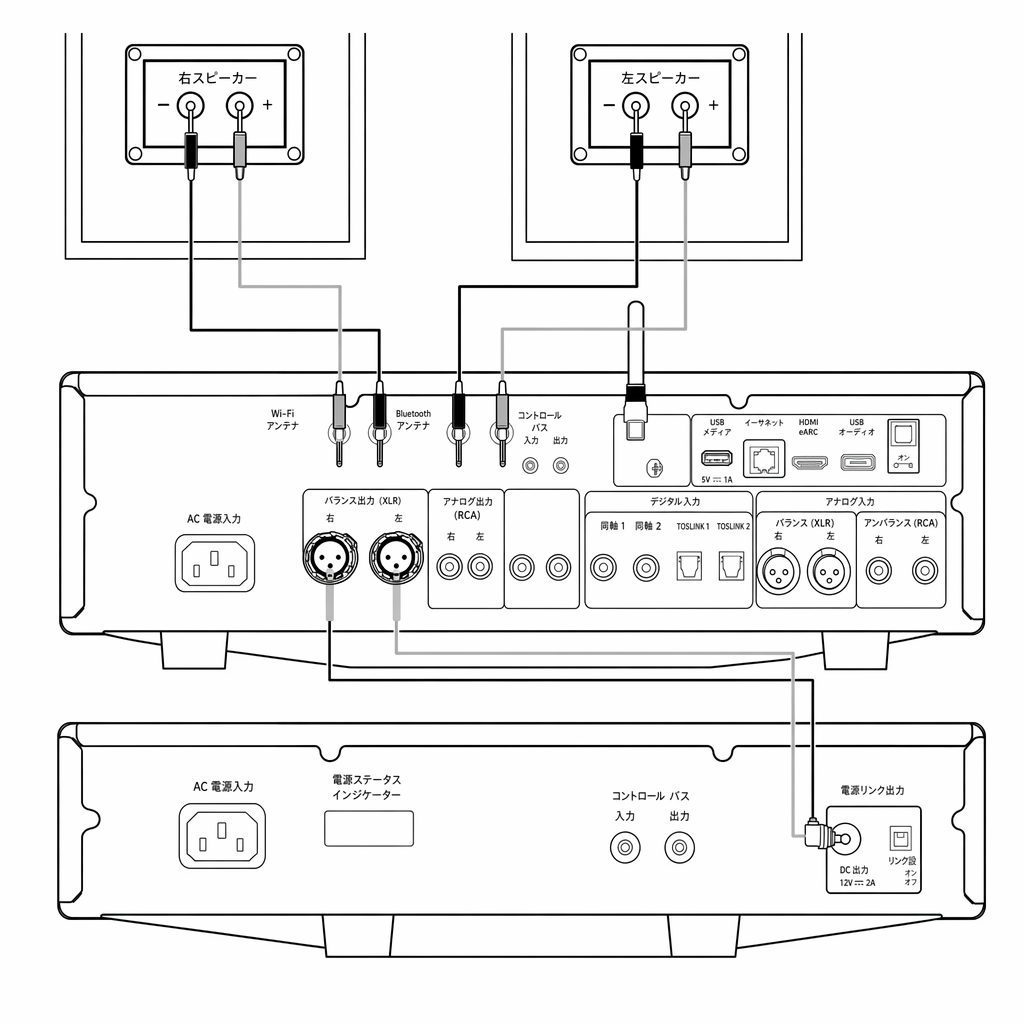
バランスオーディオの接続(CXA81 のみ)Balanced audio connections (CXA81 only)
以下の図は、3 ピン XLR コネクターのバランスオーディオ入力を用いて、CXA81 と CXN ネットワークプレーヤーを接続する方法を示しています。CXA81 はバランス出力を備えた Cambridge Audio 以外のソース機器とも接続できます。
The diagram below shows how to connect the CXA81 to the CXN Network player using the Balanced Audio inputs via three pin XLR connectors. The CXA81 can also be connected to non-Cambridge Audio sources with balanced outputs.
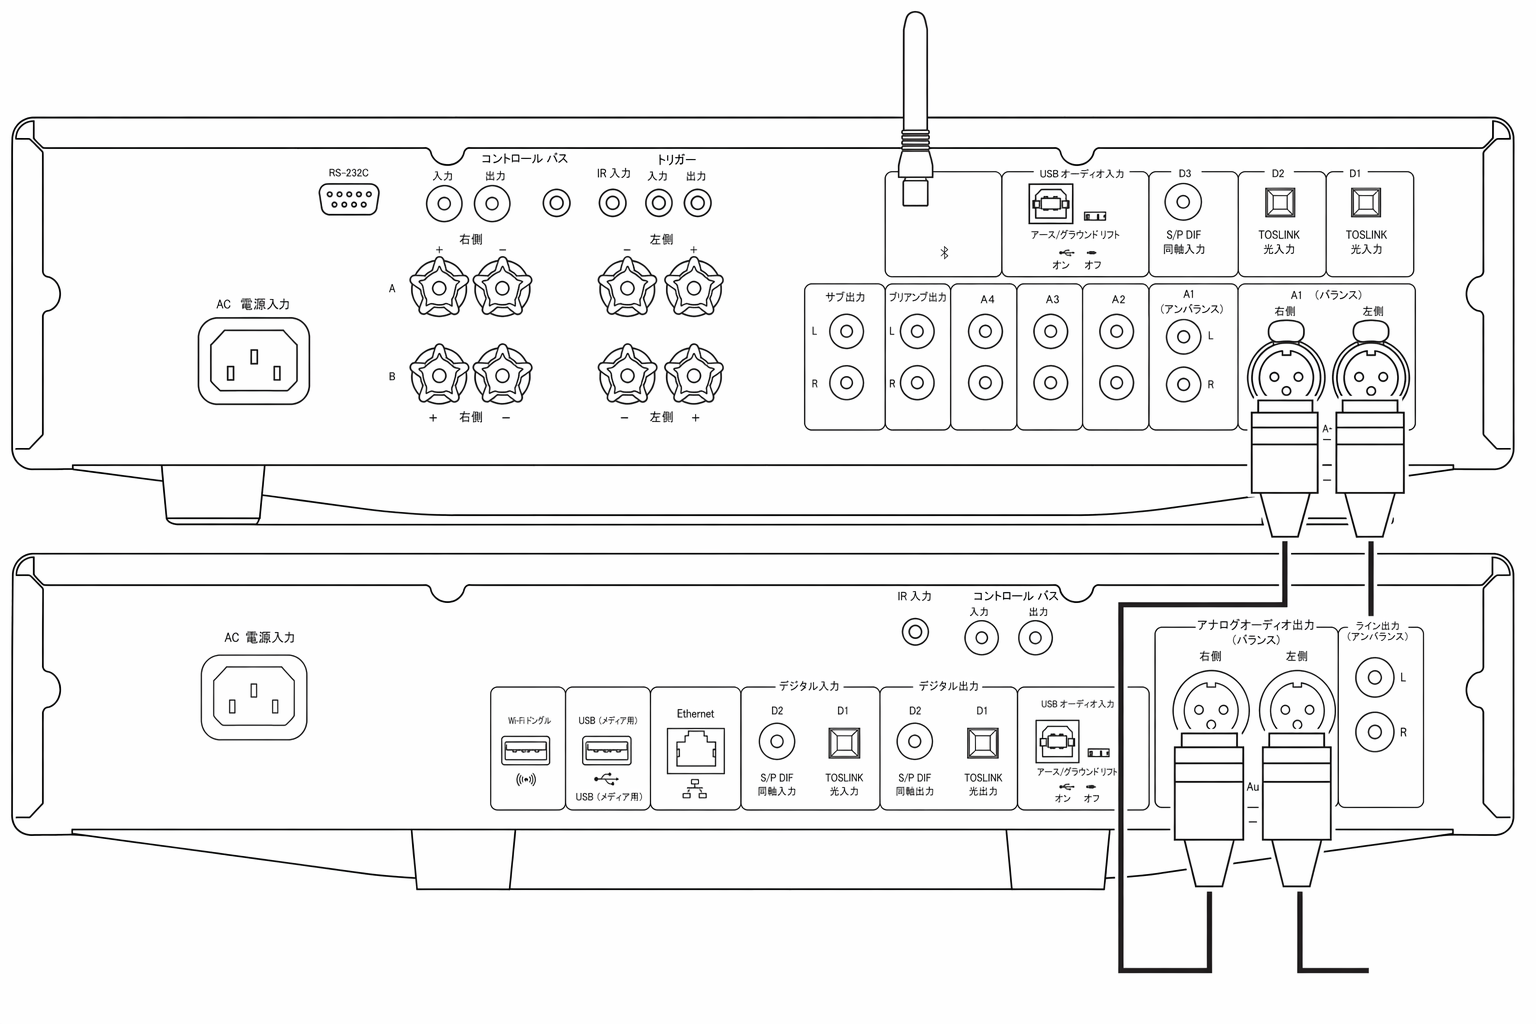
オーディオシステムのバランス接続は、電源配線などからの電気的ノイズや、グランド経路を流れるノイズ電流の影響を打ち消すために設計されています。バランス接続の基本原理は、3 線の結線を使って必要な信号を減算によって取り出すことです。1 本の信号線(ホット/同相)には通常の信号が流れ、もう 1 本(コールド/逆相)には反転した信号が流れます。バランス入力はこの 2 本の差分を検出して本来の信号を取り出します。両方の線に同じように現れるノイズ電圧(コモンモード信号)は、減算により打ち消されます。
Balanced connections in an audio system are designed to reject electrical noise, from power wiring etc, and also the effects of noise currents flowing through ground connections. The basic principle of balanced interconnection is to get the signal you want by subtraction, using a three wire connection. One signal wire (the hot or in-phase) carries the normal signal, while other (the cold or phase-inverted) carries an inverted version. The balanced input senses the difference between the two lines to give the wanted signal. Any noise voltages that appear identically on both lines (these are called common-mode signals) are cancelled by the subtraction.
CXA81 はバランス接続を使用したときに最高の性能を発揮するように設計されています。
The CXA81 is designed to work at its highest performance when a balanced interconnect is used.
注:CXA81 でバランス入力を選択するには、フロントパネルまたはリモコンの A1 ボタンを 2 回押し、フロントパネル表示の A1 LED がオレンジ色に点灯することを確認してください。A1 ボタンを繰り返し押すと、バランス入力とアンバランス入力を切り替えられます。
Note: To select the balanced input on the CXA81, press the A1 button twice on the front panel or on the remote control so that the A1 light on the front panel display lights up Orange. Repeatedly pressing the A1 button will toggle between balanced and unbalanced inputs.
テレビの接続Connecting a TV
テレビに必要な光デジタル出力または同軸デジタル出力があれば、CXA のデジタル入力のいずれかに接続できます。
A TV can be connected to one of the digital inputs on the CXA, as long as the TV has the required Optical or Coaxial output.
CXA はステレオ信号のみをデコードできます。テレビの音声出力設定は PCM または Stereo に設定してください。
Ensure that the output audio settings on the TV are set to PCM or Stereo, as the CXA is only able to decode a Stereo signal.
CXA のフロントパネルでも、テレビを接続したデジタル入力(D1、D2、D3)が選択されていることを確認してください。
Please also ensure that the digital input that the TV is connected to has been selected on the front panel of the CXA (D1, D2 or D3).
CXA で「TV Mode」を有効にする:Enabling ‘TV Mode’ within the CXA:
一部のコネクテッドテレビは、アンプ内部の DAC で処理できない不安定なサンプリングレートを CXA に送信することがあります。その結果、音声が途切れたり、音の乱れが発生したりする場合があります。このような場合は、アンプで「TV Mode」を有効にする必要があります。
Some Connected TVs will send an inconsistent sample rate to the CXA, that the DAC inside the amplifier is unable to process. This can result in audio dropouts and glitches. If this is the case with your CXA, ‘TV Mode’ will need to be enabled within the amplifier.
CXA61 および CXA81 のシリアル番号から、「TV Mode」が既にプリインストールされているか、手動インストールが必要かを判別できます。
The serial number for your CXA61 and CXA81 will indicate whether or not 'TV Mode’ is already pre-installed or whether this will require manual installation.
プリインストール済み(2020 年 10 月以降):Pre-Installed (October 2020 Onwards):
「TV Mode」がプリインストールされた個体のシリアル番号は、「KW C11125 7060 0001」のように構成されています。3 番目の数字の組が 7060 以上であれば、そのアンプは 2020 年 10 月以降に製造され、「TV Mode」が既にインストールされています。
The serial numbers for units that contain 'TV Mode' pre-installed are laid out as such; 'KW C11125 7060 0001'. If the third set of numbers are or are greater than 7060 , this indicates that your amplifier was manufactured after October 2020 and already has ‘TV Mode’ installed.
インストール済みの機種で TV モードを有効にするには:
To enable 'TV mode' on Pre-Installed units:
- CXA をスタンバイモードにして、Setup メニューに入ります。Enter the Setup menu by putting the CXA in standby mode.
- スタンバイモード中に、A/B ライトが交互に点滅し、入力 A1-A4 が点灯するまで Speaker A/B ボタンを長押しします。Whilst in Standby mode, press and hold the Speaker A/B button until the A/B lights flash alternatively and the sources A1-A4 light up.
セットアップ構成について、以下の入力ボタンの状態を参照してください:
See below source buttons for setup configuration:
注:選択されている(オンの)ボタンは青色の LED で示されます。
Note : Button selected (on) is represented by Blue light.
A2 オフ – D2 入力では、CXA が最適なデジタル入力オーディオ設定に設定されます。A2 オン – D2 入力に対して、信号が断続的に途切れる可能性を低減する、より許容度の高いデジタル入力設定に CXA が設定されます。
A2 off – The CXA is set to the best digital input audio setting on input D2. A2 on – The CXA is set to a more tolerant digital input setting for input D2 that should reduce the chance of having the signal intermittently drop.
3. セットアップ設定を保存してセットアップメニューを終了するには、Speaker A/B ボタンを押します。
3. To save the setup settings and exit the setup menu, press the Speaker A/B button.
注:セットアップメニューで Standby/On ボタンを押すと、セットアップメニューを終了し、セットアップ設定は保存されません。
Note : Pressing the Standby/On button while in the setup menu will exit this setup menu and will not save the setup settings.
未インストール(2020年10月より前):Uninstalled (Pre October 2020):
お使いの CXA のシリアル番号が上記の組み合わせより前のものである場合(3組目の数字が7060未満の場合)は、https://www.cambridgeaudio.com/gbr/en/contact のサポートチームまでお問い合わせください。手動でこのアップデートを実行する方法をご案内します。
If your CXA pre-exists the above stated serial number combination (the third set of numbers is lower than 7060), then please contact our support team at https://www.cambridgeaudio.com/gbr/en/contact and we will be able to provide you with instructions on how to perform this update manually.
注:TV モードを使用するには、テレビを TOSLINK OPTICAL 入力 D2 に接続する必要があります。
Please note: Your TV will have to be connected to TOSLINK OPTICAL input D2 for TV Mode to work.
高度な接続Advanced connections
USB オーディオ接続USB audio connection
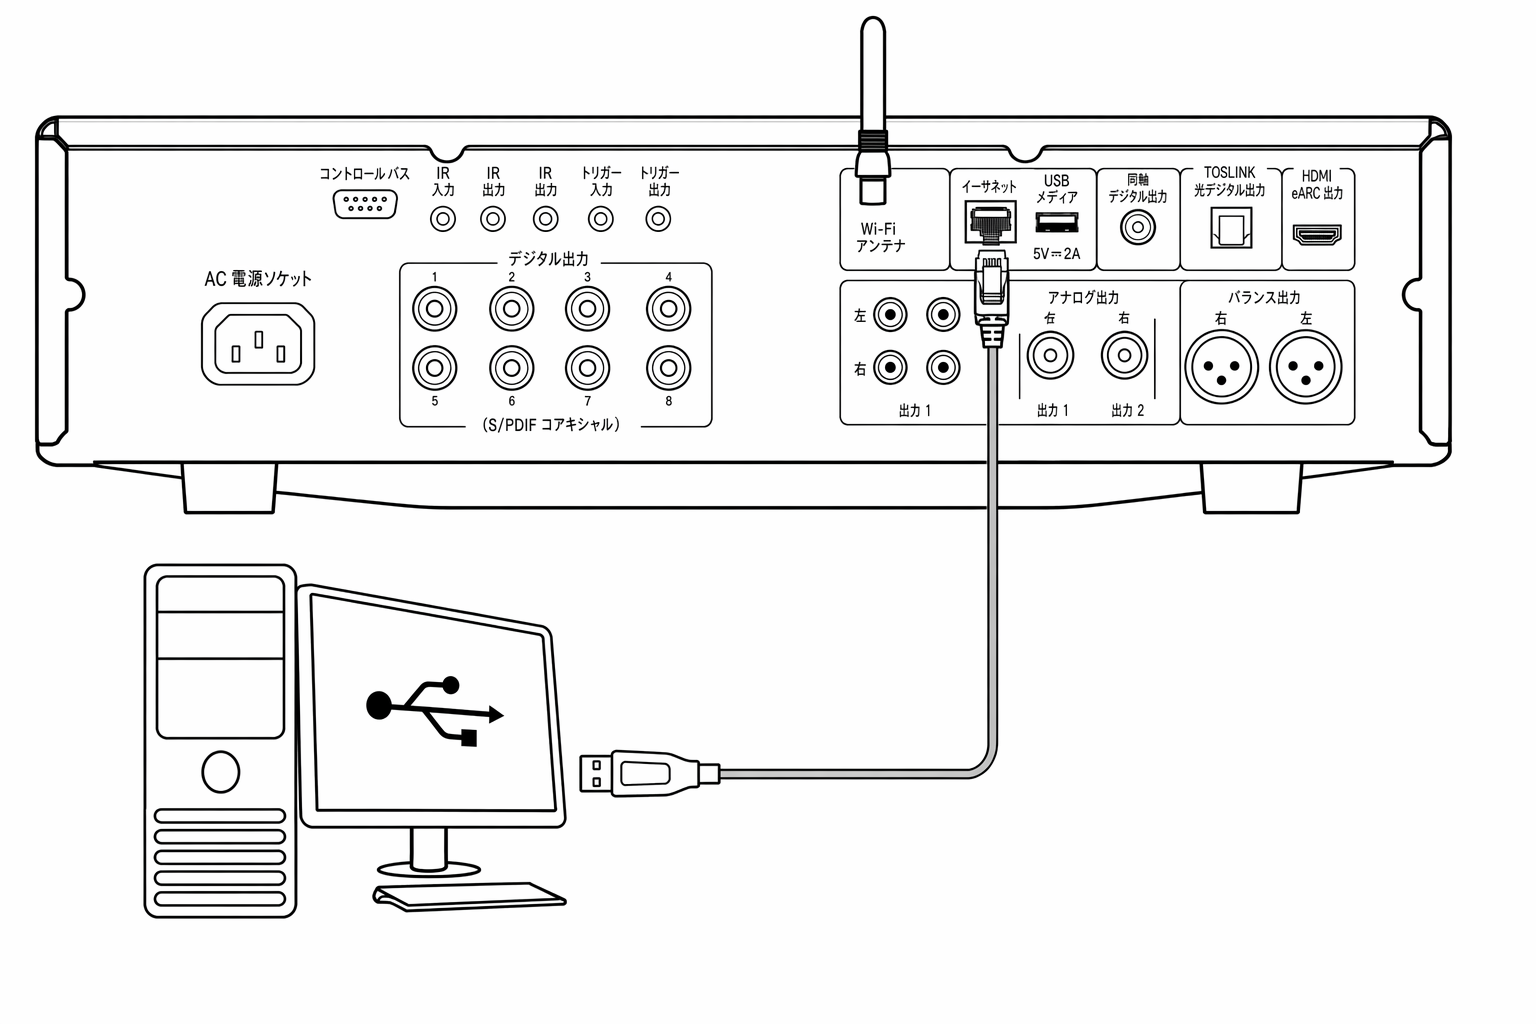
CXA の USB Audio 入力を使用すると、Microsoft Windows または Apple Mac OS X のパーソナルコンピューター(および一部の Linux ビルド)からオーディオを再生できます。
The CXA USB Audio input enables the playback of audio from Microsoft Windows or Apple Mac OS X personal computers (and some Linux builds).
USB ケーブルで接続すると、コンピューターは CXA をオーディオデバイスとして認識します。コンピューターのオーディオコントロールパネルで CXA を指定すると、コンピューターにローカルで保存されているオーディオデータ、またはネットワークやインターネット経由でコンピューターにストリーミングされたオーディオデータを再生できます。
When connected via a USB cable, the computer will identify the CXA as an audio device. Specifying the CXA in the computer’s audio control panel, will enable it to play audio data either stored locally on the computer or streamed to the computer via a network or the internet.
重要:USB 入力にケーブルを接続または取り外しする前、または PC/Mac の起動中またはシャットダウン中は、必ず音量を最小にするか、別の入力に切り替えるか、CXA の電源を切ってください。
Important Note: Always turn the volume to minimum, switch to another input or turn the CXA off before plugging/unplugging cables to the USB input or whilst booting up/shutting down your PC/Mac.
注:必ず USB Hi-Speed として認証された高品質な USB ‘A to B’ ケーブルを使用してください。3m を超える USB ケーブル接続では、オーディオ性能が安定しない場合があります。
Note: Always use a high quality USB ‘A to B’ cable certified as USB Hi-Speed. USB cable connections longer than 3m may result in inconsistent audio performance.
CXA は USB 2.0(Hi-Speed)および USB 1.1(Full-speed)の USB ポートに対応しています。
The CXA is both USB 2.0 (Hi-Speed) and USB 1.1 (Full-speed) USB port compatible.
USB 3.0 ポートでも動作するはずです。この場合、PC は CXA を USB 2.0 または 1.1 デバイスとして認識します。
It should also work with USB 3.0 ports where the PC will simply treat the CXA as if it were a USB 2.0 or 1.1 device.
CXA は 2 種類の USB Audio プロトコルに対応しています(ポートの種類そのものとは異なります):
The CXA supports two USB Audio protocols (not the same as the port types themselves):
- USB Audio Class 1(USB 1.1 ポートで動作し、最大 24-bit/96kHz に対応)USB Audio Class 1 (which works over USB 1.1 ports and supports up to 24-bit/96kHz)
- USB Audio Class 2(USB 2.0 ポートが必要で、最大 24-bit/384kHz に対応)USB Audio Class 2 (which requires a USB 2.0 port and can support up to 24-bit/384kHz)
初期設定は USB Audio Class 2 です。
The default configuration is USB Audio Class 2.
USB オーディオ入力を介して Windows PC を CXA に接続する方法How to connect a Windows PC to the CXA via the USB audio input
CXA を USB Audio Class 1 に切り替えると、Windows 7 以降で動作し、最大 24-bit/96kHz のオーディオに対応します。
With the CXA switched to USB Audio Class 1, the CXA will work with Windows 7 or above and accept audio up to 24-bit/96kHz.
CXA を USB Audio Class 2 に切り替えると、Cambridge Audio USB Audio 2.0 Driver を読み込む必要があり、読み込み後は最大 24-bit/384kHz に対応できます。
With the CXA switched to USB Audio Class 2, the CXA needs the Cambridge Audio USB Audio 2.0 Driver to be loaded and can then accept up to 24-bit/384kHz.
1. CXA を Standby モードにする、および/または音量を最小に設定した状態で、USB A to B ケーブルを使用して PC を CXA に接続します。
1. With the CXA in Standby mode and/or the volume set to minimum, connect your PC to the CXA via a USB A to B cable.
2. 最高品質で再生するには、CXA が USB 2.0 モードに設定されていることを確認します。
2. For the highest quality play back, ensure that the CXA is set to USB 2.0 mode.
USB モードの変更方法については、以下の「Setup Menu」セクションを参照してください。(初期設定は USB Audio Class 2 です)
See the ‘Setup Menu’ section below for a guide on how to change USB mode. (The default configuration is USB Audio Class 2)
3. Windows 用 USB 2.0 ドライバーをダウンロードします。
3. Download the Windows USB 2.0 driver.
USB ドライバーのダウンロード方法については、以下の「最新の USB Audio ドライバーをインストールする方法」セクションを参照してください。
See the “How do I install the latest USB Audio driver” section below, for a guide on how to download the USB driver.
4. CXA のフロントパネルで USB Audio 入力を選択します。
4. Select the USB Audio source on the front panel of the CXA.
Bluetooth/USB ボタンを押すと、2 つの入力が切り替わります。USB Audio は、シンボルのオレンジ色の点灯で示されます。
You can do this by pressing the Bluetooth/USB button, which will toggle between the two inputs. The USB Audio is shown by the symbol being lit orange.
5. Windows PC のサウンド設定で、CXA を出力スピーカーとして選択します。
5. Choose the CXA as your output speaker via your Windows PC’s sound settings.
注:可能な限り高品質で再生するには、CXA の最大サンプルレート(384 kHz まで)が選択されていることを確認してください。
Note: To ensure you are getting the highest quality play back possible, ensure that the maximum sample rate for the CXA is selected, up to 384 kHz.
Windows PC で「Control Panel」>「Sound」>「Speaker Properties」>「Advanced」タブを選択し、ドロップダウンメニューから最大サンプルレートとビット深度を選択します。
This can be done via your Windows PC by selecting ‘Control Panel’ > ‘Sound’ > ‘Speaker Properties’ > ‘Advanced’ Tab, and selecting the maximum sample rate and bit depth from the drop down menu.
CXA61/81 用の最新の USB Audio ドライバーをインストールする方法How to install the latest USB audio driver for the CXA61/81
CXA61/81 用の最新の USB Audio ドライバーをインストールするには、以下の手順に従ってください:
To install the latest USB Audio driver for your CXA61/81, please follow the steps below:
1. Windows オペレーティングシステムに適したドライバーを、https://www.cambridgeaudio.com/gbr/en/driver-updates からダウンロードします。
1. Download the correct driver for your Windows operating system from - https://www.cambridgeaudio.com/gbr/en/driver-updates
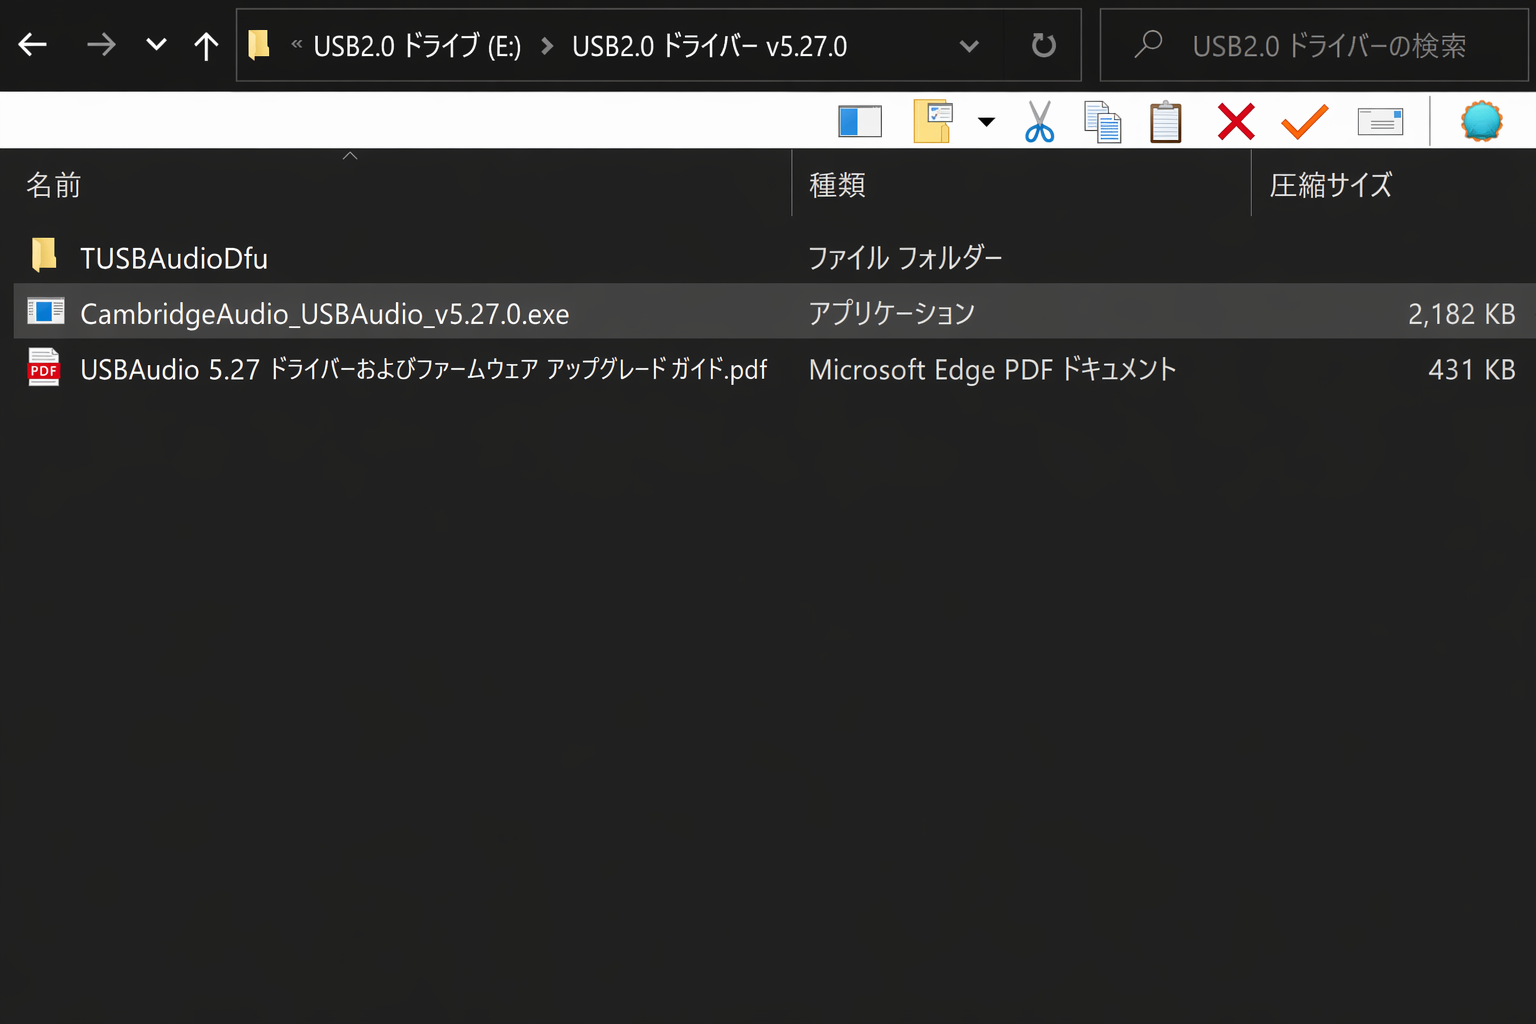
2. ダウンロードしたフォルダーを解凍し、アプリケーションファイルをダブルクリックしてインストーラーを実行します。該当ファイルは下の画像でハイライトされています。
2. Unzip the downloaded folder, and double click on the application file to run the installer. This is highlighted in the image below.
3. インストーラーを実行し、画面の指示に従います。
3. Run the installer, and follow the instructions.
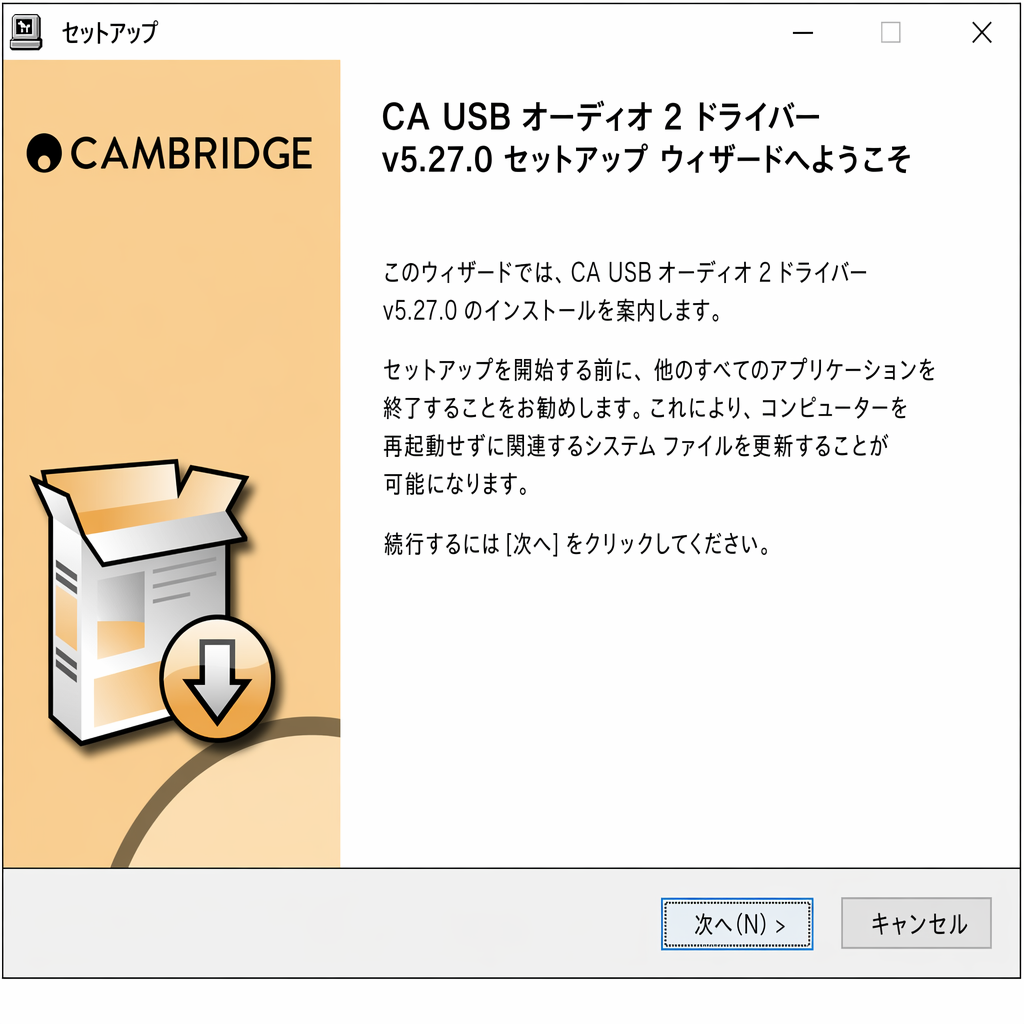
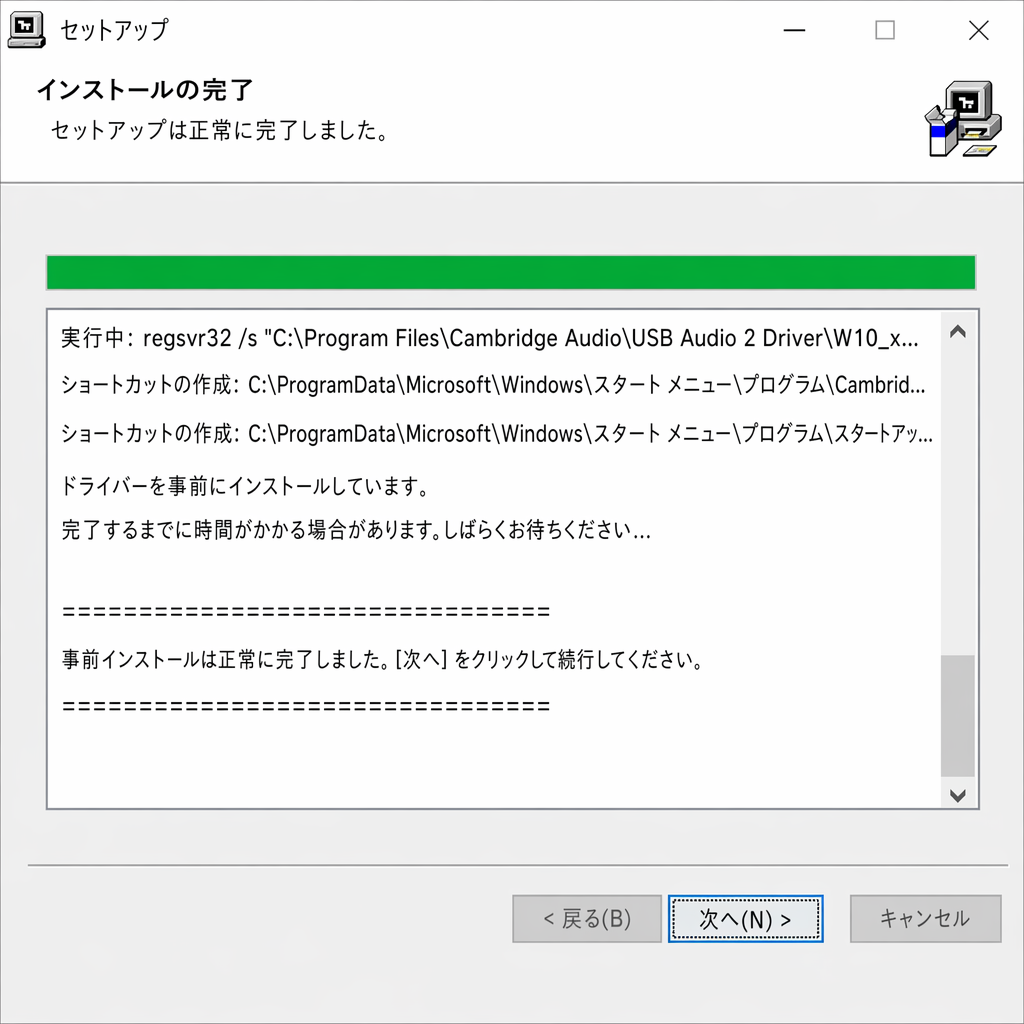
4. アップデートを進め、「next」をクリックし、続いて「finish」をクリックしてインストールを完了します。
4. Allow the update to progress, click next, and then finish to complete the installation.
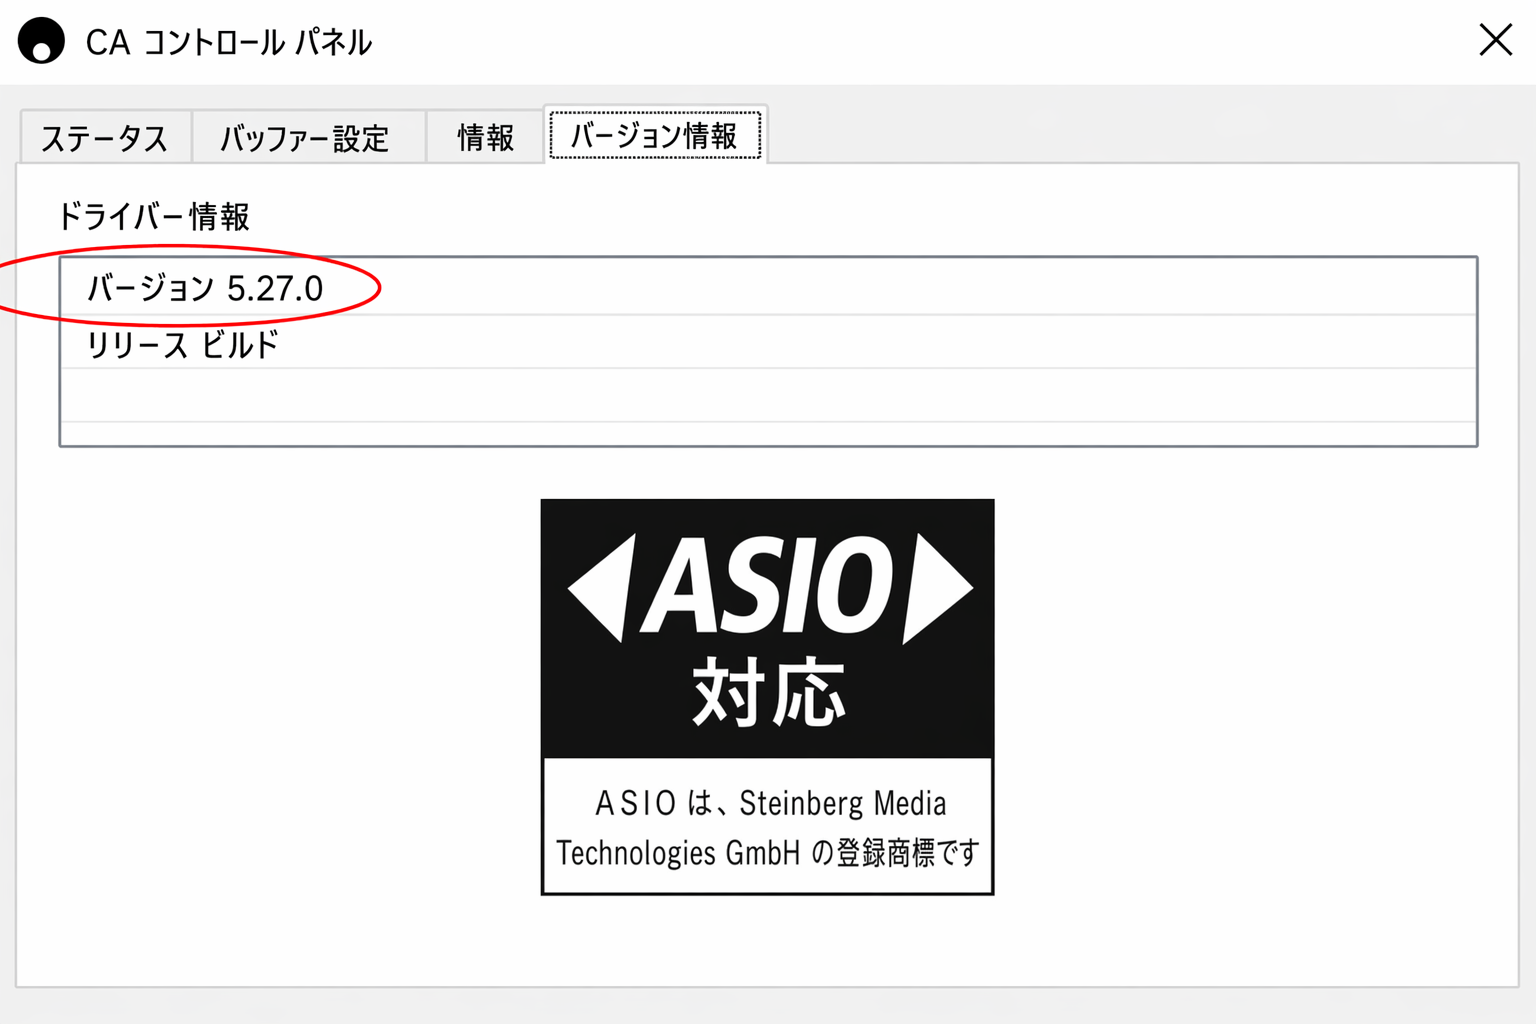
5. CA Control Panel を開いてドライバーのバージョンを確認し、インストールが完了したことを確認します。
5. Confirm the installation by opening the CA Control Panel, and checking the driver version.
USB オーディオ入力を介して Apple Mac を CXA に接続する方法How to connect an Apple Mac to the CXA via the USB audio input
追加のドライバーは必要ありません。CXA を USB Audio 1.0 に切り替えると、Mac OS-X 10.5(Leopard)以降の標準 Audio 1.0 ドライバーで動作し、最大 24-bit/96kHz のオーディオに対応します。
No extra drivers are required . With the CXA switched to USB Audio 1.0 the CXA will work with the native Mac OS-X 10.5 (Leopard) or above Audio 1.0 driver and accept audio up to 24-bit/96kHz.
CXA を USB Audio Class 2 に切り替えると、Mac OS-X 10.5(Leopard)以降の標準 Audio 2.0 ドライバーで動作し、最大 24-bit/384kHz のオーディオに対応します。
With the CXA switched to USB Audio Class 2 the CXA works with the native Mac OS-X 10.5 (Leopard) or above Audio 2.0 driver and can accept audio up to 24-bit/384kHz.
1. CXA を Standby モードにする、および/または音量を最小に設定した状態で、Mac の USB ポートに応じて、USB A to B ケーブルまたは C to B ケーブルを使用して Mac を CXA に接続します。
1. With the CXA in Standby mode and/or the volume set to minimum, connect your Mac to the CXA via a USB A to B cable, or C to B cable depending on the USB ports on your Mac.
2. CXA のフロントパネルで USB Audio 入力を選択します。
2. Select the USB Audio source on the front panel of the CXA.
Bluetooth/USB ボタンを押すと、2 つの入力が切り替わります。USB Audio は、シンボルのオレンジ色の点灯で示されます。
You can do this by pressing the Bluetooth/USB button, which will toggle between the two inputs. The USB Audio is shown by the symbol being lit orange.
3. Mac のサウンド設定で、CXA を出力スピーカーとして選択します。
3. Choose the CXA as your output speaker via your Mac’s sound settings
注:可能な限り高品質で再生するには、CXA の最大サンプルレート(384 kHz まで)が選択されていることを確認してください。
Note: To ensure you are getting the highest quality play back possible, ensure that the maximum sample rate for the CXA is selected, up to 384 kHz.
Mac で「Audio Midi Setup」>「Sound」>「Speaker Properties」>「Advanced」タブを選択し、ドロップダウンメニューから最大サンプルレートとビット深度を選択します。
This can be done via your Mac by selecting ‘Audio Midi Setup > ‘Sound’ > ‘Speaker Properties’ > ‘Advanced’ Tab, and selecting the maximum sample rate and bit depth from the drop down menu.
Linux での使用Use with Linux
Linux のほとんどのビルドでは、CXA を USB Audio Class 1 に切り替えると、標準の Audio 1.0 ドライバーで動作し、最大 24-bit/96kHz のオーディオに対応します。
For most builds of Linux with the CXA switched to USB Audio Class 1 the CXA will work with the native Audio 1.0 driver and accept audio up to 24-bit/96kHz.
Linux の非常に新しい一部のビルドでは USB Audio Class 2 に対応しているため、最大 24-bit/384kHz のオーディオに対応するには CXA を Audio 2.0 に切り替える必要があります。
Some very new builds of Linux are now supporting USB Audio Class 2 for which the CXA should be switched to Audio 2.0 to accept audio up to 24-bit/384kHz.
どちらの場合も、Linux のビルドは作成者が選択したドライバーを含むソフトウェアコンポーネントによって異なるため、動作を保証できず、オーディオドライバーの読み込みが必要になる場合があります。
For both cases because Linux builds vary according to their creators choice of software components including drivers it is not possible to guarantee operation and Audio drivers may need to be loaded.
Audio Class 1.0 または Audio Class 2.0 デバイスを汎用的にサポートする、いわゆる「Class drivers」が Linux コミュニティから入手できる場合がありますが、弊社ではこれらを提供していません。
'Class drivers' as they are called for generic support of Audio Class 1.0 or Audio Class 2.0 devices may be available from the Linux community, we do not supply these.
注:「USB Audio」入力を介して USB ドライブまたは HDD を CXA61/81 に直接接続することはできません。CXA61/81 の「USB Audio」入力は、PC または Mac との直接接続にのみ対応しています。ただし、弊社のネットワークプレーヤーのいずれかを CXA61/81 と組み合わせて使用すれば、これを行うことができます。
Note: It is not possible to connect a USB drive or HDD directly to the CXA61/81 via the ‘USB Audio’ input. The ‘USB Audio’ input on the CXA61/81 will only support a direct connection with a PC or Mac. You will, however, be able to use one of our network players in combination with the CXA61/81 to do this.
セットアップメニューSetup menu
セットアップメニューに入るにはTo enter the setup menu
1. CXA をスタンバイモードにします。
1. Put the CXA in standby mode.
2. スタンバイモードのまま Speaker A/B ボタンを長押しし、A/B の LED が交互に点滅して A1-A4 の入力 LED が点灯するまで押し続けます。
2. Whilst in Standby mode, press and hold the Speaker A/B button until the A/B lights flash alternatively and the sources A1-A4 light up.
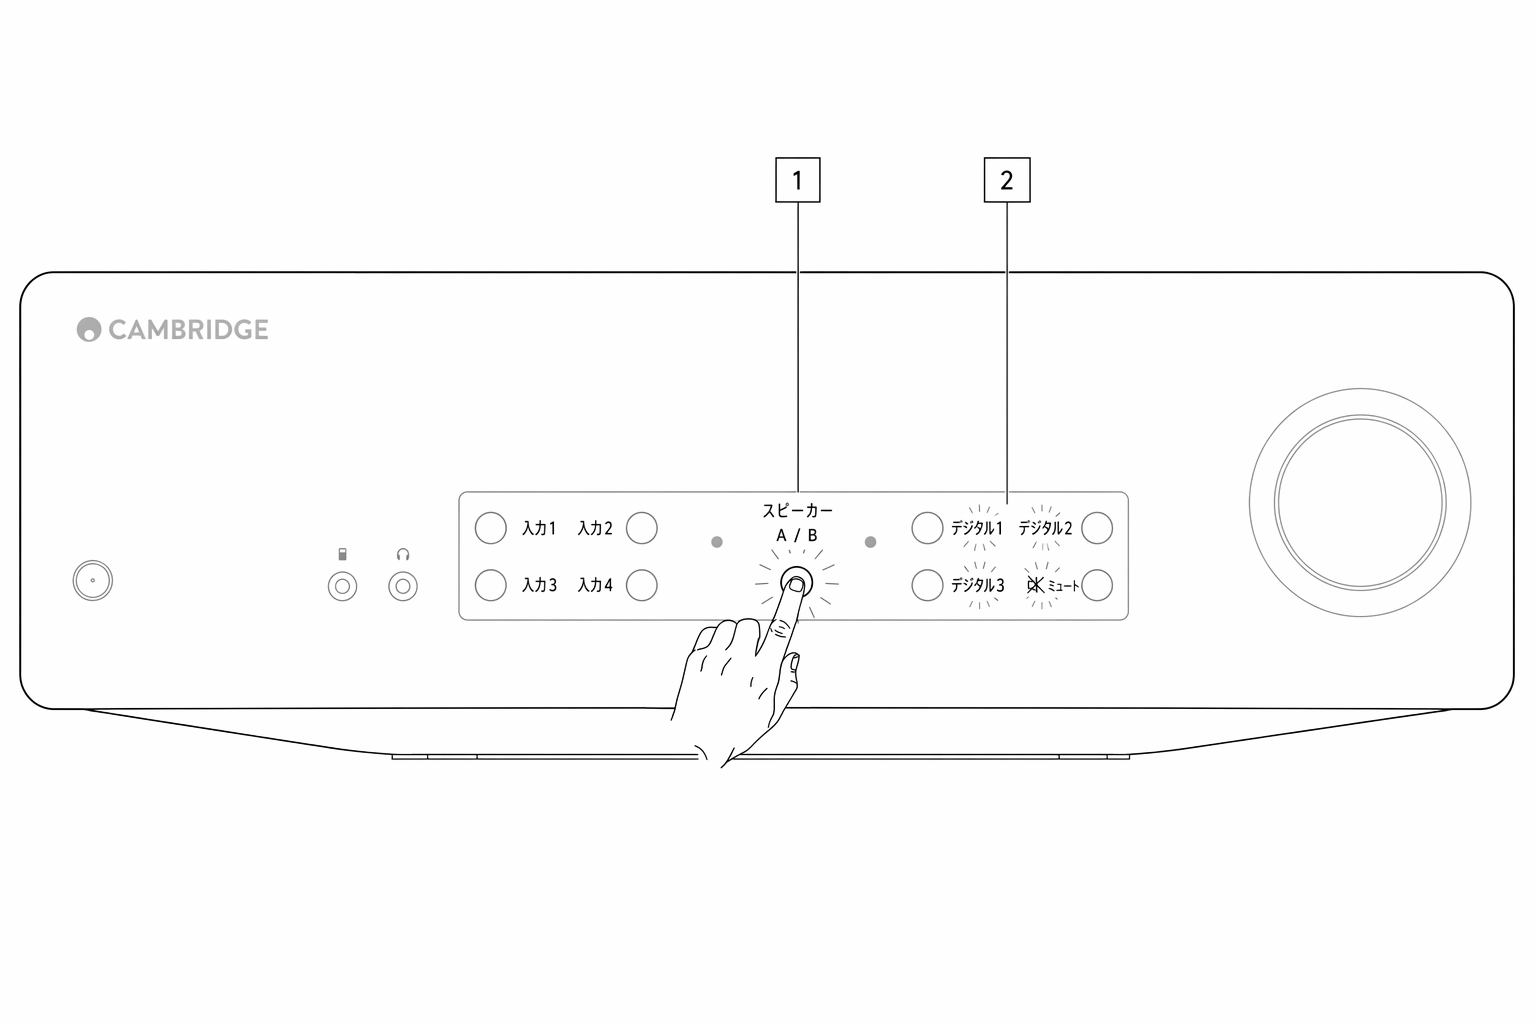
注:Speaker A/B ボタンを 1 回押すと、セットアップメニューを終了して CXA を再びスタンバイモードにします。
Note: Press the Speaker A/B button once to leave the Setup menu and place the CXA back into Standby mode.
セットアップ構成について、以下の入力ボタンの状態を参照してください:
See below source buttons for setup configuration:
注:選択中のボタンは青色の LED で示されます。
Note: Button selected is represented by Blue light.
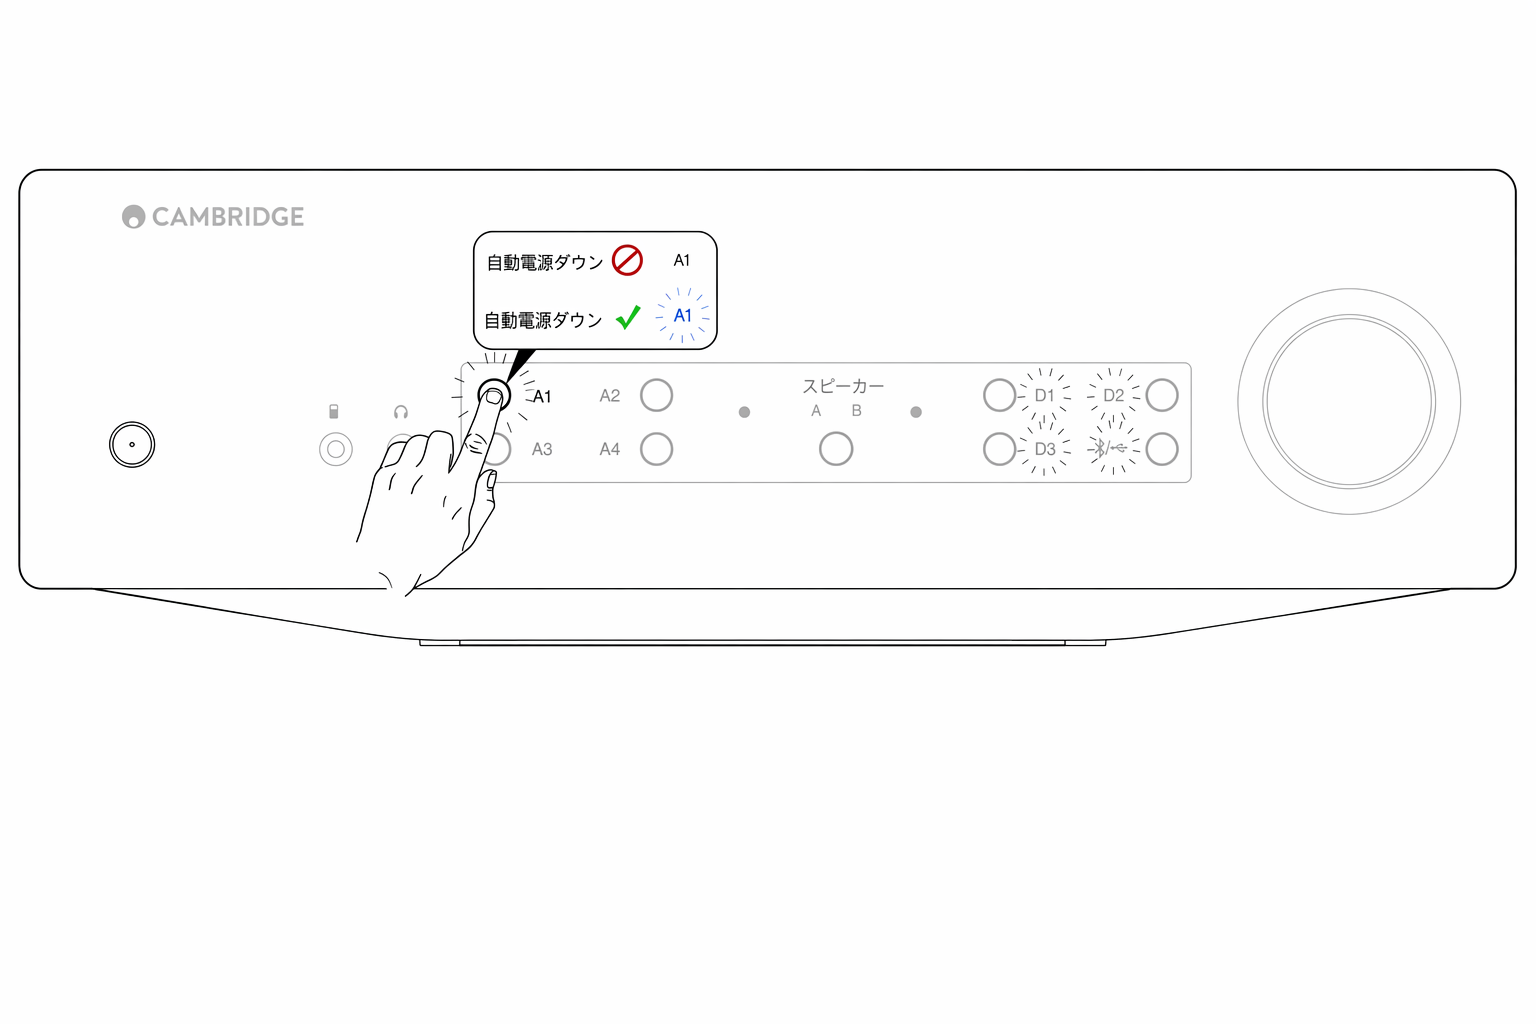
Auto Power Down(APD)Auto power down (APD)
A1 オフ – APD(自動電源オフ)機能を無効にします。
A1 off – Disables the APD (Auto power down) function.
A1 オン – APD 時間を 20 分に設定します。
A1 on – Sets the APD time to 20 minutes.
注:Auto Power Down は、音声がない状態が続くと CXA を自動的にスタンバイモードに切り替える電源管理機能です。APD 時間は、音声がない状態が続いてから CXA が自動的にスタンバイモードになるまでに必要な時間を表します。
Note: Auto power down is a power down function that automatically switches the CXA into standby mode if there is no audio. The APD time represents the amount of time required for there to be no audio before the CXA is automatically put into the standby mode.
クリッピング検出機能Clipping function
A3 オン – クリッピング検出機能を有効にします。信号のクリッピングを検出すると音量を少し下げます。
A3 on – Clipping function enabled. The volume nudges down if signal clipping is detected.
A3 オフ – クリッピング検出機能を無効にします。
A3 off – Clipping function is disabled.
USB モードUSB mode
A4 オン – CXA を USB Audio Class 2 モードに設定します。
A4 on – Puts the CXA in USB Audio Class 2 mode.
A4 オフ – CXA を USB Audio Class 1 モードに設定します。
A4 off – Puts the CXA in USB Audio Class 1 mode.
注:
Notes:
- セットアップ内容を保存してセットアップメニューを終了するには、Speaker A/B ボタンを押します。To save the setup settings and exit the setup menu, press the Speaker A/B button.
- セットアップメニューで Standby/On ボタンを押すと、このセットアップメニューを終了しますが、設定内容は保存されません。Pressing the Standby/On button while in the setup menu will exit this setup menu and will not save the setup settings.
ファクトリーリセットFactory reset
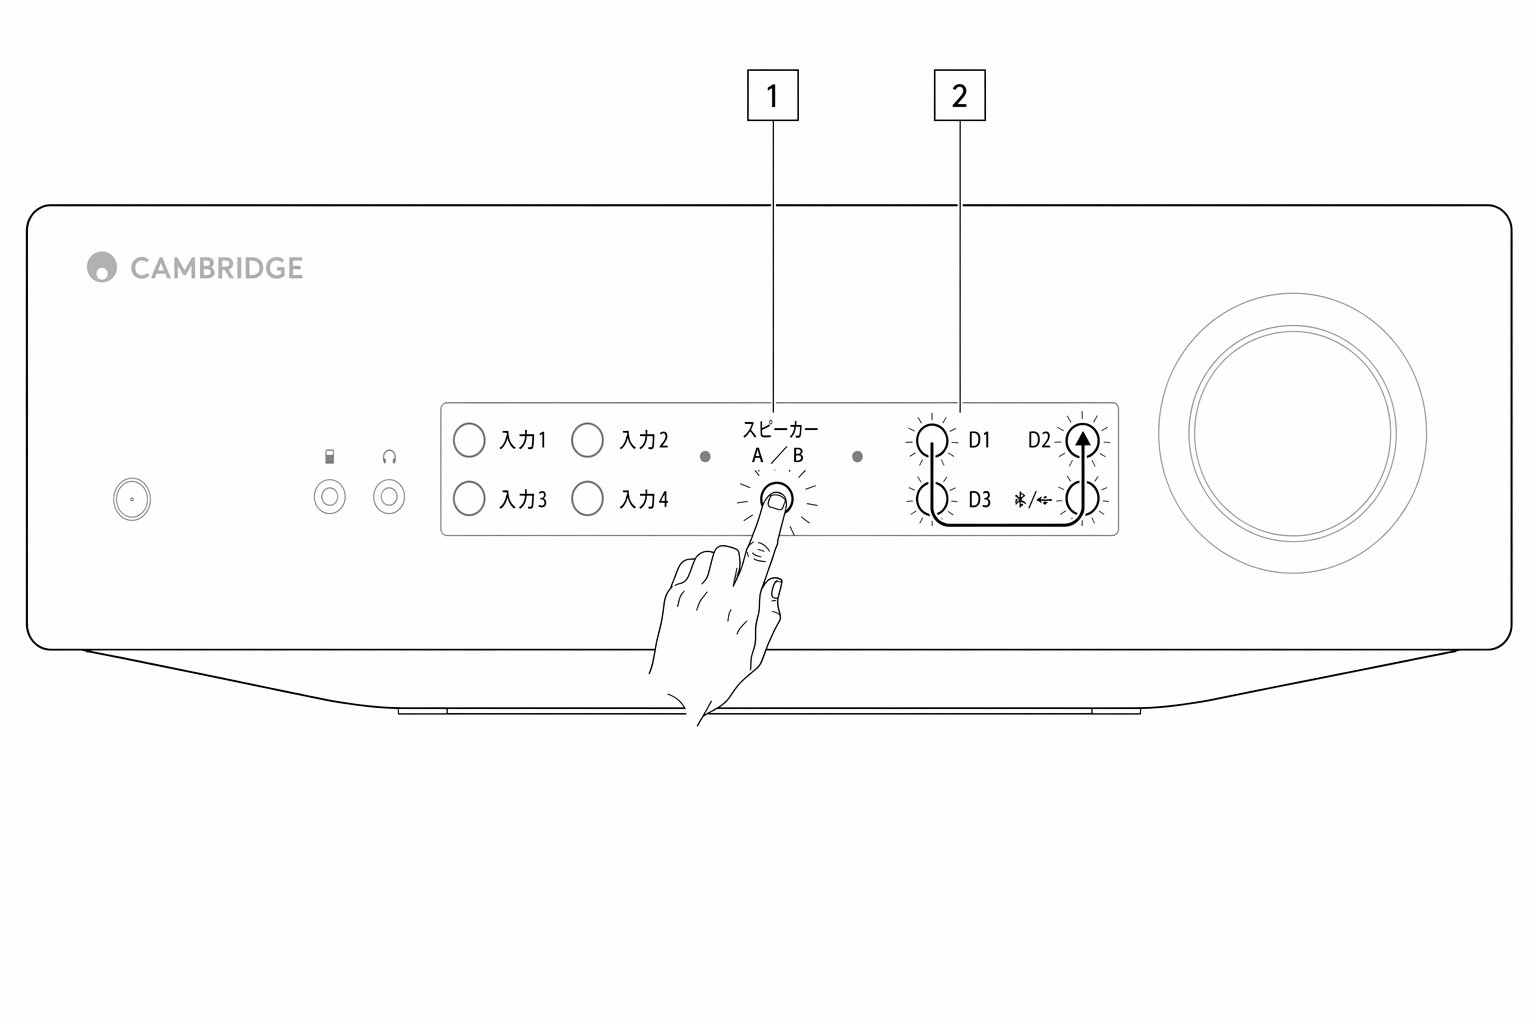
CXA を工場出荷時の設定に戻すため、ファクトリーリセットを実行できます:
A factory reset can be performed to restore the CXA to its original factory settings:
1. CXA がスタンバイモードの状態で、Speaker A/B ボタンを長押しします。
1. Whilst the CXA is in standby mode, press and hold the speaker A/B button;
2. A/B の LED が点滅したら、D1、D3、USB、D2 の順に、U の字を描くように押します。
2. Then when the A/B lights flash, press D1, D3, USB, D2 in a U shape sequence.
BluetoothBluetooth
Bluetooth オーディオストリーミングBluetooth audio streaming
この入力を選択すると、CXA はほとんどのスマートフォン、タブレット、ノート PC から Bluetooth オーディオを受信できます。
Selecting this allows the CXA to receive Bluetooth audio from most phones, tablets and laptops.
ペアリングPairing
お使いのデバイスから高音質の音楽をストリーミングするには、まず CXA とペアリングする必要があります。CXA で Bluetooth 入力を選択して、検出モードに入ります。
To begin streaming high quality music from your device it will first need to be paired with the CXA. Select the Bluetooth source on the CXA to enter discovery mode.
注:
Notes:
- お使いのデバイスは、Bluetooth 入力が選択されているときにのみ CXA とペアリングおよび接続できます。フロントパネルの Bluetooth/USB ソースボタンを選択すると、この操作を行えます。Bluetooth 入力が選択されていることは、シンボルが青色に点灯することで示されます。Your device can only be paired and connected to the CXA while the Bluetooth source is selected. This can be done by selecting the Bluetooth/USB source button on the front panel. The Bluetooth source is shown as being selected by the symbol being lit blue.
- Bluetooth 接続がない場合、CXA は常に検出可能モードになっています。検出可能モードとは、CXA を別の Bluetooth デバイスとペアリングできる状態です。The CXA is always in discoverable mode when there is no Bluetooth connection. Discoverable mode means that the CXA is able to be paired to another Bluetooth device.
- Bluetooth 機能を有効にするには、付属の Bluetooth アンテナを本機背面に取り付ける必要があります。The supplied Bluetooth antenna must be inserted into the rear of the unit to enable Bluetooth functionality.

Bluetooth トラブルシューティングガイドBluetooth troubleshooting guide
Bluetooth デバイスを CXA に接続する際に問題がある場合は、以下のトラブルシューティング手順をお試しください:
If you are having problems connecting your Bluetooth device to the CXA, please try the following troubleshooting steps:
- 付属の Bluetooth アンテナが本機背面に正しく接続されていることを確認してください。アンテナが接続されていないと、CXA61/81 は Bluetooth デバイスに接続できません。アンテナを一度外してから、もう一度接続してみてください。Ensure that the supplied Bluetooth antenna is properly connected to the back of the unit. The CXA61/81 will be unable to connect to a Bluetooth device without the antenna connected. Try disconnecting and then re-connecting the antenna.
- フロントパネルの Bluetooth/USB Audio ボタンを選択して、Bluetooth 入力が選択されていることを確認してください。Bluetooth 入力は、シンボルが青色に点灯することで示されます。USB 入力が有効なときは LED がオレンジ色になります。Ensure that the Bluetooth source has been selected by selecting the Bluetooth/USB Audio button on the front panel. The Bluetooth source is shown by the symbol being lit blue. When the USB source is active the LED will be orange.
- お使いの Bluetooth デバイスがペアリングモードになっており、他の Bluetooth 機器に接続されていないことを確認してください。Ensure that your Bluetooth device is in pairing mode and not already connected to another Bluetooth unit.
- お使いのデバイスの検出可能な Bluetooth 機器の一覧から CXA を削除し、ペアリングをやり直してください。Forget the CXA from your devices’ list of discoverable Bluetooth items and start the pairing process again.
- CXA のファクトリーリセットを実行してください(上記「ファクトリーリセット」の項目をご参照ください)。Perform a factory reset on the CXA (see 'Factory Reset' section above).
Control BusControl Bus
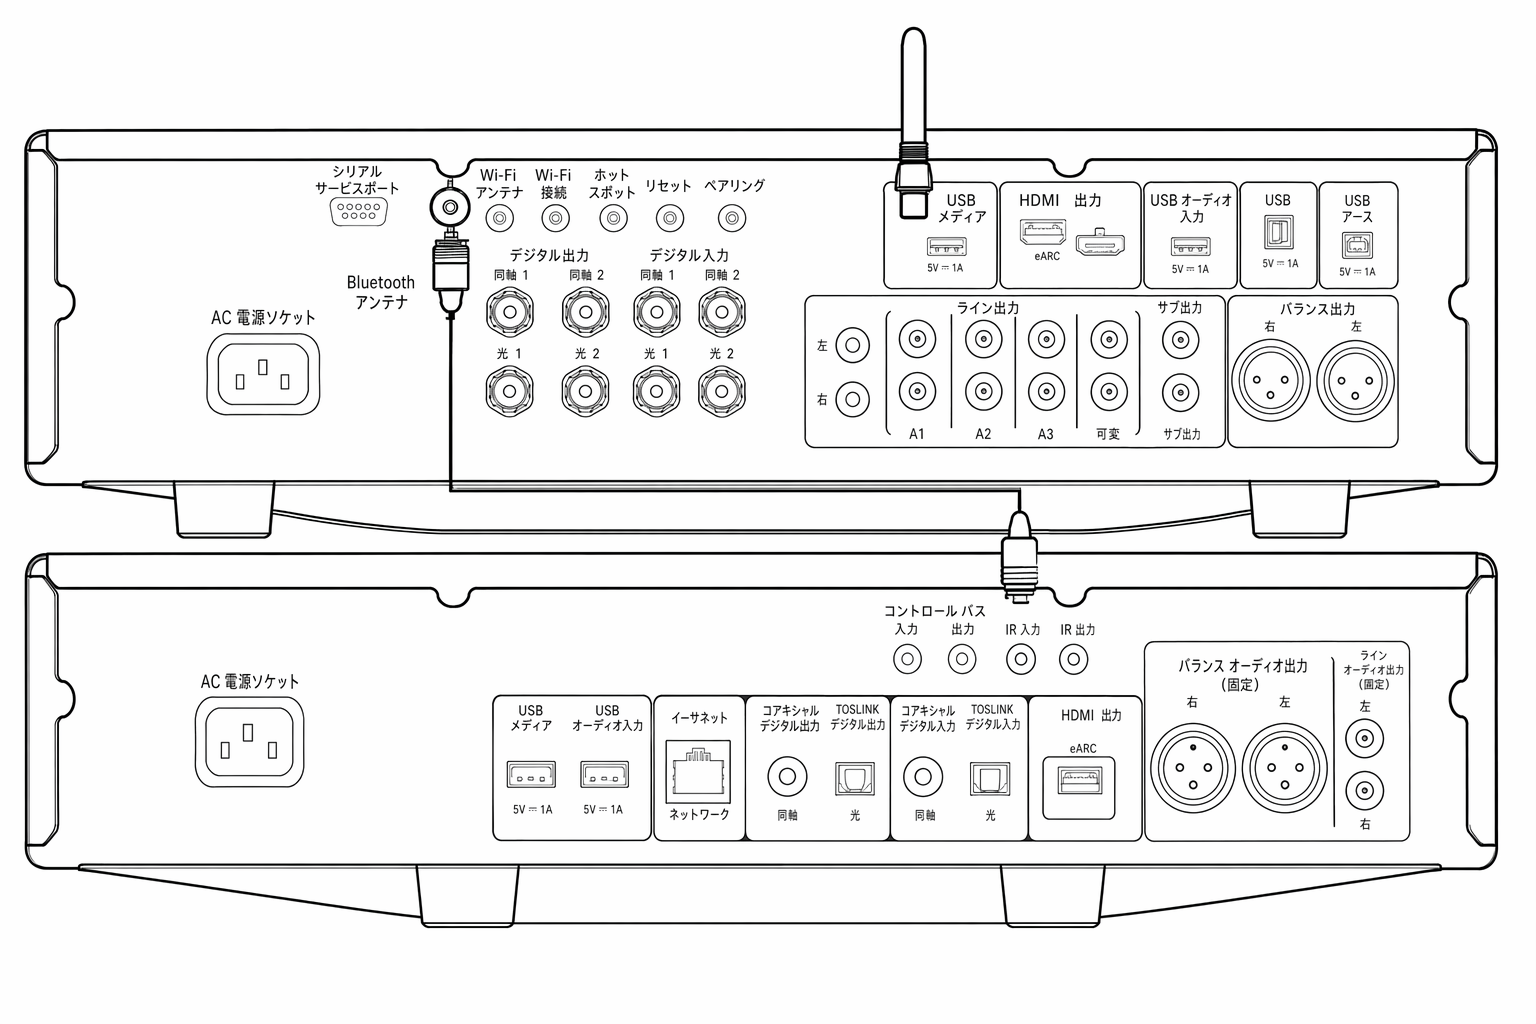
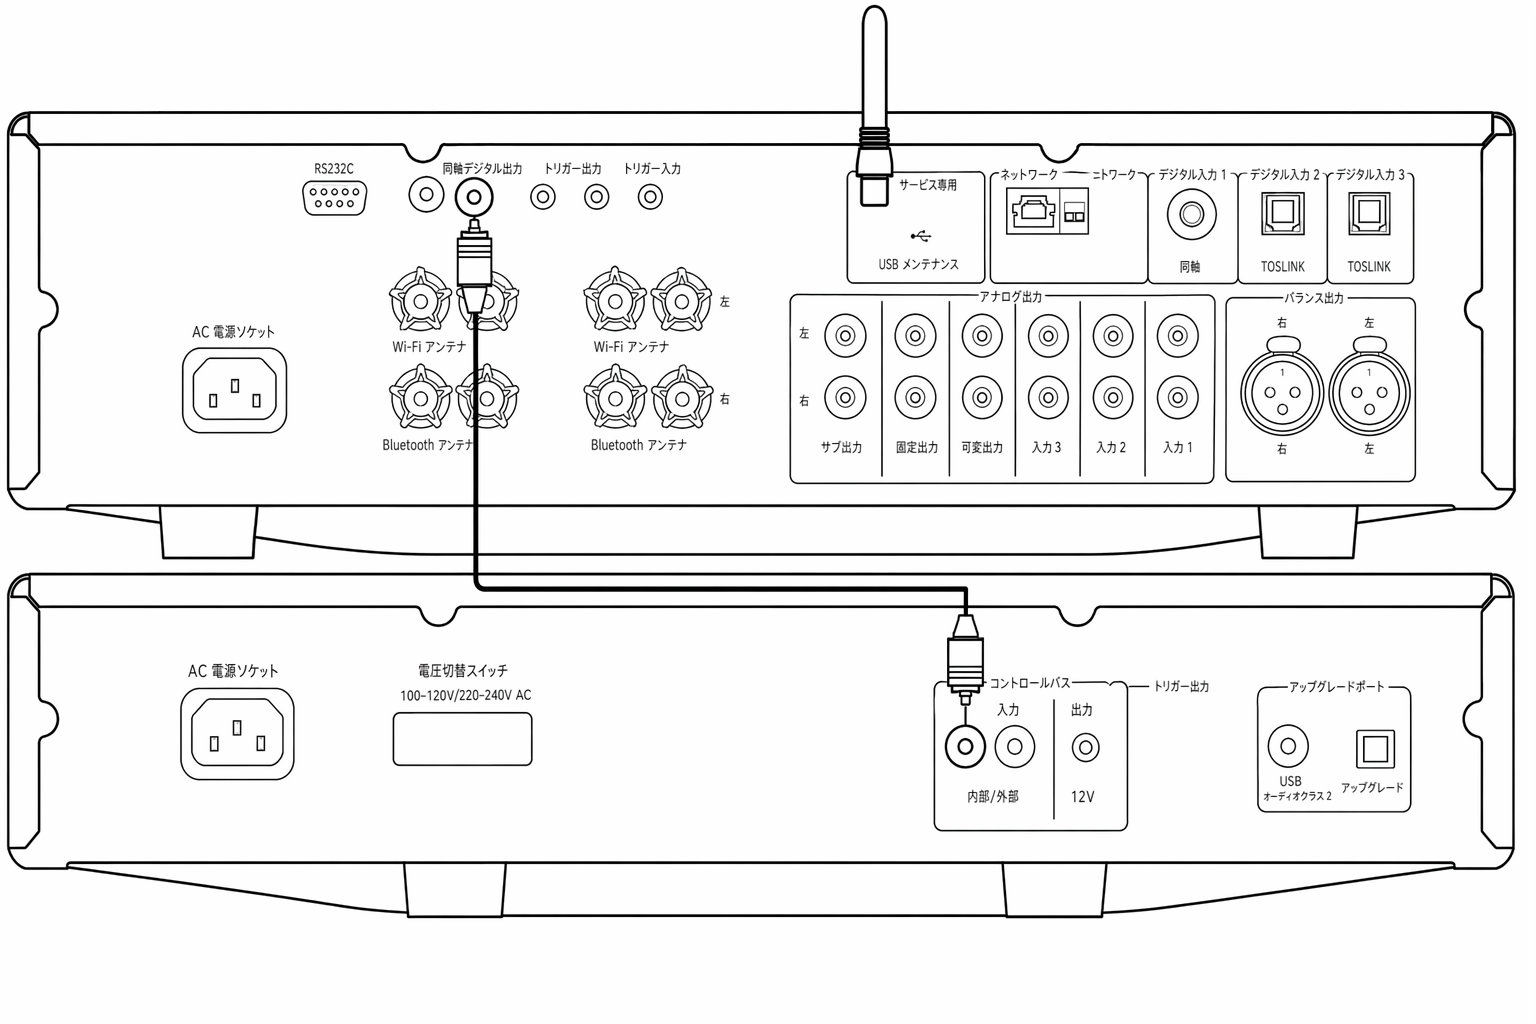
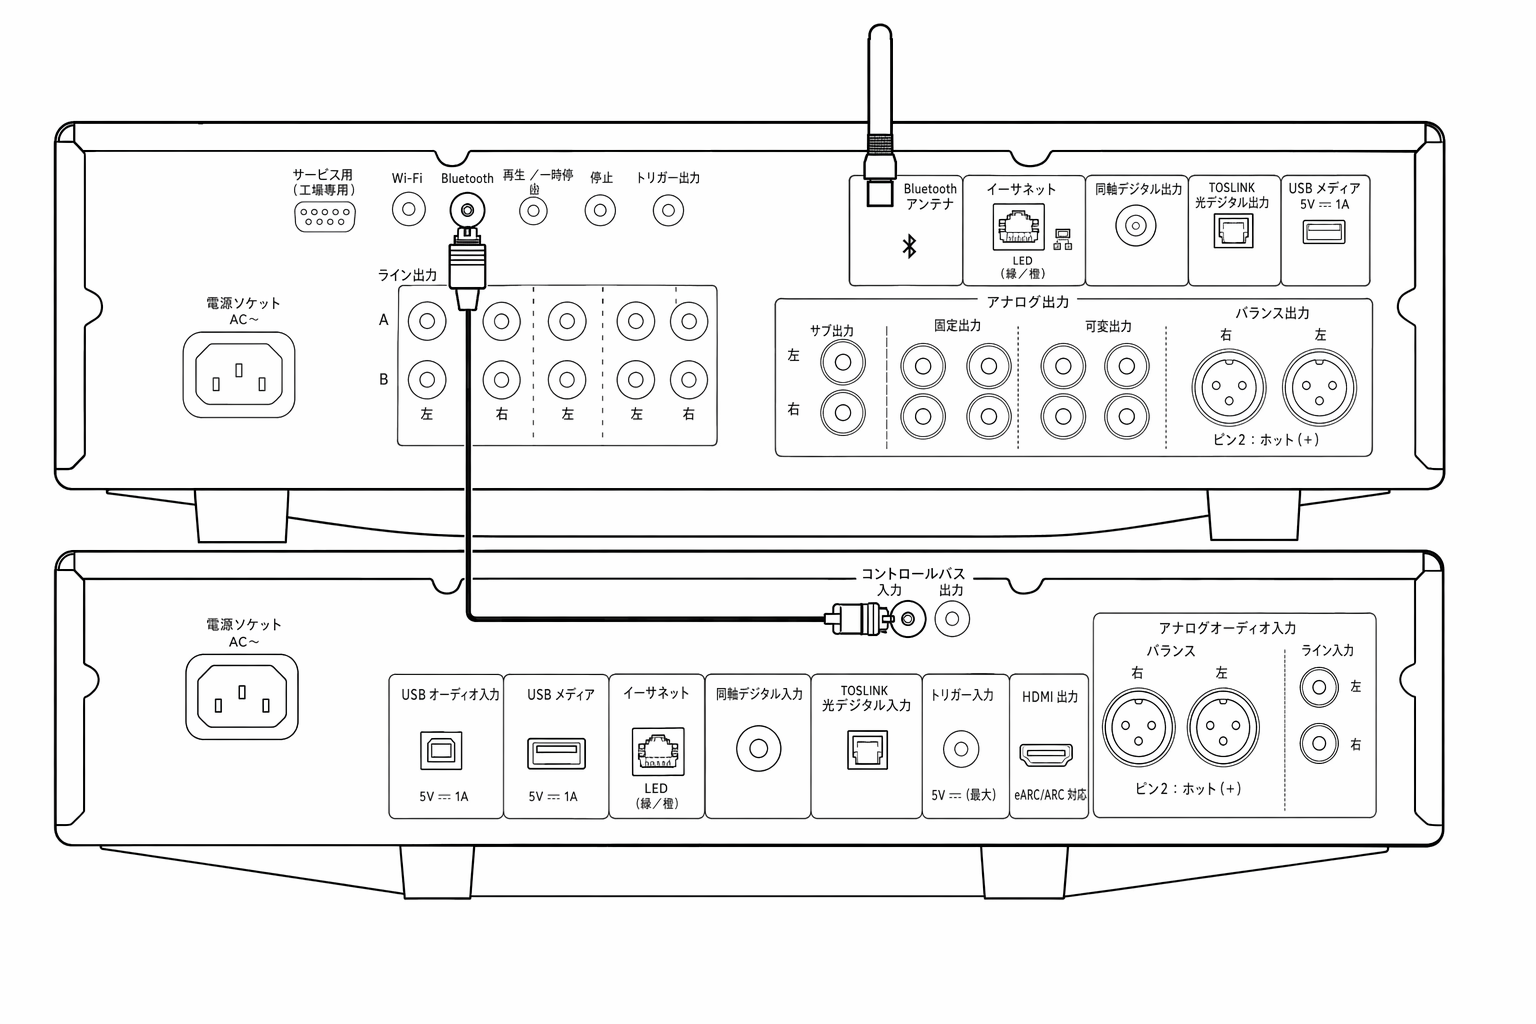
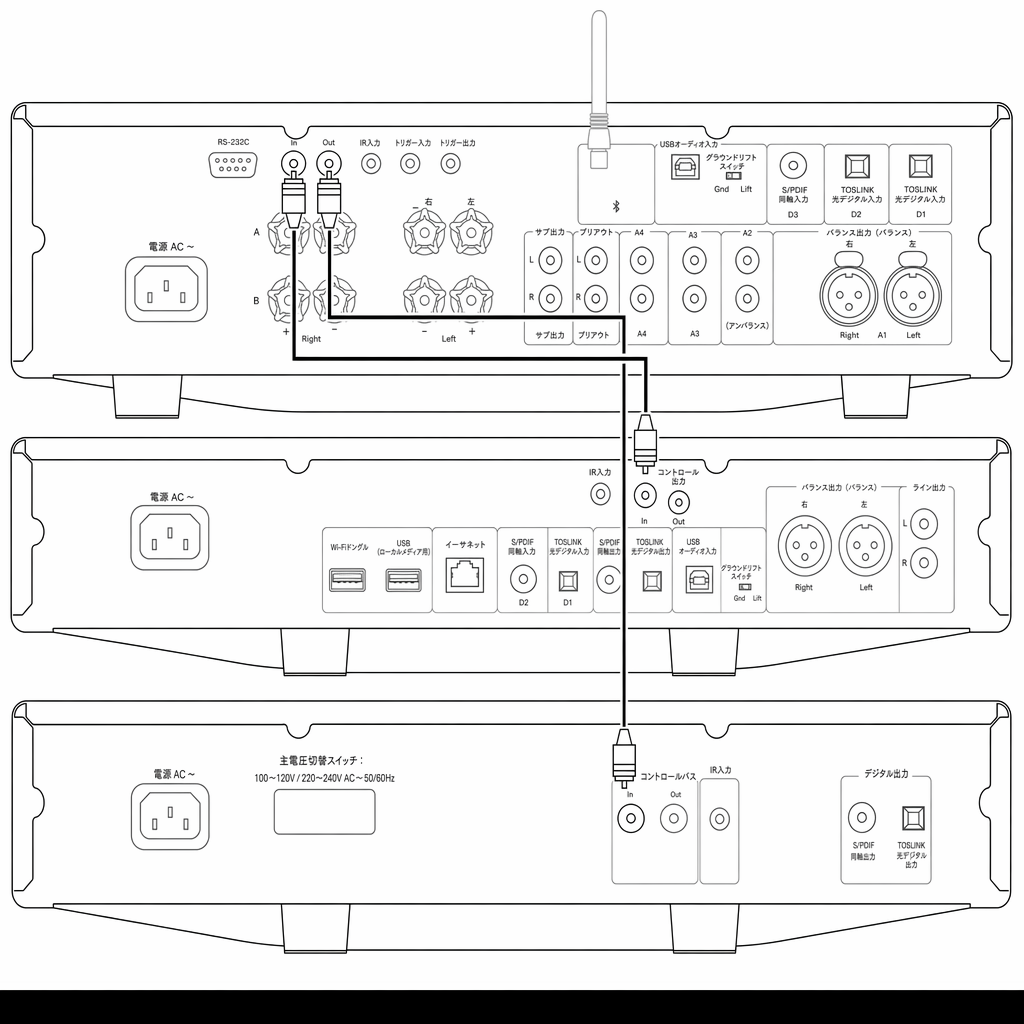
Control Bus を使うと、対応する Cambridge Audio 製品の電源投入を同期できます。付属の Control Bus ケーブルで CXA を接続する際は、以下の図を参照してください。
The Control Bus allows any compatible Cambridge products to synchronise when powering up the units. See the following diagrams when connecting the CXA using the provided Control Bus cable.
この Control Bus のもう 1 つの機能は、StreamMagic アプリを使用できることです。StreamMagic アプリを使って CXN 経由で CXA を操作できます。
Another added feature with this Control Bus is the use of the StreamMagic app. You can use the StreamMagic app to control the CXA via the CXN.
StreamMagic アプリ(CXN 経由)StreamMagic app (via CXN)
アプリを使って CXN の電源をオン/オフすると、CXA もオン/オフされます。アプリを使って CXA の音量を調整することもできます。CXN の Control Bus 出力を CXA の入力に接続してください。詳細は CXN のマニュアルを参照してください。
When using the app to turn the CXN on/off, this will also turn the CXA on/off. The app can also be used to control the volume of the CXA. Connect the CXN control bus out to CXA in. For more information, see the CXN manual.
CXA と CXCCXA with CXC
CXA の電源をオン/オフすると、CXC もオン/オフされます。CXA の Control Bus 出力を CXC の入力に接続してください。
When turning the CXA on/off, this will also turn the CXC on/off. Connect the CXA control bus out to CXC in.
CXA と CXNCXA with CXN
注:StreamMagic アプリで CXA を操作しない場合の構成です。
Note: Without using the StreamMagic app to control the CXA.
CXA の電源をオン/オフすると、CXN もオン/オフされます。CXA の Control Bus 出力を CXN の入力に接続してください。
When turning the CXA on/off, this will also turn the CXN on/off. Connect the CXA control bus out to CXN in.
CXA と CXN と CXCCXA with CXN and CXC
CXN の電源をオン/オフすると、CXA と CXC もオン/オフされます。
When turning the CXN on/off, this will turn the CXA and CXC on/off.
3 台の CX 機器をつなぐ場合は、CXN の Control Bus 出力を CXA の Control Bus 入力に接続し、続けて CXA の Control Bus 出力を CXC の Control Bus 入力に接続してください。
With all three CX devices, connect the CXN Control Bus out to CXA Control Bus in. Then connect the CXA Control Bus out to CXC Control Bus in.
注:CXC の Control Bus 出力から CXN の Control Bus 入力に戻すループ接続は行わないでください。
Note: Do not loop back from the CXC Control Bus out to the CXN Control Bus in.
また、StreamMagic アプリを CXN に接続した後、CXN のデバイス設定で Control Bus を有効にし、「Amplifier」に設定する必要があります。
Control Bus will also need to be enabled and set to 'Amplifier' within the CXN device settings in the StreamMagic app, once the app has been connected to the CXN.
注:CXA、CXN、CXC はいずれも Auto Power Down(APD)機能を備えています。APD が有効で、いずれかの機器が電源オンのまま無操作になると、設定した APD 時間後に自動でスタンバイに入ります。Control Bus の接続により、他の接続機器もすべて電源オフになります。
Note: The CXA, CXN and CXC all have an Auto Power Down (APD) function. If APD is enabled and one of the devices is switched on but inactive, the device will automatically power down after the selected APD time. This will then switch off all the other connected devices, due to the Control Bus connection.
自動的にスタンバイに入らないようにするには、各機器で APD 機能を無効にすることをおすすめします。
If you don't want the devices to go into standby automatically, we would recommend disabling the APD feature on each device.
CAP5CAP5
Cambridge Audio は、アンプ本体および接続するスピーカーの信頼性と長寿命を確保するため、独自の保護システムを開発しました。本保護システムは以下の 5 つの保護機能で構成されます:
Cambridge Audio has developed a proprietary protection system to ensure reliability and a long life for its amplifiers and the speakers they are connected to. This protection system comprises of five main protection methods:
1. DC 検出1. DC detection
表示 - 動作中に本機の電源がオフになります。フロントパネルの LED が、1 回点滅してから長い間隔を空けて点滅する、というシーケンスで一斉に点滅します。詳細は以下をご参照ください。
Indication - Unit has switched off during operation. The front panel LED light flashes together in the following sequence, one flash with long pause between flashes. Read below for more information.
説明 - 内部障害によりアンプの出力が高い一定電圧(DC)に達した場合に、CAP5 がスピーカーを保護します。この故障はまれですが、検出できれば高価なスピーカーを守れます。
Description - CAP5 offers loudspeaker protection if the output of the amplifier goes to a high constant voltage (DC) because of some internal fault. This is a rare fault although detecting it could just save those expensive loudspeakers.
対処 - DC 保護回路は必要な感度を持つため、アンプが極端にハードなクリッピングに達すると DC 保護が作動する場合があります。この故障が発生した場合は、販売店に修理を依頼してください。
Remedy - Due to the necessary sensitivity of the DC protection circuit, extremely hard clipping of the amplifier may cause DC protection to be triggered. If this fault occurs, please contact your dealer for service.
2. 過熱検出2. Over temperature detection
表示 - 動作中に本機の電源がオフになります。フロントパネルの LED が、2 回素早く点滅してから長い間隔を空ける、というシーケンスで一斉に点滅します。詳細は以下をご参照ください。
Indication - Unit has switched off during operation. The front panel LED light flashes together in the following sequence, two quick flashes with long pause between flashes. Read below for more information.
説明 - 高い音量と低インピーダンスのスピーカーが組み合わさると、温度上昇が起こります。CAP5 は温度検出機能で出力トランジスターの発熱を常時監視しています。監視温度が(出力素子の限界内の)高い水準に達すると、アンプは自動的に故障モードに切り替わります。この状態で約 15 分放置して十分に冷やすのが理想です。冷却が不十分だと、電源を入れた直後に再び限界温度に達する場合があります。スピーカーのインピーダンスが低いほどアンプは強く働くため、温度上昇も速くなります。キャビネット内への設置や通気スロットの遮蔽がある場合、短時間の再生で再び過熱検出が作動することがあります。
Description - Over temperature is caused by a combination of high listening levels and low impedance speakers. CAP5 includes temperature detection which constantly monitors the heat generated by the output transistors. If the monitored temperature reaches a high level (suitably within the limits of the output devices) the amplifier will automatically switch into a fault mode. The unit should ideally be left for 15 minutes in this state to cool down adequately. If the unit has not fully cooled down then the temperature may reach the limit soon after the amplifier is powered up. If the loudspeaker impedance is low the temperature of the amplifier may rise faster as the amplifier is working harder. If the amplifier is mounted in a cabinet or the ventilation slots are obstructed the over temperature detection may activate/reactivate after a short listening time.
対処 - 出力トランジスターの内部温度が過熱限界に達しています。15 分ほど放置して冷却した後、スタンバイボタンを押して通常動作に戻してください。
Remedy - The internal temperature of the output transistors has reached the over temperature limit. Leave the unit for 15 minutes to cool down before pressing the Standby button to resume normal operation.
3. 過電圧/過電流検出3. Overvoltage/Overcurrent detection
表示 - 動作中に本機の電源がオフになります。フロントパネルの LED が、3 回素早く点滅してから長い間隔を空ける、というシーケンスで一斉に点滅します。詳細は以下をご参照ください。
Indication - Unit has switched off during operation. The front panel LED light flashes together in the following sequence, three quick flashes with long pause between flashes. Read below for more information.
説明 - CAP5 は V/I(電圧/電流)保護を備えています。出力トランジスターを常時監視し、Safe Operating Area(SOA、安全動作領域)の範囲内で動作させます。SOA は出力トランジスターのメーカーが信頼性確保のために定める制限値です。V/I 保護はアンプ回路に組み込まれており、一時的な過負荷に素早く応答します。V/I 保護が作動している間も本機は動作を続けますが、出力トランジスターを保護するために歪みが聞こえることがあります。
Description - CAP5 offers V/I (voltage/current) protection by constantly monitoring the output transistors to keep them working inside their Safe Operating Area (SOA). The SOA is a set of limits given by the output transistor manufacturer to ensure reliability. The V/I protection has been incorporated within the amplifier circuitry to provide a fast response to temporary overload conditions. When the V/I protection is triggered the unit will continue to operate but distortion may be heard as the unit protects the output transistors.
対処 - 音量を下げてください。それでも歪みが残る場合は、スピーカーの接続と定格を確認してください。
Remedy - Reduce the volume. If distortion is still present, check the speaker connections and ratings.
4. 短絡検出4. Short circuit detection
表示 - 電源オン時に本機の電源がオフになります。フロントパネルの LED が、4 回素早く点滅してから長い間隔を空ける、というシーケンスで一斉に点滅します。詳細は以下をご参照ください。
Indication - Unit has switched off during power up. The front panel LED light flashes together in the following sequence, four quick flashes with long pause between flashes. Read below for more information.
説明 - スタンバイからの電源オン時、CAP5 はスピーカー端子を検査し、端子間に誤ってショート(短絡)がないかを確認します。スピーカー端子間で測定した抵抗値が低すぎる場合、異常が解消されて再度電源オンを試みるまでスタンバイモードのままとなります。
Description - During power up from Standby CAP5 performs a check on the loudspeaker terminals to see if a short across the terminals has been accidentally introduced. If the resistance measured across the loudspeaker terminals is too low the unit will stay in Standby mode until the fault has been removed and Power up is re-attempted.
対処 - スピーカー端子間で短絡が起きている可能性があります。本機をスタンバイから解除する前に、スピーカーの接続をすべて確認してください。
Remedy - There may be a short circuit between the loudspeaker terminals. Check all loudspeaker connections before attempting to switch the unit out of Standby.
5. インテリジェントクリッピング検出5. Intelligent clipping detection
表示 - 音量が自動的に下がります。
Indication - Volume is reduced automatically.
説明 - CAP5 はアンプ出力でクリッピングやオーバードライブが始まったことを検出できます。クリッピングはスピーカーを損傷させ、音質を損なう原因になります。クリッピング歪みは、高い音量でアンプが供給できる最大電圧を出力信号が超えようとしたときに発生し、信号の頂点が平らに潰れる現象です。CAP5 がクリッピングを検出すると、歪みのない出力になるまで音量を自動的に下げます。
Description - CAP5 has the ability to detect when the amplifier starts to clip or overdrive at its output, which can damage loudspeakers, and degrade the sound. Clipping distortion is caused at high volume levels when the output signal attempts to go outside the maximum voltage that the amplifier can provide, causing the tops of the signal to flatten off. When CAP5 detects clipping the volume will be automatically reduced down until CAP5 detects an undistorted output.
注:クリッピング検出は初期設定では無効です。セットアップメニューで有効に切り替えられます(「セットアップメニュー」の項目をご参照ください)。
Note: The clipping detection is disabled by default. The clipping detection can be enabled in the Setup menu (see 'Setup menu' section).
CAP5 が繰り返し作動する場合は、お使いのスピーカーの仕様が CXA61/81 と適合するかも確認してください。どちらのアンプもインピーダンス 4 〜 8 オームのスピーカーに対応します。
If CAP5 is persisting, it is also advisable to check the specifications of your speakers to ensure that they are compatible with the CXA61/81. Both amplifiers can be used with speakers with an impedance of between 4 and 8 Ohms.
CXA61 は 8 オーム負荷で 60W RMS、4 オーム負荷で 90W RMS を出力します。CXA81 は 8 オーム負荷で 80W RMS、4 オーム負荷で 120W RMS を出力します。
The CXA61 outputs 60W RMS into 8 Ohms and 90W RMS into 4 Ohms, while the CXA81 outputs 80W RMS into 8 Ohms and 120W RMS into 4 Ohms.
接続したスピーカーがこの仕様から外れている場合も、CAP5 保護が作動する原因になり得ます。
If your connected speakers fall outside of these specifications, then this could also be a reason for CAP5 protection being activated.
トラブルシューティングTroubleshooting
電源が入らない • AC 電源コードがしっかり接続されているか確認してください。• プラグが壁コンセントに完全に差し込まれ、電源が入っているか確認してください。• 電源プラグまたはアダプターのヒューズを確認してください。
There is no power • Ensure the AC power cord is connected securely. • Ensure the plug is fully inserted into the wall socket and is switched on. • Check fuse in the mains plug or adaptor.
音が出ない • 本機がスタンバイモードでないことを確認してください。• ソース機器が正しく接続されているか確認してください。• スピーカーが正しく接続されているか確認してください。• 選択中の Speaker A/B LED が、スピーカーを接続した端子側と一致しているか確認してください。• 本機がミュートモードでないか確認してください。• フロントパネルで正しいアナログ/デジタル入力が選択されているか確認してください。詳細は「フロントパネル」の項目をご参照ください。
There is no sound • Make sure the unit is not in Standby mode. • Check that the source component is properly connected. • Check that your speakers are properly connected. • Make sure the selected speaker A/B light corresponds to the speaker terminals that the loudspeakers are connected to. • Make sure unit is not in mute mode. • Check that the correct analogue or digital input button has been selected on the front panel. See the ‘Front Panel Connections’ section for more information.
片方のチャンネルから音が出ない • スピーカーの接続を確認してください。• インターコネクトケーブルを確認してください。
There is no sound on one channel • Check speaker connections. • Check interconnects.
低域が弱い、またはステレオイメージがぼやける • スピーカーの極性が逆相になっていないか確認してください。
There is weak bass or diffused stereo imaging • Ensure that speakers are not wired out of phase.
Speaker A/B とミュートの LED が点滅する • 「CAP5 保護システム」の項目をご参照ください。
Speaker A/B and mute light flashing • See section on CAP5 protection system.
リモコンが動作しない • 電池が切れていないか確認してください。• リモコン受光部の前方に遮るものがないか確認してください。
The remote handset does not function • Check that the batteries have not expired. • Ensure that nothing is blocking the remote sensor.
Mac/PC を USB オーディオ入力に接続しても音が出ない • マニュアルの「USB オーディオ接続」の項目の手順をすべて実施してください。• フロントパネルの Bluetooth/USB Audio ボタンで USB オーディオ入力が選択されていることを確認してください。USB オーディオ入力選択時はシンボルがオレンジ色に点灯します。• PC/Mac が USB A-B ケーブルで USB オーディオ入力に接続されていることを確認してください。• PC で CXA を USB Audio Class 2 で使用する場合は、正しい USB ドライバーがダウンロードされていることを確認してください。ドライバーは www.cambridgeaudio.com/gbr/en/driver-updates から入手できます。• Cambridge Audio USB 2.0 ドライバーを導入した場合は、セットアップメニューで CXA が USB Audio Class 2 に設定されていることを確認してください。
There is no audio when connecting a Mac/PC to the USB audio input • Ensure that all the steps within the ‘USB Audio Connection’ section of the manual have been followed. • Ensure that the USB Audio source has been selected by selecting the Bluetooth/USB Audio button on the front panel. The USB Audio source is shown by the symbol being lit orange. • Ensure that your PC/Mac is connected to the USB Audio input with a USB A to B cable. • If you are connecting a PC and using the CXA in USB Audio Class 2, make sure that the correct USB driver is downloaded. The driver is available from www.cambridgeaudio.com/gbr/en/driver-updates . • If you have downloaded a Cambridge Audio USB 2.0 Driver, ensure that the CXA is set to USB Audio Class 2 in the Setup Menu.
テレビを CXA に接続しても音が出ない • CXA は Dolby やサラウンド信号をデコードできません。テレビの音声設定を PCM またはステレオに変更してください。• テレビが CXA の SP/DIF または TOSLINK 入力に接続されていることを確認してください。
There is no audio when connecting a TV to the CXA • The CXA is unable to decode a Dolby or Surround signal, ensure that the audio settings on your TV are set to PCM or Stereo. • Ensure that your TV is connected to one of the SP/DIF or TOSLINK inputs on the CXA.
TOSLINK でテレビに接続したときに音が途切れる • マニュアルの「接続方法」>「テレビの接続」の項目をご参照ください。
There are drop outs in audio when connected to a TV via Toslink • Please see the 'Getting Connected' > ‘Connecting a TV’ section in the manual.
仕様Technical specifications
連続出力 CXA81/CXA81 Mk II: 80W RMS(8 オーム)、120W RMS(4 オーム)CXA61: 60W RMS(8 オーム)、90W RMS(4 オーム)
CONTINUOUS POWER OUTPUT CXA81/CXA81 Mk II: 80W RMS into 8 Ohms, 120W RMS into 4 Ohms CXA61: 60W RMS into 8 Ohms, 90W RMS into 4 Ohms
DAC CXA81 Mk II:ES9018K2M。CXA81:ES9016K2M。CXA61:ES9010K2M。
DAC CXA81 Mk II: ES9018K2M CXA81: ES9016K2M CXA61: ES9010K2M
全高調波歪率(THD)(アンウェイテッド) 0.002% 未満(1kHz、定格出力の 80% 時)0.02% 未満(20Hz ~ 20kHz、定格出力の 80% 時)
THD (UNWEIGHTED) <0.002% 1kHz at 80% of rated power <0.02% 20Hz – 20kHz at 80% of rated power
周波数特性:<5Hz – 60kHz +/-1dB
FREQUENCY RESPONSE <5Hz – 60kHz +/-1dB
SN 比(1W、8 オーム基準) 93dB を超える
S/N RATIO (REF 1W INTO 8 OHM) >93 dB
S/N比(フルパワー基準) >105 dB
S/N RATIO (REF FULL POWER) >105 dB
入力感度 入力 A1-A4(アンバランス):370mV RMS。
INPUT SENSITIVITY Input A1-A4 (unbalanced) 370mV RMS
入力インピーダンス CXA81/CXA81 Mk II:入力 A1(バランス)50kΩ、入力 A1-A4(アンバランス)43kΩ。
INPUT IMPEDANCES CXA81/CXA81 Mk II: Input A1 (balanced) 50 kOhm Input A1-A4 (unbalanced) 43 kOhm
入力 バランス(CXA81/CXA81 Mk II のみ)、アンバランス、MP3 ジャック(CXA61 のみ)、同軸 SPDIF、TOSLINK、Bluetooth、USB オーディオ。
INPUTS Balanced ( CXA81/CXA81 Mk II only ), Unbalanced, MP3 jack ( CXA61 only ), Coax SPDIF, TOSLINK, Bluetooth, USB Audio
出力 スピーカー、ヘッドホン、プリアンプ出力、サブ出力。
OUTPUTS Speakers, Headphone, Preamplifier Output, Sub Output
パワーアンプダンピングファクター 110 を超える(1kHz)
POWER AMP DAMPING FACTOR >110 at 1kHz
USB オーディオ入力 USB Type B。USB Audio Class 1 または USB Audio Class 2 に対応(ユーザーが切り替え可能)。
USB AUDIO INPUT USB Type B conforming to USB Audio Class 1 or USB Audio Class 2 (user selectable)
Bluetooth 4.2 A2DP/AVRCP。SBC、aptX、aptX HD コーデックに対応。
BLUETOOTH 4.2 A2DP/AVRCP supporting SBC, aptX and aptX HD codecs
対応フォーマット USB Audio Class 1:最大 24 ビット 96kHz(非同期)。USB Audio Class 2:最大 24 ビット 384kHz(非同期)、DSD 256 まで対応。TOSLINK:16/24 ビット 32〜96kHz。同軸 SPDIF:16/24 ビット 32〜192kHz。
COMPATIBILITY USB Audio Class 1: Up to 24-bit 96kHz (asynchronous) USB Audio Class 2: Up to 24-bit 384kHz (asynchronous) and up to DSD-256 TOSLINK: 16/24-bit 32-96kHz Coax SPDIF: 16/24-bit 32-192kHz
最大消費電力 CXA81/CXA81 Mk II:750W。CXA61:600W。
MAX POWER CONSUMPTION CXA81/CXA81 Mk II: 750W CXA61: 600W
スタンバイ消費電力 0.5W 未満。
STANDBY POWER CONSUMPTION <0.5W
外形寸法 115 × 430 × 341mm(4.5 × 16.9 × 13.4 インチ)。
DIMENSIONS 115 x 430 x 341mm (4.5 x 16.9 x 13.4”)
質量 CXA81/CXA81 Mk II:8.7kg(19.1Lbs)。CXA61:8.3kg(18.3lbs)。
WEIGHT CXA81/CXA81 Mk II: 8.7kg (19.1Lbs) CXA61: 8.3kg (18.3lbs)
よくあるご質問(FAQ)Frequently Asked Questions (FAQ)
CXA81 のバランス入力またはアンバランス入力を選択するにはどうすればよいですか?How do I select the Balanced or Unbalanced inputs on the CXA81?
CXA81 では、A1 入力選択ボタンを押すと、バランス入力とアンバランス入力が切り替わります。バランス入力は A1 がオレンジ色に点灯し、アンバランス入力は A1 が青色に点灯します。
On the CXA81, pressing the A1 input selection button will toggle between the balanced and unbalanced inputs. The balanced input is shown by A1 being lit orange, while the unbalanced input is shown by A1 being lit blue.
CXA81 の接続方法に応じて、CXA で正しい入力が選択されていることを確認してください。誤った入力が選択されていると、アンプから音は出ません。
Please ensure that the correct input is selected on the CXA, depending on how your CXA81 is connected. If the wrong input is selected, then there will be no sound from the amplifier.
CXA61/81 の「USB Audio In」に外付け HDD を接続できますか?Can I connect an external HDD to ‘USB Audio In’ on the CXA61/81?
いいえ、CXA61/81 の「USB Audio」入力を使用して、USB ドライブや HDD を CXA61/81 に直接接続する方法はありません。CXA61/81 の「USB Audio」入力は、PC または Mac との直接接続にのみ対応しています。ただし、CXA61/81 と当社のネットワークプレーヤーを組み合わせて使用すれば、これを行うことができます。
No, there is no way to connect a USB drive or HDD directly to the CXA61/81 using its ‘USB Audio’ input. The ‘USB Audio’ input on the CXA61/81 will only support a direct connection with a PC or Mac. You will, however, be able to use one of our network players in combination with the CXA61/81 to do this.
CXA61/81 の USB Audio 入力を選択するにはどうすればよいですか?How do I select the USB Audio input on the CXA61/81?
CXA61/81 の USB Audio 入力を選択するには、本体前面にある「Bluetooth / USB Audio」ボタンを 2 回押します。
To select the USB Audio input on the CXA61/81, you will need to press the Bluetooth / USB Audio button found on the front of the unit twice.
- ボタンを 1 回押すと Bluetooth 入力が選択され、ボタンが青色に点灯します。Press the button once to select the Bluetooth input, this will then turn Blue.
- ボタンをもう一度押すと USB Audio 入力が選択され、ボタンがオレンジ色に点灯します。Press the button once again to select the USB Audio input, which will then turn Orange.
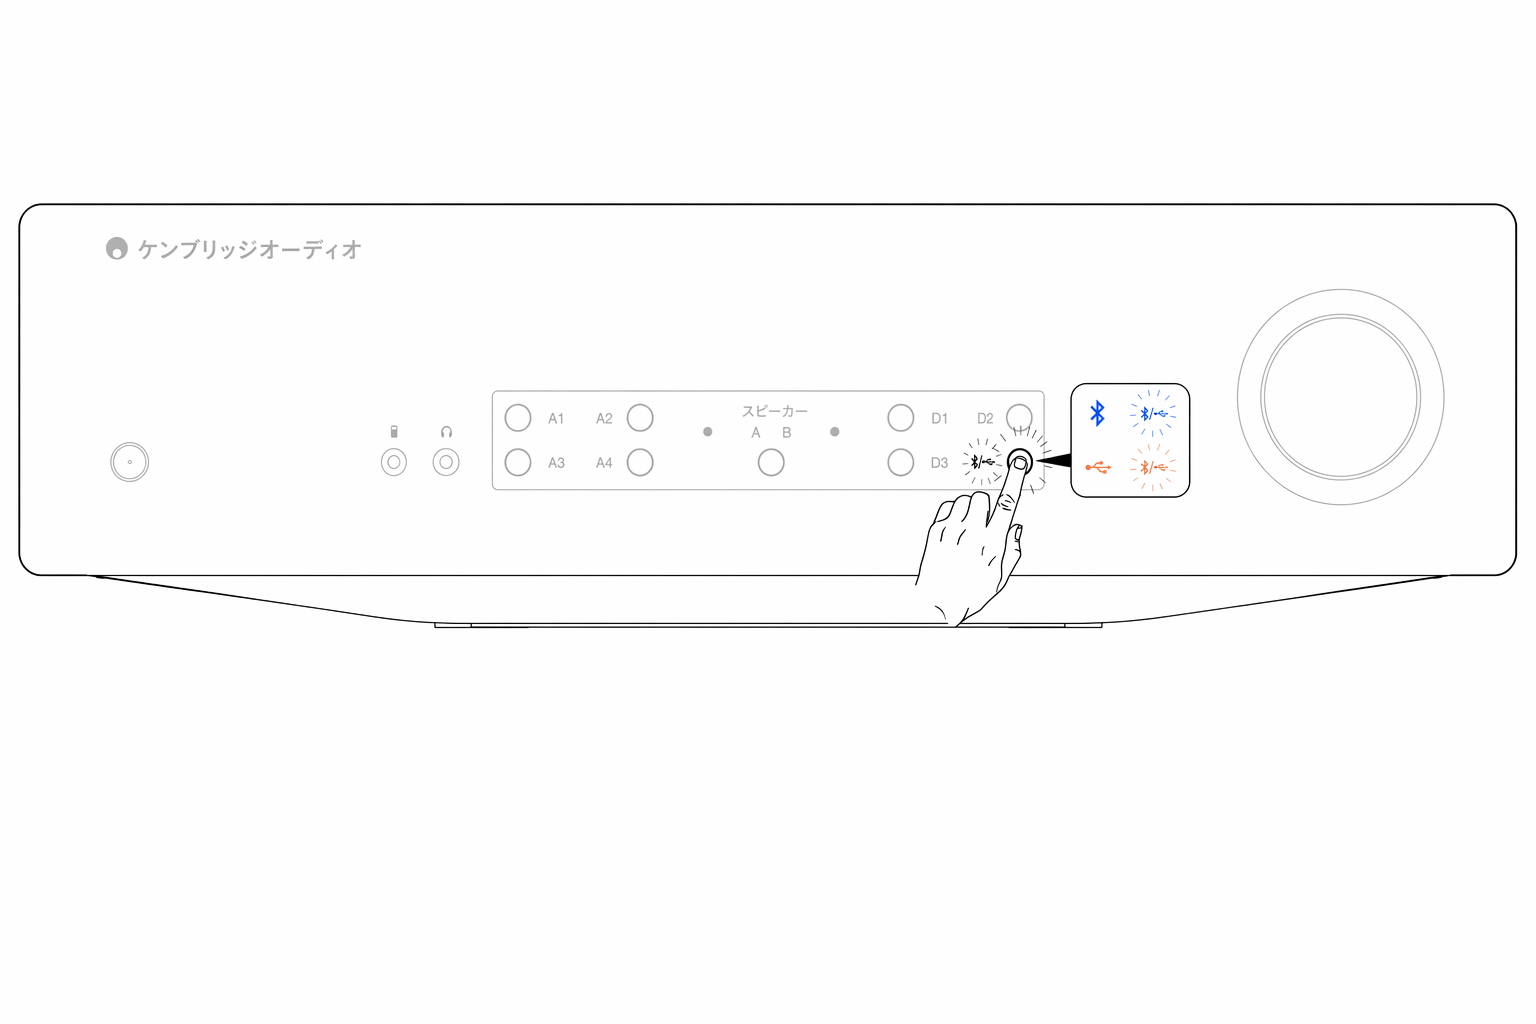
または、CX リモコンの「USB Audio」ボタンを使ってこの入力を選択できます。
Alternatively, you can select this input using by using the USB Audio button on the CX remote.
Bluetooth で接続したとき、モバイルデバイスから CXA61/81 の音量を調整できないのはなぜですか?Why can’t I adjust the volume of the CXA61/81 with my mobile device when connected via Bluetooth?
CXA61/81 で Bluetooth を使用すると、アンプの音量調整がモバイルデバイスの音量調整を引き継ぎます。モバイルデバイスは音量が固定された Bluetooth ストリームを出力し、その音量をアンプ側で調整します。
When using Bluetooth with the CXA61/81, the amplifier’s volume control takes over from the mobile devices’ volume. The mobile device then produces a Bluetooth stream of fixed level volume, which is then adjusted at the amplifier’s end.
Bluetooth 接続時にモバイルデバイスから CXA61/81 の音量を調整できないのは正常な動作です。音量は、リモコンまたは本体前面の音量ノブを使ってアンプ本体で調整できます。
It is normal behaviour for your mobile device not to be able to control the volume of the CXA61/81 when connected via Bluetooth. Volume adjustments can be made on the amplifier itself, using either the remote control or the front panel volume knob.
CXA61/81 のクロスオーバー周波数はいくつですか?What is the crossover frequency on the CXA61/81?
CXA61/81 の Sub Out 出力には 2.3 kHz のローパスフィルターが適用されています。これは、Sub Out の周波数帯域で CXA によって付加される位相を最小限に抑えるためです。これにより、Subwoofer 本体で任意のクロスオーバー周波数を設定できます。
The CXA61/81 has a low pass filter of 2.3 kHz applied at the Sub Out output. This is so that there is minimal phase added by the CXA at the Sub Out frequencies. This allows you to set your own crossover frequency on the Subwoofer itself.
スピーカーを 2 組接続した場合、CXA の出力電力はどうなりますか?What would the power output of the CXA be if I connect two pairs of speakers?
アンプにスピーカーを 2 組接続すると、合成インピーダンスは半分になります。したがって、8Ω(Ohm)のスピーカーを 2 組接続すると、各スピーカーのインピーダンスは 8Ω のまま変わりませんが、全体のインピーダンスは 4Ω になります。
When you connect two pairs of speakers to an amplifier, the combined impedance is halved. So, when two pairs of 8Ω (Ohm) speakers are connected, the overall impedance becomes 4Ω, even though the individual impedance for each speaker remains unchanged at 8Ω.
CXA61 は、8 Ohms の負荷に対してチャンネルあたり 60W RMS を出力し、4Ω では 90W RMS に増加します。
The CXA61 has a power output of 60W RMS per channel into 8 Ohms, increasing to 90W RMS into 4Ω.
このアンプの定格出力はチャンネルあたりの値です。8Ω のスピーカーを 2 組接続すると、全体のインピーダンスは半分の 4Ω になるため、チャンネルあたり 90W が出力されます。この出力は、そのチャンネルに接続された 2 台のスピーカーに分配され、各スピーカーには 45W が送られます。
This quoted amplifier power rating is per channel. If you attach 2 pairs of 8Ω speakers, the overall impedance halves to 4Ω, so you'll be sending 90W per channel. This will then split between the two speakers attached to that channel, sending 45W to each speaker.
CXA81 も上記と同様ですが、CXA81 の出力は 80W RMS で、4Ω では 120W に増加します。そのため、CXA81 で 2 組のスピーカーを使用すると、各スピーカーには 60W が供給されます。
For the CXA81 the same as above will apply but as the CXA81 outputs 80W RMS which is increased to 120W at 4Ω. This means you will get 60W for each speaker when two pairs are used with the CXA81.
CXA61/81 に 4 Ohm または 6 Ohm のスピーカーを 2 組接続することは推奨されません。インピーダンスが半分になり、それぞれ 2 Ohms または 3 Ohms になるためです。これにより、アンプに過大な負荷がかかって CAP5 保護機能が作動したり、アンプやスピーカーが損傷したりするおそれがあります。
It is not recommended to connect 2 pairs of 4 Ohm or 6 Ohm speakers to the CXA61/81, as the impedance is halved meaning the impedance will be 2 Ohms or 3 Ohms respectively. This could result in the amplifier being driven too hard and CAP5 protection being activated, or damage being done to the amplifier and/or speakers.
CXA61/81 は USB Audio 入力を介して 32-bit ファイルを再生できますか?Will the CXA61/81 playback 32-bit files via the USB Audio input?
CXA のハードウェアは USB Audio 入力を介した 32-bit 音声を処理できますが、USB インターフェースはホストを 24-bit 対応としてのみ認識します。
Whilst the CXA's hardware is capable of handling 32-bit audio via the USB Audio input, the USB interface is reporting the host to be only 24-bit capable.
32-bit ファイルを再生しようとすると、USB ドライバーが下位ビット情報を取り除いて 24-bit に変換します。
If you attempt to play 32-bit files, the USB driver will convert them to 24-bit by removing the least significant information.
安全にお使いいただくためにSafety Instructions
Click here to view