
取扱説明書
CXC v2
はじめにIntroduction
このガイドは、本製品の設置と使用をできる限り簡単に行えるように作成されています。本書の情報は印刷時点で正確であることを入念に確認していますが、Cambridge Audio は継続的な改善を方針としているため、設計および仕様は予告なく変更される場合があります。
This guide is designed to make installing and using this product as easy as possible. Information in this document has been carefully checked for accuracy at the time of printing; however, Cambridge Audio’s policy is one of continuous improvement, therefore design and specifications are subject to change without prior notice.
本書には著作権で保護された専有情報が含まれています。すべての権利は留保されています。本マニュアルのいかなる部分も、メーカーの事前の書面による許可なく、機械的、電子的、その他の手段を問わず、いかなる形式でも複製することはできません。すべての商標および登録商標は、それぞれの所有者に帰属します。
This document contains proprietary information protected by copyright. All rights are reserved. No part of this manual may be reproduced by any mechanical, electronic or other means, in any form, without prior written permission of the manufacturer. All trademarks and registered trademarks are the property of their respective owners.
© Copyright Cambridge Audio Ltd
© Copyright Cambridge Audio Ltd
今後の製品に関する最新ニュース、ソフトウェアアップデート、限定オファーを受け取るには、https://www.cambridgeaudio.com/register で製品を登録してください。
For upcoming news on future products, software updates and exclusive offers, make sure you register your product at https://www.cambridgeaudio.com/register
このマニュアル内の画像の一部は、元の PDF から自動生成されたものです。自動処理の都合上、製品の細部や配線図などが実際と異なる場合があります。正確な形状・寸法・配線は、実機および製品ページの写真、同梱の正規マニュアル(英語版)をあわせてご確認ください。
CXC の付属品What's included with the CXC?
CXC の箱には、次のものが入っています:Inside the box of your CXC you will receive:
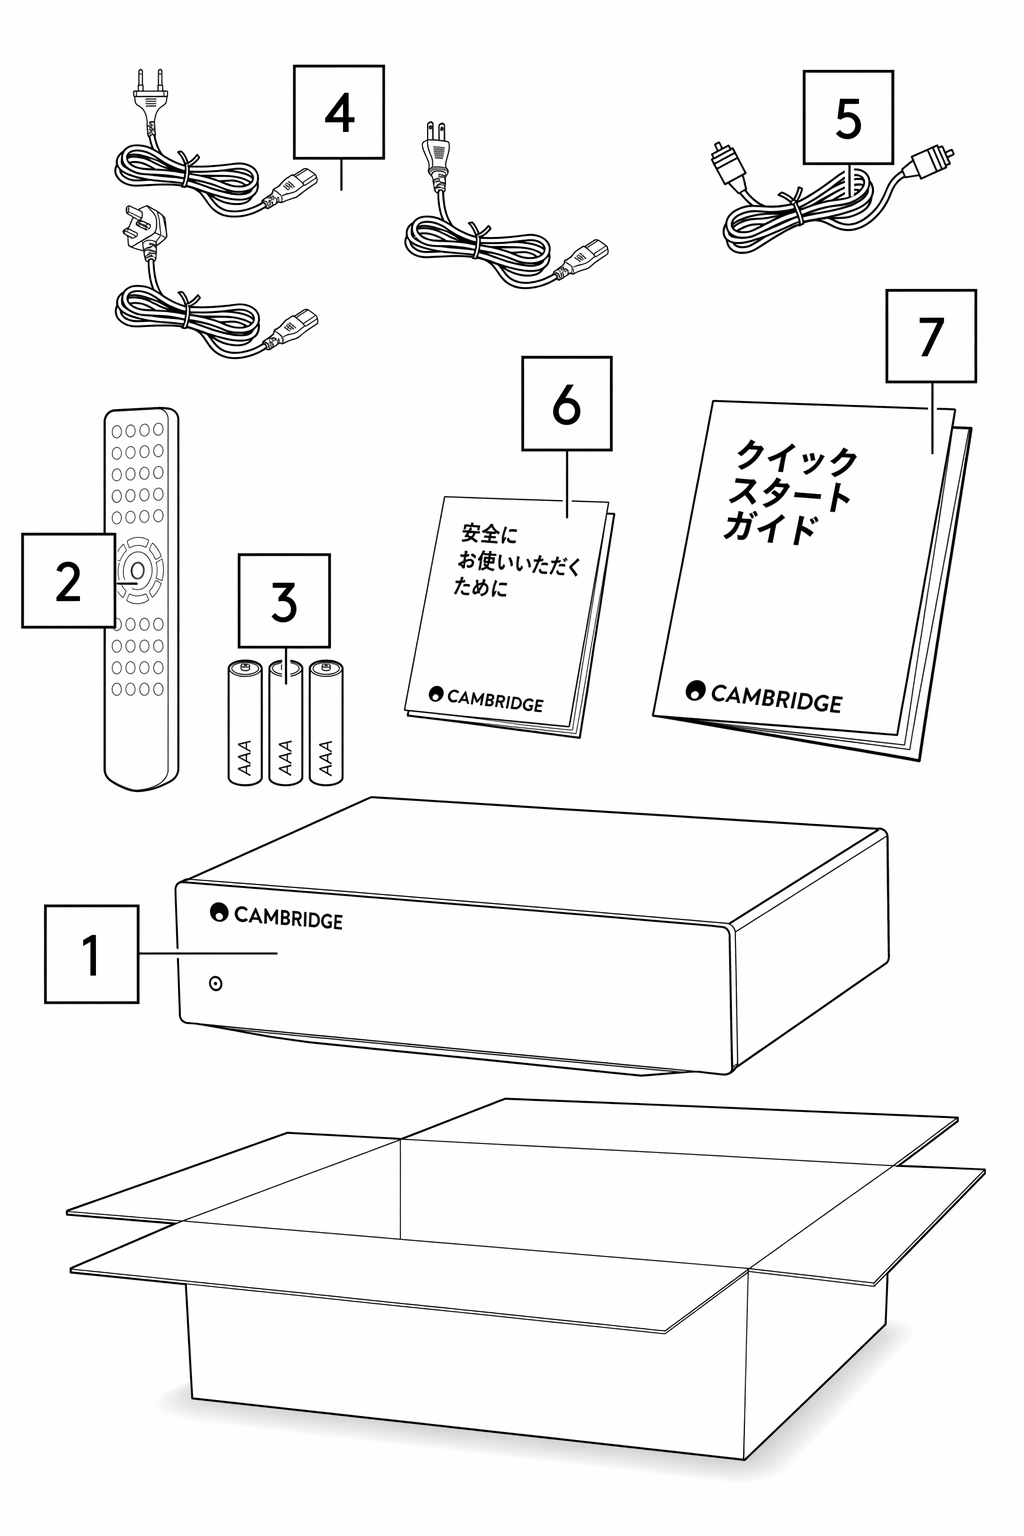
1. CXC CD トランスポート 2. リモコン 3. AAA 電池 3 本 4. 英国用電源コード(5A ヒューズ付き)(CXC を購入した国によって異なります)、EU 用電源コード(CXC を購入した国によって異なります)、CU 用電源コード(CXC を購入した国によって異なります) 5. オレンジ色のコントロールバスケーブル。6. 安全ガイド 7. クイックスタートガイド
1. CXC CD Transport 2. Remote Control 3. 3 x AAA Batteries 4. UK power cord (5A fused) (Depending on which country the CXC was purchased in), EU power cord (Depending on which country the CXC was purchased in), CU power cord (Depending on which country the CXC was purchased in) 5. Orange Control bus cable. 6. Safety Guide 7. Quickstart Guide
フロントパネルの操作部Front panel controls
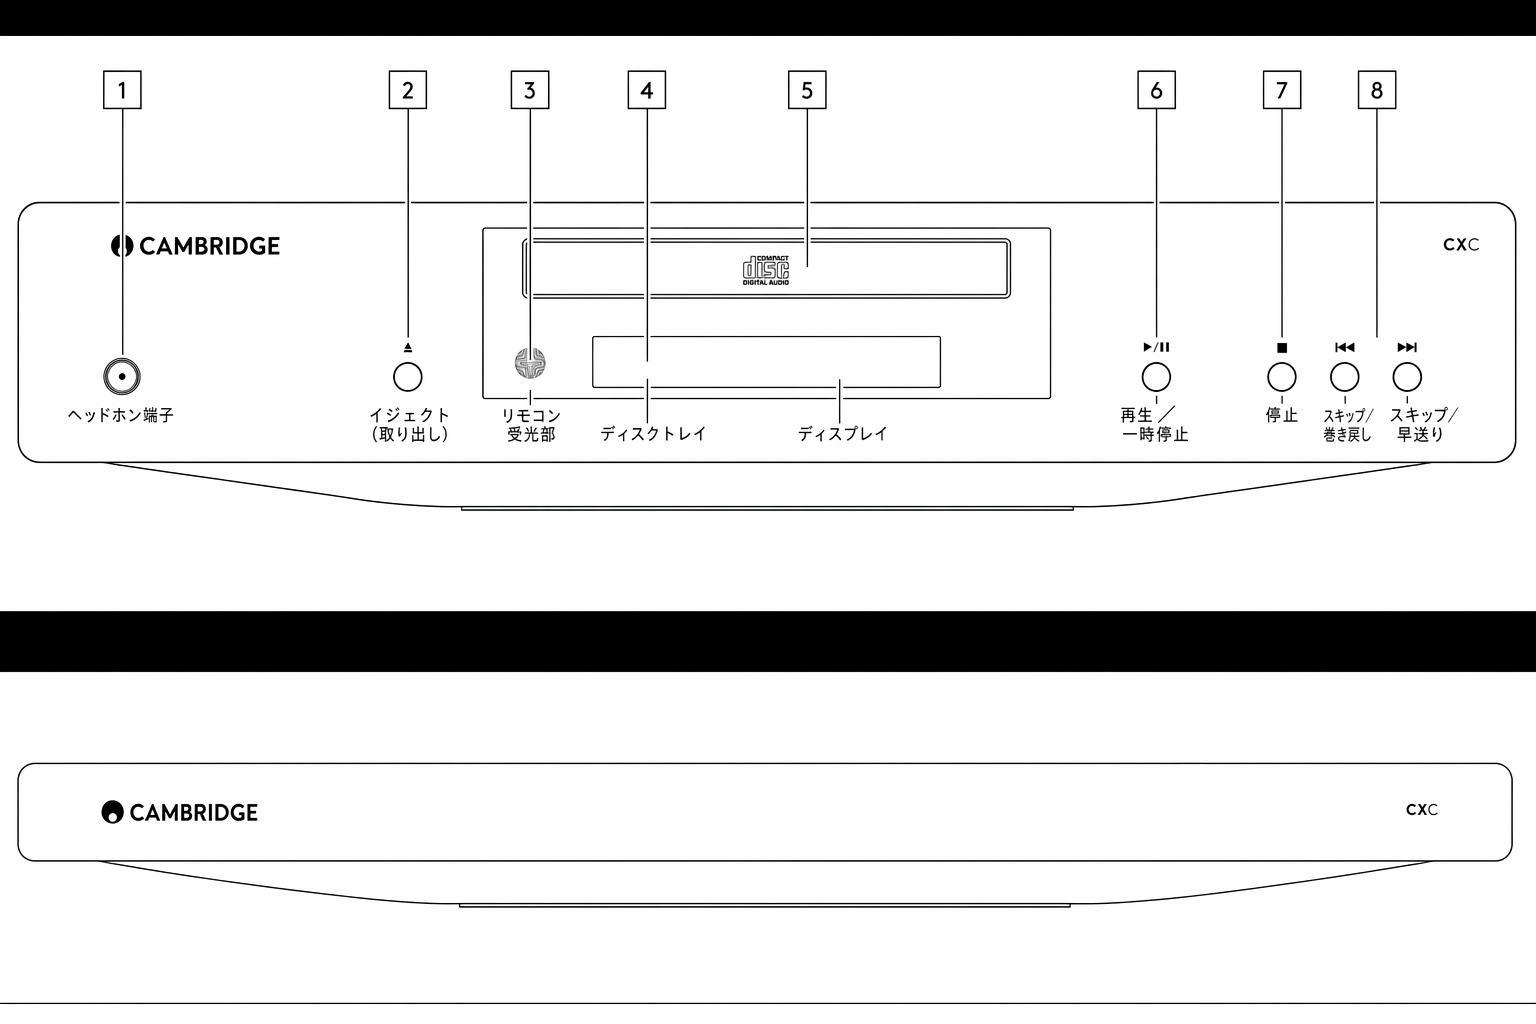
1. Standby/On — 本機を低消費電力のスタンバイモード(暗い電源 LED で表示)とオン(明るい電源 LED で表示)に切り替えます。CXC では Auto Power Down(APD)が初期設定で有効になっており、30 分間操作がないと本機は自動的にスタンバイに切り替わります。
1. Standby/On – Switches the unit between low-power standby mode (indicated by a dim power LED), and on (indicated by a bright power LED). The CXC has Auto Power Down (APD) enabled by default, and the unit will automatically switch to standby after 30 minutes of inactivity.
2. Open/Close Button — CXC のディスクローディングトレイを開閉します。
2. Open/Close Button – Opens or closes the CXC’s disc loading tray.
3. Infrared Receiver — CXC のリモコンから赤外線コマンドを受信します。正しく動作させるには、赤外線レシーバーと CXC のリモコンの間に遮るものがないことが必要です。
3. Infrared Receiver – Receives infrared commands from the CXC remote. For correct operation there must be a clear line of sight between the infrared receiver, and the CXC remote control
4. Display — ディスプレイには、現在選択されているソースとさまざまな再生情報が表示されます。
4. Display – The display shows the current selected source and a variety of playback information.
5. Disc Tray — コンパクトディスクの読み込みに使用し、Open/Close ボタンで操作します。
5. Disc Tray – Used for the loading of compact discs, operated by the Open/Close button.
6. Play/Pause Button — セットしたディスクを再生する、または再生を一時停止するには押します。注:ディスクトレイが開いているときにこのボタンを押すと、トレイが閉じます。
6. Play/Pause Button – Press to play a loaded disc or pause playback. Note : Pressing this button whilst the disc tray is open will close the tray.
7. Stop Button — CD の再生を停止します。
7. Stop Button – Stops CD playback.
8. Skip/Scan Buttons — CD のトラックをスキップするには押します。いずれかのボタンを押し続けると、現在のトラックを早送りまたは巻き戻しします。Skip/Scan ボタンはメニュー操作にも使用します。
8. Skip/Scan Buttons – Press to skip CD tracks. Pressing and holding either button will scan forwards or backwards through the current track. The skip/scan buttons are also used for menu navigation.
ディスプレイの機能Display functions
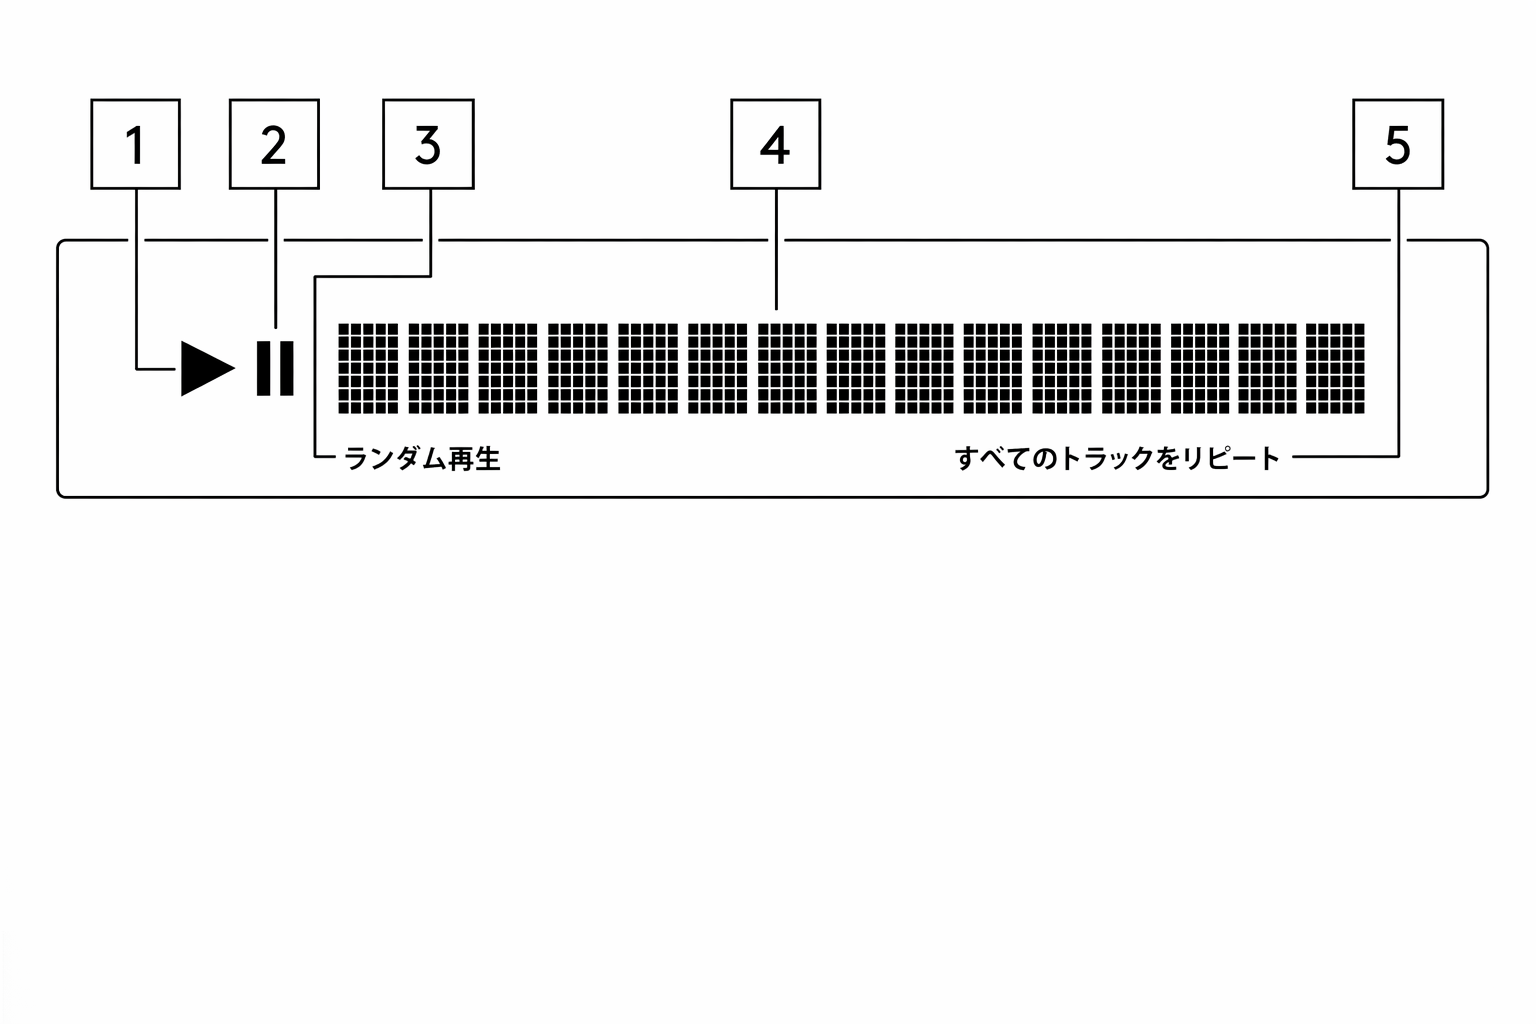
1. Play — ディスク再生中に点灯します。
1. Play – Illuminated during disc playback.
2. Pause — ディスクの再生が一時停止中であることを示します。
2. Pause – Indicates that disc playback has been paused.
3. Display — CD のトラック数や CD の合計再生時間など、再生情報を表示します。
3. Display - Shows playback information including the number of tracks on the CD and the total length of the CD.
4. Random — 「random」再生モードが選択されていることを示します。このモードでは、セットした CD のトラックの再生順がランダムになります。
4. Random – Indicates that ‘random’ playback mode has been selected. This will randomise the playback order of the loaded CDs tracks.
5. Repeat All/Track — 「Repeat All」が選択されているときに点灯し、CD 全体がリピートされること、または「Repeat Track」
5. Repeat All/Track – Illuminated when ‘Repeat All’ is selected, indicating that the whole CD will be repeated, or ‘Repeat Track’
リアパネルの接続Rear panel connections
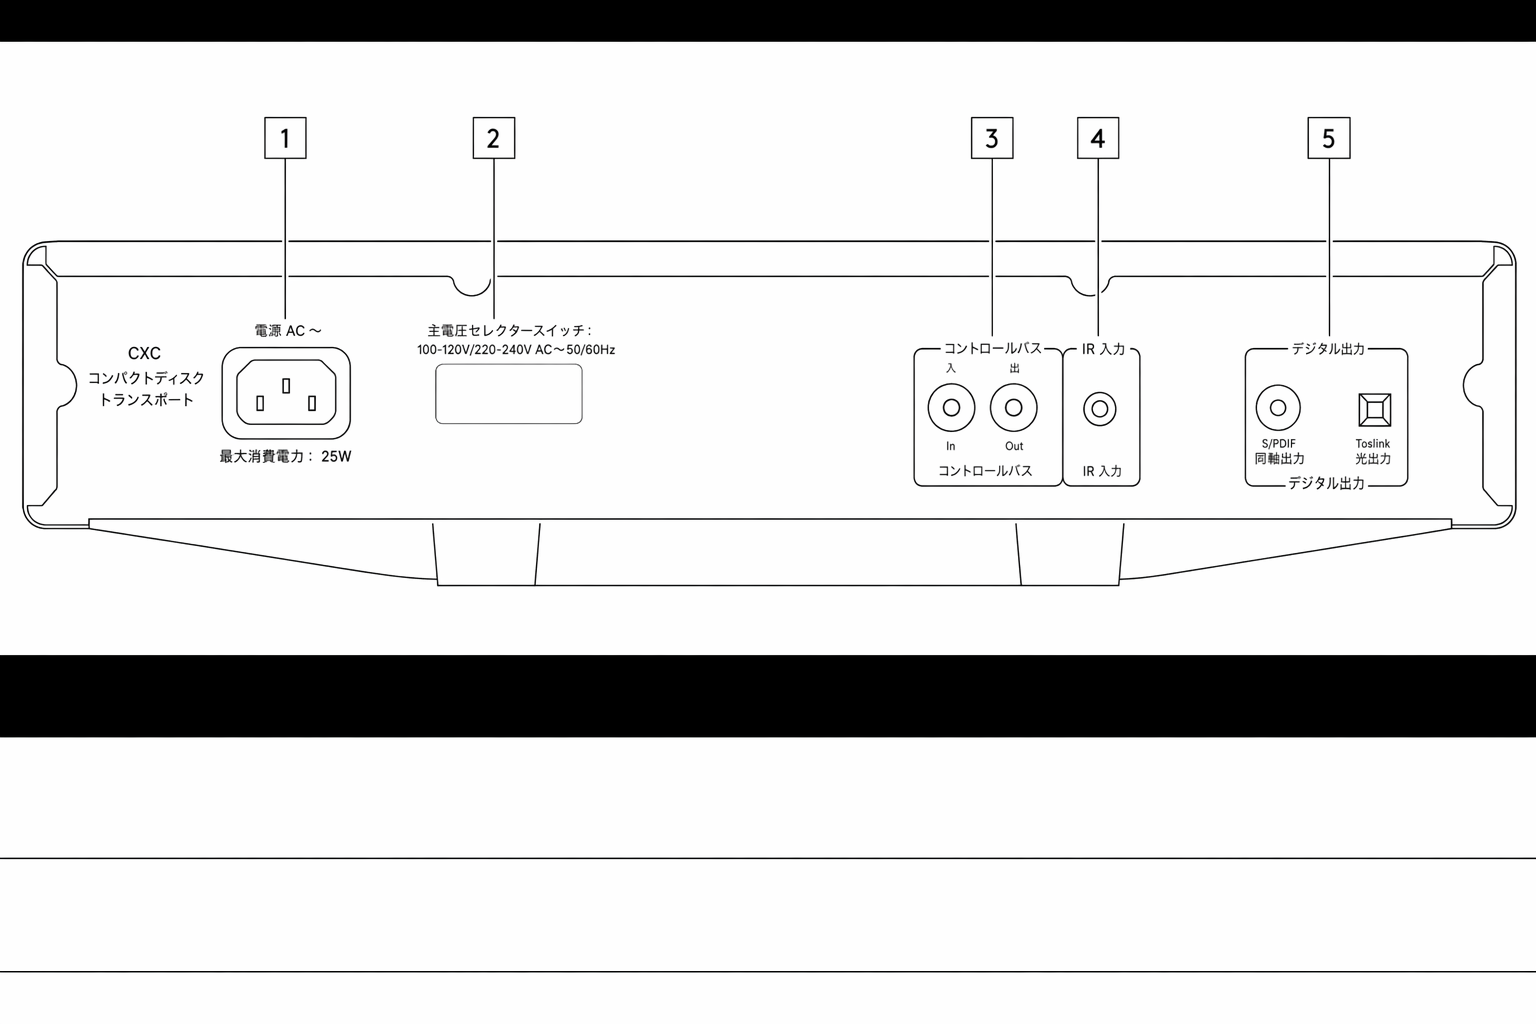
1. AC Power Socket — CD プレーヤーへのすべての接続が完了したら、AC 電源ケーブルを適切な電源コンセントに接続してから電源を入れます。CD プレーヤーを使用する準備が整いました。
1. AC Power Socket – Once you have completed all connections to the CD player, plug the AC power cable into an appropriate mains socket then switch on. Your CD player is now ready for use.
2. Mains Voltage Selector Switch — CXC の主電源電圧を 115V と 230V の間で切り替えます。
2. Mains Voltage Selector Switch – Switches the CXC mains voltage between 115V and 230V.
注:認定された Cambridge Audio のサービス担当者のみが使用してください。
Note : For use by certified Cambridge Audio service personnel only.
3. Control Bus — 接続された他の CX シリーズ製品との間で電源および音量コマンドを送受信するための RCA 端子です。Control Bus の詳細については、「Control Bus」セクションを参照してください。
3. Control Bus – RCA sockets used to send and receive power and volume commands from other connected CX Series products. For more information on the Control Bus, see Control Bus section.
4. IR In — IR リピーターまたはカスタムインストールシステムからの変調 IR コマンドを CD プレーヤーで受信できます。IR In 端子で受信したコマンドは、Control Bus からループ出力されません。注:IR 入力から電源は供給されないため、この入力に接続する機器には独自の電源が必要です。
4. IR In – Allows modulated IR commands from an IR repeater or custom install systems to be received by the CD player. Commands received by the IR In socket are not looped out of the Control Bus. Note : The IR input doesn’t provide any power, so any device connected to this input will need to have its own power source.
5. Digital Outputs — CXC には 2 系統のデジタル出力があります。短距離で高品質な伝送が可能な TOSLINK 光出力と、長距離の接続に使用できる S/P DIF 同軸出力が 1 系統ずつあります。S/P DIF を使用する場合は、最良の結果を得るため、高品質な 75-ohm デジタル RCA インターコネクトケーブル(通常のオーディオ用途向けに設計されたものではありません)を使用してください。TOSLINK を使用する場合は、最良の結果を得るため、オーディオ用途向けに設計された高品質な光ファイバー・インターコネクトケーブルを使用してください。
5. Digital Outputs – The CXC has two digital outputs. One TOSLINK optical which can provide high quality transfer over shorter distances, and one S/P DIF coaxial which can be used for longer connections. For best results via S/P DIF use a high-quality 75-ohm digital RCA interconnect cable (not one designed for normal audio use). For best results via TOSLINK use a high-quality fibre optic interconnect cable designed for audio use.
リモコンRemote control
CXC には、フロントパネルの操作機能を再現し、他の CX シリーズ製品も操作できるリモコンが付属しています。リモコンを使用する前に、付属の AAA 電池を装着してください。
The CXC is supplied with a remote-control handset that duplicates the front panel control functions and is also able to control other CX series products. The supplied AAA batteries must be fitted before the remote control can be used.
| 1. Brightness — CXC ディスプレイのバックライトを、Bright、Dim、Off の 3 段階の明るさ設定で切り替えます。2. Standby/On — 本機をオンと低消費電力のスタンバイの間で切り替えます。3. Play — セットした CD を再生するには押します。4. Pause — CD の再生を一時停止するには押します。5. Stop — CD の再生を停止するには押します。6. Open/Close Button — CXC のディスクローディングトレイを開閉します。7. Scan — 選択したトラック内をスキャンするには押し続けます。スキャン速度を上げるには 7 秒間押し続けます。右ボタンを押すと早送り、左ボタンを押すと巻き戻しします。8. Skip — 左ボタンを押すと 1 トラック前にスキップし、右ボタンを押すと 1 トラック先にスキップします。9. Repeat — 1 回押すと「repeat all」となり、CD 全体を繰り返し再生します。トラックの再生中に 2 回押すと、そのトラックだけを繰り返し再生します。10. Random — CD 全体をランダムな順序で再生するには押します。注:「repeat」および「random」ボタンは、ディスプレイのバックライトが「Bright」または「Dim」モードのときにのみ機能します。「Off」に設定すると、これらの機能は応答しません。リモコンが機能しない場合は、電池の使用期限が切れていないこと、またフロントパネルの IR レシーバーを遮るものがないことを確認してください。1. Brightness – Switches the CXC display backlight between three brightness settings: Bright, Dim, and Off. 2. Standby/On - Switches the unit between on and low power standby. 3. Play – Press to play the loaded CD. 4. Pause – Press to pause CD playback. 5. Stop – Press to stop CD playback. 6. Open/Close Button - Opens or closes the CXC’s disc loading tray. 7. Scan - Press and hold to scan within the selected track. Hold down for seven seconds to increase scan speed. Press the right button to fast forward, the left button to rewind. 8. Skip – Press the left button to skip backwards one track and press the right button to skip forward one track. 9. Repeat – Press once to ‘repeat all’, repeating the entire CD. Press twice whilst playing a track to repeat that specific track. 10. Random – Press to play the entire CD in a randomised order. Note : the ‘repeat’ and ‘random’ buttons will function only when the display backlight is in either 'Bright' or 'Dim' modes. If it is set to 'Off', these functions do not respond. If the remote control will not function, please check that the batteries have not expired, and that there is nothing blocking the front panel IR receiver. |
|---|
接続Getting connected
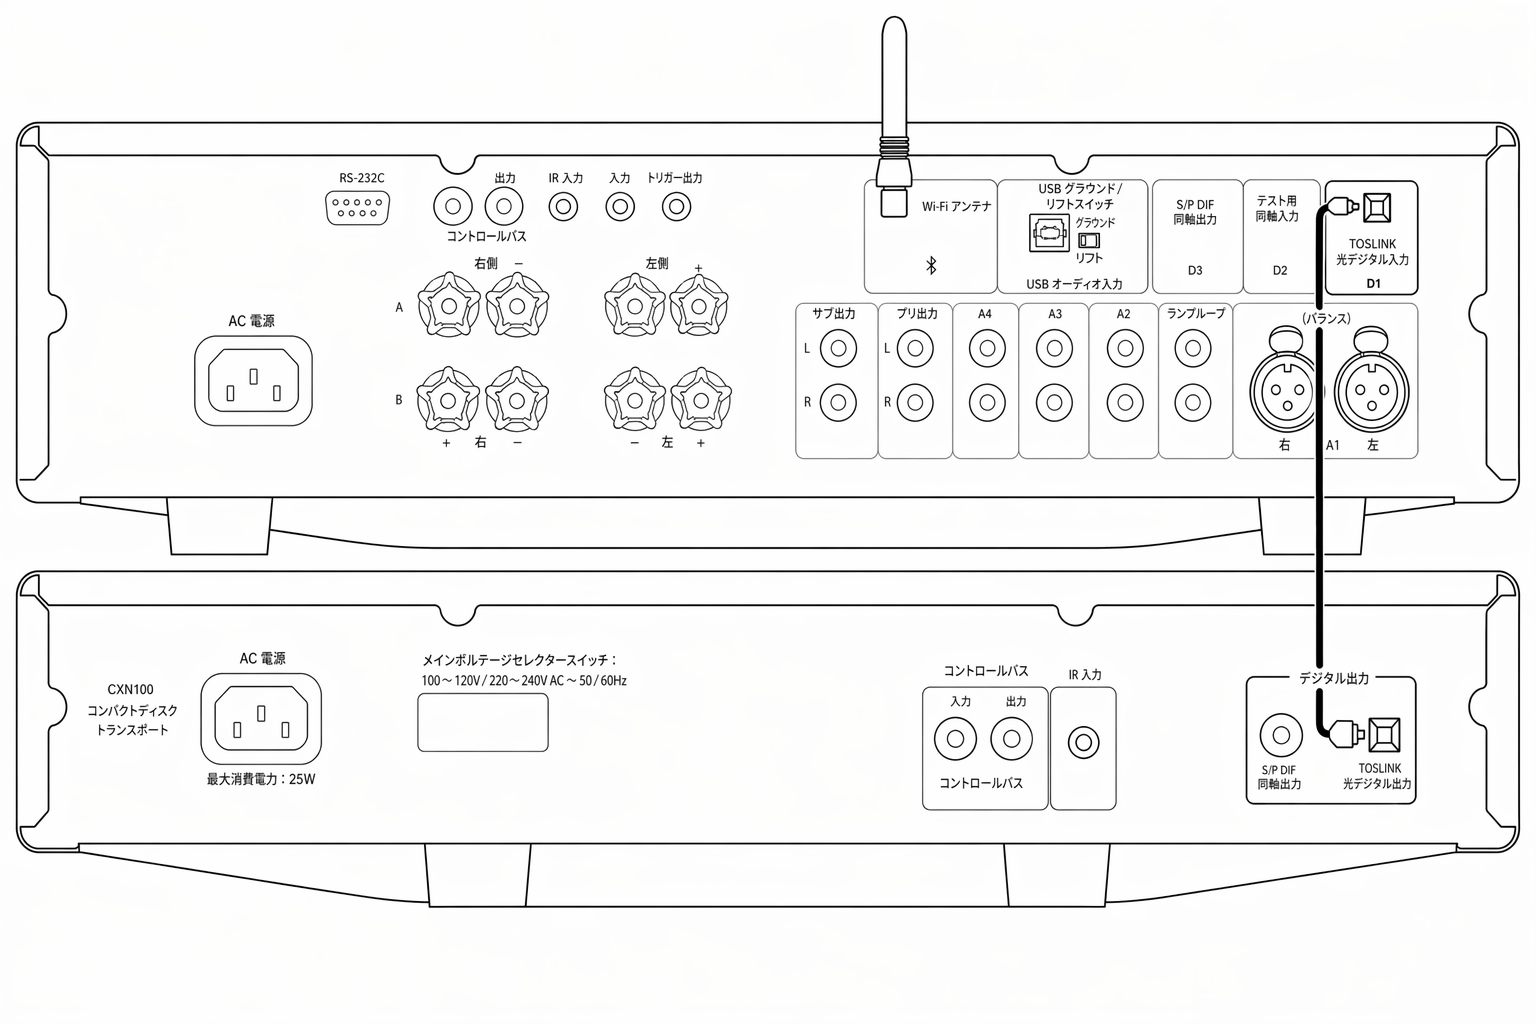
TOSLINK 光による CXC と CXA81 の接続:CXC connection with CXA81 via TOSLINK optical:
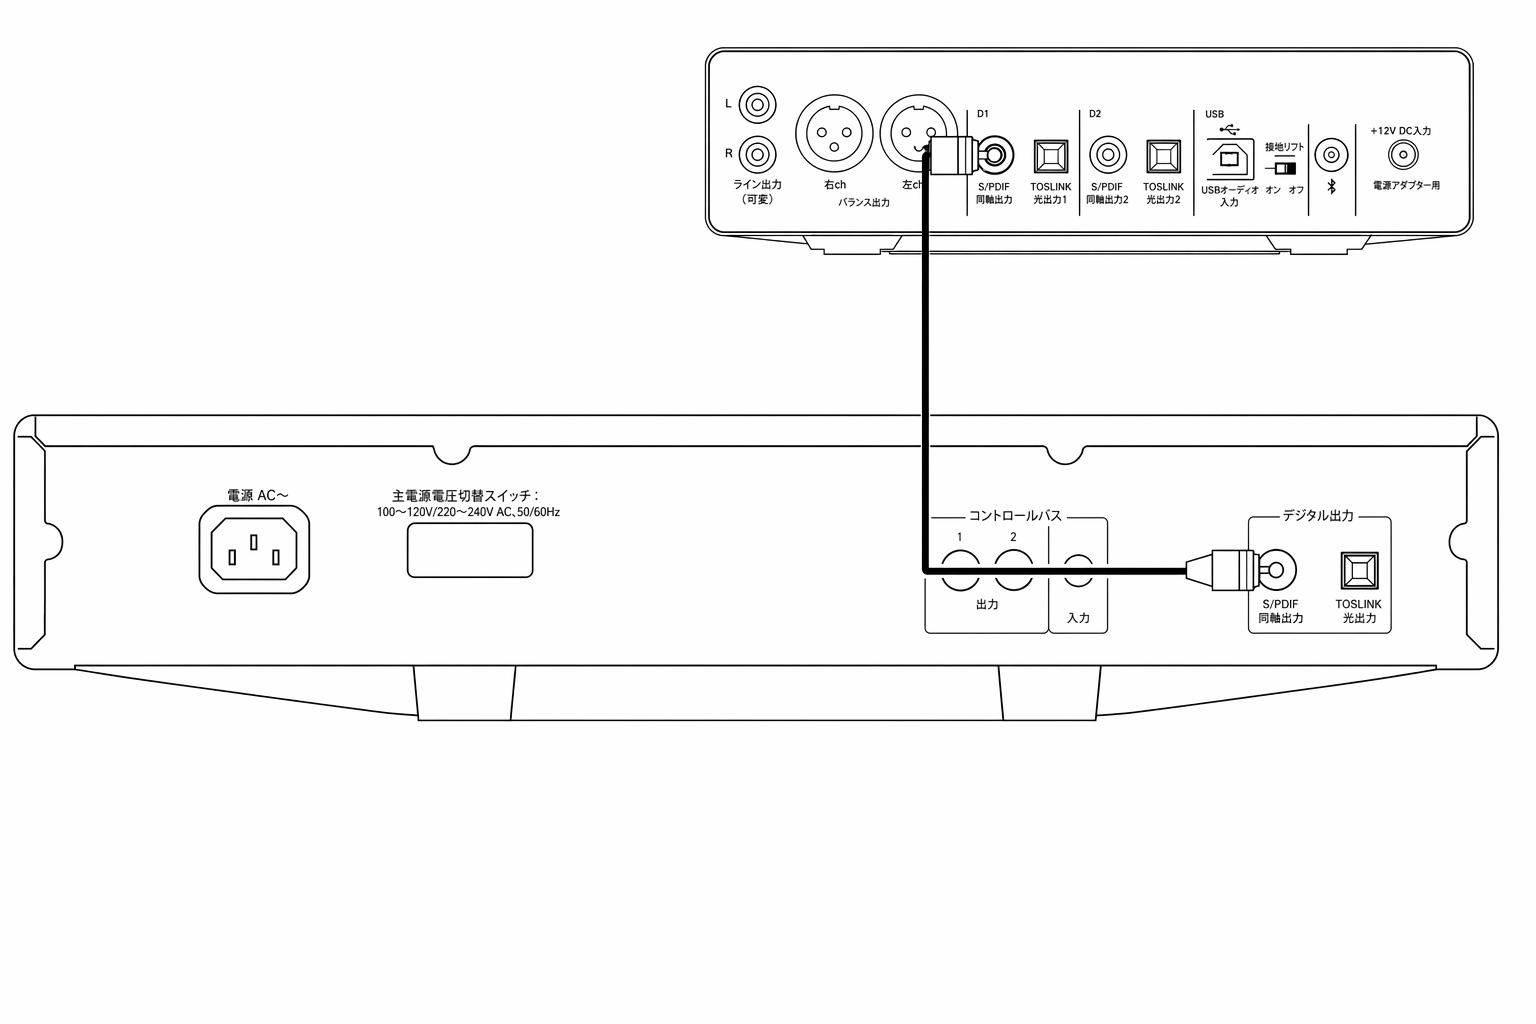
S/P DIF 同軸による CXC と DacMagic 200M の接続:CXC connection with DacMagic 200M via S/P DIF Coaxial:
初期設定Initial setup
- CXC を、使用する DAC、プリメインアンプ、またはネットワークストリーマーのデジタル入力に接続します。短距離で高品質な伝送を行う場合は、TOSLINK 光出力を使用してください。長距離接続には、S/P DIF 同軸出力を使用してください。Connect your CXC to the digital input of your chosen DAC, integrated amplifier, or network streamer. For high quality transfer over shorter distances use the TOSLINK optical output. For longer distance connections use the S/P DIF coaxial output.
- 使用する DAC、プリメインアンプ、またはネットワークストリーマー間の出力接続およびスピーカー接続が確実に接続されていることを確認します。Confirm that any output, and speaker connections between your chosen DAC, integrated amplifier, or network streamer are secure.
- 付属の電源ケーブルを使用して CXC を電源コンセントに接続します。Connect the CXC to a mains socket using the included power cable.
- 本機の電源を入れ、ディスクトレイを開いて、読み込む CD をセットします。Power on the unit, open the disc tray, and insert a CD to be loaded.
本機に電源が入らない場合は、次の手順を確認してください:If there is no power to the unit, please see the following steps:
- 付属の電源ケーブルが CXC 背面の電源アダプターソケットにしっかり接続されていることを確認します。Check that the supplied power cable is securely connected to the power adaptor socket on the rear of the CXC.
- 電源ケーブルが電源コンセントにしっかり接続され、コンセントのスイッチがオンになっていることを確認します。Confirm that the power cable is securely connected to the mains socket, and that the socket is switched on.
スピーカーからハム音が聞こえる場合は、すべてのケーブル接続が確実であることを確認してください。If there is a hum coming from the speaker, please ensure that all cable connections are secure.
CX シリーズ機器の接続Connecting CX series equipment
CXA81 と組み合わせた、S/P DIF による CXC と CXN V2 の接続:CXC connected to a CXN V2 via S/P DIF alongside a CXA81:
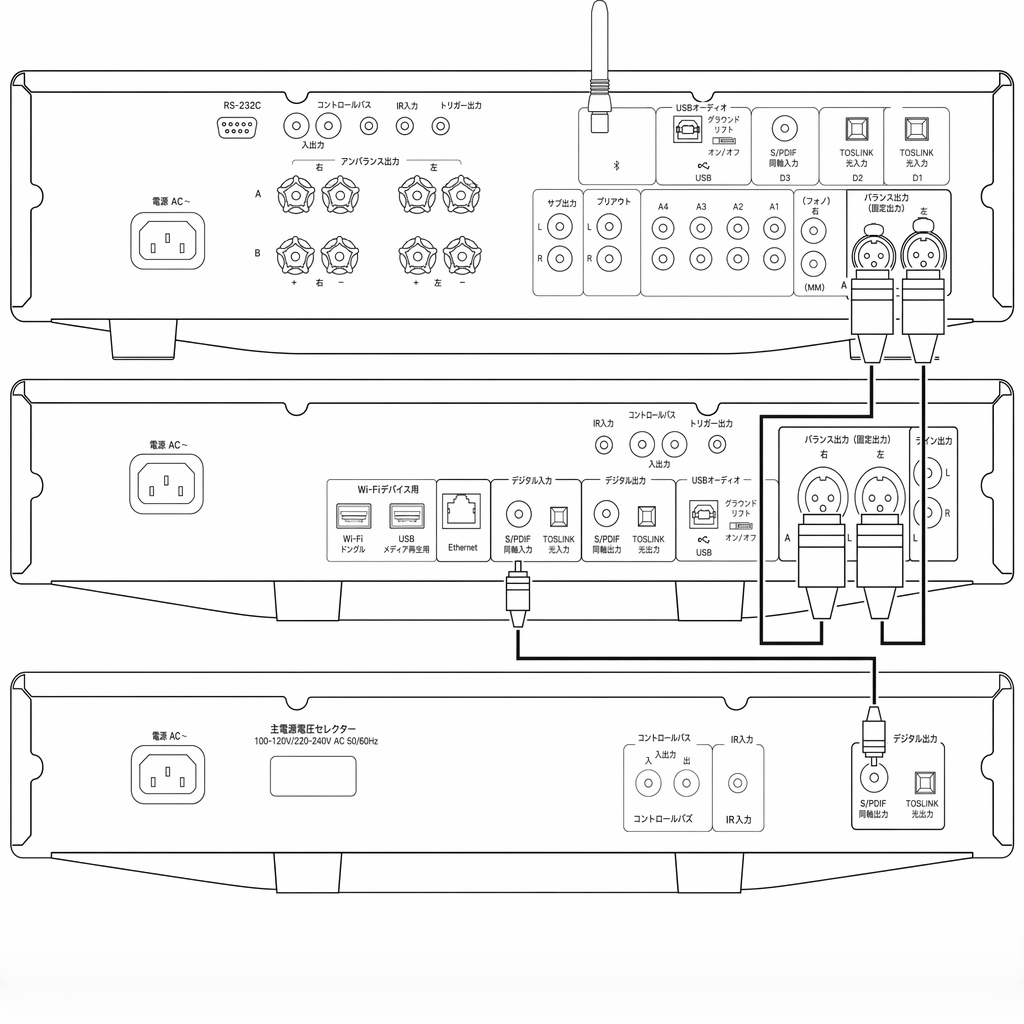
CXN V2 と CXA61/81 はいずれも、音質傾向の異なる高品質な内蔵 DAC を搭載しています。CXC、CXN V2、CXA61/81 の接続をいろいろ試して、好みの音質を確認することをおすすめします。
Both the CXN V2, and the CXA61/81 use high quality internal DACs with differing sound profiles. It is worth experimenting with connections between the CXC, the CXN V2, and the CXA61/81 to see which you prefer.
CXN V2 の内蔵 DAC を使用して CXC を CXN V2 および CXA61/81 に接続するには:To connect the CXC to a CXN V2 and CXA61/81 using the internal DAC of the CXN V2:
- 短い接続には S/P DIF、長い接続には TOSLINK 光のいずれかを使用して、CXC を CXN V2 のデジタル入力の 1 つに接続します。Connect the CXC to one of the digital inputs on the CXN V2 using either S/P DIF for a shorter connection, or TOSLINK optical for a longer connection.
- CXN V2 の出力を、バランス XLR(CXA81 のみ)またはアンバランス RCA を使用して、CXA61/81 のアナログ入力の 1 つに接続します。Connect the CXN V2 outputs to one of the analogue inputs of the CXA61/81 via balanced XLR (CXA81 only), or unbalanced RCA.
- これで CXN V2 で CXC をオーディオソースとして選択し、高品質な CD 再生を行えるようになります。You will now be able to select the CXC as an audio source on the CXN V2 for high quality CD playback.
または、S/PDIF入力またはいずれかのTOSLINK光入力を使用して、CXCをCXA61/81に直接接続することもできます。この場合、CXA61/81の内蔵DACが使用されます。
Alternatively, the CXC can be connected directly to the CXA61/81 using the S/P DIF input, or one of the TOSLINK optical inputs. This will then use the internal DAC of the CXA61/81.
CXCの2つのデジタル出力は同時にアクティブになるため、CXCをCXN V2とCXA61/81の両方に同時に直接接続して、2通りのリスニング環境を選択することもできます。
As both digital outputs on the CXC are active at the same time it is also possible to connect the CXC directly to both the CXN V2, and CXA61/81 simultaneously giving you the option of two separate listening experiences.
S/PDIF経由でCXN V2を、TOSLINK光経由でCXA81をCXCに接続:CXC connected to a CXN V2 via S/P DIF, and a CXA81 via TOSLINK optical:
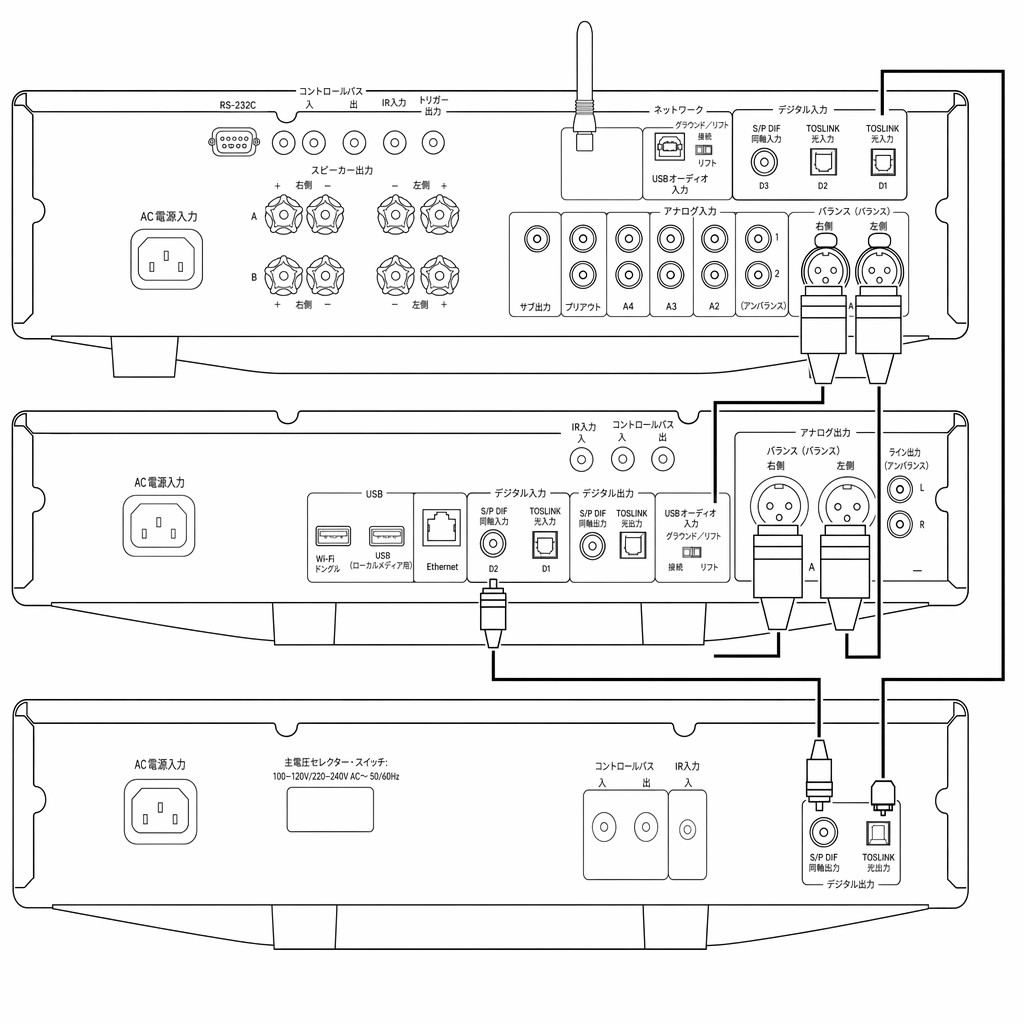
上記の構成では、CXCでCXN V2の内蔵DACとCXAの内蔵DACのどちらを使用するかを選択できます。
With the above configuration you would be able to choose whether the CXC uses the internal DAC of the CXN V2, or that of the CXA.
注:最適な性能を得るには、CXA61/81またはDacMagic 200MにTOSLINKで接続する場合は「D1」入力を使用してください。または、「D2」入力を使用する場合は、「TV Mode」が無効になっていることを確認してください。
Note : For optimal performance use the ‘D1’ input when connected to a CXA61/81, or DacMagic 200M via TOSLINK. Alternatively, if using the ‘D2’ input, ensure that ‘TV Mode’ is disabled.
操作方法Operating instructions

CXCは次のディスクのみを再生するように設計されています:The CXC has been designed to only play:
- コンパクトディスク、Compact discs,
- 記録可能なCD(CD-R)Recordable CDs (CD-R)
- 上記の識別ロゴが付いた書き換え可能なCD(CD-RW)Re-writable CDs (CD-RW) bearing the identification logo shown above
注:CD-R/CD-RWディスクには、再生できるように、正しく記録されたTOC(目次)情報が含まれている必要があります。
Note : Any CD-R/CD-RW discs should contain properly recorded TOC (Table of Contents) information so that they can be played back.
CXCで再生できるのは、音楽再生用に設計されたCD-DA形式で記録されたディスクのみです。MP3またはWMAファイルが保存されたPC用CD-ROMなど、その他のデータを含むディスクを再生しようとしないでください。
The CXC can play only the discs recorded in the CD-DA format designed for music reproduction. Do not attempt to play a disc containing other data, such as a CD-ROM for PCs with MP3 or WMA files.
ディスクの出し入れLoading and unloading discs
- フロントパネルまたはリモートコントロールの「Open/Close」ボタンを押して、CXCのディスクトレイを開いてください。Using the front panel or remote control, press the ‘Open/Close’ button to open the CXC disc tray.
- ディスクトレイが完全に開いたら、ラベル面を上にして、ディスクをトレイに慎重に置いてください。Once the disc tray has fully opened, carefully place a disc into the tray with the label side facing upwards.
- 「Open/Close」ボタンをもう一度押してディスクトレイを閉じてください。トレイが完全に閉じると、CXCがディスクを読み取り、内容情報を表示します。Close the disc tray by pressing the ‘Open/Close’ button again. When the tray has fully closed the CXC will read the disc and display the content information.
- 再生中はいつでも、フロントパネルの「Open/Close」ボタンまたはリモートコントロールにある「Open/Close」ボタンを使用してディスクトレイを開けます。挿入したディスクは、ディスクトレイが完全に開いてから取り出してください。The disc tray can be opened at any time during playback using either the front panel ‘Open/Close’ button, or the one located on the remote control. Only remove an inserted disc after the disc tray has fully opened.
重要な情報Important information
- メカニズムが損傷するおそれがあるため、ディスクトレイにはコンパクトディスク以外のものを入れないでください。Do not put anything except for a compact disc into the disc tray as this can damage the mechanism.
- 開閉操作中にトレイを手で無理に動かさないでください。Do not force the tray by hand during opening and closing operations.
- 汚れやほこりがメカニズムに入らないように、使用しないときはディスクトレイを閉じておいてください。To avoid dirt and dust entering the mechanism, keep the disc tray closed when not in use.
- 読み込もうとしているコンパクトディスクにひどい傷や汚れがある場合、プレーヤーがディスクを読み取れない、または再生できないことがあります。If the compact disc that you are attempting to load is badly scratched or dirty, the player may be unable to read or play it.
- ディスクトレイに複数のディスクを同時に入れようとしないでください。Never attempt to load multiple discs into the disc tray at any time.
通常のディスク再生Normal disc playback
- CXCとアンプの電源を入れてください。アンプで、CXCを接続した入力を選択してください。音量が最小に設定されていることを確認してください。Switch on your CXC, and amplifier. Select the input on your amplifier that is connected to the CXC. Check that the volume is set to a minimum.
- 上記の手順に従って、ディスクトレイにディスクを入れてください。Load a disc into the disc tray by following the above loading procedure.
- CXCが挿入されたディスクを正常に読み取ったら、フロントパネルまたはリモートコントロールの「Play」ボタンを押して再生を開始してください。Once the CXC has successfully read the inserted disc, begin playback by pressing the ‘Play’ button on the front panel, or on your remote control.
- CDの最後のトラックの再生が終了すると、ディスプレイ表示はTOC(目次)に戻ります。When the last track on the CD has finished playing, the display will return to the Table of Contents (TOC).
- ディスクを途中で停止するには、「Stop」ボタンを押してください。ディスクを一時停止するには、「Pause」ボタンを押してください。その後、「Play」ボタンをもう一度押すと再生を再開できます。To stop the disc at any point, press the ‘Stop’ button. To pause the disc, press the ‘Pause’ button. Playback can then be resumed by pressing the ‘Play’ button again.
再生中に特定のトラックを探すLocating a specific track during playback
- 順方向の「Skip/Scan」ボタンを1回短く押すと、CDの次のトラックの先頭に移動します。必要に応じて繰り返してください。A single short press of the forward ‘Skip/Scan’ button will take you to the beginning of the next track on the CD. Repeat as necessary.
- 逆方向の「Skip/Scan」ボタンを1回短く押すと、前のトラックの先頭に移動します。A single short press of the reverse ‘Skip/Scan’ button will take you to the beginning of the previous track.
再生停止中に特定のトラックを探すLocating a specific track when playback is stopped
- 順方向の「Skip/Scan」ボタンを1回短く押すと、CDの次のトラックの先頭に移動します。必要に応じて繰り返してください。A single short press of the forward ‘Skip/Scan’ button will take you to the beginning of the next track on the CD. Repeat as necessary.
- 逆方向の「Skip/Scan」ボタンを1回短く押すと、前のトラックの先頭に移動します。A single short press of the reverse ‘Skip/Scan’ button will take you to the beginning of the previous track.
- 「Skip/Scan」ボタンを押し続けると、対応する方向にトラックをすばやく移動できます。Pressing and holding the ‘Skip/Scan’ buttons will scroll rapidly through tracks in the relative directions.
- 選択したトラックから再生を開始するには、「Play」ボタンを押してください。Press the ‘Play’ button to start playback from the selected track.
ディスクおよびトラックのリピート再生Repeating discs and tracks
- CXCにディスクをセットしたら、リモートコントロールの「Repeat」ボタンを1回押し、「Play」ボタンを押すと、ディスク全体がリピート再生されます。機能をオフにするまで、CXCのディスプレイに「Repeat All」と表示されます。Once you have loaded a disc to the CXC, press the ‘Repeat’ button on the remote control once and press ‘Play’ to repeat the entire disc. ‘Repeat All’ will appear on the CXC display until the function is turned off.
- リモートコントロールの「Repeat」ボタンを2回押し、「Play」ボタンを押すと、現在のトラックがリピート再生されます。機能をオフにするまで、CXCのディスプレイに「Repeat Track」と表示されます。Press the ‘Repeat’ button on the remote control twice and press ‘Play’ to repeat the current track. ‘Repeat Track’ will appear on the CXC display until the function is turned off.
- 再生前または再生中に「Repeat」ボタンをもう一度押すと、この機能がオフになります。Press the ‘Repeat’ button again either before or during playback to turn off this function.
トラックをランダムな順序で再生Playing tracks in a random order
- CXCにディスクをセットしたら、リモートコントロールの「Random」ボタンを押してください。ディスプレイに「Random」と表示されます。Once you have loaded a disc to the CXC, press the ‘Random’ button on the remote control. ‘Random’ will appear on the display.
- 「Play」ボタンを押してください。CXCはディスク全体をランダムな順序で再生します。Press the ‘Play’ button. The CXC will now play the entire disc in a randomised order.
- 再生中に「Random」ボタンを押して、その時点以降のトラックをランダムな順序で聴くこともできます。It is also possible to press the ‘Random’ button during playback to listen to tracks in a random order from that point onward.
注:「Repeat Track」が選択されている状態で「Random」モードを選択すると、「Repeat Track」モードは自動的に解除されます。
Note : Selecting ‘Random’ mode when ‘Repeat Track’ has been selected will automatically cancel ‘Repeat Track’ mode.
セットアップメニューSetup menu
CXCのセットアップメニューでは、Auto-PlayおよびAuto Power Down(APD)機能に関連する設定を調整できます。
The CXC setup menu allows adjustment of settings related to the Auto-Play, and Auto Power Down (APD) functions.
注:ディスク再生中はセットアップメニューにアクセスできません。
Note : The setup menu cannot be accessed during disc playback.
セットアップメニューの使用Using the setup menu
- CXCのフロントパネルにある「stop」ボタンを5秒間押し続けてください。セットアップメニューが開きます。On the front panel of the CXC press and hold the ‘stop’ button for five seconds. This will open the setup menu.
- 「skip/scan」ボタンを使用してメニューをスクロールしてください。Scroll through the menu using the ‘skip/scan’ buttons.
- 「play」ボタンを使用してサブメニューに入り、オプションを選択してください。Use the ‘play’ button to enter sub-menus and select options.
- サブメニューを終了するには、「stop」ボタンを押してください。To exit a sub-menu, press the ‘stop’ button.
Auto play setting — セットアップメニュー内でこの設定を有効にすると、「play」ボタンを押さなくても、CXCで挿入したディスクを再生できます。
Auto play setting – This setting can be enabled from within the setup menu and allows the CXC to play inserted discs without the need for the ‘play’ button to be pressed.
Auto power down (APD) — CXCはデフォルトでAPDが30分に設定されており、30分間操作がないとスタンバイに切り替わります。セットアップメニューでこの機能を完全にオフにするか、時間を30分、60分、120分のいずれかに変更できます。
Auto power down (APD) – The CXC comes with APD set to 30-minutes by default and will switch to standby after a 30-minute period of inactivity. This can be switched off completely or the time can be changed between 30, 60, and 120 minutes within the setup menu.
コントロールバスControl bus
CXCとCXA61/81のコントロールバスを接続するConnecting the CXC and CXA61/81 control bus
付属のオレンジ色のコントロールバスケーブルで CXC と CXA61/81 を接続すると、両機器の電源オン/オフが連動します。
Connecting the CXC and CXA61/81 via the supplied orange Control Bus cables will ensure that the devices are switched off and on at the same time.
CXA のコントロールバス出力を、CXC のコントロールバス入力に接続してください。
Connect the CXA control bus out to the CXC in.
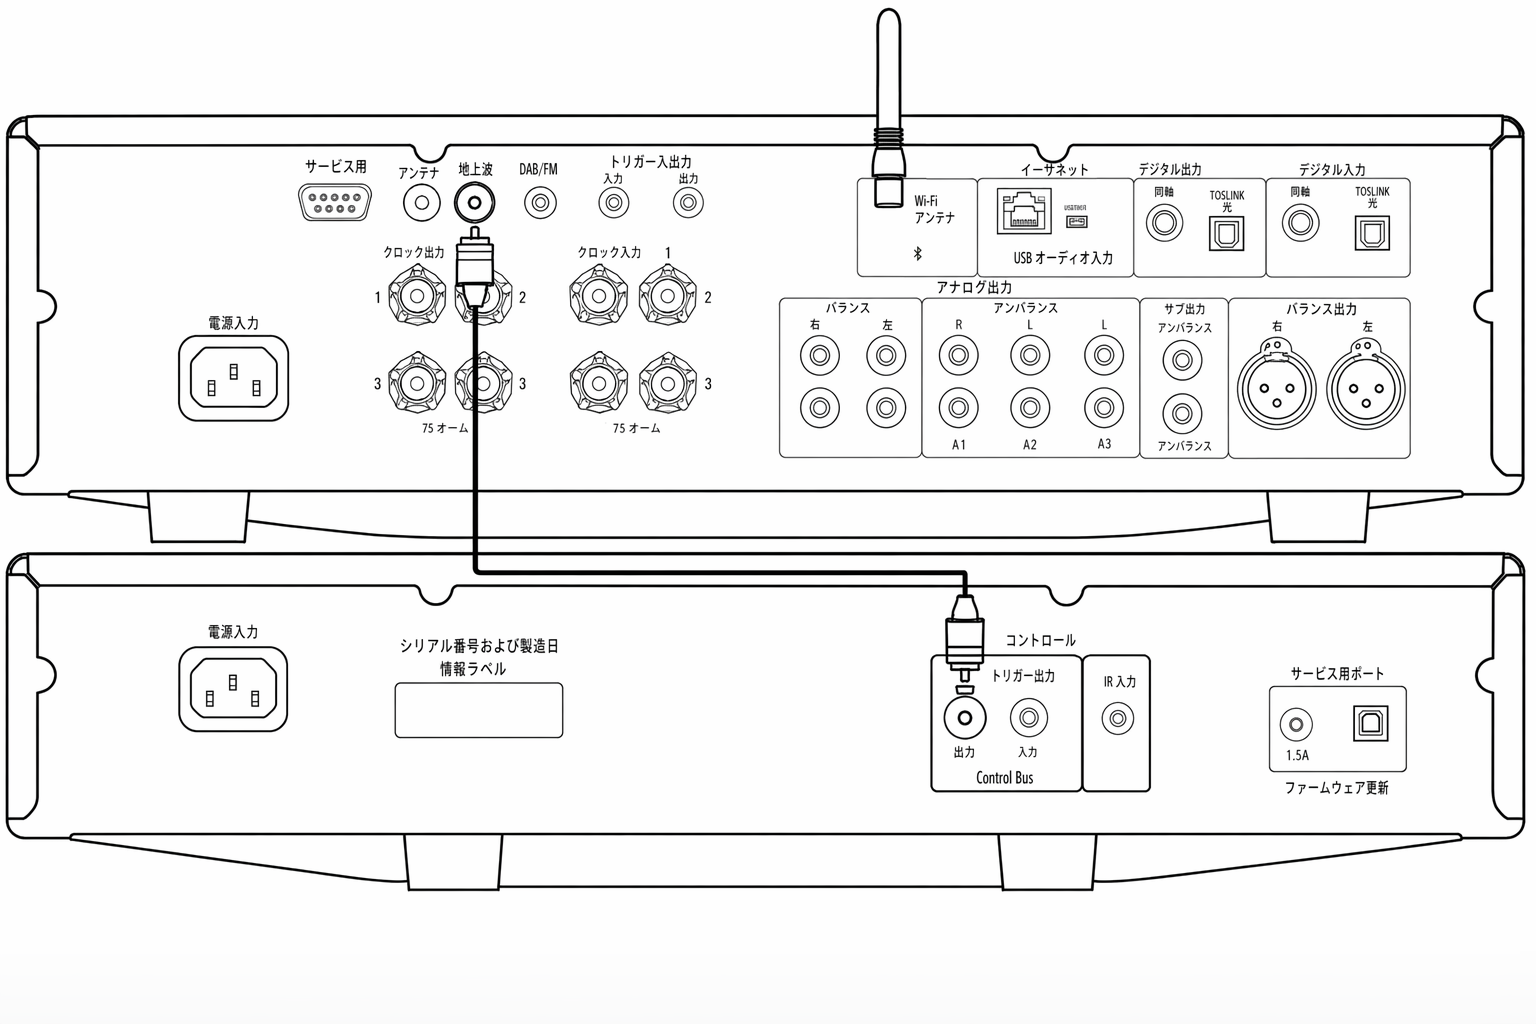
注:CXC および CXA にはいずれもオートパワーダウン(APD)機能があります。APD が有効な状態で、いずれかの機器が電源オンのまま操作されない場合、設定された APD 時間の経過後に自動で電源オフになります。その結果、コントロールバス接続を介して、接続されている他の機器もすべて電源オフになります。
Note : The CXC and CXA all have an Auto Power Down (APD) function. If APD is enabled and one of the devices is switched on but inactive, the device will automatically power down after the selected APD time. This will then switch off all the other connected devices, due to the Control Bus connection.
機器を自動でスタンバイに移行させたくない場合は、各機器の APD 機能を無効にすることをおすすめします。
If you don't want the devices to go into standby automatically, we would recommend disabling the APD feature on each device.
トラブルシューティングTroubleshooting
電源が入らない • AC 電源コードが確実に接続されていることを確認してください。 • プラグが壁のコンセントに完全に差し込まれ、コンセントのスイッチがオンになっていることを確認してください。 • 電源プラグまたはアダプターのヒューズを確認してください。
There is no power • Ensure that the AC power cord is connected securely. • Ensure the plug is fully inserted into the wall socket and is switched on. • Check fuse in the mains plug or adaptor.
プレーヤーがディスクを読み取らない • ディスクが裏返しにセットされていないか確認してください。 • ディスクの傷や汚れがひどくないか確認してください。
The player will not read the disc • Check the disc is not loaded upside down. • Check that the disc is not too scratched or dirty.
音が出ない • アンプが正しく設定されていることを確認してください。 • インターコネクトケーブルが正しく差し込まれていることを確認してください。
There is no sound • Ensure that the amplifier is set correctly. • Check that the interconnects are inserted correctly.
ディスクの音飛びが発生する • ディスクの傷や汚れがひどくないか確認してください。 • プレーヤーを安定した場所に設置し、振動の影響を受けていないことを確認してください。
The disc is skipping • Check that the disc is not too scratched or dirty. • Ensure the player is on a firm surface and not subject to vibrations.
スピーカーからハム音が出る • すべてのケーブル接続が確実であることを確認してください。
There is a hum coming from the speakers • Ensure that all cable connections are secure.
リモコンが動作しない • 電池が消耗していないか確認してください。 • リモコン受光部を遮るものがないことを確認してください。
The remote will not function • Check that the batteries have not expired. • Ensure that nothing is blocking the remote sensor.
技術仕様Technical specifications
相関ジッター合計 <0.2ns
Total correlated jitter <0.2ns
S/PDIF および TOSLINK 光出力インピーダンス <75 Ω
S/PDIF and TOSLINK optical output impedance <75 Ohms
デジタルオーディオ出力 S/PDIF 同軸および TOSLINK 光
Digital audio outputs S/PDIF coaxial and TOSLINK optical
最大消費電力 25W
Maximum power consumption 25W
スタンバイ時消費電力 <0.5W
Standby power consumption <0.5W
外形寸法(H × W × D) 85 × 430 × 315mm(3.3 × 16.9 × 12.4 インチ)
Dimensions (H x W x D) 85 x 430 x 315mm (3.3 x 16.9 x 12.4")
質量 4.3kg(10.3 ポンド)
Weight 4.3kg (10.3lbs)
安全に関する注意事項Safety Instructions
Click here to view
よくあるご質問(FAQ)Frequently Asked Questions (FAQ)
CXC で SACD や MP3/WMA ディスクを再生する方法は?How can I play SACD or MP3/WMA discs on the CXC?
CXC では SACD、MP3、WMA ディスクは再生できません。CXC は Azur シリーズの CD プレーヤーと同じ S3 サーボを採用しており、CD 再生に特化して最適化されています。
It is not possible to play SACD, MP3 or WMA discs on the CXC. The CXC uses the same S3 servo as our Azur CD players and is optimised for CD playback only.
CXC にアナログ音声出力がないのはなぜですか?Why doesn't the CXC have an analogue audio output?
一般的な CD プレーヤーでは、CD のデジタル情報を読み取り、プレーヤー内部の DAC(デジタル/アナログコンバーター)を通します。変換後のアナログ信号は、通常 RCA 接続でアンプに出力されます。
In a 'normal' CD player, the CD's digital information is read and passed through a DAC (Digital to Analogue Converter) inside the CD player. The resulting analogue signal is then output to the amplifier, usually via RCA connection.
CXC は CD トランスポートです。つまり、CXC は CD を再生してディスクからデジタル情報を取り出し、S/PDIF 同軸または TOSLINK 接続でデジタル信号のまま出力します。
The CXC is a CD Transport. This means that the CXC plays the CD and extracts the digital information from the CD disc and outputs it digitally, via S/PDIF Coaxial or Toslink connection.
当社の CX シリーズアンプ(CXA61/81)は高品位な ESS Sabre DAC を搭載しています。そのため、CD トランスポートからデジタル信号を出力し、デジタルからアナログへの変換はアンプ側で行うことをおすすめします。
As we use high-quality ESS Sabre DACs inside our CX Series amplifiers (CXA61/81), we recommend outputting a digital signal from the CD Transport and allow the digital to analogue conversion take place in the amplifier instead.