取扱説明書
EXA100
はじめに
本ガイドは、本製品の設置と使用をできる限り容易にするために作成されています。本書の情報は印刷時に正確性を入念に確認しています。ただし Cambridge Audio は継続的な改良を方針としているため、設計と仕様は予告なく変更される場合があります。
This guide is designed to make installing and using this product as easy as possible. Information in this document has been carefully checked for accuracy at the time of printing; however, Cambridge Audio’s policy is one of continuous improvement, therefore design and specifications are subject to change without prior notice.
本書には著作権で保護された専有情報が含まれています。すべての権利を留保します。本マニュアルのいかなる部分も、製造元の書面による事前の許可なしに、機械的・電子的その他の手段によって、いかなる形式でも複製することはできません。すべての商標および登録商標は、それぞれの所有者に帰属します。
This document contains proprietary information protected by copyright. All rights are reserved. No part of this manual may be reproduced by any mechanical, electronic or other means, in any form, without prior written permission of the manufacturer. All trademarks and registered trademarks are the property of their respective owners.
Bluetooth® のワードマークおよびロゴは Bluetooth SIG, Inc. が所有する登録商標であり、Audio Partnership Plc による使用はライセンスに基づきます。その他の商標および商号は、それぞれの所有者に帰属します。
The Bluetooth® word mark and logos are registered trademarks owned by the Bluetooth SIG, Inc. and any use of such marks by Audio Partnership Plc is under license. Other trademarks and trade names are those of their respective owners.
Qualcomm は Qualcomm Incorporated の商標であり、米国およびその他の国で登録されています。許可を得て使用しています。aptX は Qualcomm Technologies International, Ltd. の商標であり、米国およびその他の国で登録されています。許可を得て使用しています。
Qualcomm is a trademark of Qualcomm Incorporated, registered in the United States and other countries, used with permission. aptX is a trademark of Qualcomm Technologies International, Ltd., registered in the United States and other countries, used with permission.
Qualcomm aptX は Qualcomm Technologies International, Ltd の製品です。
Qualcomm aptX is a product of Qualcomm Technologies International, Ltd
© Copyright Cambridge Audio Ltd
© Copyright Cambridge Audio Ltd
今後の製品情報、ソフトウェアアップデート、特別オファーをお受け取りいただくため、https://www.cambridgeaudio.com/register にて製品登録をお願いいたします。
For upcoming news on future products, software updates and exclusive offers, make sure you register your product at https://www.cambridgeaudio.com/register
このマニュアル内の画像の一部は、元の PDF から自動生成されたものです。自動処理の都合上、製品の細部や配線図などが実際と異なる場合があります。正確な形状・寸法・配線は、実機および製品ページの写真、同梱の正規マニュアル(英語版)をあわせてご確認ください。
EXA100 の同梱品
EXA の箱の中には、以下が同梱されています。
Inside the box of your EXA you will receive:
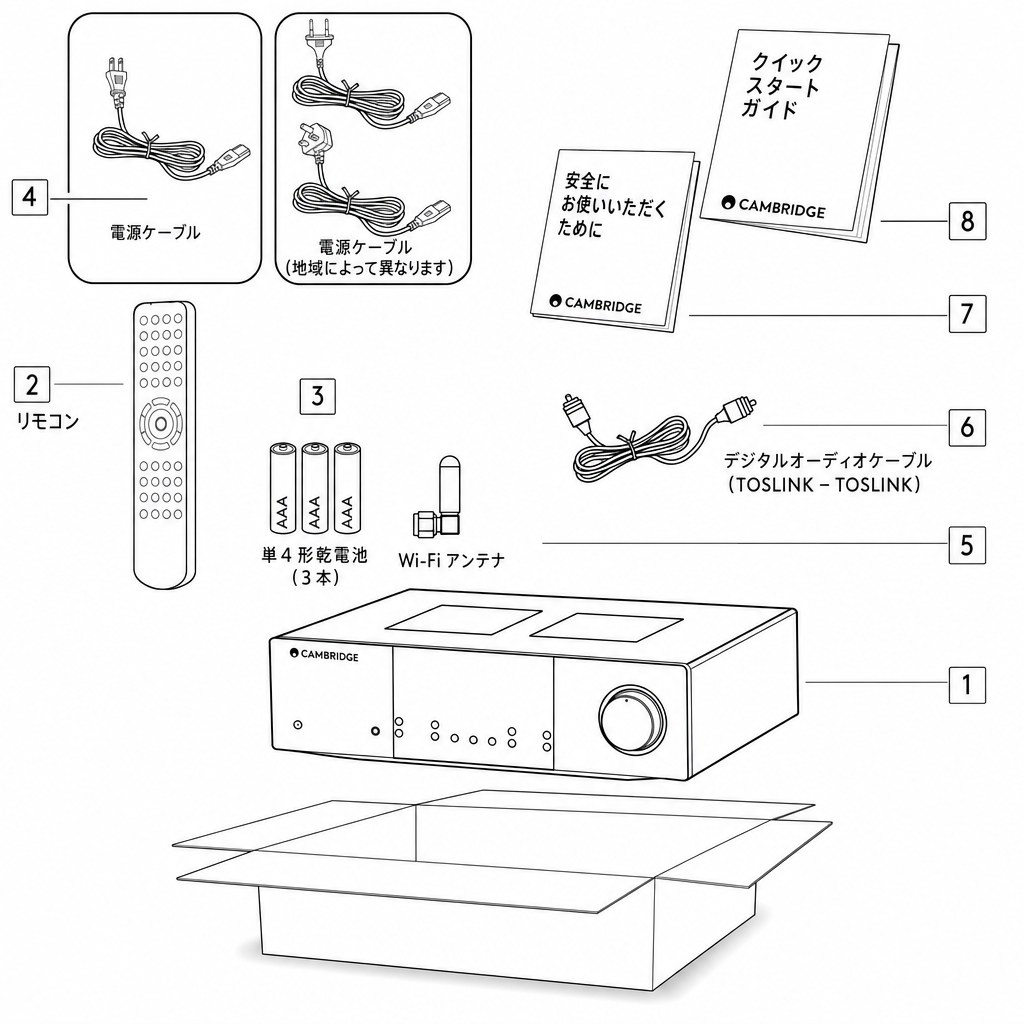
- EXA100 インテグレーテッドアンプ
- リモコン
- 単4電池 × 3本
- 地域別電源コード
- Bluetooth アンテナ
- オレンジ色のコントロールバスケーブル
- 安全ガイド
- クイックスタートガイド
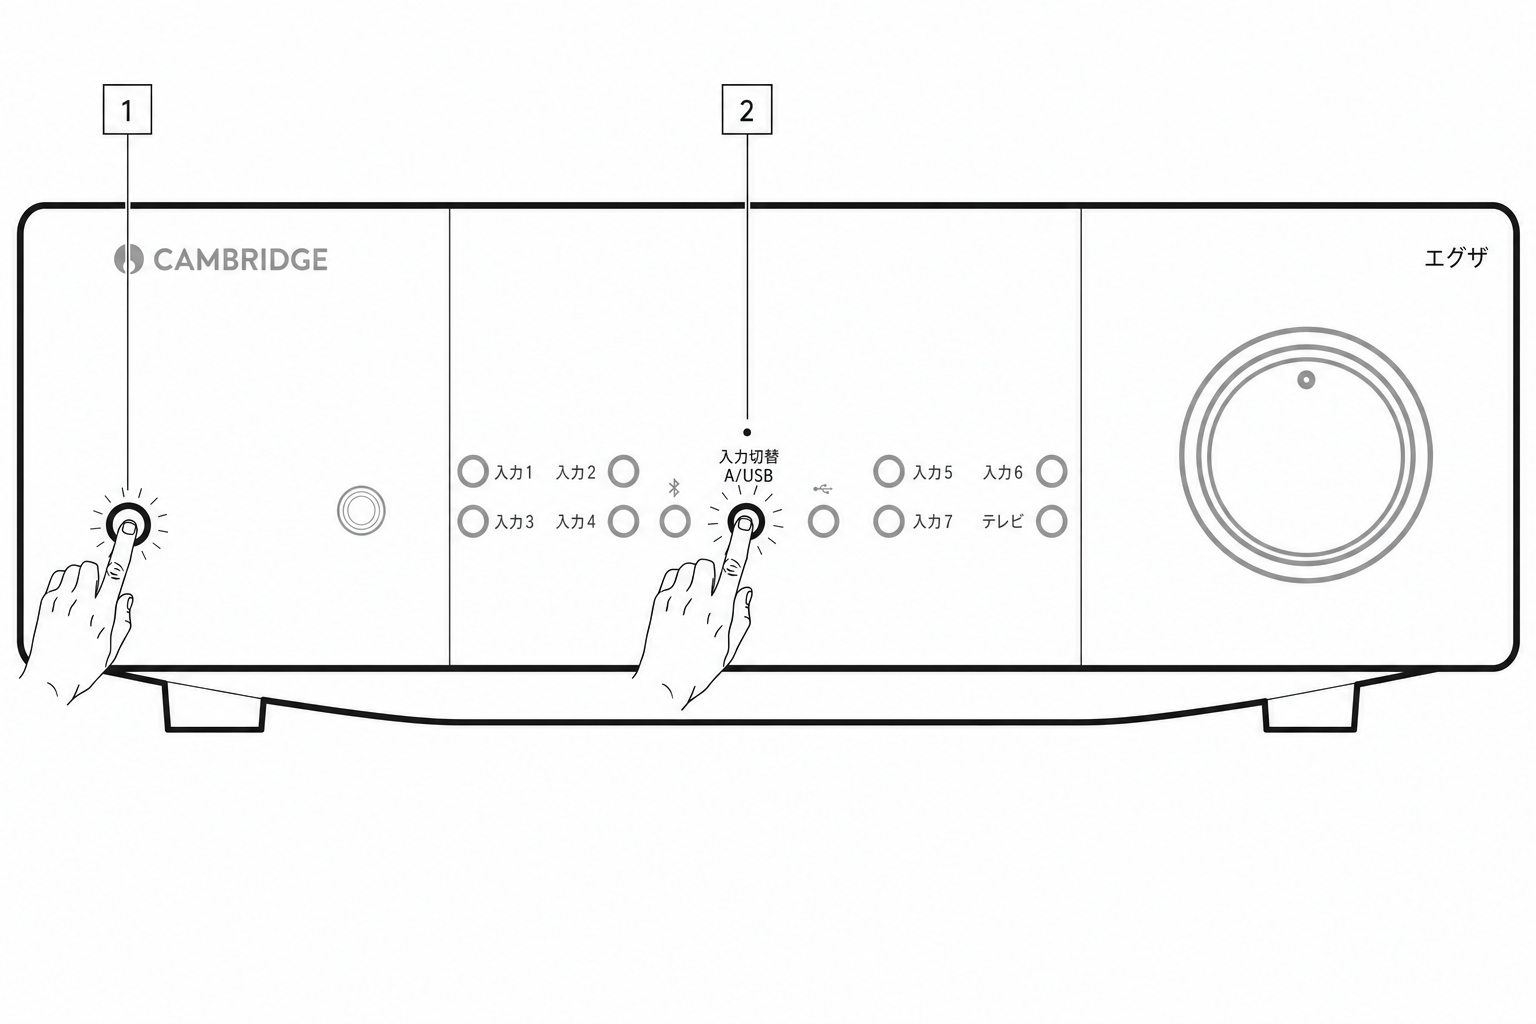
フロントパネルの操作部
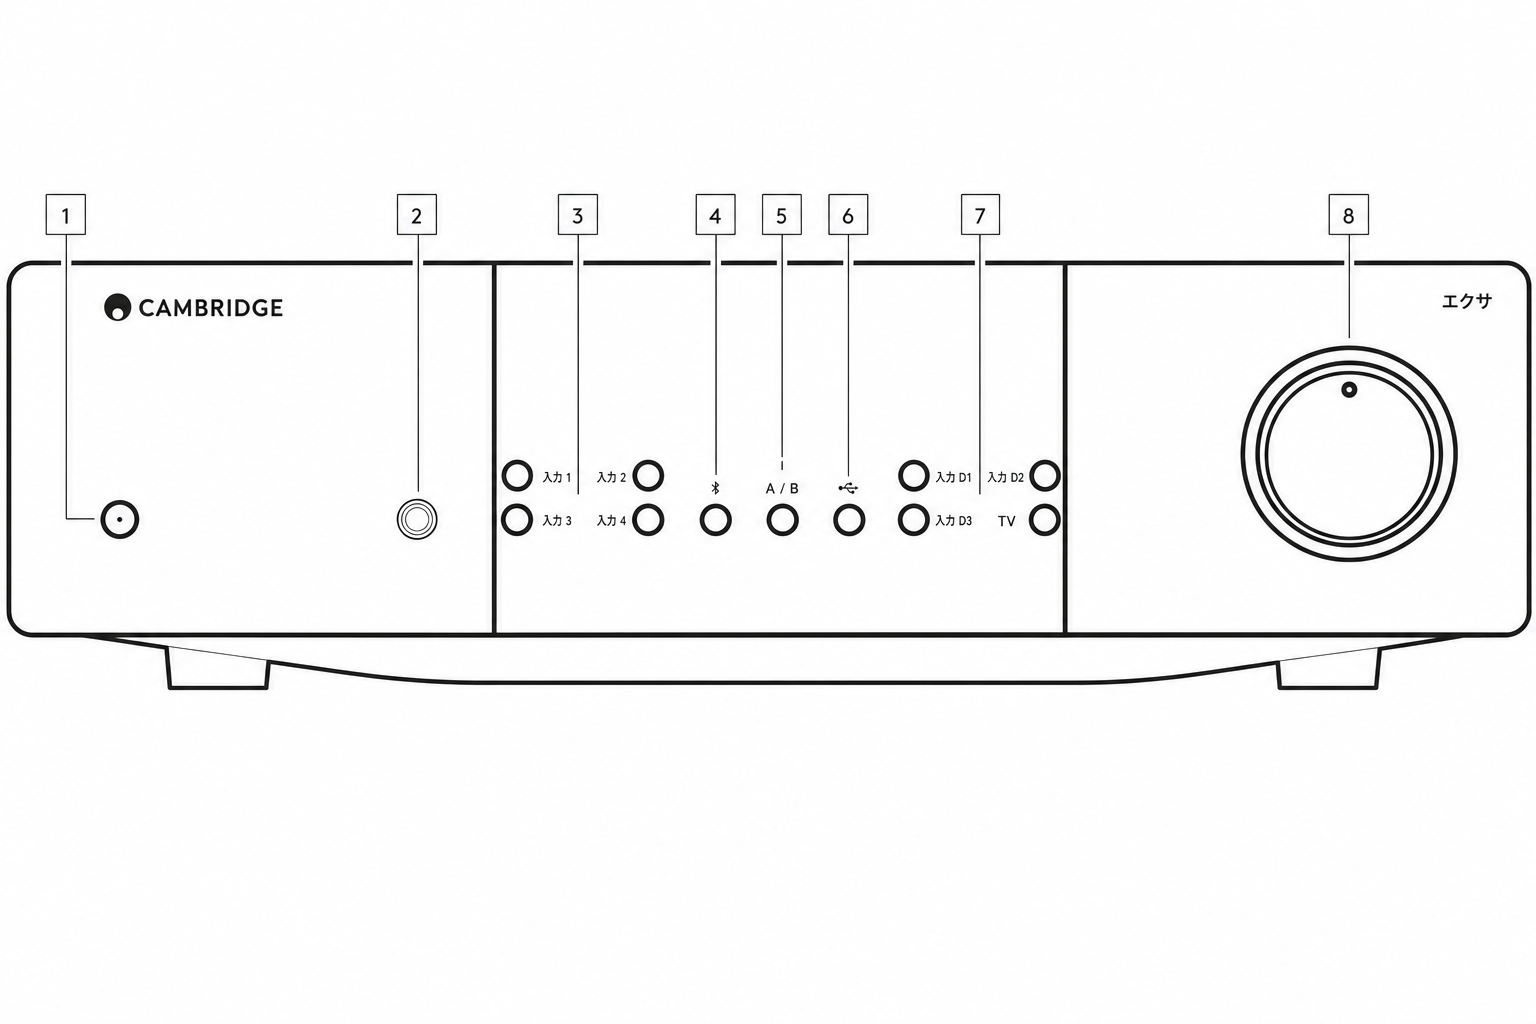
- スタンバイ/オン - 本機をスタンバイモード(電源 LED が暗く点灯)とオン(電源 LED が明るく点灯)の間で切り替えます。スタンバイモードは消費電力 0.5W 未満の低電力モードです。オートパワーダウン(APD)EXA は工場出荷時に APD が有効になっており、操作のない状態が 20 分続くと自動的にスタンバイへ切り替わります。詳細は「セットアップメニュー」をご覧ください。注:A1 または A1 バランスを選択したパワーアンプモード時、および Bluetooth 機器を接続している場合、APD は無効になります。
- ヘッドホン - 適合するヘッドホンを接続できます。接続するとスピーカーとプリアウトは自動的にミュートされます。
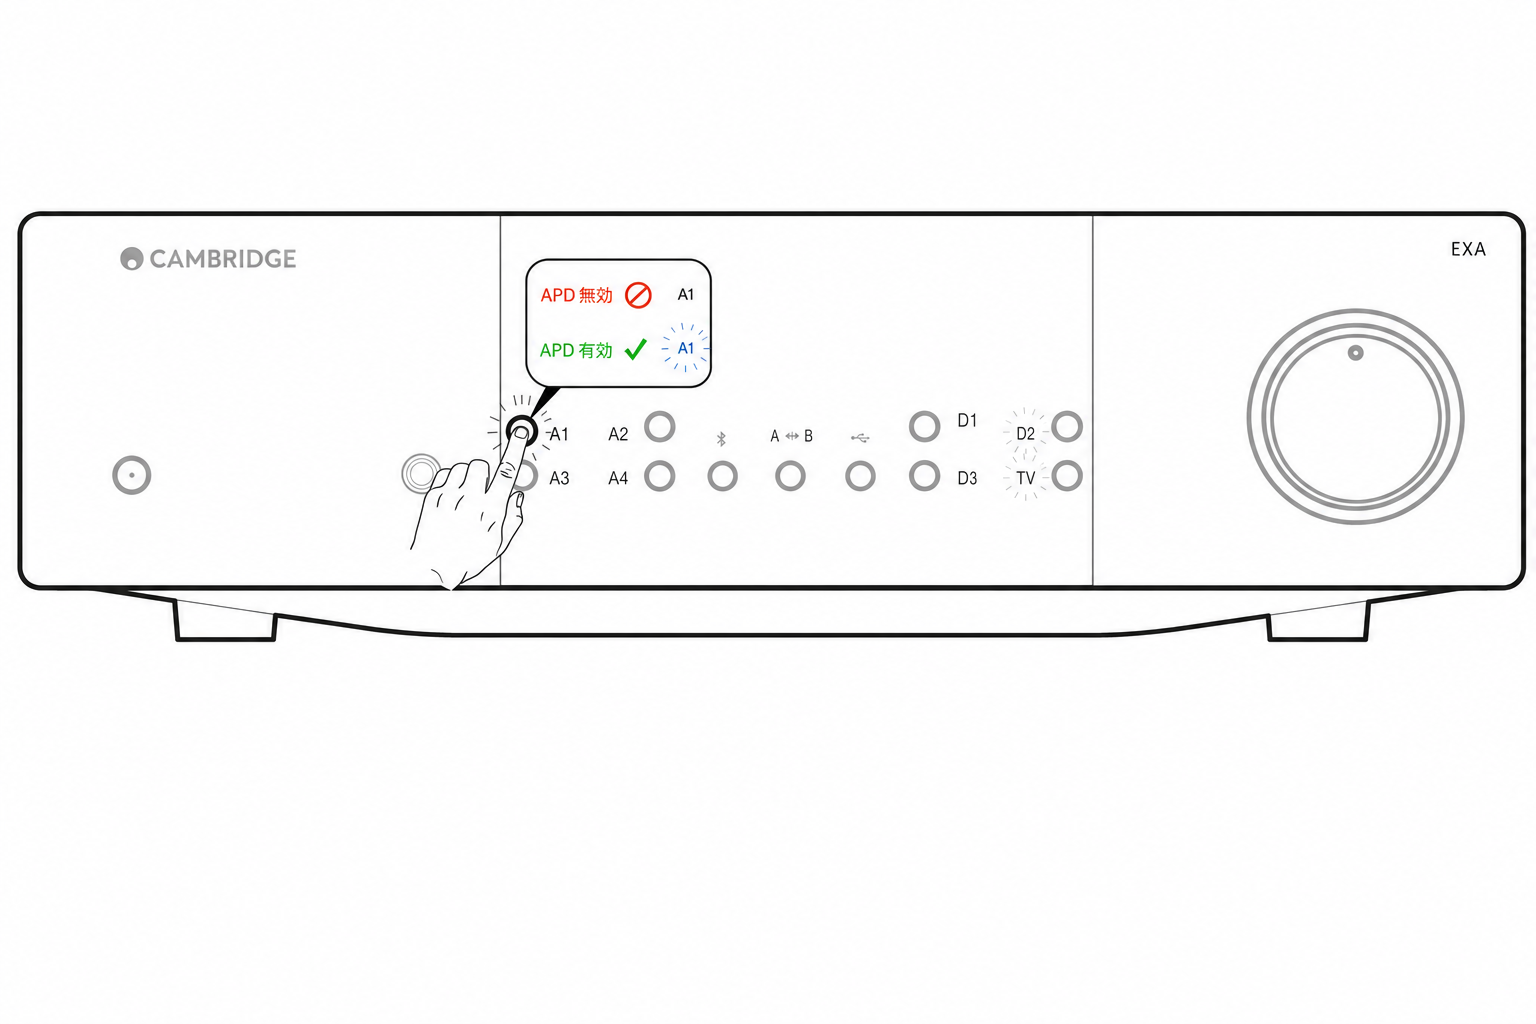
- アナログソース選択 - 該当する入力選択ボタンを押して、聴きたいソースを選択します。注:バランス入力とアンバランス入力について、A1 入力選択ボタンを押すたびにバランスとアンバランスが切り替わります。A1 がオレンジ色に点灯している場合はバランス入力、青色に点灯している場合はアンバランス入力です。正しい入力ボタンを選択していないとアンプから音は出ません。たとえばオーディオソースをバランス入力に接続している場合は、A1 入力ランプがオレンジ色に点灯していることを確認してください。
- Bluetooth - 押すと Bluetooth 入力がオンになります。Bluetooth ソースを使うと、ほとんどのスマートフォン、タブレット、ノート PC からワイヤレスで Bluetooth オーディオを受信できます。
- スピーカー A/B - リアパネルのスピーカー端子に接続したスピーカーセット(A のみ、B のみ、A+B)を順に切り替えます。別室の追加スピーカーで聴く際に便利です。詳細は「接続」セクションをご覧ください。ミュートインジケーターリモコンで出力をミュートしているとき、ランプが点滅します。本機リアパネルの A1 パワーアンプモードが有効な場合は、ランプが常時点灯します。プロテクションインジケーター詳細は「CAP4」セクションをご覧ください。
- USB オーディオ - 押すと USB オーディオ入力を選択します。
- デジタルソース選択 - 該当する入力選択ボタンを押して、聴きたいソースを選択します。
- 音量 - アンプ出力の音量レベルを上下します。A1 および A1 バランスのパワーアンプモード時を除き、すべての出力レベルに影響します。
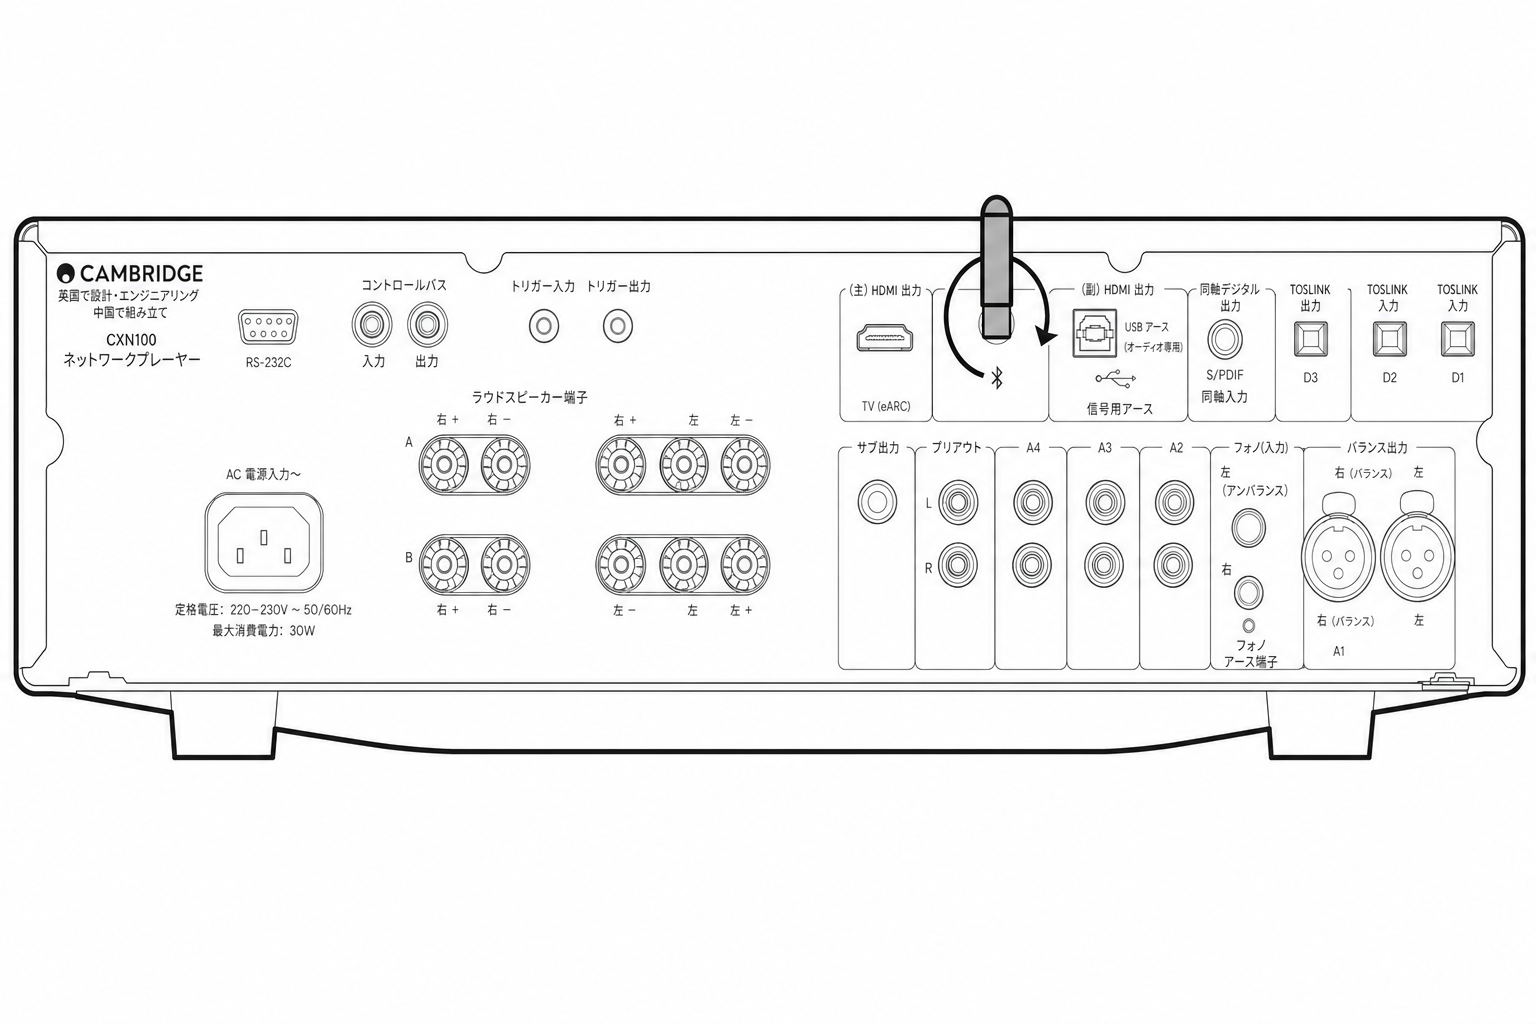
リアパネルの接続
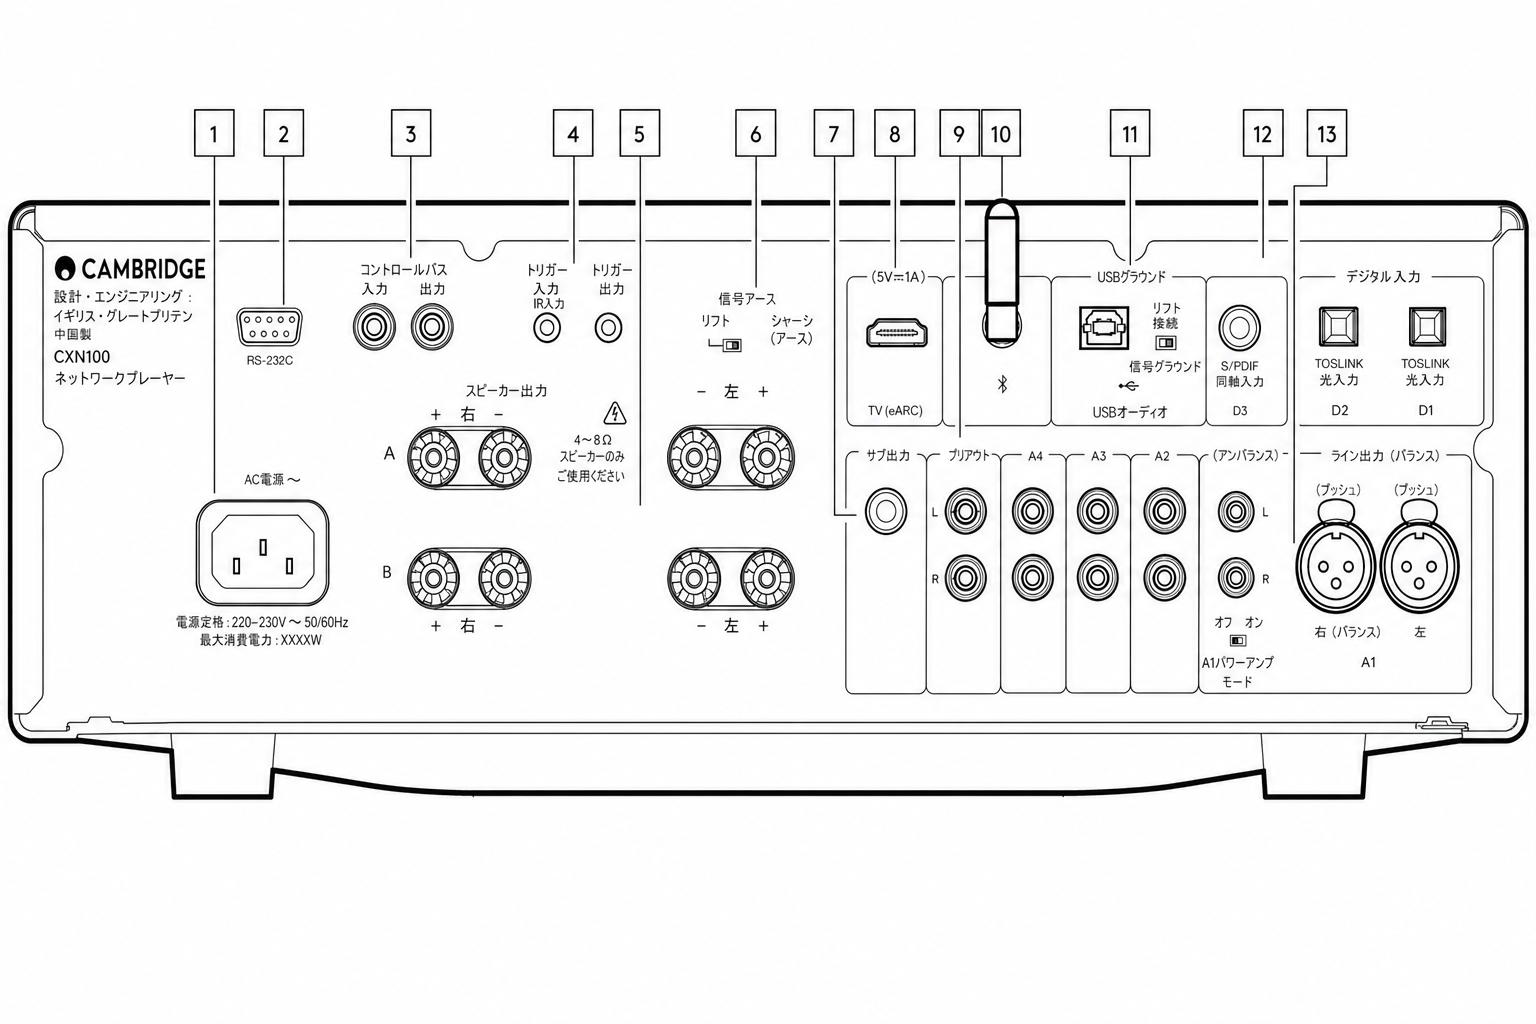
- AC 電源ソケット - アンプへのすべての接続が完了したら、AC 電源ケーブルを適切な電源コンセントに差し込み、スタンバイボタンを押します。これでアンプを使用できる状態になります。
- RS232C - RS232 は標準的なシリアルデータ通信プロトコルで、ホームオートメーションシステムの一部として RS232 対応機器同士の通信を可能にします。カスタムインストール制御 - EXA の完全なプロトコルは弊社 Web サイトでご覧いただけます。
- コントロールバス - 接続された他の EX シリーズ製品との間で、電源と音量のコマンドを送受信するための RCA ソケットです。詳細は「コントロールバス」セクションをご覧ください。
- トリガートリガー出力 - EXA とトリガー入力を備えた製品の間にリンクワイヤーを接続します。EXA をオン/スタンバイにすると、両製品の電源状態が同期します。トリガー入力 / IR 入力トリガー入力 - トリガー出力を備えた製品と EXA の間にリンクワイヤーを接続します。IR 入力 - IR リピーターやカスタムインストールシステムから変調 IR コマンドを受信します。
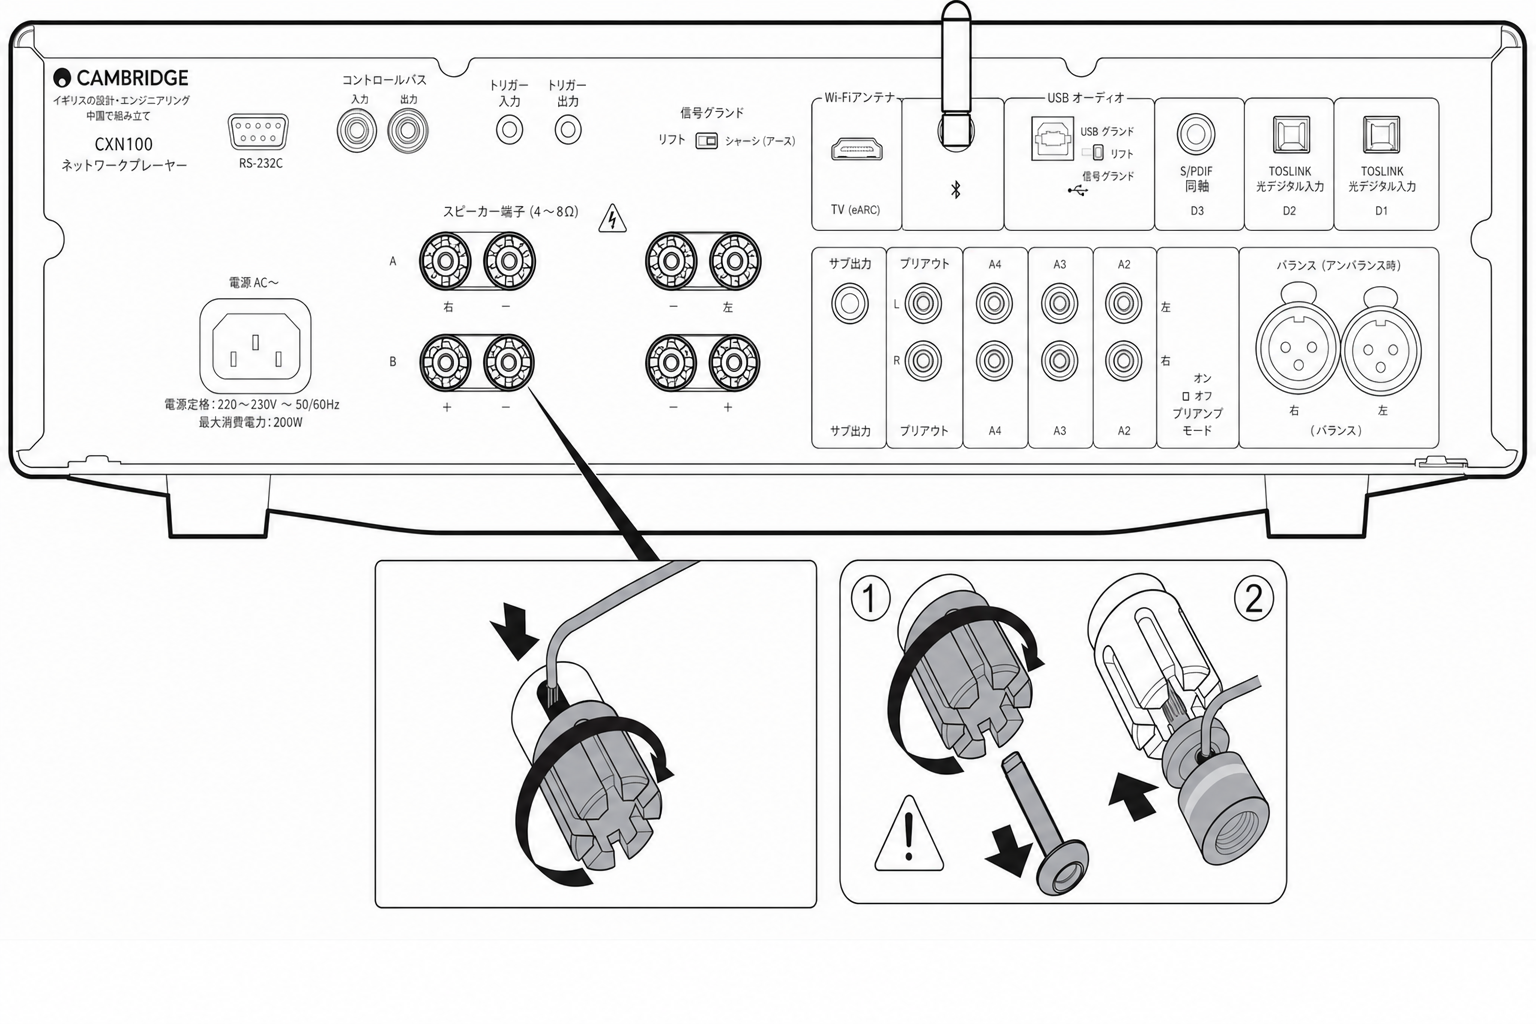
- スピーカー端子注:バナナプラグを使用する場合、プラグを差し込む前にスピーカー端子を完全に締めてください。2 系統のスピーカー端子(A:メインスピーカー端子、B:セカンダリースピーカー端子)が用意されています。左チャンネルのスピーカー線を EXA の左側端子に、右チャンネルのスピーカー線を EXA の右側端子に接続します。アンプのプラスは必ずスピーカーのプラスに、アンプのマイナスは必ずスピーカーのマイナスに接続してください。赤端子がプラス出力、黒端子がマイナス出力です。スピーカー出力同士がショートしないよう、はみ出した素線に注意してください。良好な電気接続のためにスピーカー端子は完全に締め付けてください。ねじ端子がゆるんでいると音質に影響することがあります。注:バナナプラグを差し込むには、スピーカー端子の丸い栓(pip)を取り外す必要があります。ヒント:取り外しは、スピーカー端子を少しゆるめてから締め直すのが最も簡単です。これによって栓が浮き上がり、外しやすくなります。
- シグナルグランド ポジション 1 - 通常の標準位置。本機のオーディオグランドはシャーシアースから絶縁されます。ポジション 2 - 本機のオーディオグランドはシャーシグランドに直接接続されます。一部のセットアップでは、特定のテレビ、ターンテーブル、その他の機器を EXN100 に接続した際のハム音やノイズを低減できます。
- サブ出力 - 必要に応じて、アクティブサブウーファーの入力に接続します。注:サブ出力には約 2.3kHz のローパスフィルターがかかっており、この出力に接続したサブウーファーには 2.3kHz を超える周波数は送られません。これは EXA がサブ出力周波数で加える位相を最小限に抑えるためです。クロスオーバー周波数はサブウーファー側で調整できます。
- Enhanced Audio Return Channel(eARC)- ARC と eARC の両方に対応するテレビからの接続です。
- プリアウト - パワーアンプまたはアクティブサブウーファーのアンバランス入力に接続します。注:プリアウトにはローパスフィルターは適用されず、全帯域がプリアウトに接続したサブウーファーに送られます。
- Bluetooth アンテナ - Bluetooth オーディオストリーミングに使用します。詳細は「Bluetooth」セクションをご覧ください。
- USB オーディオ入力 - Microsoft Windows または Apple Mac OS X で動作するコンピューターからオーディオを再生できる USB B タイプソケットです。一部の Linux ビルドにも対応します。注:- USB Hi-Speed 認証を受けた高品質な USB 接続ケーブルを必ずご使用ください。3m を超える USB ケーブルでは音質が安定しない場合があります。- USB 入力にケーブルを抜き差しする際、または PC/Mac の起動・終了時には、必ず音量を最小にし、別の入力に切り替えるか EXA の電源を切ってください。シグナルグランド/リフトスイッチ - シグナルグランド/リフトスイッチは、USB インターフェースのアースを EXA のシグナルグランドに接続/切断します。USB 入力選択時にスピーカーから電気的なハム音が聞こえる場合は、アースを切断(リフト)すると改善することがあります。それ以外の場合はグランド位置のままにしてください。
- デジタル入力(D1、D2、D3)- TOSLINK および S/PDIF 同軸デジタル入力です。同軸 - 高品質な 75 オームのデジタル RCA フォノインターコネクトケーブル(通常のオーディオ用ではないもの)をご使用ください。この入力は最大 192kHz、16〜24 ビットのコンテンツに対応します。TOSLINK 光(オプティカル) - オーディオ用に設計された高品質な TOSLINK 光ファイバーインターコネクトケーブルをご使用ください。この入力は最大 96kHz、16〜24 ビットのコンテンツに対応します(TOSLINK は 192kHz サンプリングレートでの使用は推奨しません)。注:システムから最高の結果を得るため、Cambridge Audio の高品質インターコネクトのみのご使用を推奨します。これにより設計通りの音質をお楽しみいただけます。詳細はお買い求めの販売店にお問い合わせください。
- アナログ入力(A1 アンバランス、A2、A3、A4)- CD プレーヤー、DAB チューナー、FM/AM チューナーなど、あらゆる「ラインレベル」のソース機器に対応します。これらの入力はアナログ音声信号専用です。CD プレーヤーなどデジタル機器のデジタル出力には接続しないでください。注:バランス XLR 入力の場合、ピン 1 がグランド、ピン 2 がプラス、ピン 3 がマイナスです。A1 入力A1 入力はアンバランス(フォノ/RCA)またはバランス(XLR)接続に対応します。バランス接続はより高品質な選択肢で、対応機器と組み合わせて使用するとケーブル内のノイズや干渉を排除できます。XLR コネクターの結線は、ピン 1:グランド、ピン 2:ホット(同相)、ピン 3:コールド(逆相)です。A1 パワーアンプモードオフ:標準位置。オン:アンプモードを有効にします。外部プリアンプとの組み合わせに最適です。注:パワーアンプモードを有効にする前に、必ず音量を下げてください。
リモコン
EXA のリモコンはフロントパネルの操作機能を再現しており、他の EX シリーズ製品も操作できます。
The EXA remote control handset duplicates the front panel control functions and is also able to control other EX series products.
注:リモコンを使用するには、付属の単 4 電池をあらかじめセットする必要があります。
Note: The supplied AAA batteries must be fitted before the remote control can be used.
リモコンのボタンは以下のように動作します。
The handset buttons function as described below:
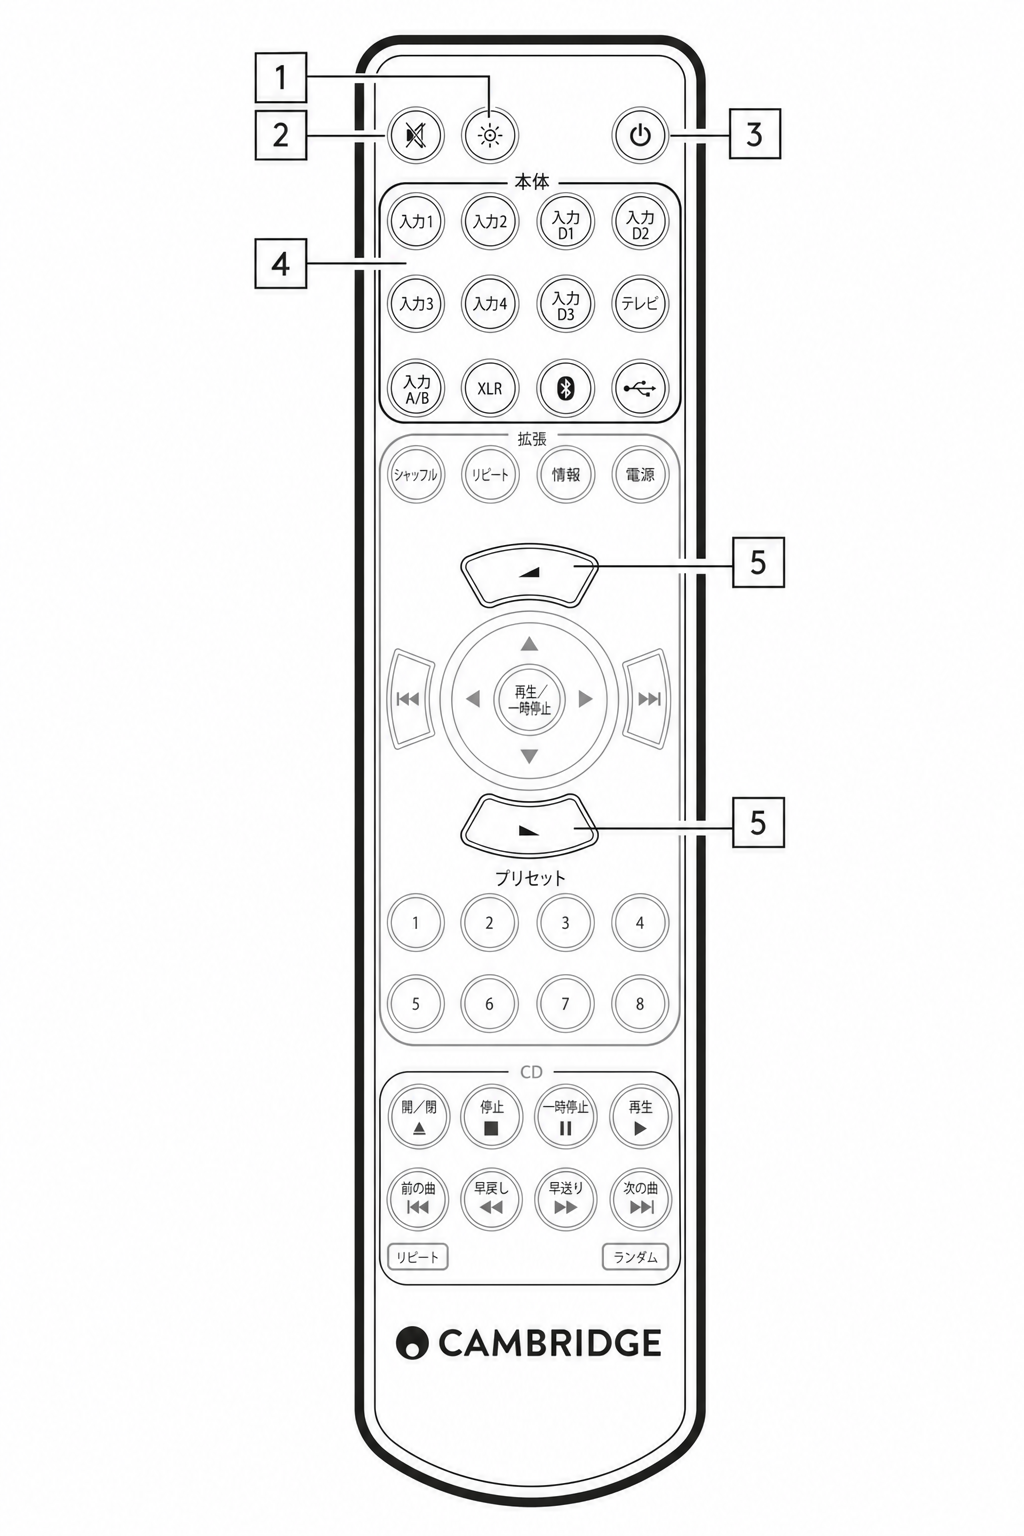
- 明るさ - EXA のディスプレイランプの明るさを変更します。2 段階の明るさに加え、バックライトをオフにする選択肢もあります。注:EXA のディスプレイランプをオフに設定している場合、いずれかの機能を選択すると、変更を示すために短時間ランプが点灯します。
- ミュート - 押すとスピーカー、プリアウト、サブ、ヘッドホン出力をミュート/解除します。出力がミュートされている間、本体前面のランプが点滅します。
- スタンバイ/オン - EXA をオンとスタンバイモードの間で切り替えます。
- ソース - ソース入力を選択するボタンです。注:A1 ボタンはバランス/アンバランス A1 入力の選択を兼ねており、2 回押すと両入力が切り替わります。
- 音量アップ/ダウン - 音量レベルの調整に使用します。注:リモコンが動作しない場合は、電池切れになっていないか、フロントパネルの IR 受光部が塞がれていないかをご確認ください。
接続のしかた
Cambridge Audio のアンプは、システムをさまざまな方法で接続できるよう設計されています。プリアウトやスピーカー B 端子といった機能により、用途に応じて柔軟にシステムを構成できます。
When designing our amplifiers, we include features that allow you to connect your system in various ways. The inclusion of features such as Pre-Out and Speaker B connections mean that you can flexibly configure your system depending on your requirements.
注:バナナプラグを使用する場合、プラグを差し込む前にスピーカー端子を完全に締めてください。
Note: When using a banana plug, make sure the speaker terminals are completely tightened before inserting the plug.
注:バナナプラグを差し込むには、スピーカー端子の丸い栓(pip)を取り外す必要があります。
Note: The speaker terminals will need to have the round pips removed before you can insert a banana plug into them.
ヒント:取り外しは、スピーカー端子を少しゆるめてから締め直すのが最も簡単です。これによって栓が浮き上がり、外しやすくなります。
Tips: The easiest way to remove these is to slightly unscrew the speaker terminal and then do it back up again. This will raise the plug for easy removal.
基本的な接続
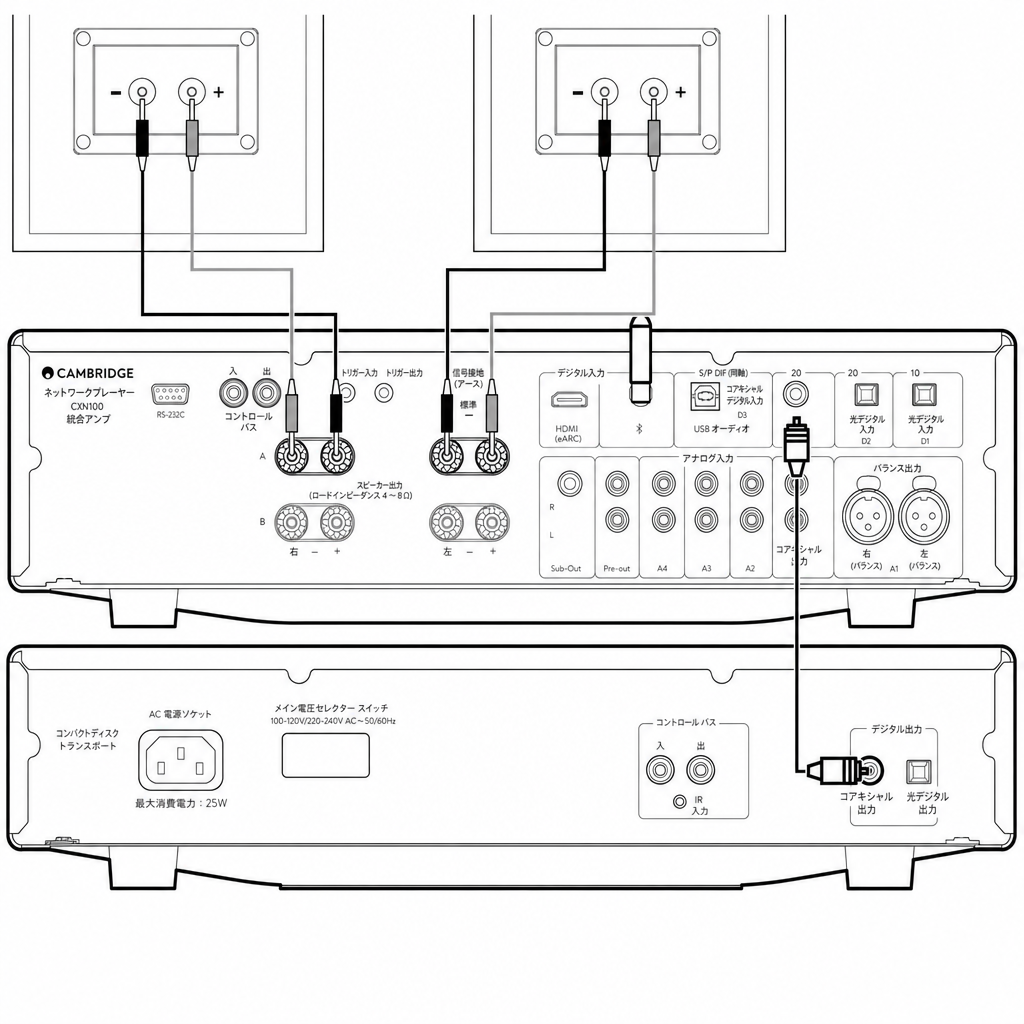
下図は、D3 同軸デジタル入力を使って本機を CD プレーヤーに接続し、1 組のスピーカーをつないだ基本的な接続例です。
The diagram below shows the basic connection of your amplifier to a CD player using the D3 coaxial digital input source and a pair of loudspeakers.
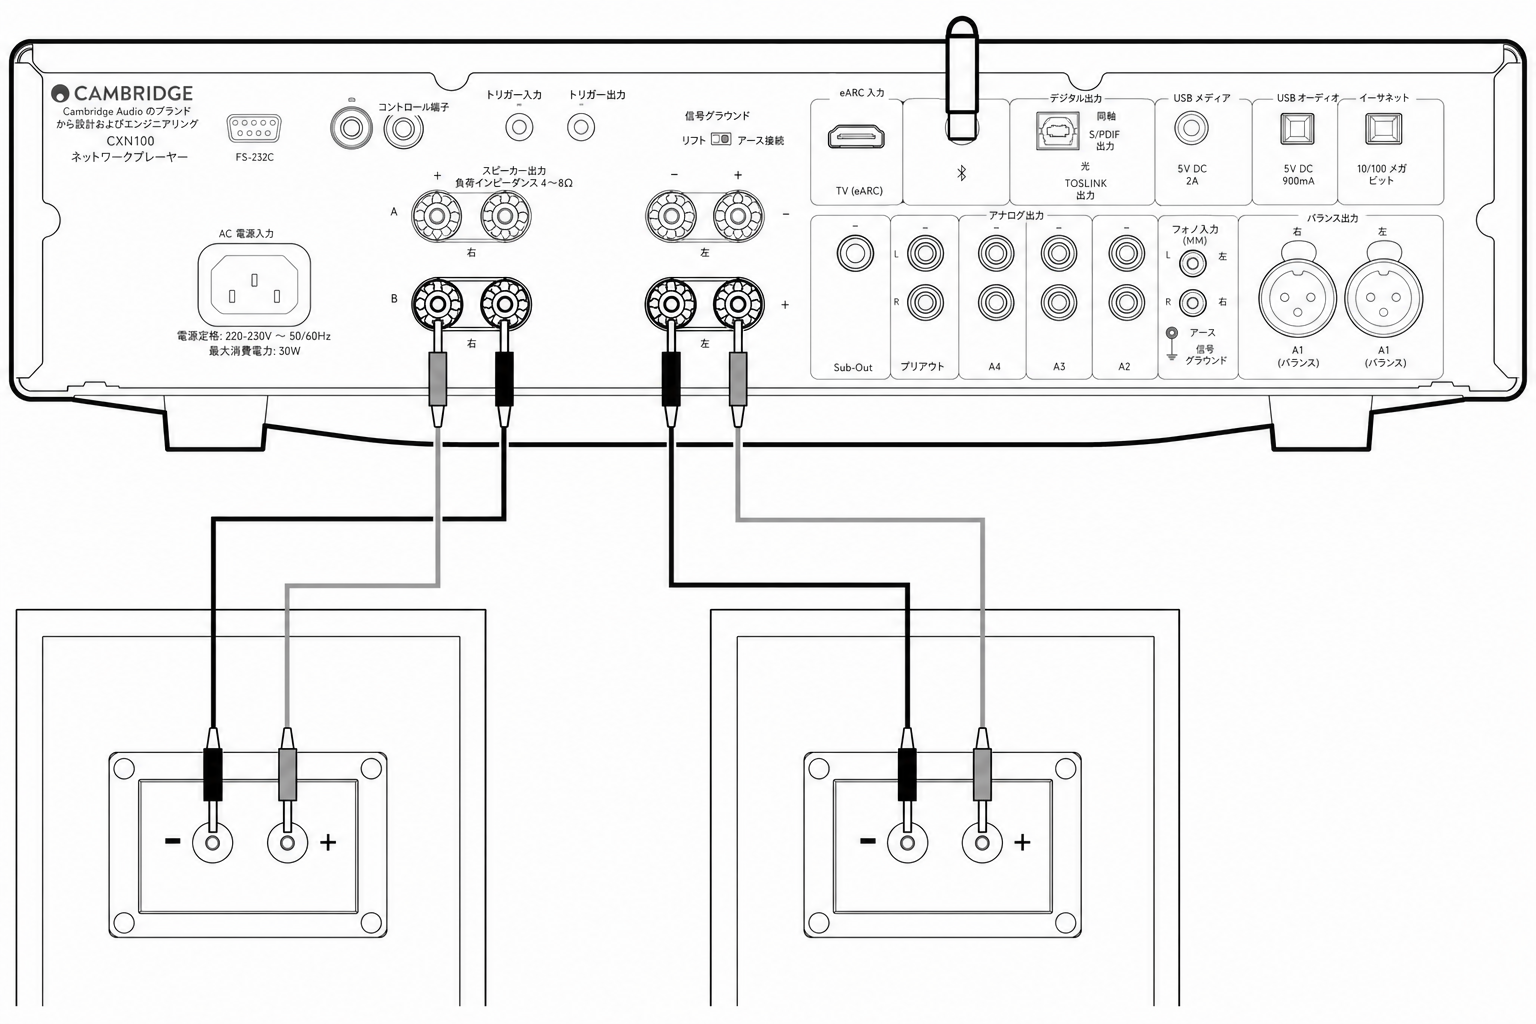
スピーカー B の接続
アンプ背面のスピーカー B 端子により、2 組目のスピーカー(たとえば別室のスピーカー)を使用できます。フロントパネルのスピーカー A/B ボタンを押すと、A のみ、B のみ、A と B の同時鳴動が順に切り替わります。
The Speaker B connections on the back of the amplifier allow for a second set of speakers to be used (i.e. speakers located in another room). The Speaker A/B button on the front panel scrolls through the selection of speaker A only, speaker B only, and speaker A and B together.
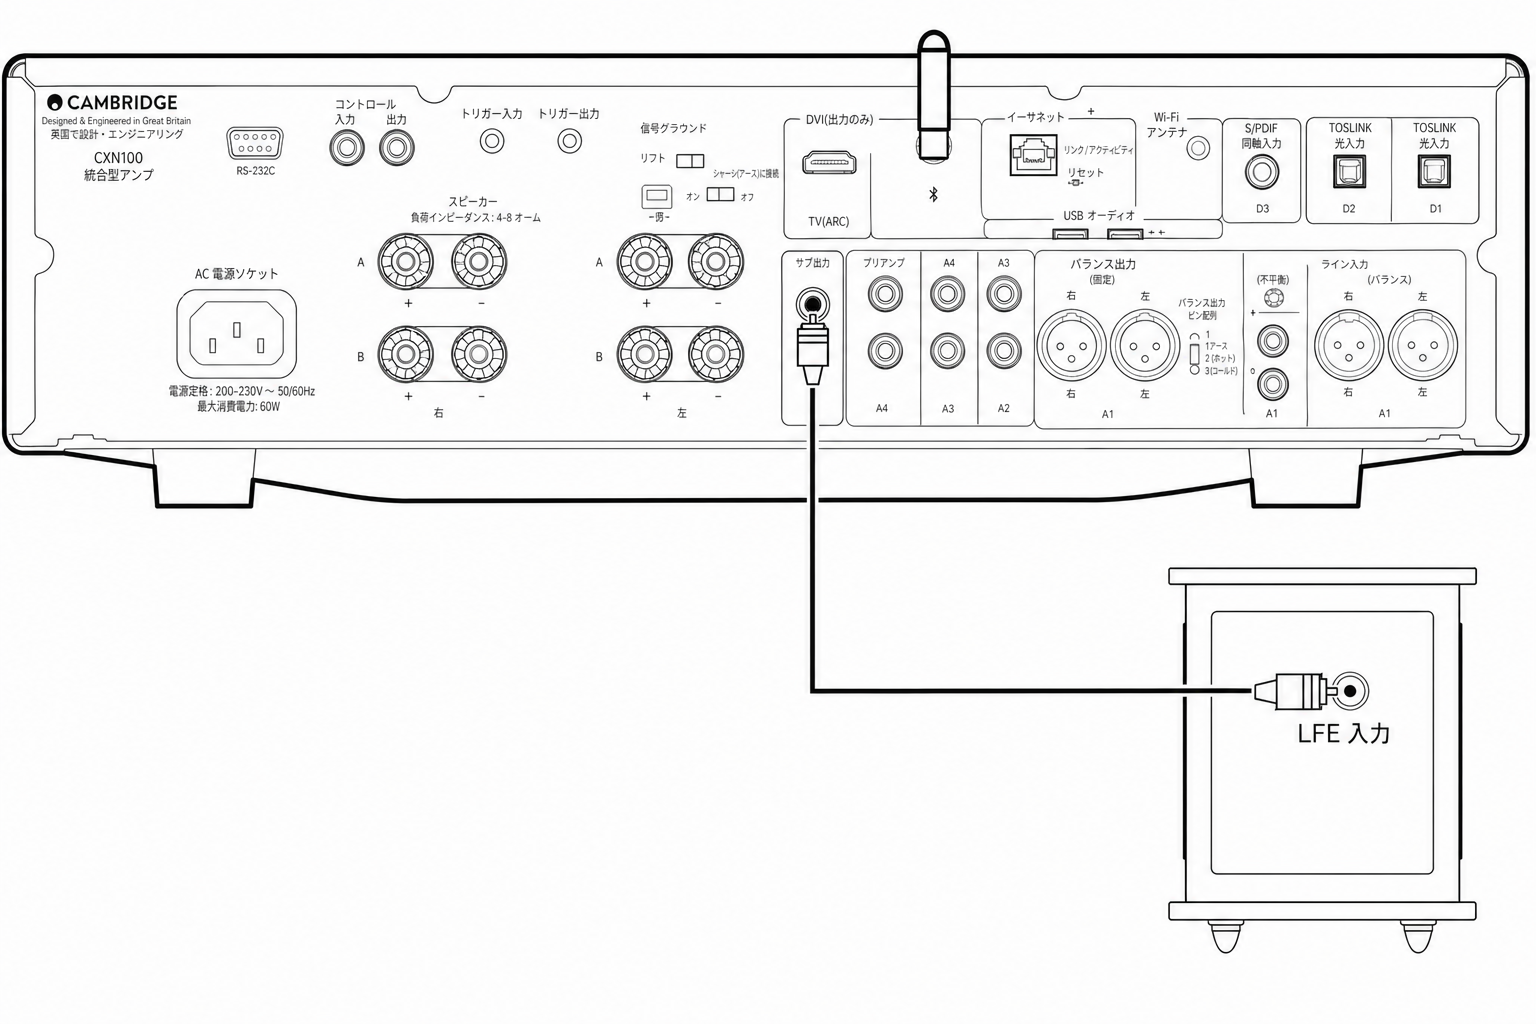
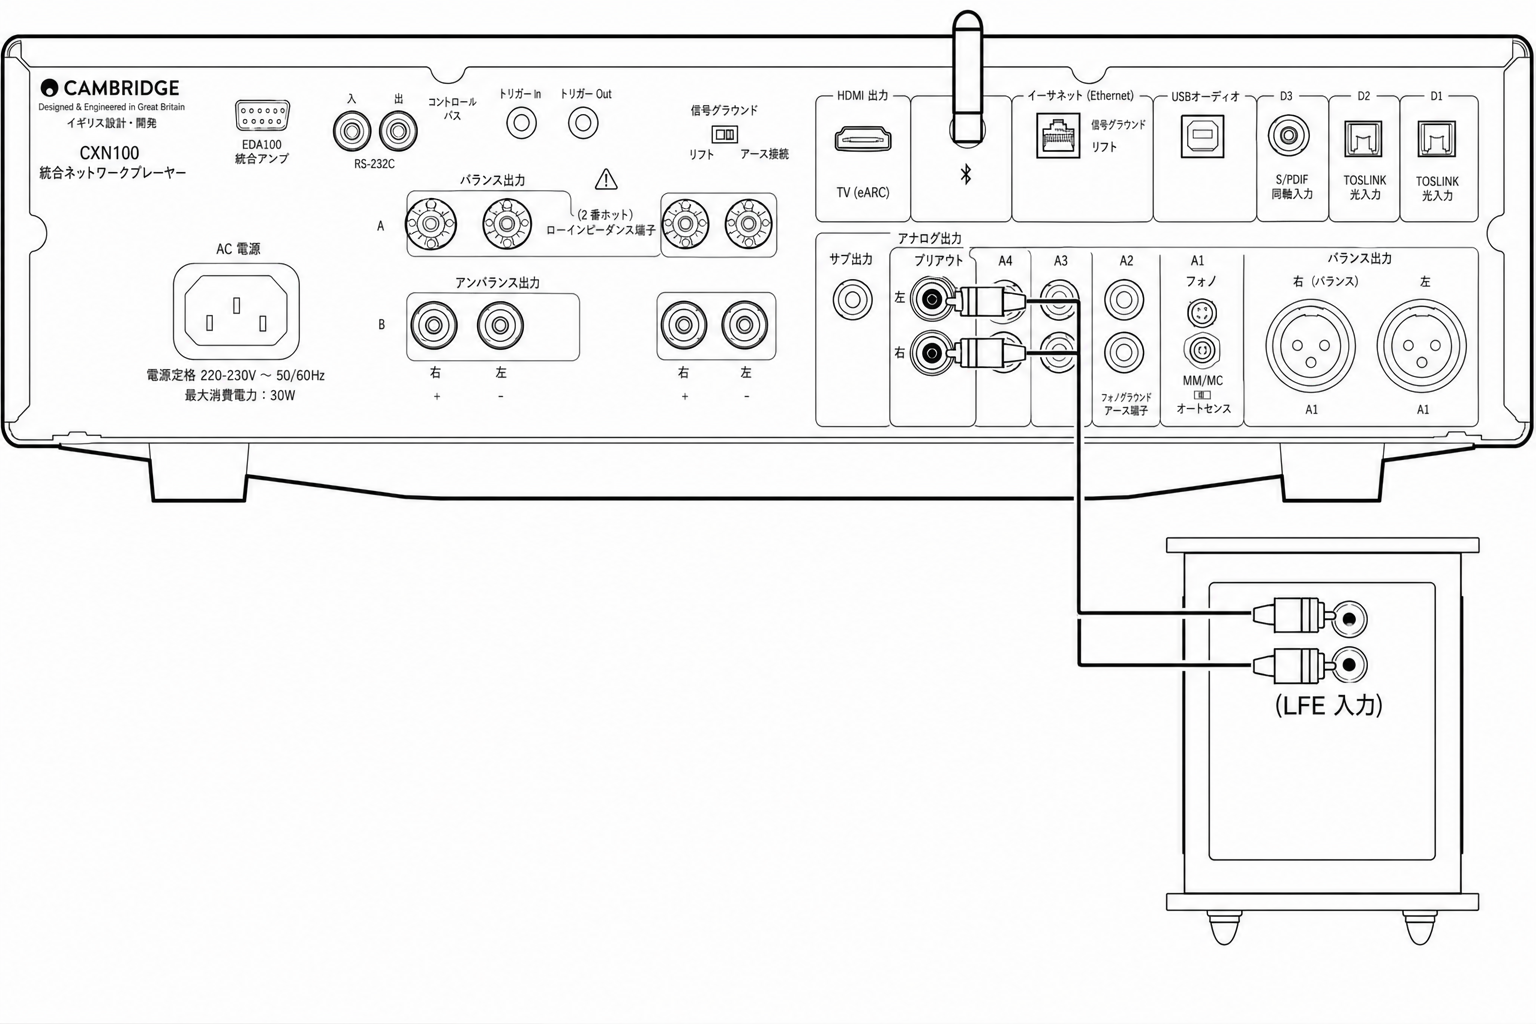
サブ出力の接続
サブ出力は、アクティブサブウーファーの LFE/Sub 入力に接続するためのものです。下図は、サブウーファーの LFE/Sub 入力経由で本機をアクティブサブウーファーに接続する方法を示しています。
The Sub Out is for connecting to the LFE/Sub input of an active subwoofer. The diagram below shows how to connect the amplifier to an active subwoofer via the LFE/Sub input on the subwoofer.
プリアンプ出力の接続
プリアンプ出力ソケットは、パワーアンプやアクティブサブウーファーの入力ソケットに接続するためのものです。下図は、サブウーファーの Line In 入力経由で本機をアクティブサブウーファーに接続する方法を示しています。
The Preamp Out sockets are for connecting to the input sockets of a power amplifier or active subwoofer. The diagram below shows how to connect the amplifier to an active subwoofer via the Line In inputs on the subwoofer.
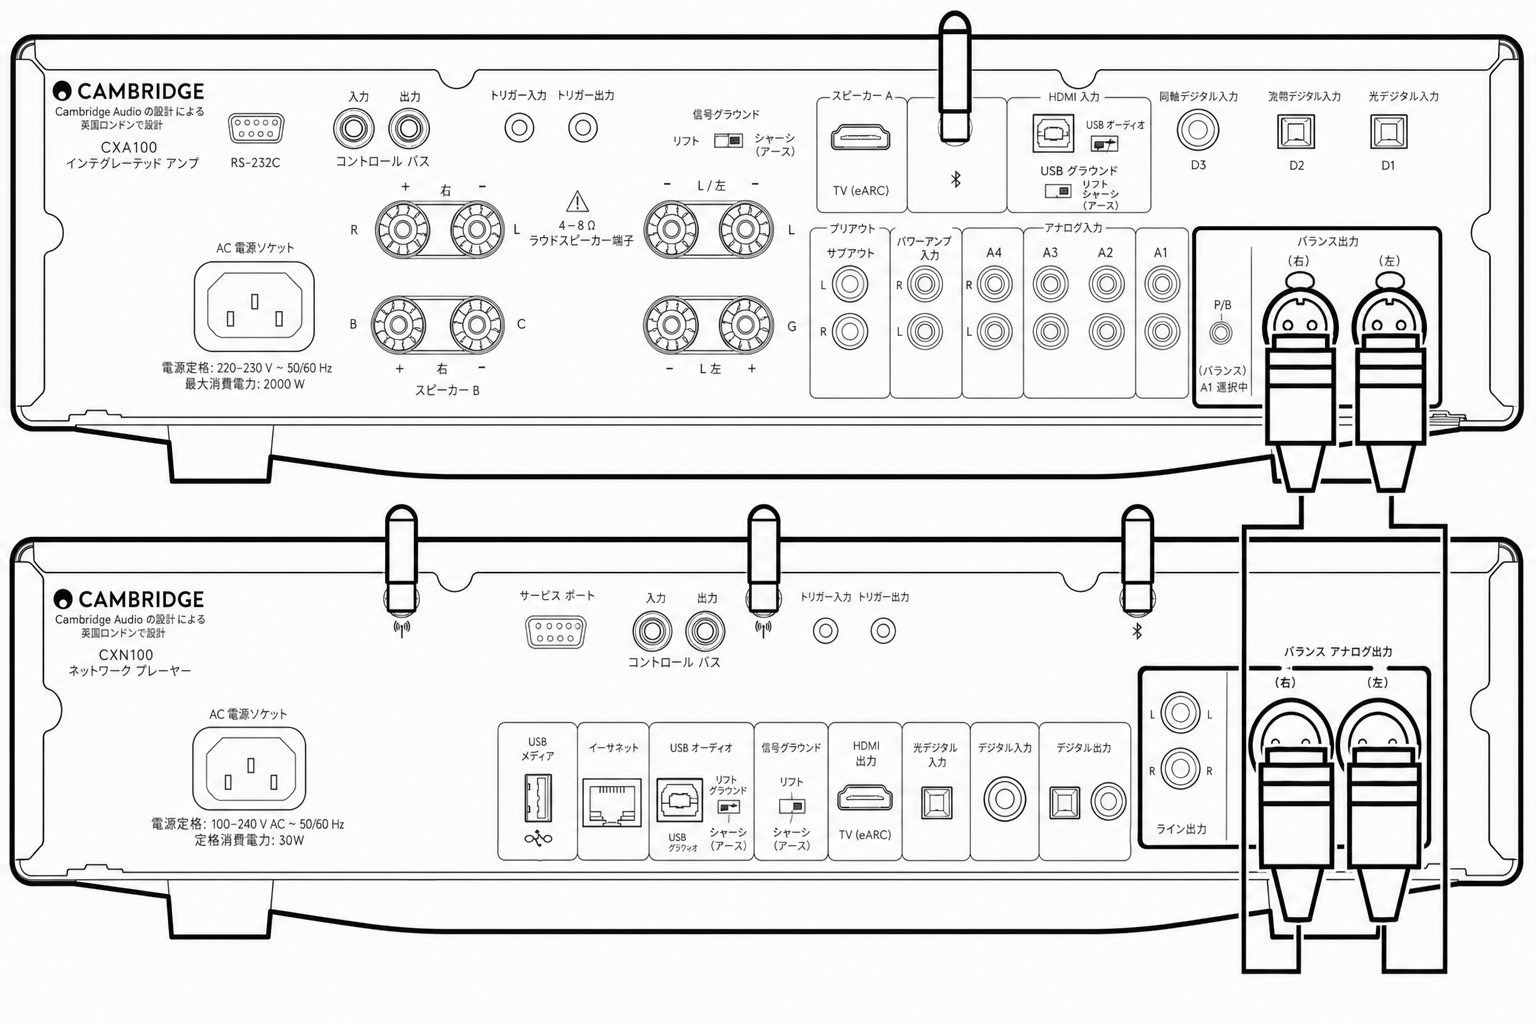
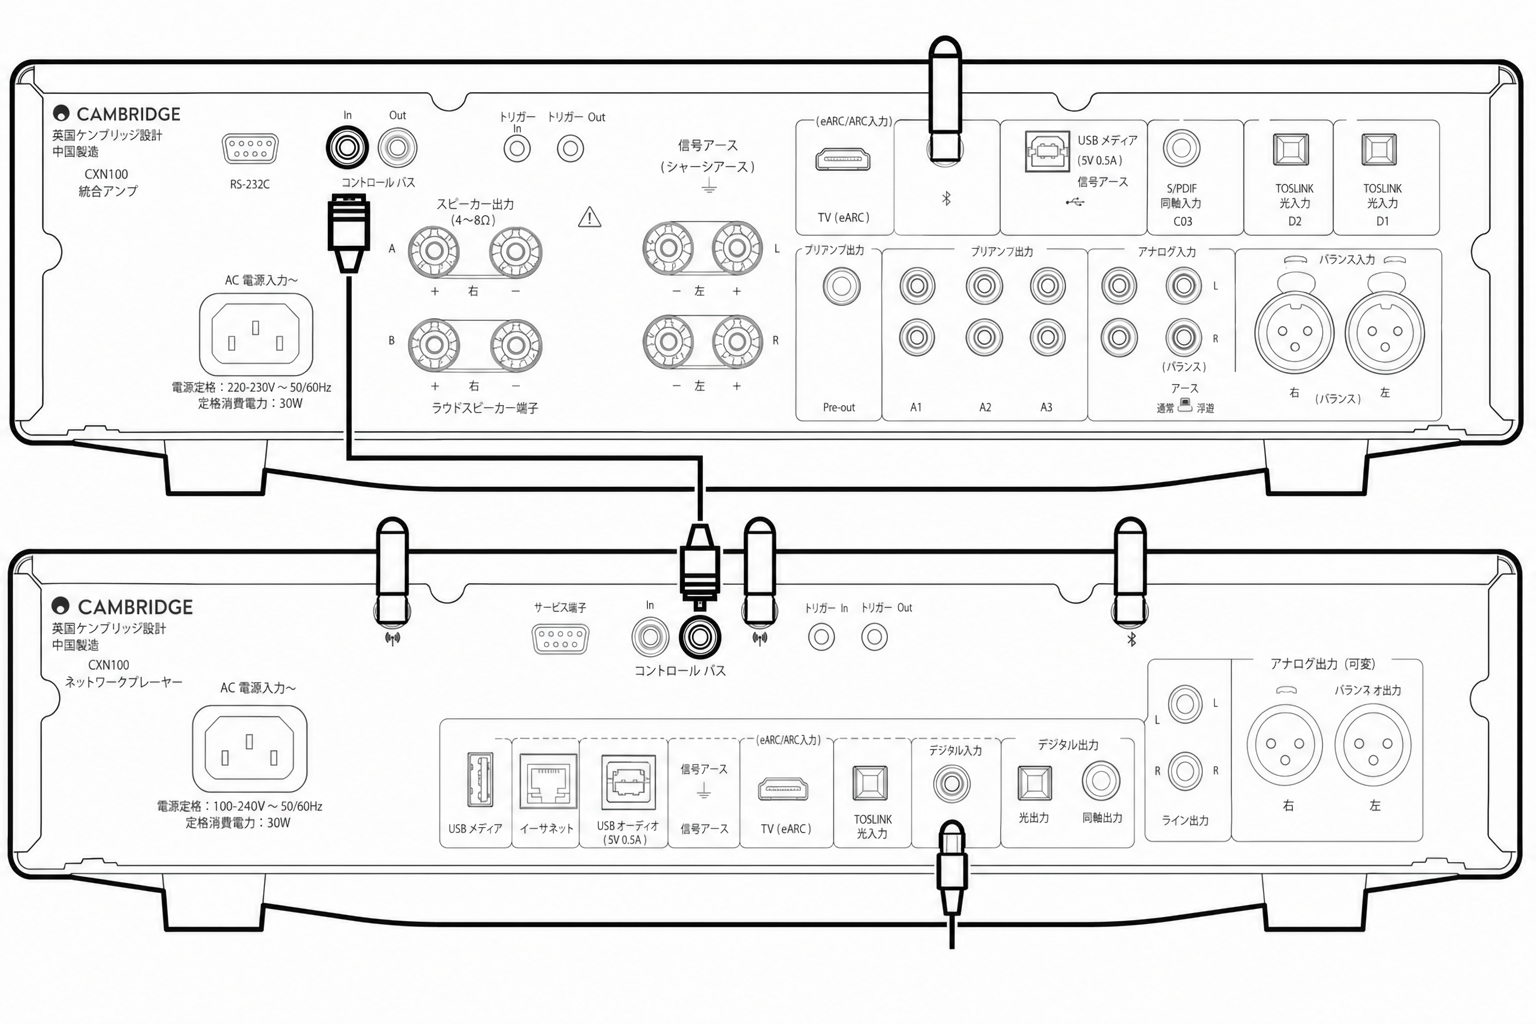
バランスオーディオの接続
下図は、3 ピン XLR コネクターを使ったバランスオーディオ入力で EXA と EXN ネットワークプレーヤーを接続する方法を示しています。EXA は Cambridge Audio 以外のバランス出力ソースとも接続できます。
The diagram below shows how to connect the EXA to the EXN Network player using the Balanced Audio inputs via three pin XLR connectors. The EXA can also be connected to non-Cambridge Audio sources with balanced outputs.
オーディオシステムにおけるバランス接続は、電源配線などからの電気的ノイズや、グランド接続を流れるノイズ電流の影響を排除するために設計されています。バランス伝送の基本原理は、3 線式の接続で「引き算」によって目的の信号を取り出すというものです。1 本の信号線(ホット、または同相)は通常の信号を伝え、もう 1 本(コールド、または逆相)は反転した信号を伝えます。バランス入力は 2 本の信号線の差分を検出して目的の信号を得ます。両方の線に同一に現れるノイズ電圧(コモンモード信号と呼びます)は、この引き算によって打ち消されます。EXA はバランスインターコネクトを使用したときに最高のパフォーマンスを発揮するよう設計されています。
Balanced connections in an audio system are designed to reject electrical noise, from power wiring etc, and also the effects of noise currents flowing through ground connections. The basic principle of balanced interconnection is to get the signal you want by subtraction, using a three-wire connection. One signal wire (the hot or in-phase) carries the normal signal, while other (the cold or phase-inverted) carries an inverted version. The balanced input senses the difference between the two lines to give the wanted signal. Any noise voltages that appear identically on both lines (these are called common-mode signals) are cancelled by the subtraction.The EXA is designed to work at its highest performance when a balanced interconnect is used.
注:EXA でバランス入力を選択するには、フロントパネルまたはリモコンの A1 ボタンを 2 回押し、フロントパネルディスプレイの A1 ランプをオレンジ色に点灯させます。A1 ボタンを繰り返し押すと、バランス入力とアンバランス入力が切り替わります。
Note: To select the balanced input on the EXA, press the A1 button twice on the front panel or on the remote control so that the A1 light on the front panel display lights up Orange. Repeatedly pressing the A1 button will toggle between balanced and unbalanced inputs.
テレビの接続
テレビに必要な光(オプティカル)または同軸出力があれば、EXA のデジタル入力のいずれかに接続できます。EXA はステレオ信号のみデコードできるため、テレビの音声出力設定を PCM またはステレオにしてください。また、テレビを接続したデジタル入力(D1、D2、D3)を EXA のフロントパネルで選択していることもご確認ください。EXA の「TV モード」を有効にする:一部のコネクテッドテレビは、アンプ内蔵 DAC が処理できない不安定なサンプリングレートを EXA に送信することがあります。その結果、音声の途切れやノイズが発生する場合があります。お使いの EXA でこのような症状が出る場合は、「TV モード」を有効にする必要があります。EXA で「TV モード」を有効にする手順は以下のとおりです。
A TV can be connected to one of the digital inputs on the EXA, as long as the TV has the required Optical or Coaxial output. Ensure that the output audio settings on the TV are set to PCM or Stereo, as the EXA is only able to decode a Stereo signal.Please also ensure that the digital input that the TV is connected to has been selected on the front panel of the EXA (D1, D2 or D3).Enabling ‘TV Mode’ within the EXA:Some Connected TVs will send an inconsistent sample rate to the EXA, that the DAC inside the amplifier is unable to process. This can result in audio dropouts and glitches. If this is the case with your EXA, ‘TV Mode’ will need to be enabled within the amplifier. To enable 'TV mode' on the EXA:
- EXA をスタンバイモードにしてセットアップメニューに入ります。
- スタンバイモードのまま、A/B ランプが交互に点滅し、ソース A1〜A4 が点灯するまでスピーカー A/B ボタンを長押しします。セットアップ構成については、以下のソースボタンの説明をご覧ください。注:選択中(オン)のボタンは青色のランプで示されます。A2 オフ - 入力 D2 に対して最良のデジタル入力オーディオ設定になります。A2 オン - 入力 D2 に対してより寛容なデジタル入力設定となり、信号が断続的に途切れる可能性を低減します。
- 設定を保存してセットアップメニューを終了するには、スピーカー A/B ボタンを押します。
注:セットアップメニュー中にスタンバイ/オンボタンを押すと、セットアップメニューを終了し、設定は保存されません。TV 入力(ARC/eARC 入力)
テレビの ARC/eARC 機能は、接続したオーディオ製品に音声と制御コマンドを送信します。これにより、必要に応じてテレビからオーディオ製品の電源を入れたり、テレビのリモコンで音量を調整したりできます。注:設定メニューの TV 電源コントロールオプションは初期設定で有効ですが、必要に応じて無効にできます。
The ARC/eARC function on a TV allows it to send audio and control commands to a connected audio product. This allows the TV to switch on the audio product when needed, and also to control the volume from the TV remote. Note: the TV power Control option in the configuration menu is enabled by default but can be disabled if required.
トラブルシューティング
フロントパネルに信号が表示されない、または接続した製品から音声が出力されない場合
No signal shown on the front panel or no audio output from your connected product
- テレビの HDMI 入力が ARC/eARC に対応していることを確認してください。
- テレビが内蔵スピーカーではなく、接続したオーディオシステムを使用する設定になっていることを確認してください。
- テレビの音声出力が「ステレオ PCM(非圧縮)」に設定されていることを確認してください。
- HDMI ケーブルが HDMI 1.4 以降に対応していることを確認してください。
テレビが接続製品の電源をオンにできない、または制御できない場合
TV will not switch on or control your connected product
- テレビ側で関連する CEC および ARC 設定が有効になっていることを確認してください。
- EXA 側で TV 電源コントロールモードが有効になっていることを確認してください。詳細は「セットアップメニュー」セクションをご覧ください。
問題のご報告 上記のトラブルシューティング手順を試しても ARC/eARC が動作しない場合は、サポートチームまでお問い合わせください。
Reporting an issue If after following the above troubleshooting steps you still have a problem getting ARC/eARC to work with your product, please contact our support team
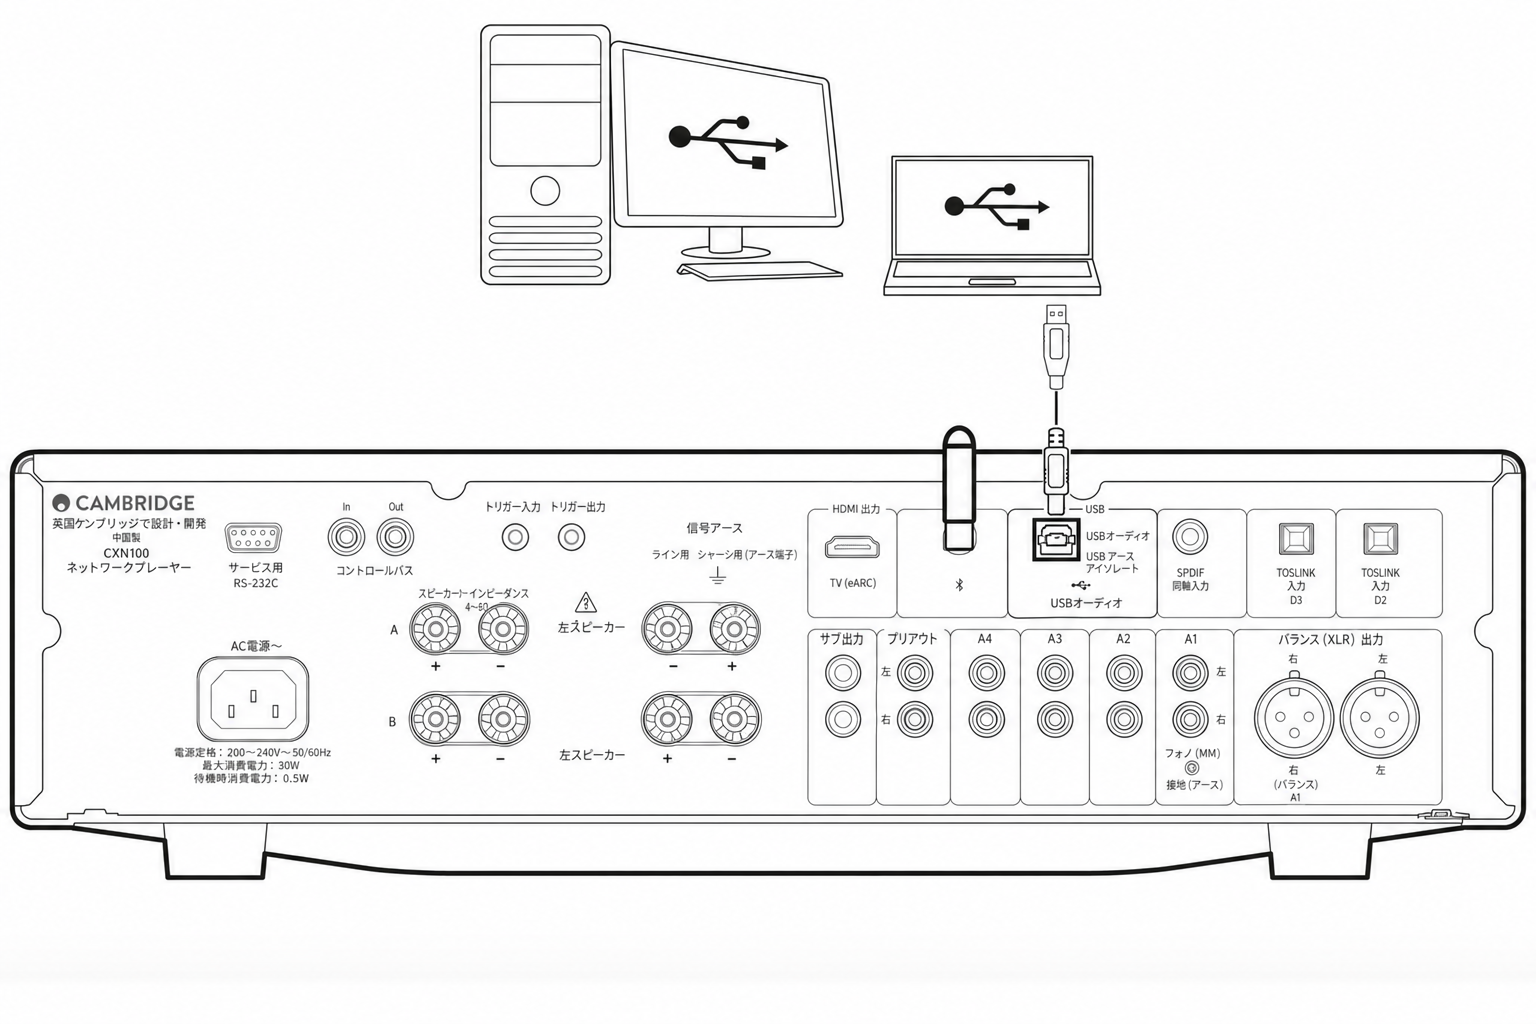
USB オーディオ接続
EXA の USB オーディオ入力を使用すると、Microsoft Windows または Apple Mac OS X のパソコン(および一部の Linux ビルド)からオーディオを再生できます。USB ケーブルで接続すると、コンピューターは EXA をオーディオデバイスとして認識します。コンピューターのオーディオコントロールパネルで EXA を指定すると、ローカルに保存されたオーディオデータや、ネットワーク・インターネット経由でストリーミングされるオーディオデータを再生できます。
The EXA USB Audio input enables the playback of audio from Microsoft Windows or Apple Mac OS X personal computers (and some Linux builds).When connected via a USB cable, the computer will identify the EXA as an audio device. Specifying the EXA in the computer’s audio control panel, will enable it to play audio data either stored locally on the computer or streamed to the computer via a network or the internet.
重要:USB 入力にケーブルを抜き差しする際や、PC/Mac を起動・終了する際は、必ず音量を最小にするか、別の入力に切り替えるか、EXA の電源をオフにしてください。
Important Note: Always turn the volume to minimum, switch to another input or turn the EXA off before plugging/unplugging cables to the USB input or whilst booting up/shutting down your PC/Mac.
注:USB Hi-Speed 認証を取得した高品質な USB「A-B」ケーブルを必ず使用してください。3m を超える USB ケーブルでは、オーディオ性能が不安定になる場合があります。
Note: Always use a high-quality USB ‘A to B’ cable certified as USB Hi-Speed. USB cable connections longer than 3m may result in inconsistent audio performance.
EXA は USB 2.0(Hi-Speed)と USB 1.1(Full-speed)の両方の USB ポートに対応します。USB 3.0 ポートでも動作し、PC は EXA を USB 2.0 または 1.1 デバイスとして扱います。
The EXA is both USB 2.0 (Hi-Speed) and USB 1.1 (Full-speed) USB port compatible.It should also work with USB 3.0 ports where the PC will simply treat the EXA as if it were a USB 2.0 or 1.1 device.
EXA は 2 種類の USB オーディオプロトコルに対応します(ポート規格とは別物です):- USB Audio Class 1(USB 1.1 ポートで動作し、最大 24 ビット/96kHz に対応)- USB Audio Class 2(USB 2.0 ポートが必要で、最大 24 ビット/384kHz に対応)
The EXA supports two USB Audio protocols (not the same as the port types themselves):- USB Audio Class 1 (which works over USB 1.1 ports and supports up to 24-bit/96kHz)- USB Audio Class 2 (which requires a USB 2.0 port and can support up to 24-bit/384kHz)
初期設定は USB Audio Class 2 です。
The default configuration is USB Audio Class 2.
Windows PC を USB オーディオ入力経由で EXA に接続する方法
EXA を USB Audio Class 1 に切り替えると、Windows 7 以降で動作し、最大 24 ビット/96kHz のオーディオに対応します。
With the EXA switched to USB Audio Class 1, the EXA will work with Windows 7 or above and accept audio up to 24-bit/96kHz.
EXA を USB Audio Class 2 に切り替える場合は、Cambridge Audio USB Audio 2.0 ドライバーのインストールが必要です。インストール後は最大 24 ビット/384kHz に対応します。
With the EXA switched to USB Audio Class 2, the EXA needs the Cambridge Audio USB Audio 2.0 Driver to be loaded and can then accept up to 24-bit/384kHz.
- EXA をスタンバイモードにし、音量を最小にした状態で、USB A-B ケーブルで PC と EXA を接続します。
- 最高品質で再生するには、EXA を USB 2.0 モードに設定してください。USB モードの変更方法は「Setup Menu」セクションを参照してください。(初期設定は USB Audio Class 2 です)
- Windows USB 2.0 ドライバーをダウンロードします。ドライバーのダウンロード方法は、後述の「最新の USB オーディオドライバーをインストールする方法」セクションを参照してください。
- EXA のフロントパネルで USB Audio ソースを選択します。フロントパネルの USB Audio ボタンを押して選択します。
- Windows PC のサウンド設定で、出力スピーカーとして EXA を選択します。注:最高品質で再生するには、EXA のサンプリングレートを最大 384 kHz に設定してください。Windows PC で「コントロールパネル」>「サウンド」>「スピーカーのプロパティ」>「詳細」タブを開き、ドロップダウンメニューから最大のサンプリングレートとビット深度を選択します。
EXA100 用の最新 USB オーディオドライバーをインストールする方法
EXA100 用の最新 USB オーディオドライバーをインストールするには、以下の手順に従ってください:
To install the latest USB Audio driver for your EXA100, please follow the steps below:
- お使いの Windows OS に対応するドライバーを以下からダウンロードします:https://www.cambridgeaudio.com/gbr/en/driver-updates
- ダウンロードしたフォルダーを解凍し、アプリケーションファイルをダブルクリックしてインストーラーを実行します。下の画像で示された箇所です。
- インストーラーを実行し、指示に従います。
- アップデートを進行させ、「次へ」をクリックし、最後に「完了」をクリックしてインストールを終えます。
- CA コントロールパネルを開いてドライバーのバージョンを確認し、インストール完了を確認します。
Apple Mac を USB オーディオ入力経由で EXA に接続する方法
追加のドライバーは不要です。EXA を USB Audio 1.0 に切り替えると、Mac OS-X 10.5(Leopard)以降の標準 Audio 1.0 ドライバーで動作し、最大 24 ビット/96kHz に対応します。
No extra drivers are required. With the EXA switched to USB Audio 1.0 the EXA will work with the native Mac OS-X 10.5 (Leopard) or above Audio 1.0 driver and accept audio up to 24-bit/96kHz.
EXA を USB Audio Class 2 に切り替えると、Mac OS-X 10.5(Leopard)以降の標準 Audio 2.0 ドライバーで動作し、最大 24 ビット/384kHz に対応します。
With the EXA switched to USB Audio Class 2 the EXA works with the native Mac OS-X 10.5 (Leopard) or above Audio 2.0 driver and can accept audio up to 24-bit/384kHz.
- EXA をスタンバイモードにし、音量を最小にした状態で、Mac の USB ポートに合わせて USB A-B ケーブルまたは C-B ケーブルで Mac と EXA を接続します。
- EXA のフロントパネルで USB Audio ソースを選択します。フロントパネルの USB Audio ボタンを押して選択します。
- Mac のサウンド設定で、出力スピーカーとして EXA を選択します。
注:最高品質で再生するには、EXA のサンプリングレートを最大 384 kHz に設定してください。
Note: To ensure you are getting the highest quality play back possible, ensure that the maximum sample rate for the EXA is selected, up to 384 kHz.
Mac で「Audio MIDI 設定」>「サウンド」>「スピーカーのプロパティ」>「詳細」タブを開き、ドロップダウンメニューから最大のサンプリングレートとビット深度を選択します。
This can be done via your Mac by selecting ‘Audio Midi Setup > ‘Sound’ > ‘Speaker Properties’ > ‘Advanced’ Tab, and selecting the maximum sample rate and bit depth from the drop down menu.
Linux での使用
ほとんどの Linux ビルドでは、EXA を USB Audio Class 1 に切り替えると、標準の Audio 1.0 ドライバーで動作し、最大 24 ビット/96kHz に対応します。
For most builds of Linux with the EXA switched to USB Audio Class 1 the EXA will work with the native Audio 1.0 driver and accept audio up to 24-bit/96kHz.
一部の新しいLinuxビルドはUSB Audio Class 2をサポートしており、EXAをAudio 2.0に切り替えることで最大24-bit/384kHzを受信できます。
Some very new builds of Linux are now supporting USB Audio Class 2 for which the EXA should be switched to Audio 2.0 to accept audio up to 24-bit/384kHz.
いずれの場合も、Linux ビルドは作成者が選択するドライバーなどのソフトウェア構成によって異なるため、動作を保証できません。オーディオドライバーの追加インストールが必要になる場合もあります。
For both cases because Linux builds vary according to their creator’s choice of software components including drivers it is not possible to guarantee operation and Audio drivers may need to be loaded.
Audio Class 1.0 または Audio Class 2.0 デバイスを汎用的にサポートする「クラスドライバー」と呼ばれるものは、Linux コミュニティから入手できる場合があります。当社では提供していません。
'Class drivers' as they are called for generic support of Audio Class 1.0 or Audio Class 2.0 devices may be available from the Linux community, we do not supply these.
注:EXA100 の「USB Audio」入力に USB ドライブや HDD を直接接続することはできません。EXA100 の「USB Audio」入力は PC または Mac との直接接続のみに対応します。ただし、当社のネットワークプレーヤーと組み合わせて EXA100 で使用することは可能です。
Note: It is not possible to connect a USB drive or HDD directly to the EXA100 via the ‘USB Audio’ input. The ‘USB Audio’ input on the EXA100 will only support a direct connection with a PC or Mac. You will, however, be able to use one of our network players in combination with the EXA100 to do this.
セットアップメニュー
セットアップメニューに入る方法
- EXA をスタンバイモードにします。
- スタンバイモードのまま、Speaker A/B ボタンを押し続けます。A/B ランプが交互に点滅し、ソース A1〜A4 と TV 入力 LED が点灯するまで押し続けてください。注:TV 入力 LED は、TV Power Control が初期設定で有効になっていることを示します。
設定オプション
注:選択中のボタンは青いランプで示されます。
Note: Button selected is represented by a blue light.
オートパワーダウン(APD)


A1 オン:APD 時間を 20 分に設定します。A1 オフ:APD(オートパワーダウン)機能を無効にします。注:オートパワーダウンは、オーディオ信号がない場合に EXA を自動的にスタンバイモードへ切り替える機能です。APD 時間は、EXA が自動的にスタンバイモードへ移行するまでに必要な無信号時間を示します。
A1 on – Sets the APD time to 20 minutes.A1 off – Disables the APD (Auto power down) function. Note: Auto power down is a power down function that automatically switches the EXA into standby mode if there is no audio. The APD time represents the amount of time required for there to be no audio before the EXA is automatically put into the standby mode.
クリッピング機能


ボタン A3 でアンプのクリップ保護モードを選択します。A3 オン:クリッピング機能が有効になります。信号のクリッピングを検出すると音量が自動的に下がります。A3 オフ:クリッピング機能が無効になります。
Button A3 selects the amp clip protection modeA3 on – Clipping function enabled. The volume nudges down if signal clipping is detected. A3 off – Clipping function is disabled.
USB モード


ボタン A4 で USB オーディオモードを選択します。A4 オン:EXA が USB Audio Class 2 モードになります。A4 オフ:EXA が USB Audio Class 1 モードになります。注:
Button A4 selects the USB Audio modeA4 on – EXA in USB Audio Class 2 mode. A4 off – EXA in USB Audio Class 1 mode. Notes:
TV モード
ボタン A2 で D2 入力と TV 入力の両方を TV 最適化モードに切り替えます。A2 オン:D/A コンバーター(DAC)が SYNC モードになります。A2 オフ:DAC が ASYNC モードになります。
Button A2 selects the TV optimized mode on both D2 and TV inputs.A2 on – DAC in SYNC modeA2 off – DAC in ASYNC mode
TV Power Control
TV 入力ボタンで ARC 経由の TV Power Control を選択します(初期設定はオン)。TV LED オン:TV Power Control が有効です。TV LED オフ:TV Power Control が無効です。
TV input button selects TV Power Control via ARC (default is on)TV LED on – TV Power control is enabled. TV LED off - TV Power control is disabled.
USB ファームウェアアップデートモード
USB 入力ボタンでファームウェアアップデートモードを選択します。リアパネルの USB コネクターは、USB Audio(初期設定)とファームウェアアップデートモードを切り替えられます。ファームウェアアップデートモードは電源を切ると保持されず、EXA の電源を入れ直すと USB は USB Audio モードに戻ります。USB オン:ファームウェアアップデートモードがオンになります。USB オフ:ファームウェアアップデートモードがオフになります。
USB input button selects firmware update mode. The rear panel USB connector is switched between USB Audio (default) and firmware update mode. Firmware Update mode is not persistent across a power cycle, the EXA will default to USB switched to USB Audio mode after being switched off.USB on – Firmware update mode on. USB off – Firmware update mode off.
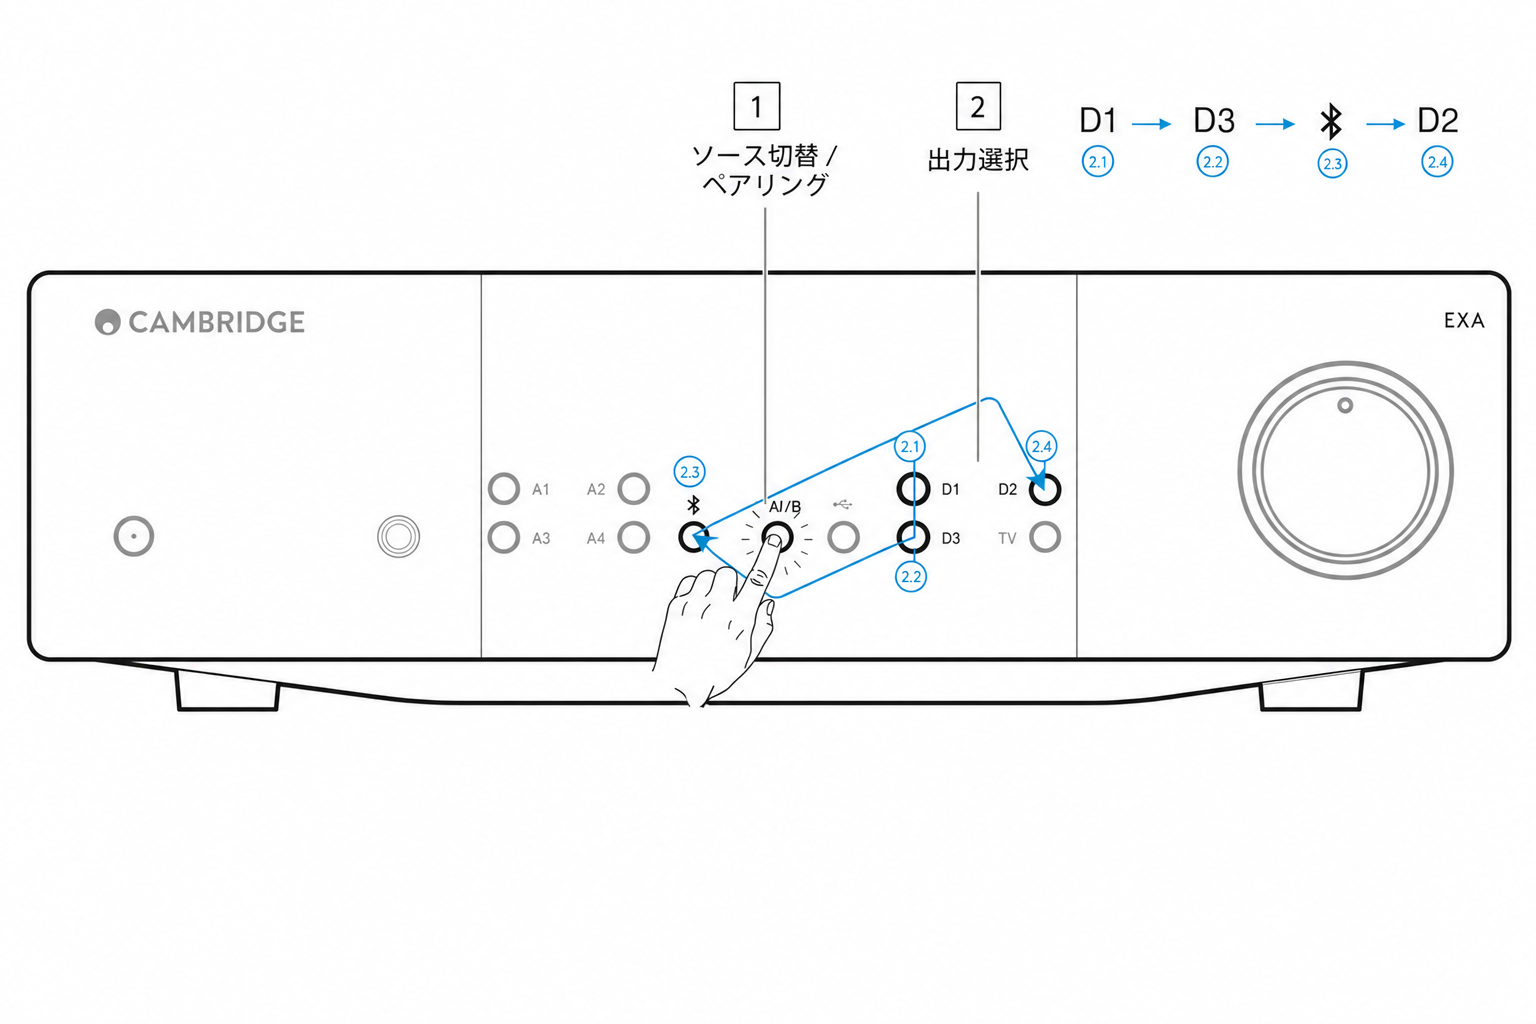
工場出荷時設定へのリセット
EXA を工場出荷時の初期設定に戻します。
This will restore the EXA to its original factory settings.
- EXA をスタンバイモードにし、Speaker A/B ボタンを押し続けます。
- A/B ランプが点滅したら、D1、D3、Bluetooth、D2 の順に押します:
設定を保存する方法
Speaker A/B ボタンを 1 回押すと、現在の設定が保存され、EXA がスタンバイ状態に戻ります。
Press the Speaker A/B button once to save the current settings and place the EXA back into Standby.
設定を保存せずにメニューを終了する方法
電源ボタンを押すと、EXA はスタンバイ状態に戻ります。
Pressing power button, the EXA will turn to Standby.
Bluetooth
このソースを選択すると、EXA は多くのスマートフォン、タブレット、ノートパソコンから Bluetooth 音声を受信できます。
Selecting this source allows the EXA to receive Bluetooth audio from most phones, tablets, and laptops.
Bluetooth 機能を使用するには、付属の Bluetooth アンテナを本体背面に取り付けてください。
The supplied Bluetooth antenna must be inserted into the rear of the unit to enable Bluetooth functionality.
ペアリング
デバイスから高音質の音楽をストリーミングするには、まず EXA とペアリングする必要があります。EXA で Bluetooth ソースを選択すると、検出モードに入ります。
To begin streaming high quality music from your device it will first need to be paired with the EXA. Select the Bluetooth source on the EXA to enter discovery mode.
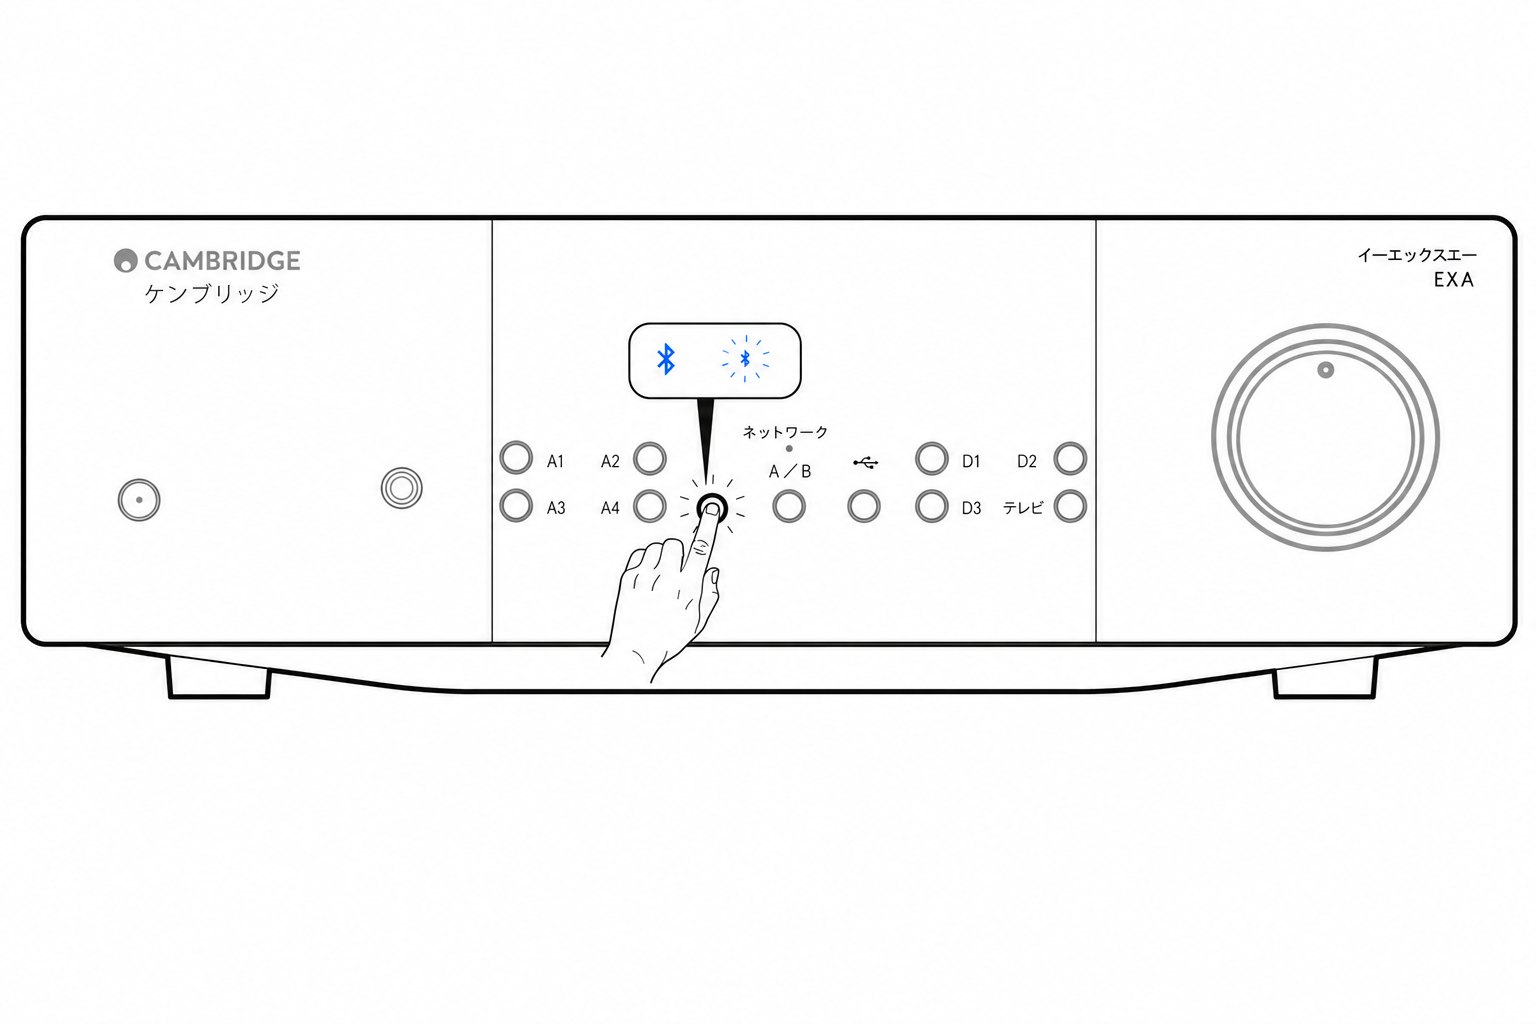
デバイスのペアリングと接続は、Bluetooth ソースが選択されているときのみ可能です。フロントパネルの Bluetooth ソースボタンを押して選択してください。Bluetooth ソース選択中はシンボルが青色に点灯します。
Your device can only be paired and connected to the EXA while the Bluetooth source is selected. This can be done by selecting the Bluetooth source button on the front panel. The Bluetooth source is shown as being selected by the symbol being lit blue.
EXA は Bluetooth 接続がない状態では常に検出モードになっています。検出モードとは、EXA が別の Bluetooth デバイスとペアリング可能な状態を指します。
The EXA is always in discoverable mode when there is no Bluetooth connection. Discoverable mode means that the EXA can be paired to another Bluetooth device.
Bluetooth トラブルシューティングガイド
Bluetooth デバイスを EXA に接続できない場合は、次のトラブルシューティング手順をお試しください。
If you are having problems connecting your Bluetooth device to the EXA, please try the following troubleshooting steps:
- 付属の Bluetooth アンテナが本体背面に正しく接続されているかを確認してください。EXA100 はアンテナが接続されていないと Bluetooth デバイスに接続できません。アンテナを一度取り外し、再度接続してみてください。
- フロントパネルの Bluetooth ボタンを押して、Bluetooth ソースが選択されているか確認してください。
- Bluetooth デバイスがペアリングモードになっており、他の Bluetooth 機器に接続されていないかを確認してください。
- デバイスの Bluetooth 検出リストから EXA を一度削除し、再度ペアリング操作を行ってください。
- EXA を工場出荷時設定にリセットしてください(詳細は「セットアップメニュー」セクションを参照)。
Control Bus
Control Bus を使用すると、対応する Cambridge 製品の電源を連動させることができます。次の図は、付属の Control Bus ケーブルを使用した EX シリーズの接続方法を示しています。
Control Bus allows any compatible Cambridge products to synchronise when powering up the units. The following diagrams show how to connect the EX series using the provided Control Bus cables.
Control Bus を使用すれば、StreamMagic アプリから EXN 経由で EXA を操作することもできます。
Control Bus also allows the StreamMagic app to control the EXA via an EXN.
StreamMagic アプリ(EXN 経由)
アプリで EXN の電源オン/オフを行うと、EXA の電源も連動してオン/オフします。アプリから EXA の音量を操作することも可能です。EXN の Control Bus 出力を EXA の入力に接続してください。詳細は EXN マニュアルを参照してください。
When using the app to turn the EXN on/off, this will also turn the EXA on/off. The app can also be used to control the volume of the EXA. Connect the EXN control bus out to EXA in. For more information, see the EXN manual.
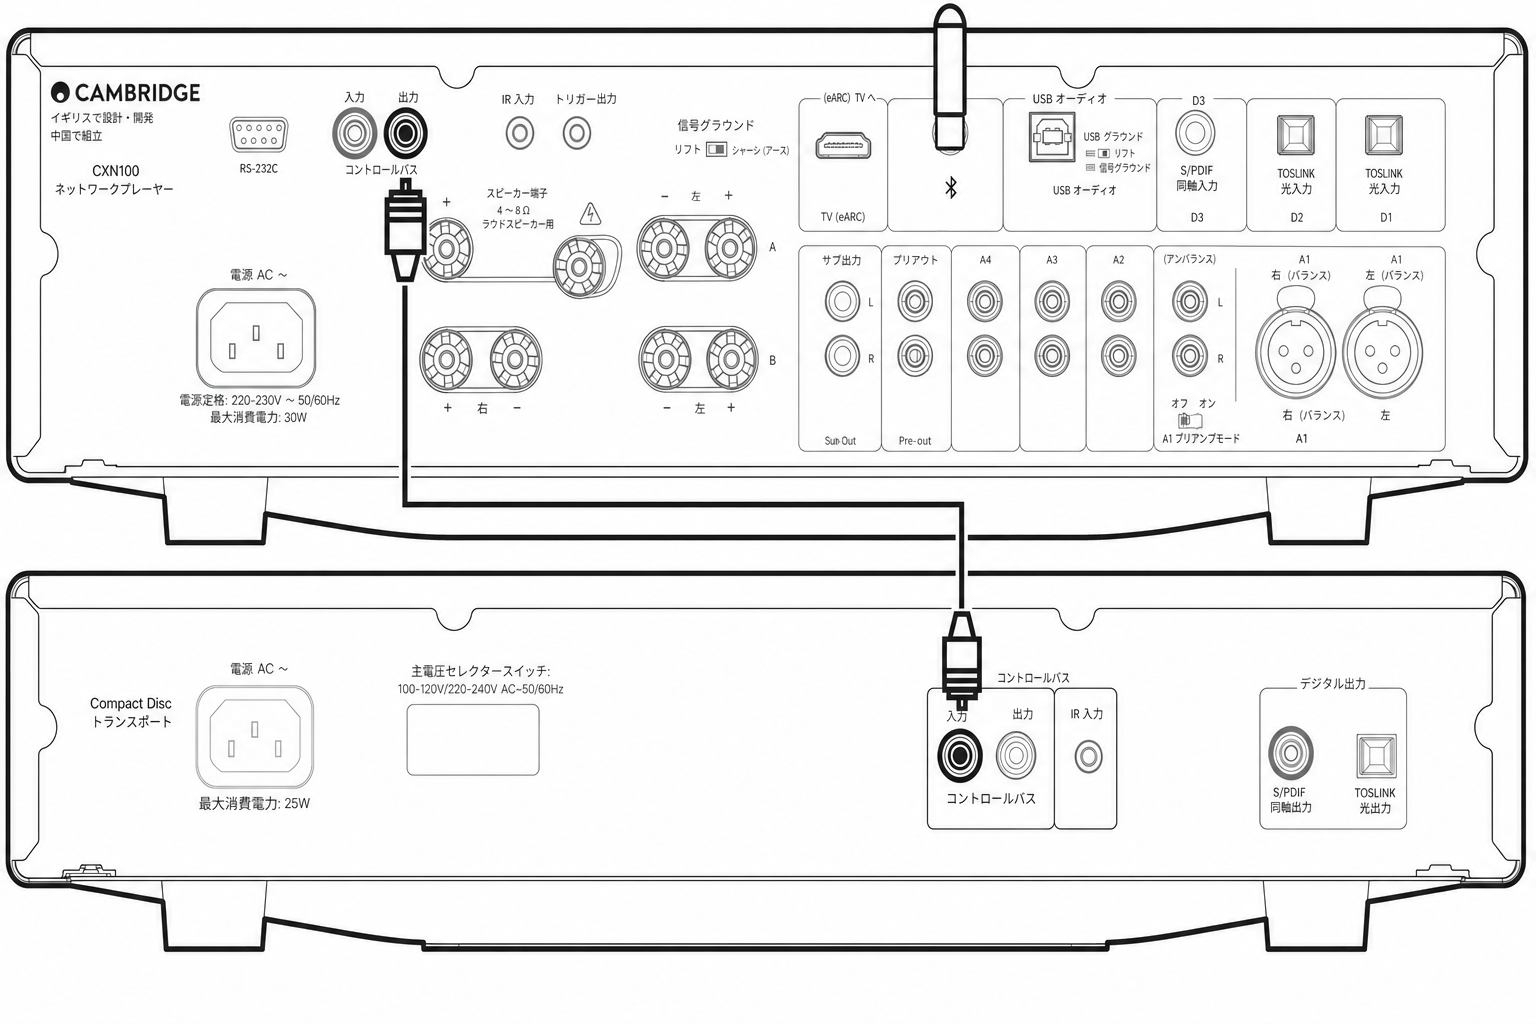
EXA と CXC の組み合わせ
EXA の電源オン/オフを行うと、CXC の電源も連動してオン/オフします。EXA の Control Bus 出力を CXC の入力に接続してください。
When turning the EXA on/off, this will also turn the CXC on/off. Connect the EXA control bus out to CXC in.
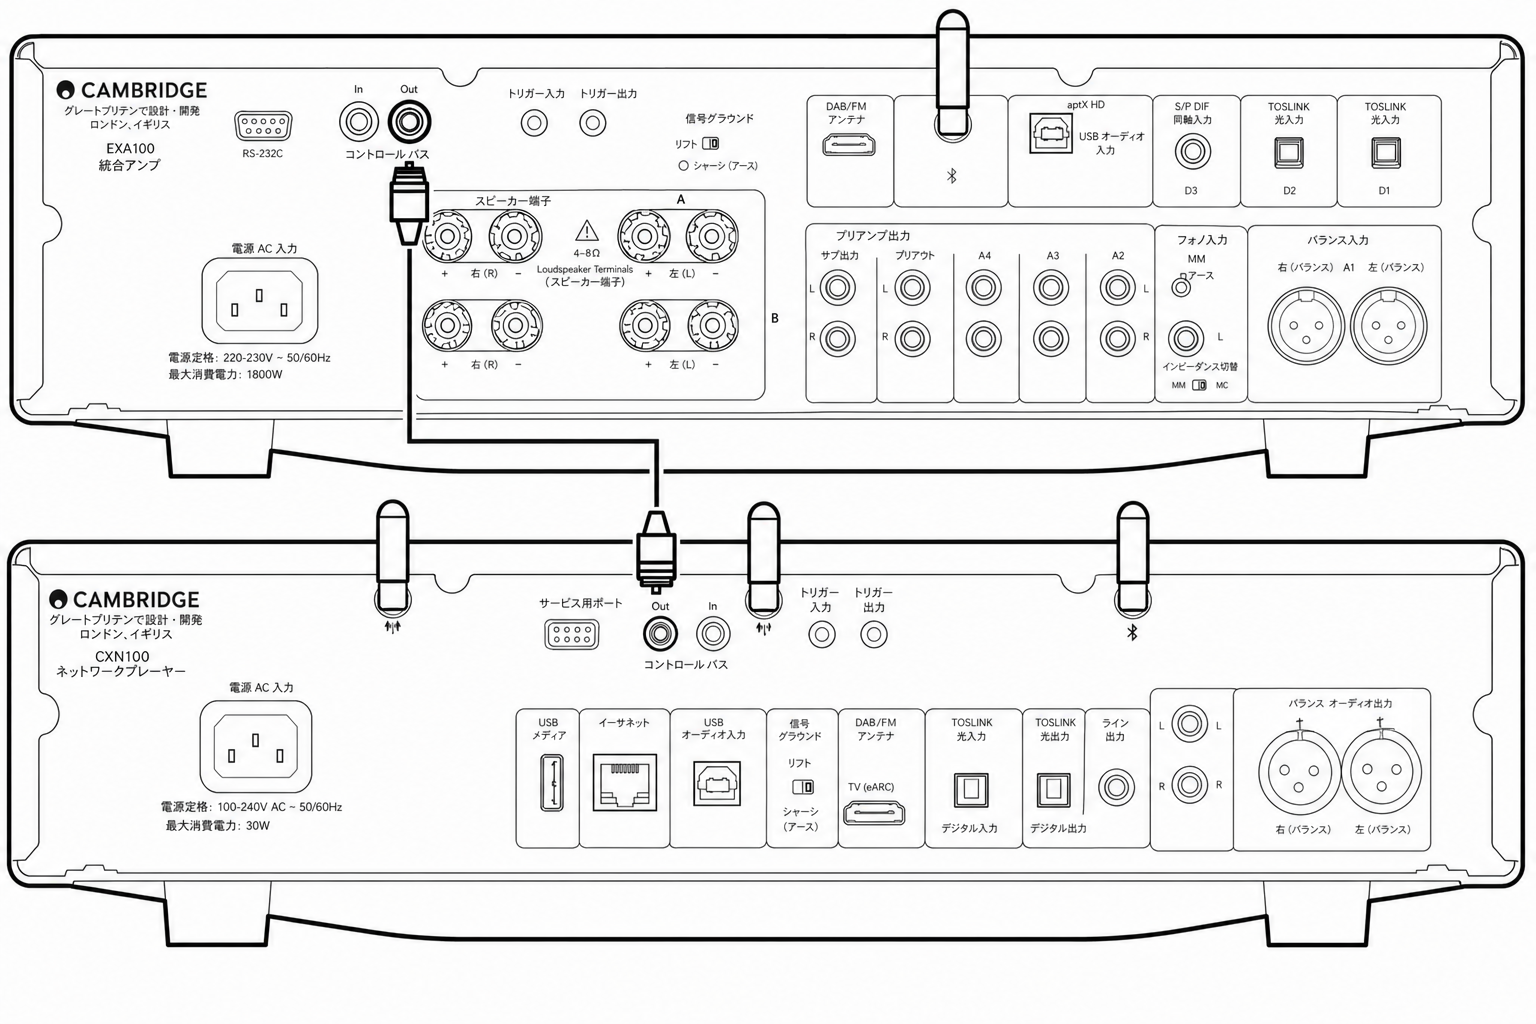
EXA と EXN の組み合わせ
注:StreamMagic アプリを使用せずに EXA を操作する場合の構成です。
Note: Without using the StreamMagic app to control the EXA.
EXA の電源オン/オフを行うと、EXN の電源も連動してオン/オフします。EXA の Control Bus 出力を EXN の入力に接続してください。
When turning the EXA on/off, this will also turn the EXN on/off. Connect the EXA control bus out to EXN in.
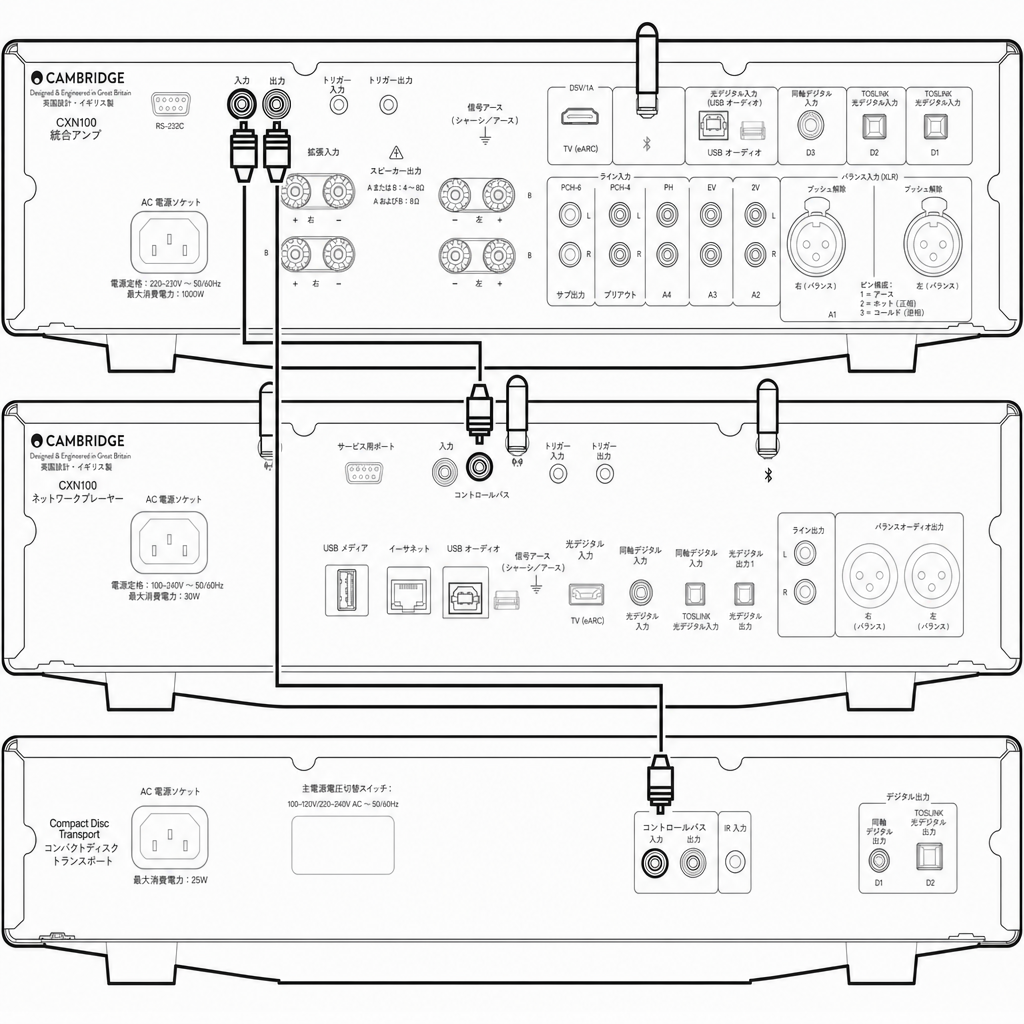
EXA と EXN、CXC の組み合わせ
EXN の電源オン/オフを行うと、EXA と CXC の電源も連動してオン/オフします。
When turning the EXN on/off, this will turn the EXA and CXC on/off.
EX シリーズ 3 機種すべてを接続する場合は、EXN の Control Bus 出力を EXA の Control Bus 入力に接続します。続いて EXA の Control Bus 出力を CXC の Control Bus 入力に接続してください。
With all three EX devices, connect the EXN Control Bus out to EXA Control Bus in. Then connect the EXA Control Bus out to CXC Control Bus in.
注:CXC の Control Bus 出力から EXN の Control Bus 入力へループバック接続しないでください。
Note: Do not loop back from the CXC Control Bus out to the EXN Control Bus in.
アプリと EXN を接続したら、StreamMagic アプリ内の EXN デバイス設定で Control Bus を有効化し、「Amplifier」に設定する必要があります。
Control Bus will also need to be enabled and set to 'Amplifier' within the EXN device settings in the StreamMagic app once the app has been connected to the EXN.
注:EXA、EXN、CXC はいずれもオートパワーダウン(APD)機能を備えています。APD が有効な状態で機器の電源が入っていても操作されない場合、設定した APD 時間の経過後に自動的に電源がオフになります。Control Bus 接続により、連動する他の機器もすべてオフになります。自動でスタンバイに入らないようにしたい場合は、各機器の APD 機能を無効にすることをおすすめします。
Note: The EXA, EXN and CXC all have an Auto Power Down (APD) function. If APD is enabled and one of the devices is switched on but inactive, the device will automatically power down after the selected APD time. This will then switch off all the other connected devices, due to the Control Bus connection.If you don't want the devices to go into standby automatically, we would recommend disabling the APD feature on each device.
CAP 保護機能
Cambridge Audio はアンプと接続スピーカーの信頼性と長寿命を確保するため、独自の保護システムを開発しました。この保護システムは、主に 4 つの保護方式で構成されています。
Cambridge Audio has developed a proprietary protection system to ensure reliability and a long life for its amplifiers and the speakers they are connected to. This protection system comprises of four main protection methods:
DC 検出
症状:動作中に本体の電源がオフになります。フロントパネルのスピーカー A/B の白色 LED が赤色 LED と同時に点滅し、短い点滅 1 回と長い間隔のパターンを繰り返します。詳細は以下をお読みください。
Indication - Unit switches off during operation. The front panel speaker A/B white LED’s flash in unison with the red LED in the following sequence, one quick flash with long pause between flashes. Read below for more information.
説明:CAP4 は、内部の故障によりアンプ出力が高い直流電圧(DC)になった場合に、スピーカーを保護します。まれな故障ですが、検出することで高価なスピーカーを守ることができます。
Description – CAP4 offers loudspeaker protection if the output of the amplifier goes to a high constant voltage (DC) because of some internal fault. This is a rare fault although detecting it could just save those expensive loudspeakers.
対処方法:DC 保護回路は感度を高く設定しているため、極端に強いクリッピングが発生した場合にも DC 保護が作動することがあります。この症状が発生した場合は、販売店にサービスをご依頼ください。
Remedy - Due to the necessary sensitivity of the DC protection circuit, extremely hard clipping of the amplifier may cause DC protection to be triggered. If this fault occurs, please contact your dealer for service.
過熱検出
症状:動作中に本体の電源がオフになります。フロントパネルのスピーカー A/B の白色 LED が赤色 LED と同時に点滅し、短い点滅 2 回と長い間隔のパターンを繰り返します。詳細は以下をお読みください。
Indication - Unit switches off during operation. The front panel speaker A/B white LED’s flash in unison with the red LED in the following sequence, two quick flashes with long pause between flashes. Read below for more information.
説明:過熱は、大音量での再生と低インピーダンススピーカーの組み合わせで発生します。CAP4 は出力トランジスタの発熱を常時監視する温度検出機能を備えています。監視温度が出力素子の許容範囲内で設定された高温に達すると、アンプは自動的にフォルトモードに切り替わります。理想的には、本体を 15 分間そのままにして十分に冷却してください。冷却が不十分なまま電源を入れ直すと、すぐに温度が再び上限に達することがあります。スピーカーのインピーダンスが低い場合、アンプの動作負荷が大きくなるため温度上昇が早くなります。キャビネットに収納している場合や通気口がふさがれている場合、短時間の使用で過熱検出が作動または再作動することがあります。
Description - Over temperature is caused by a combination of high listening levels and low impedance speakers. CAP4 includes temperature detection which constantly monitors the heat generated by the output transistors. If the monitored temperature reaches a high level (suitably within the limits of the output devices) the amplifier will automatically switch into a fault mode. The unit should ideally be left for 15 minutes in this state to cool down adequately. If the unit has not fully cooled down then the temperature may reach the limit soon after the amplifier is powered up. If the loudspeaker impedance is low the temperature of the amplifier may rise faster as the amplifier is working harder. If the amplifier is mounted in a cabinet or the ventilation slots are obstructed the over temperature detection may activate/reactivate after a short listening time.
対処方法:出力トランジスタの内部温度が過熱の上限に達しています。本体を 15 分間放置して冷却してから、スタンバイボタンを押して通常動作に戻してください。
Remedy - The internal temperature of the output transistors has reached the over temperature limit. Leave the unit for 15 minutes to cool down before pressing the Standby button to resume normal operation.
過電圧/過電流(V/I)検出
症状:動作中に本体の電源がオフになります。フロントパネルのスピーカー A/B の白色 LED が赤色 LED と同時に点滅し、短い点滅 3 回と長い間隔のパターンを繰り返します。詳細は以下をお読みください。
Indication - Unit switches off during operation. The front panel speaker A/B white LED’s flash in unison with the red LED in following sequence, three quick flashes with long pause between flashes. Read below for more information.
説明:CAP4 は出力トランジスタを常時監視し、安全動作領域(SOA)内で動作させることで V/I(電圧/電流)保護を行います。SOA は出力トランジスタメーカーが信頼性を保証するために定めた限界値です。V/I 保護はアンプ回路内に組み込まれており、一時的な過負荷状態にも素早く反応します。V/I 保護が作動した場合、本体は動作を継続しますが、出力トランジスタを保護するために歪みが聞こえることがあります。
Description – CAP4 offers V/I (voltage/current) protection by constantly monitoring the output transistors to keep them working inside their Safe Operating Area (SOA). The SOA is a set of limits given by the output transistor manufacturer to ensure reliability. The V/I protection has been incorporated within the amplifier circuitry to provide a fast response to temporary overload conditions. When the V/I protection is triggered the unit will continue to operate but distortion may be heard as the unit protects the output transistors.
対処方法:音量を下げてください。それでも歪みが残る場合は、スピーカーの接続と定格を確認してください。
Remedy - Reduce the volume. If distortion is still present, check the speaker connections and ratings.
インテリジェントクリッピング検出
症状:音量が自動的に下がります。
Indication - Volume is reduced automatically.
説明:CAP4 はアンプ出力でクリッピングやオーバードライブが始まったことを検出します。これらはスピーカーを損傷し、音質を劣化させる可能性があります。クリッピング歪みは大音量時に発生し、出力信号がアンプの供給可能な最大電圧を超えようとして信号波形の頂点が平らに潰れることで生じます。CAP4 はクリッピングを検出すると、歪みのない出力を検出するまで自動的に音量を下げます。
Description – CAP4 has the ability to detect when the amplifier starts to clip or overdrive at its output, which can damage loudspeakers, and degrade the sound. Clipping distortion is caused at high volume levels when the output signal attempts to go outside the maximum voltage that the amplifier can provide, causing the tops of the signal to flatten off. When CAP4 detects clipping the volume will be automatically reduced down until CAP4 detects an undistorted output.
注:クリッピング検出はデフォルトでは無効になっています。セットアップメニューで有効化できます(「セットアップメニュー」セクションを参照)。セットアップメニューから無効化することも可能です。
Note: The clipping detection is disabled by default. The clipping detection can be enabled in the Setup menu (see 'Setup menu' section). This can be disabled in setup menu.
CAP4 が継続して作動する場合は、お使いのスピーカーの仕様が EXA100 と適合しているかを確認することをおすすめします。本機はインピーダンスが 4〜8 Ω のスピーカーで使用できます。
If CAP4 is persisting, it is also advisable to check the specifications of your speakers to ensure that they are compatible with the EXA100. Both amplifiers can be used with speakers with an impedance of between 4 and 8 Ohms.
接続したスピーカーがこの仕様の範囲外である場合、CAP4 保護機能が作動する原因となることがあります。
If your connected speakers fall outside of these specifications, then this could also be a reason for CAP4 protection being activated.
トラブルシューティング
電源が入らない
There is no power
- AC 電源コードがしっかり接続されているか確認します。
- プラグが壁のコンセントに完全に差し込まれ、電源が入っているか確認します。
- 電源プラグまたはアダプターのヒューズを確認します。
音が出ない
There is no sound
- 本機がスタンバイモードになっていないか確認します。
- ソース機器が正しく接続されているか確認します。
- スピーカーが正しく接続されているか確認します。
- 選択中の Speaker A/B のランプが、実際にスピーカーを接続している端子と一致しているか確認します。
- 本機がミュートモードになっていないか確認します。
- フロントパネルで正しいアナログまたはデジタル入力ボタンが選択されているか確認します。詳しくは「フロントパネルの接続」のセクションをご覧ください。
片方のチャンネルから音が出ない
There is no sound on one channel
- スピーカーの接続を確認します。
- インターコネクトケーブルを確認します。
低音が弱い、またはステレオイメージがぼやける
There is weak bass or diffused stereo imaging
- スピーカーが逆相で配線されていないか確認します。
Speaker A/B とミュートのランプが点滅する
Speaker A/B and mute light flashing
- CAP4 保護システムのセクションをご覧ください。
リモコンが動作しない
The remote handset does not function
- 電池が切れていないか確認します。
- リモコンセンサーの前に障害物がないか確認します。
Mac/PC を USB オーディオ入力に接続しても音が出ない
There is no audio when connecting a Mac/PC to the USB audio input
- マニュアルの「USB オーディオ接続」セクションの手順をすべて実施したか確認します。
- フロントパネルの USB Audio ボタンを押して、USB オーディオソースを選択します。
- PC/Mac が USB A-B ケーブルで USB オーディオ入力に接続されているか確認します。
- PC を接続し、EXA を USB Audio Class 2 で使用する場合は、正しい USB ドライバーをダウンロードします。ドライバーは www.cambridgeaudio.com/gbr/en/driver-updates から入手できます。
- Cambridge Audio USB 2.0 ドライバーをダウンロードした場合は、EXA のセットアップメニューで USB Audio Class 2 に設定されているか確認します。
テレビを EXA に接続しても音が出ない
There is no audio when connecting a TV to the EXA
- EXA は Dolby やサラウンド信号をデコードできません。テレビのオーディオ設定を PCM またはステレオにします。
- EXA で正しい入力が選択されているか確認します。
- テレビの設定で EXA が外部スピーカーとして選択されているか確認します。
- テレビを EXA の eARC 入力に接続している場合は、テレビ側で eARC/ARC 関連の設定がすべて有効になっているか確認します。
TOSLINK でテレビに接続したときに音が途切れる
There are dropouts in audio when connected to a TV via Toslink
- マニュアルの「接続する」>「テレビを接続する」のセクションをご覧ください。
技術仕様
連続出力 100W RMS(8 Ω)、155W RMS(4 Ω)
Continuous power output100W RMS into 8 Ohms, 155W RMS into 4 Ohms
DAC:ES9018K2M
DACES9018K2M
全高調波歪率(THD)(A ウェイトなし) <0.002% 1kHz 定格出力時(8 Ω)、<0.02% 20Hz~20kHz 定格出力時(8 Ω)
THD (unweighted)<0.002% 1kHz at rated power(8 Ohms)<0.02% 20Hz – 20kHz at rated power (8 Ohms)
周波数特性:3Hz 未満〜40kHz 超 ±1dB
Frequency response<3Hz – >40kHz +/-1dB
SN 比(Ref 1W 8 Ω) >91 dB
S/N ratio (Ref 1W into 8 OHM)>91 dB
SN 比(定格出力基準):105dB 超
S/N ratio (Ref full power)>105 dB
入力感度:入力 A1〜A4(アンバランス)395mV RMS
Input sensitivityInput A1-A4 (unbalanced) 395mV RMS
入力インピーダンス:入力 A1(バランス)100kΩ、入力 A1〜A4(アンバランス)45kΩ
Input impedancesInput A1 (balanced) 100 kOhm Input A1-A4 (unbalanced) 45 kOhm
入力:バランス、アンバランス、同軸 S/PDIF、TOSLINK、Bluetooth、USB オーディオ、eARC
InputsBalanced, Unbalanced, Coax SPDIF, TOSLINK, Bluetooth, USB Audio, eARC
出力:スピーカー、ヘッドホン、プリアンプ出力、サブウーファー出力
OutputsSpeakers, Headphone, Preamplifier Output, Sub Output
パワーアンプダンピングファクター >160(1kHz、8 Ω)
Power amp damping factor>160 at 1kHz into 8 Ohm
USB オーディオ入力:USB Type B、USB Audio Class 1 または USB Audio Class 2 準拠(ユーザー選択可)
USB audio inputUSB Type B conforming to USB Audio Class 1 or USB Audio Class 2 (user selectable)
対応フォーマット:USB Audio Class 1 は最大 24bit/96kHz(アシンクロナス)。USB Audio Class 2 は最大 24bit/384kHz(アシンクロナス)および DSD-256 まで対応
CompatibilityUSB Audio Class 1: Up to 24-bit 96kHz (asynchronous)USB Audio Class 2: Up to 24-bit 384kHz (asynchronous) and up to DSD-256
Bluetooth:5.0 A2DP/AVRCP 対応、SBC、aptX、aptX HD コーデックに対応
Bluetooth5.0 A2DP/AVRCP supporting SBC, aptX and aptX HD codecs
TOSLINK:16/24bit、32〜96kHz
TOSLINK16/24-bit 32-96kHz
同軸 S/PDIF:16/24bit、32〜192kHz
Coax SPDIF16/24-bit 32-192kHz
最大消費電力:1200W
Max power consumption 1200W
スタンバイ時消費電力:0.5W 未満
Standby power consumption<0.5W
外形寸法:115 × 430 × 341mm(4.5 × 16.9 × 13.4 インチ)
Dimensions115 x 430 x 341mm (4.5 x 16.9 x 13.4”)
質量:12.8kg(28.2 ポンド)
Weight12.8kg (28.2Lbs)
よくあるご質問(FAQ)
EXA でバランス入力とアンバランス入力を切り替えるには?
EXA では、A1 入力選択ボタンを押すたびにバランス入力とアンバランス入力が切り替わります。バランス入力が選択されている場合は A1 がオレンジに点灯し、アンバランス入力の場合は A1 が青に点灯します。EXA の接続方法に合わせて、正しい入力を選択してください。誤った入力を選択するとアンプから音が出ません。
On the EXA, pressing the A1 input selection button will toggle between the balanced and unbalanced inputs. The balanced input is shown by A1 being lit orange, while the unbalanced input is shown by A1 being lit blue.Please ensure that the correct input is selected on the EXA, depending on how your EXA is connected. If the wrong input is selected, then there will be no sound from the amplifier.
EXA100 の「USB Audio In」に外付け HDD を接続できますか?
いいえ。EXA100 の「USB Audio」入力に USB ドライブや HDD を直接接続する方法はありません。EXA100 の「USB Audio」入力は PC または Mac との直接接続にのみ対応します。ただし、当社のネットワークプレーヤーと EXA100 を組み合わせれば、同じことが実現できます。
No, there is no way to connect a USB drive or HDD directly to the EXA100 using its ‘USB Audio’ input. The ‘USB Audio’ input on the EXA100 will only support a direct connection with a PC or Mac. You will, however, be able to use one of our Network Players in combination with the EXA100 to do this.
Bluetooth 接続時にモバイル端末から EXA100 の音量を調整できないのはなぜですか?
EXA100 で Bluetooth を使用する場合、音量制御はモバイル端末側ではなくアンプ側が担います。モバイル端末は固定レベルの Bluetooth ストリームを送信し、アンプ側で音量を調整します。そのため、Bluetooth 接続時に一部のモバイル端末から EXA100 の音量を制御できないのは正常な動作です。音量はアンプ本体のリモコンまたはフロントパネルのボリュームノブで調整してください。
When using Bluetooth with the EXA100, the amplifier’s volume control takes over from the mobile devices’ volume. The mobile device then produces a Bluetooth stream of fixed level volume, which is then adjusted at the amplifier’s end.It is normal behavior for some mobile device nots to be able to control the volume of the EXA100 when connected via Bluetooth. Volume adjustments can be made on the amplifier itself, using either the remote control or the front panel volume knob.
EXA100 のクロスオーバー周波数はいくつですか?
EXA100 の Sub Out 出力には 2.3kHz のローパスフィルターが適用されています。これは Sub Out 帯域で EXA 側が付加する位相成分を最小限に抑えるためです。これによりクロスオーバー周波数はサブウーファー本体側で自由に設定できます。
The EXA100 has a low pass filter of 2.3 kHz applied at the Sub Out output. This is so that there is minimal phase added by the EXA at the Sub Out frequencies. This allows you to set your own crossover frequency on the Subwoofer itself.
2 組のスピーカーを接続した場合、EXA の出力はどうなりますか?
アンプに 2 組のスピーカーを接続すると、合成インピーダンスは半分になります。たとえば 8Ω のスピーカーを 2 組接続した場合、各スピーカー単体のインピーダンスは 8Ω のままですが、全体のインピーダンスは 4Ω になります。EXA100 の出力は 8Ω で 100W RMS、4Ω で 155W に増加します。
When you connect two pairs of speakers to an amplifier, the combined impedance is halved. So, when two pairs of 8Ω (Ohm) speakers are connected, the overall impedance becomes 4Ω, even though the individual impedance for each speaker remains unchanged at 8Ω. The EXA100 outputs are rated at 100 RMS at 8Ω which is increased to 155W at 4Ω.
EXA100 に 4Ω または 6Ω のスピーカーを 2 組接続することは推奨しません。インピーダンスが半分になるため、それぞれ 2Ω または 3Ω となります。アンプに過大な負荷がかかり、CAP4 保護が作動したり、アンプやスピーカーが損傷するおそれがあります。
It is not recommended to connect 2 pairs of 4 Ohm or 6 Ohm speakers to the EXA100, as the impedance is halved meaning the impedance will be 2 Ohms or 3 Ohms respectively. This could result in the amplifier being driven too hard and CAP4 protection being activated, or damage being done to the amplifier and/or speakers.
EXA100 は USB オーディオ入力経由で 32bit ファイルを再生できますか?
EXA のハードウェアは USB オーディオ入力経由で 32bit オーディオを扱える性能を持っていますが、USB インターフェース側はホストに対し 24bit 対応として通知します。32bit ファイルを再生しようとすると、USB ドライバーが下位ビットの情報を削除して 24bit に変換します。
Whilst the EXA's hardware is capable of handling 32-bit audio via the USB Audio input, the USB interface is reporting the host to be only 24- bit capable.If you attempt to play 32-bit files, the USB driver will convert them to 24-bit by removing the least significant information.