
取扱説明書
EXN100
はじめにIntroduction
本ガイドは、本製品の設置および使用をできるだけ簡単に行えるように作成されています。本書の情報は、発行時点で正確であることを慎重に確認しています。ただし、Cambridge Audio は継続的な改善を方針としているため、設計および仕様は予告なく変更される場合があります。
This guide is designed to make installing and using this product as easy as possible. Information in this document has been carefully checked for accuracy at the time of publishing; however, Cambridge Audio’s policy is one of continuous improvement, therefore design and specifications are subject to change without prior notice.
本書には、著作権で保護された専有情報が含まれています。すべての権利を留保します。本マニュアルのいかなる部分も、製造元の書面による事前の許可なく、機械的、電子的、その他いかなる手段・形式によっても複製することはできません。すべての商標および登録商標は、それぞれの所有者に帰属します。
This document contains proprietary information protected by copyright. All rights are reserved. No part of this manual may be reproduced by any mechanical, electronic or other means, in any form, without prior written permission of the manufacturer. All trademarks and registered trademarks are the property of their respective owners.
Bluetooth® のワードマークおよびロゴは、Bluetooth SIG, Inc. が所有する登録商標であり、Audio Partnership Plc によるこれらのマークの使用はライセンスに基づいています。その他の商標および商号は、それぞれの所有者に帰属します。
The Bluetooth® word mark and logos are registered trademarks owned by the Bluetooth SIG, Inc. and any use of such marks by Audio Partnership Plc is under license. Other trademarks and trade names are those of their respective owners.
Qualcomm は Qualcomm Incorporated の商標であり、米国およびその他の国で登録されています。aptX は Qualcomm Technologies International, Ltd. の商標であり、米国およびその他の国で登録されています。
Qualcomm is a trademark of Qualcomm Incorporated, registered in the United States and other countries. aptX is a trademark of Qualcomm Technologies International, Ltd., registered in the United States and other countries.
Qualcomm aptX は Qualcomm Technologies, Inc. および/またはその子会社の製品です。
Qualcomm aptX is a product of Qualcomm Technologies, Inc. and/or its subsidiaries.
StreamMagic は Audio Partnership Plc の商標であり、欧州共同体およびその他の国で登録されています。
StreamMagic is a trademark of Audio Partnership Plc and is registered in the European Community and other countries.
本製品には、GNU Public License バージョン 2 および GNU Lesser Public License バージョン 2.1 に基づいてライセンスされたソフトウェアが含まれています。このソフトウェアのソースコードは、次の URL から入手できます:https://gpl.stream-magic.com/
This product contains software licensed under version 2 of the GNU Public License and version 2.1 of the GNU Lesser Public License. The source code for this software is available from: https://gpl.stream-magic.com/
本製品には、Microsoft Corporation が所有し、Microsoft Licensing GP からライセンスを受けている技術が含まれています。該当する場合、Microsoft Corporation および/または Microsoft Licensing, GP のライセンスなしに、本製品外でこの技術を使用または配布することは禁止されています。
This product includes technology owned by Microsoft Corporation and under a licence from Microsoft Licensing GP. Use or distribution of such technology outside of this product is prohibited without a license from Microsoft Corporation and/or Microsoft Licensing, GP as applicable.
Spotify ソフトウェアには、次の URL に記載された第三者ライセンスが適用されます:https://www.spotify.com/connect/third-party-licenses
The Spotify Software is subject to third party licenses found here: https://www.spotify.com/connect/third-party-licenses
EXN100 で AirPlay を使用するには、iOS、iPadOS、または macOS の最新バージョンの使用を推奨します。
To use AirPlay with EXN100, the latest version of iOS, iPadOS, or macOS is recommended.
Apple、AirPlay、Apple Home、Apple TV、Apple Watch、HomeKit、HomePod、HomePod mini、iPad、iPad Air、iPhone、および tvOS は Apple Inc. の商標であり、米国およびその他の国や地域で登録されています。
Apple, AirPlay, Apple Home, Apple TV, Apple Watch, HomeKit, HomePod, HomePod mini, iPad, iPad Air, iPhone, and tvOS are trademarks of Apple Inc., registered in the U.S. and other countries and regions.
Works with Apple AirPlay バッジの使用は、アクセサリーがバッジに示された技術で動作するよう特別に設計され、Apple の性能基準を満たすことを開発者によって認証されていることを意味します。
Use of the Works with Apple AirPlay badge means that an accessory has been designed to work specifically with the technology identified in the badge and has been certified by the developer to meet Apple performance standards.
Android、Google Play、および Chromecast built-in は Google LLC の商標です。
Android, Google Play and the Chromecast built-in are trademarks of Google LLC.
TIDAL および TIDAL ロゴは、欧州連合およびその他の国における Aspiro AB の登録商標です。
TIDAL and TIDAL logo are registered trademarks of Aspiro AB in the European Union and other countries.
MQA および Sound Wave Device は、MQA Limited © 2016 の登録商標です。
MQA and the Sound Wave Device are registered trademarks of MQA Limited © 2016.
© Copyright Cambridge Audio Ltd
© Copyright Cambridge Audio Ltd
今後の製品、ソフトウェアアップデート、限定オファーに関する最新情報を受け取るには、次の URL で製品を登録してください:https://w https://www.cambridgeaudio.com/register ww.cambridgeaudio.com/register
For upcoming news on future products, software updates and exclusive offers, make sure you register your product at https://w https://www.cambridgeaudio.com/register ww.cambridgeaudio.com/register
このマニュアル内の画像の一部は、元の PDF から自動生成されたものです。自動処理の都合上、製品の細部や配線図などが実際と異なる場合があります。正確な形状・寸法・配線は、実機および製品ページの写真、同梱の正規マニュアル(英語版)をあわせてご確認ください。
EXN100 の同梱品What's included with the EXN100?
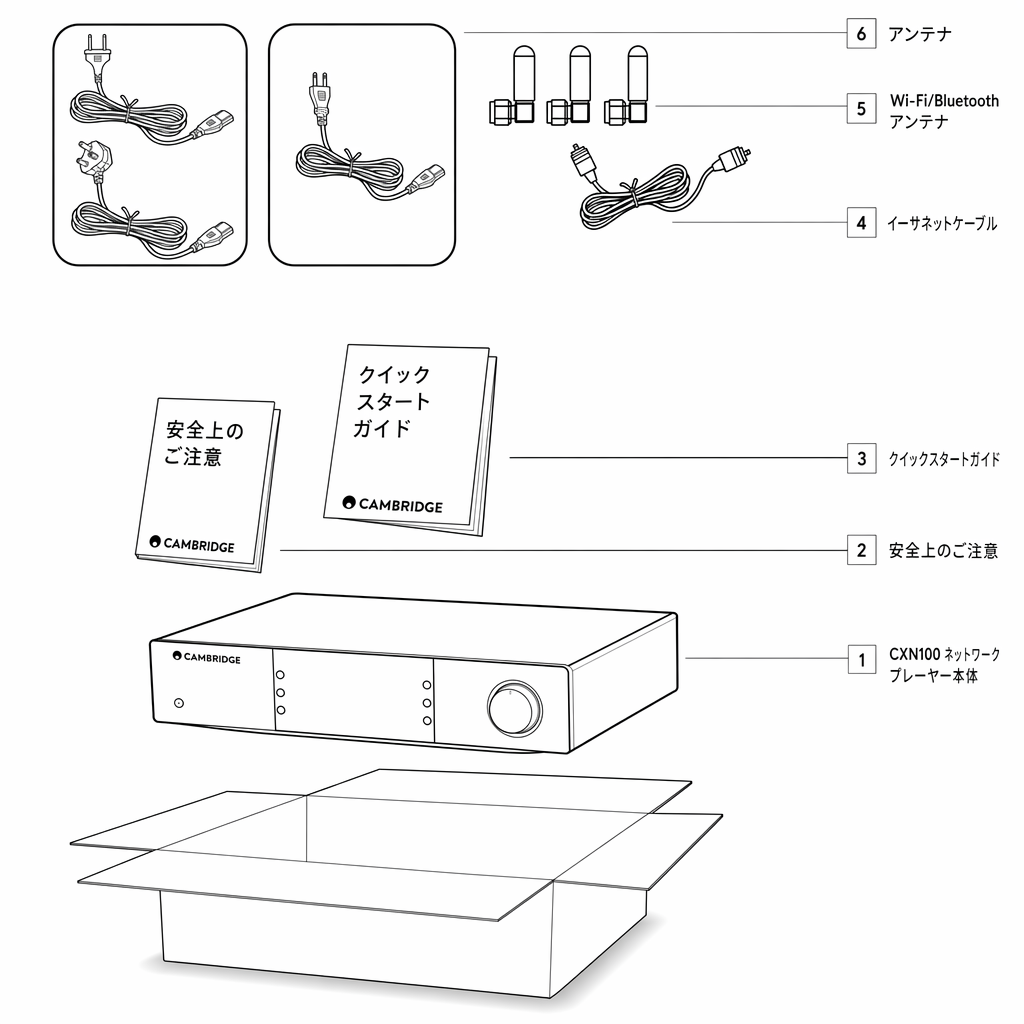
EXN100 の箱の中には、次のものが同梱されています。
Inside the box of your EXN100 you will receive:
- EXN100 ネットワークプレーヤーEXN100 Network Player
- 安全ガイドSafety Guide
- クイックスタートガイドQuick Start Guide
- コントロールバスケーブルControl Bus Cable
- Wi-Fi/Bluetooth アンテナ 3 本(本体に取り付け済み)3x Wi-Fi/Bluetooth Antennas (affixed to the unit)
- 地域仕様電源ケーブルRegional Power Cable
フロントパネルの操作部Front panel controls
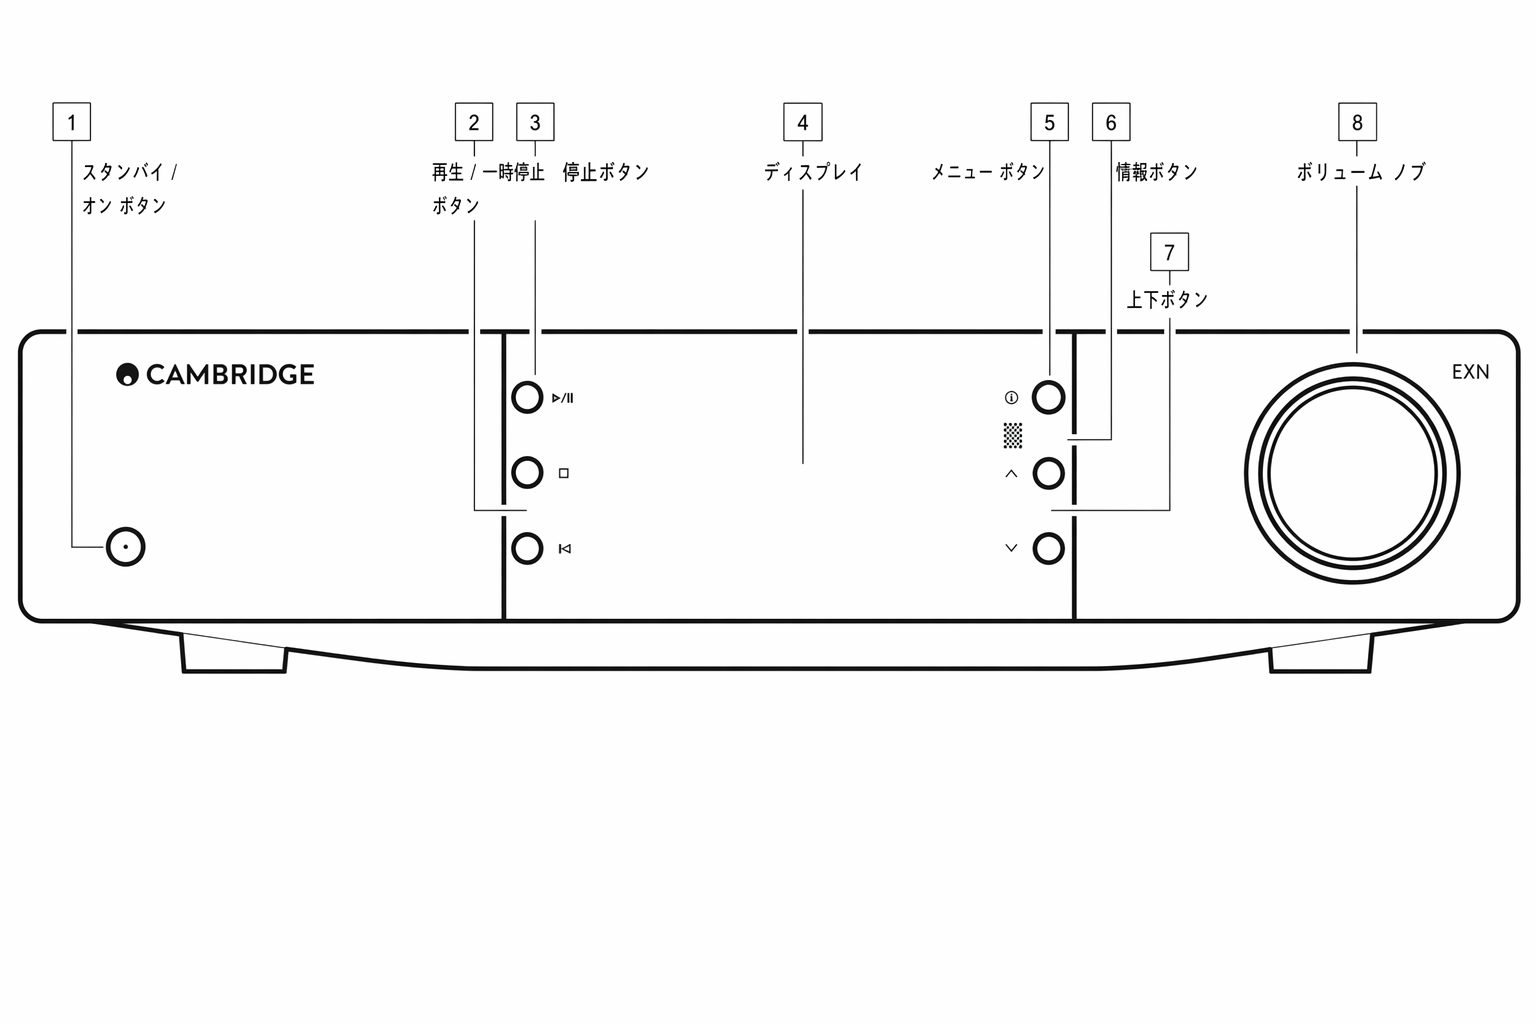
1. スタンバイ/オン
1. Standby/On
本体を、電源 LED が暗く点灯しているスタンバイモードと、電源 LED が明るく点灯しているオンの状態に切り替えます。
Switches the unit between Standby Mode (indicated by dim power LED) and On (indicated by bright power LED).
2. スキップ
2. Skip
再生中に次のトラックへスキップします。
Skip to next track during playback.
3. 再生/一時停止
3. Play/Pause
現在のトラックを再生または一時停止します。
Play or pause current track.
4. ディスプレイ
4. Display
5. Info
5. Info
再生中にこのボタンを押すと、さまざまな「Now Playing」画面が順に切り替わります。長押しすると、製品情報に加えて、ファームウェアの更新、ネットワーク設定モード、工場出荷時設定へのリセットのオプションが表示されます。ソースごとに異なる「Now Playing」画面が保存されます。
During playback, pressing this button will cycle through the different ‘Now Playing’ screens. Press and hold to display the product info, as well as options for updating the firmware, network setup mode and factory reset. Different “Now Playing” screens are saved for each source.
6. 赤外線センサー
6. Infrared sensor
対応する EX series 2 リモコンから IR コマンドを受信する IR センサーです。
IR sensor that receives IR commands from the compatible EX series 2 remote control.
注記: EXN100 には専用のリモコンがなく、リモコンは同梱されていません。
Note: The EXN100 does not have its own remote control and does not come with one included.
7. ソースセレクター
7. Source Selector
StreamMagic アプリで有効化したソースを順に切り替えます。
Scroll through sources enabled in the StreamMagic app.
8. ボリューム調整
8. Volume Control
プリアンプモードが有効なときは、アナログ出力経由で音量を調整します。
When Pre-amp mode is enabled, this will control volume via the analogue outputs.
リアパネルの接続Rear panel connections
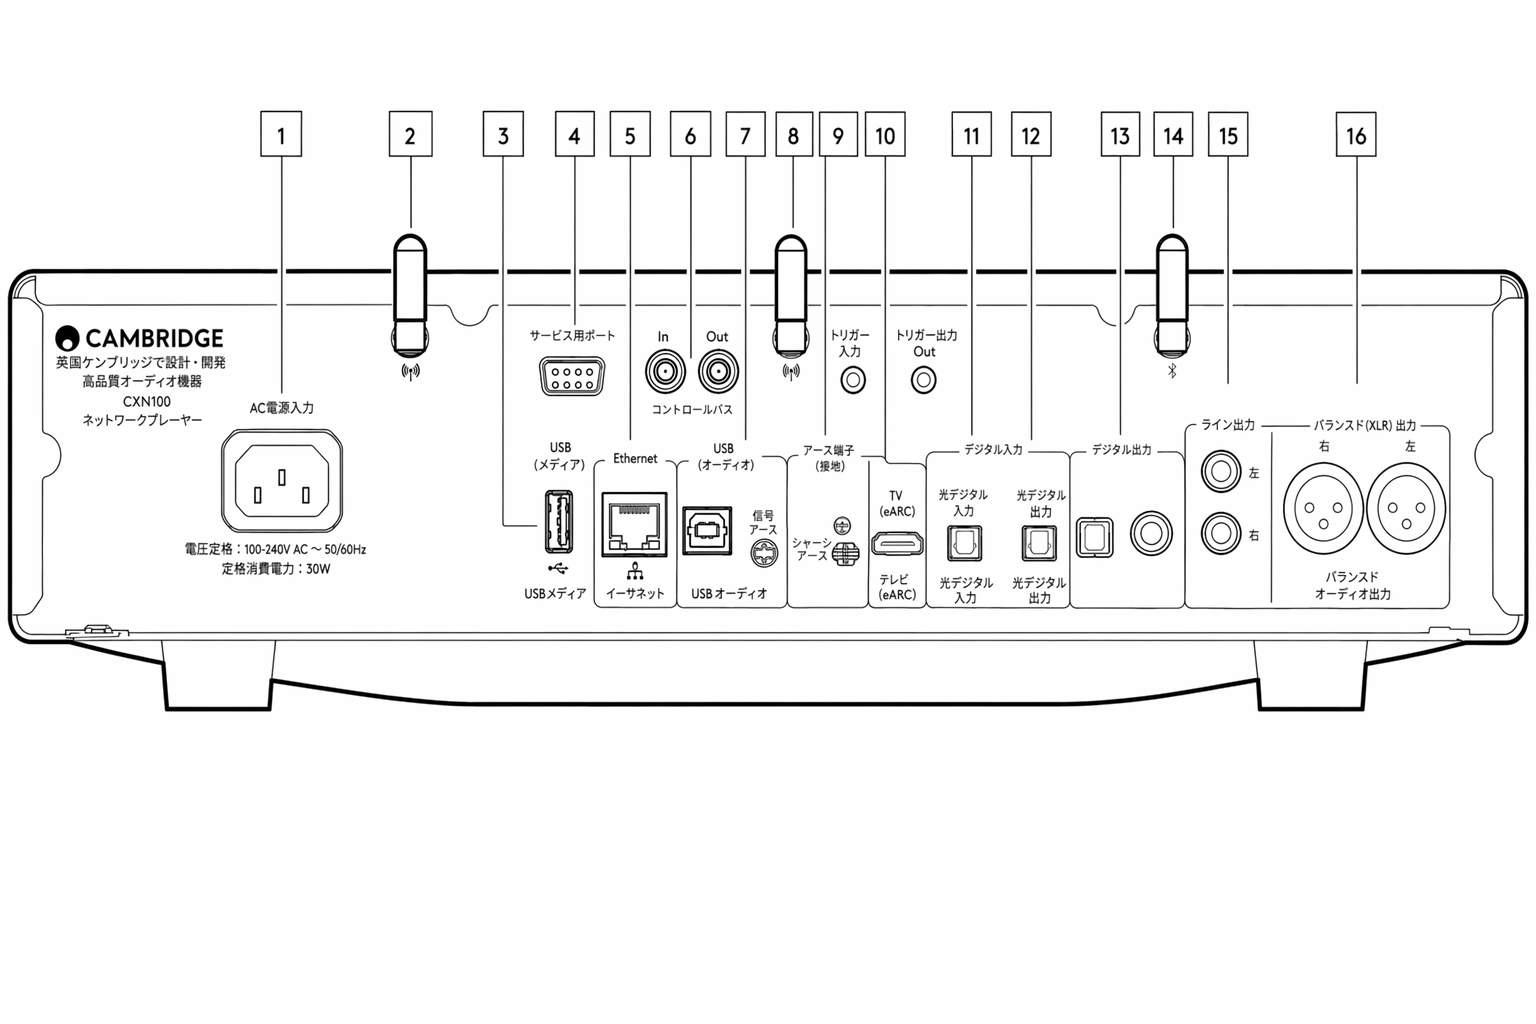
1. AC 電源ソケット
1. AC Power socket
アンプへのすべての接続が完了したら、AC 電源ケーブルを適切な電源コンセントに差し込み、電源を入れます。
Once you have completed all connections to the amplifier, plug the AC power cable into an appropriate mains socket then switch on.
2. Wi-Fi アンテナ
2. Wi-Fi Antenna
使用前にアンテナが確実に接続されていることを確認してください。
Ensure antenna is connected securely before use.
3. USB メディア
3. USB Media
ローカルメディアストレージの接続に使用します。USB ポートはモバイルデバイスへの接続を目的としていないため、充電などを含め、いかなる機能にも対応していないことに注意してください。
For connecting local media storage. Note that the USB ports are not intended for connection to mobile devices; no functionality, charging or otherwise is supported.
4. サービスポート
4. Service Port
サービス用途専用です。
For servicing use only.
注記: このポートに他のデバイスを接続すると、故障の原因となることがあります。
Note : Connecting any other device here may result in damage.
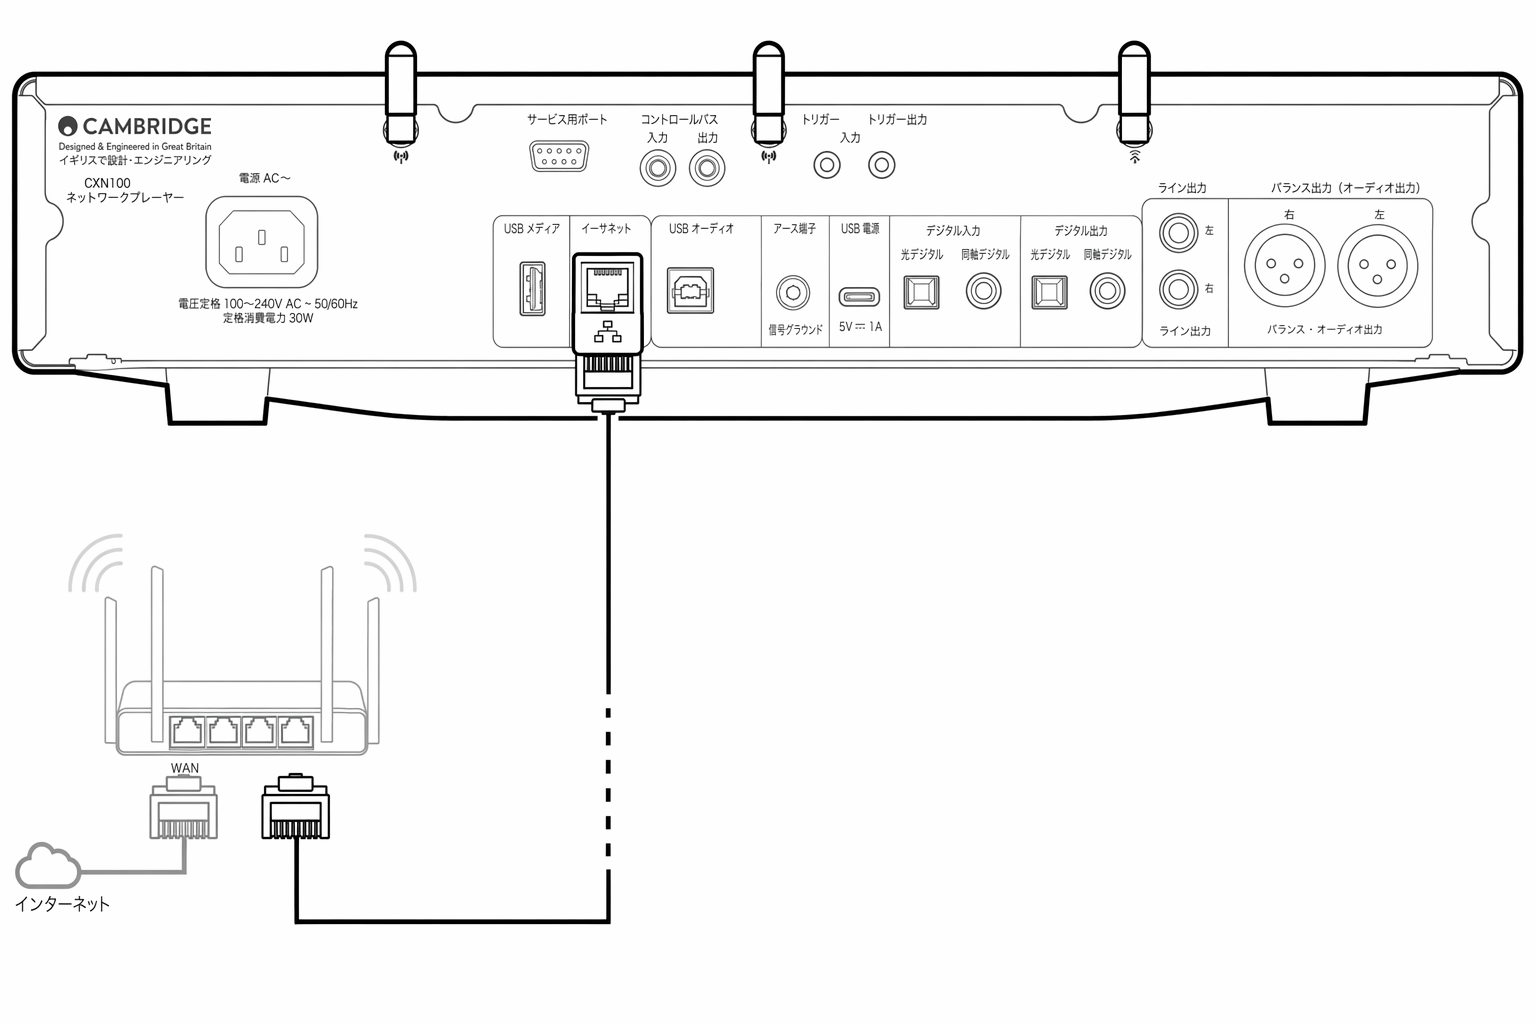
5. Ethernet
5. Ethernet
EXN100 をネットワークルーターに直接接続するために使用します。高解像度の 352.8kHz、384kHz、および DSD 256 を途切れなく再生するには、有線接続を使用してください。
Use to connect the EXN100 directly to a network router. Use a wired connection for seamless playback of high-resolution 352.8kHz, 384kHz, and DSD 256.
6. コントロールバス
6. Control Bus
接続された他の EX Series 製品との間で、電源および音量コマンドを送受信する RCA ソケットです。コントロールバスの詳細については、「コントロールバス」セクションを参照してください。
RCA sockets used to send and receive power and volume commands from other connected EX Series products. For more information on the Control Bus, see Control Bus section.
7. USB オーディオ入力
7. USB Audio In
PC、Mac、および一部の Linux コンピューターを接続できる USB B タイプソケットです。
A USB B type socket to enable connection to PC, Mac and some Linux computers.
注記:Class 2 USB オーディオを使用する場合、Windows PC では接続前に Cambridge Audio の USB ドライバーをインストールしてください。最新の USB ドライバーはこちらから入手できます。
Note: For Class 2 USB audio, Windows-based PCs require a Cambridge Audio USB driver to be installed before connection. You can find the latest USB driver here.
USB グランドスイッチ 注記:グランドスイッチの位置は、初期設定では「Lifted」に設定してください。ハムノイズが発生した場合は、別の位置を使用してください。
USB Ground Switch Note: The ground switch position should be set to lifted as default. Use another position if a humming noise occurs.
Lifted – 通常/初期位置。本機のオーディオグランドはシャーシアースから切り離されています。
Lifted – Normal/default position. The main unit audio ground is lifted from chassis earth.
Chassis earthed – USB オーディオのグランドが本機のオーディオグランドから切り離され、本機のオーディオグランドもシャーシアースから切り離されます。一部の USB オーディオ構成で発生するハムやノイズを低減するのに役立ちます。
Chassis earthed – USB Audio ground is lifted from the main unit audio ground, which is also lifted from chassis earth. This may be useful to reduce hum and noise that can occur with some USB Audio setups.
8. Wi-Fi アンテナ
8. Wi-Fi Antenna
使用前にアンテナが確実に接続されていることを確認してください。
Ensure antenna is connected securely before use.
9. シグナルグラウンドスイッチ
9. Signal Ground Switch
Lifted – 通常/初期位置。本機のオーディオグランドはシャーシアースから切り離されています。
Lifted – Normal/default position. The main unit audio ground is lifted from chassis earth.
Chassis earthed – 本機のオーディオグランドがシャーシグランドに直接接続されます。一部の構成では、特定のテレビ、ターンテーブル、その他の機器を EXN100 に接続した際のハムやノイズを低減できます。
Chassis earthed – Main unit audio ground is connected directly to chassis ground. For some setups, this can reduce hum or noise when certain TVs, Turntables, and other equipment are connected to the EXN100 unit.
10. トリガー
10. Triggers
Trigger Out - トリガー入力を備えた製品と EXN の間をリンクワイヤーで接続します。これにより、EXN の電源をオン/スタンバイにすると、両製品の電源状態が同期します。
Trigger Out - Use a link wire between the EXN and a product that has a trigger input. This will synchronise the power state of both products when powering the EXN on/standby.
トリガー/IR 入力
Trigger/IR In
Trigger In - トリガー出力を備えた製品と EXN の IR In の間をリンクワイヤーで接続します。IR リピーターまたはカスタムインストールシステムから変調された IR コマンドを受信します。
Trigger In - Use a link wire between a product that has a trigger output and the EXN IR In – Receives modulated IR commands from an IR repeater or custom install systems.
11. Enhanced Audio Return Channel(eARC)
11. Enhanced Audio Return Channel (eARC)
eARC および ARC に対応するテレビとの HDMI 接続です。
A connection from a TV that supports eARC and ARC via HDMI connection.
12. デジタル入力(同軸および光):TOSLINK および S/PDIF 同軸デジタル入力端子。
12. Digital Inputs (Coax and Optical) TOSLINK and S/P DIF coaxial digital inputs.
Coaxial – 高品質な 75 ohm のデジタル RCA ピンケーブルを使用してください(アナログオーディオ用ピンケーブルとは異なります)。この入力は、最大 192kHz の 16-24 bit コンテンツに対応します。
Coaxial – Use a high quality 75 ohm digital RCA Phono interconnect cable (This is different from an analogue audio phono interconnect). This input is suitable for 16-24 bit content up to 192kHz.
TOSLINK Optical – オーディオ用途専用に設計された高品質な TOSLINK 光ファイバーインターコネクトケーブルを使用してください。この入力は、最大 96kHz の 16-24 bit コンテンツに対応します(192kHz のサンプリングレートでは TOSLINK の使用を推奨しません)。
TOSLINK Optical – Use a high quality TOSLINK fibre optic interconnect cable designed specifically for audio use. This input is suitable for 16-24 bit content up to 96kHz (TOSLINK is not recommended at 192kHz sampling rates).
注記:デジタル入力をテレビに接続する場合、StreamMagic アプリのソース設定で「TV mode」を有効にできます。このモードは MQA デコードをバイパスしてオーディオ経路のリップシンク遅延を最小限に抑え、さらに一部のテレビで発生する音切れや不具合の可能性を低減します。
Note : If a digital input is connected to a TV, you can enable TV mode in the sources settings of the StreamMagic app. This mode minimises lip-sync delays on the audio path by bypassing MQA decoding and also reduces the chance of dropouts and glitches from some TVs.
13. デジタル出力
13. Digital Outputs
TOSLINK および S/PDIF 同軸デジタル出力端子。
TOSLINK and S/P DIF coaxial digital outputs.
14. Bluetooth アンテナ
14. Bluetooth Antenna
このアンテナが接続されていない場合、Bluetooth 機能は利用できません。
Bluetooth functionality won't be possible if this antenna is not connected.
15. ライン出力
15. Line Output
別のアンプや録音機器に信号を送るためのライン出力(固定または可変)です。
Line Output (fixed or variable) used to provide a signal to another amplifier or a recording device.
16. バランスオーディオ出力
16. Balanced Audio Output
バランス XLR 接続で使用します。バランス接続はより高品質な選択肢であり、この機能に対応する他の機器と組み合わせると、ケーブル内のノイズや干渉を除去できます。
For use with balanced XLR connections. The balanced connection is the higher quality option and can reject noise and interference in the cable when used with other equipment that supports this function.
注記:XLR コネクターは次のように配線してください。ピン 1:グランド、ピン 2:ホット(正相)、ピン 3:コールド(逆相)。
Note: XLR connectors should be wired as follows: Pin 1: Ground, Pin 2: Hot (in-phase) and Pin 3: Cold (phase-inverted).
ディスプレイDisplay
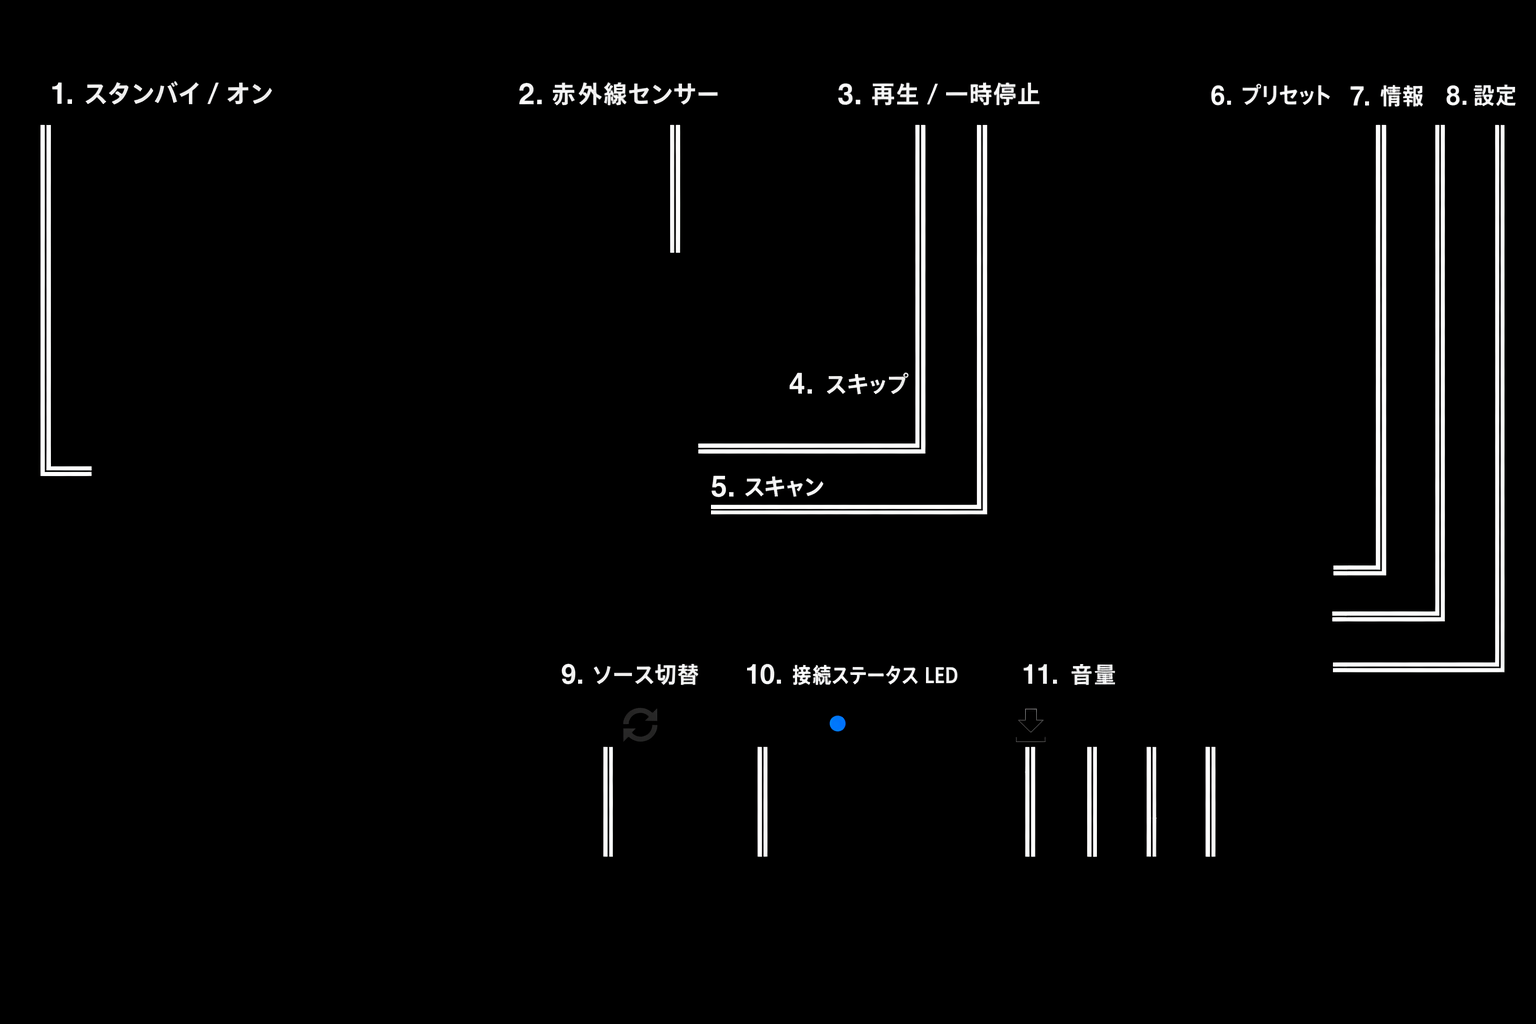
1. アルバム/ソースアートワーク:アルバムアートワークを表示します。アートワークがない場合は、ソース入力アイコンを表示します。
1. Album/Source artwork Displays the album artwork. Alternatively, if no artwork is available this will display the source input icon.
2. トラックタイトル、アーティスト、アルバム:インターネットラジオの場合は、ラジオ局名と現在の再生内容を表示します。
2. Track title, artist and album For Internet Radio, this will display the radio station name and the current playback.
3. フォーマット情報:ストリーミングのサンプルレートを表示します。インターネットラジオの場合は、ラジオ局がストリーミングしているビットレートを表示します。
3. Format info Displays the streaming sample rate. For Internet Radio, this will display the bitrate the station is streaming.
4. ソース入力:現在選択中のソース入力を表示します。
4. Source input Displays the currently selected source input.
5. プログレスバー:利用可能な場合、再生中のトラックの進行状況を表示します。
5. Progress bar When available, this will display the current track progression during playback.
6. トラック時間:利用可能な場合、再生中のトラックの経過時間を表示します。
6. Track time When available, this will display the elapsed track time during playback.
7. 時計
7. Clock
8. ネットワーク接続:現在のネットワーク接続を表示します。
8. Network connection Displays the current network connection.
| 無線ネットワーク接続Wireless network connection | 無線接続(インターネット接続なし)Wireless connection with no internet access | 有線ネットワーク接続Wired network connection | 有線接続(インターネット接続なし)Wired connection with no internet access | ネットワーク接続なしNo network connection |
|---|
9. スピーカー出力:対応するネットワークストリーマーで、現在選択中のスピーカー出力を表示します。
9. Speaker output Displays the currently selected speaker output on relevant network streamers.
10. ミュート:ネットワークストリーマーがミュート状態のときに表示します。
10. Mute volume Displays when the network streamer is muted.
11. ファームウェアアップデート:新しいファームウェアが利用可能なときに表示します。フロントパネルの「Info」ボタンを押すか、StreamMagic アプリを使用して、ネットワークストリーマーのファームウェアをアップデートしてください。
11. Firmware update This indicates when new firmware is available. Press the 'Info' button on the front panel or use the StreamMagic app to update the network streamer's firmware.
12. MQA インジケーター:詳細は MQA セクションを参照してください。
12. MQA indicator See the MQA section for more details.
13. シャッフル、リピート、リピート +1
13. Shuffle, Repeat and Repeat +1
リモコンRemote Control
注記:EXN100 にはリモコンが付属しておらず、EX シリーズのリモコンを使用した赤外線操作に対応しています。また、EXN100 は StreamMagic アプリから、より詳細に操作できます。
Note: The EXN100 does not come with a remote control, it supports infrared control using the remote control of the EX series. In addition, EXN100 can also be controlled in more detail through the StreamMagic App
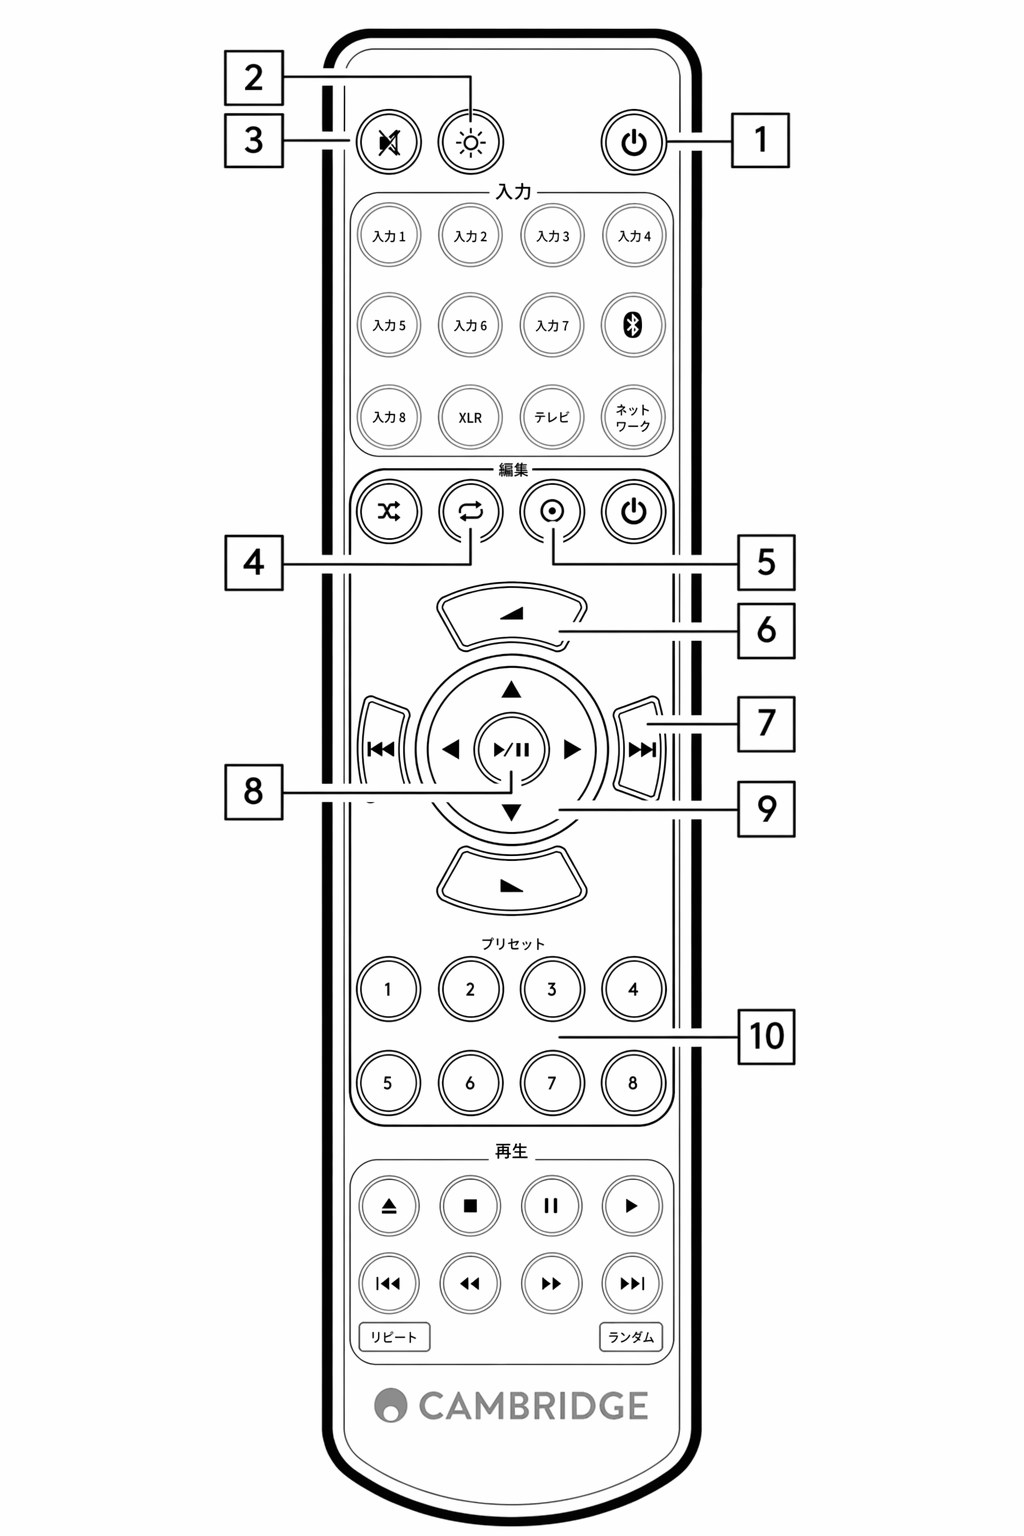
- スタンバイ/オン:EXN100 をオンとスタンバイモードの間で切り替えます。Standby/On Switches the EXN100 between On and Standby mode.
- 明るさ:EXN100 のディスプレイの明るさを変更します。明るさは 2 段階あり、バックライトをオフにする選択肢もあります。注記:明るさを「off」に設定した場合、いずれかの機能を選択すると、変更を示すためにライトが一時的に点灯します。Brightness Alters the brightness of the EXN100 display. There are two brightness levels and an option to switch off the backlight. Note: When the brightness is switched to 'off', selecting any of the functions will briefly switch on the lights to show the change.
- ミュート:押すと音声をミュート/ミュート解除します。Pre-amp モードが有効な場合のみ使用できます。Mute Press to mute or un-mute the audio. This can only be used with Pre- amp mode enabled.
- ランダム:キュー内のトラックをランダムに再生します。Random Play random track within queue.
- Info:タップすると表示情報が切り替わります。長押しすると「info」画面が表示されます。Info Tapping will toggle between display information. Holding will display the 'info' screen.
- 音量:音量レベルを調整します。アナログ出力で接続し、Pre-amp モードが有効な場合のみ使用できます。Volume Volume level adjust. This can only be used with Pre-amp mode enabled when connected via the analogue outputs.
- スキップ:前後のトラックに移動します。Skip Skips between previous and next tracks.
- 再生/一時停止:現在のトラックを再生または一時停止します。Play/Pause Play or Pause current track.
- ソースセレクター:StreamMagic アプリで有効化したソースを順に切り替えます。Source Selector Scroll through sources enabled in the StreamMagic app.
- プリセット:保存された 1 – 8 のプリセットを呼び出します。Presets Recalls stored 1 – 8 presets.
リモコンが機能しない場合は、電池が切れていないこと、またフロントパネルの IR センサーを遮るものがないことを確認してください。
If the remote control will not function, please check that the batteries have not expired, and that there is nothing blocking the front panel IR sensor.
接続Getting connected
基本的なアナログ接続Basic Analogue Connections
重要な注記: 接続を行う前に電源を切ってください。EXN100 には、2 種類のアナログ接続方法があります。
Important Note: Switch the power off before making any connections. There are two analogue connection options for the EXN100.
ライン出力接続(RCA)
Line Output Connection (RCA)
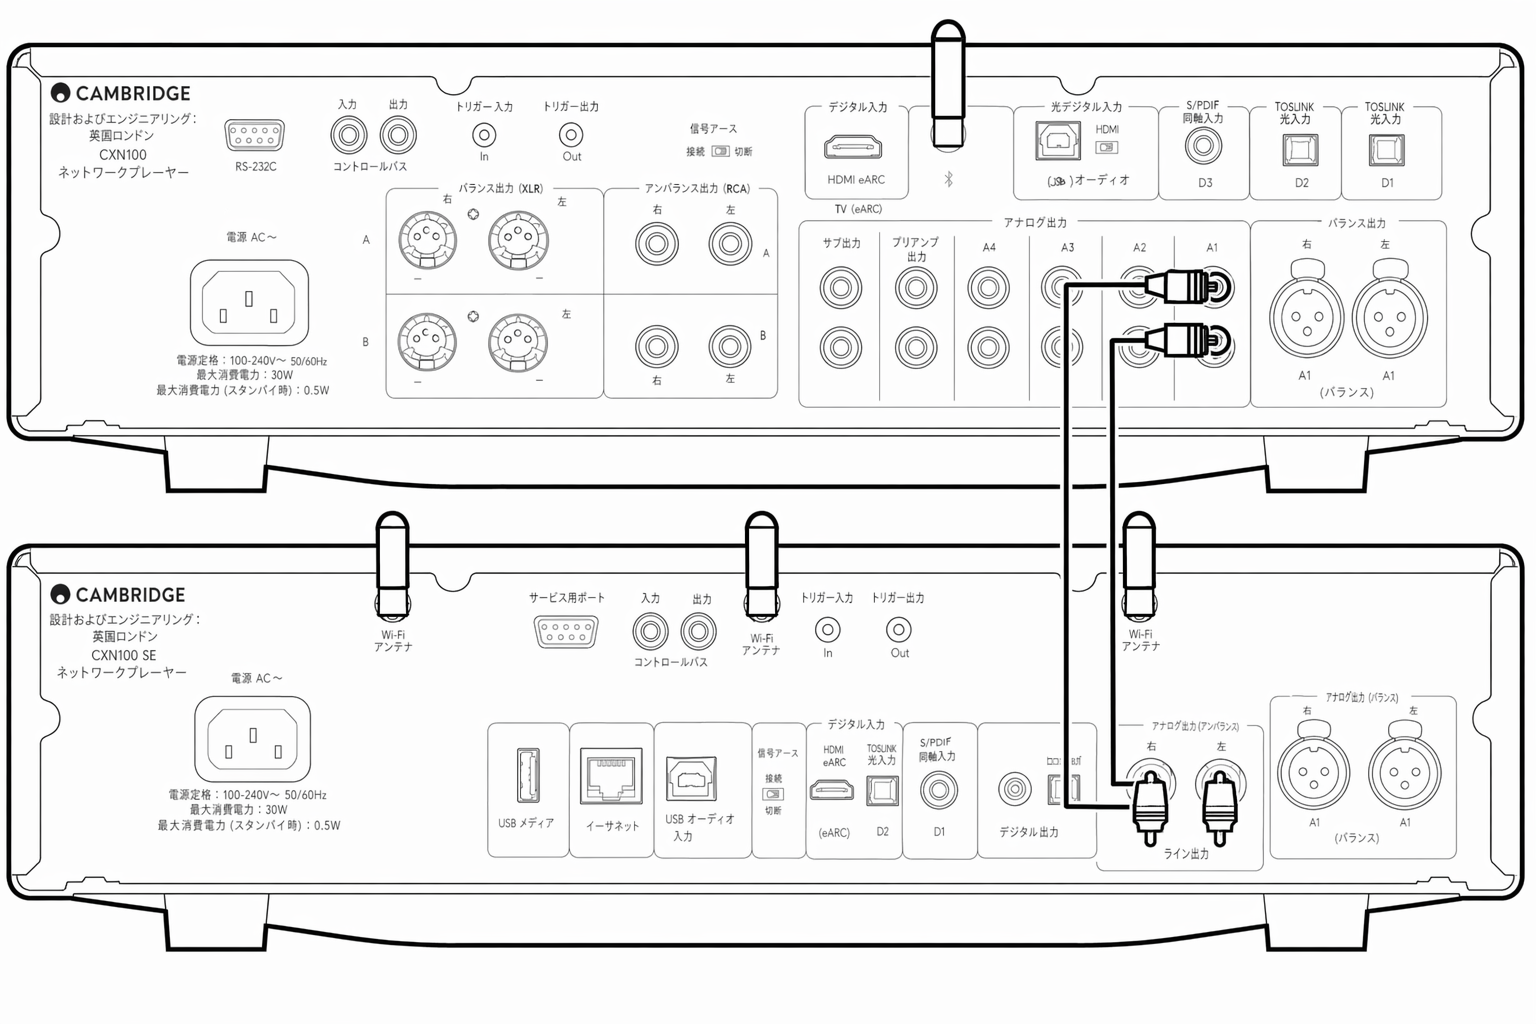
バランスオーディオ接続(XLR) バランス接続はより高品質な接続方法で、この機能に対応した他の機器と使用すると、ケーブル内のノイズや干渉を除去できます。注記: XLR コネクターは次のように配線してください。Pin 1: グラウンド、Pin 2: ホット(同相)、Pin 3: コールド(逆相)。
Balanced Audio Connection (XLR) The balanced connection is the higher quality option and can reject noise and interference in the cable when used with other equipment that supports this function. Note: XLR connectors should be wired as follows: Pin 1: Ground, Pin 2: Hot (in-phase) and Pin 3: Cold (phase-inverted).
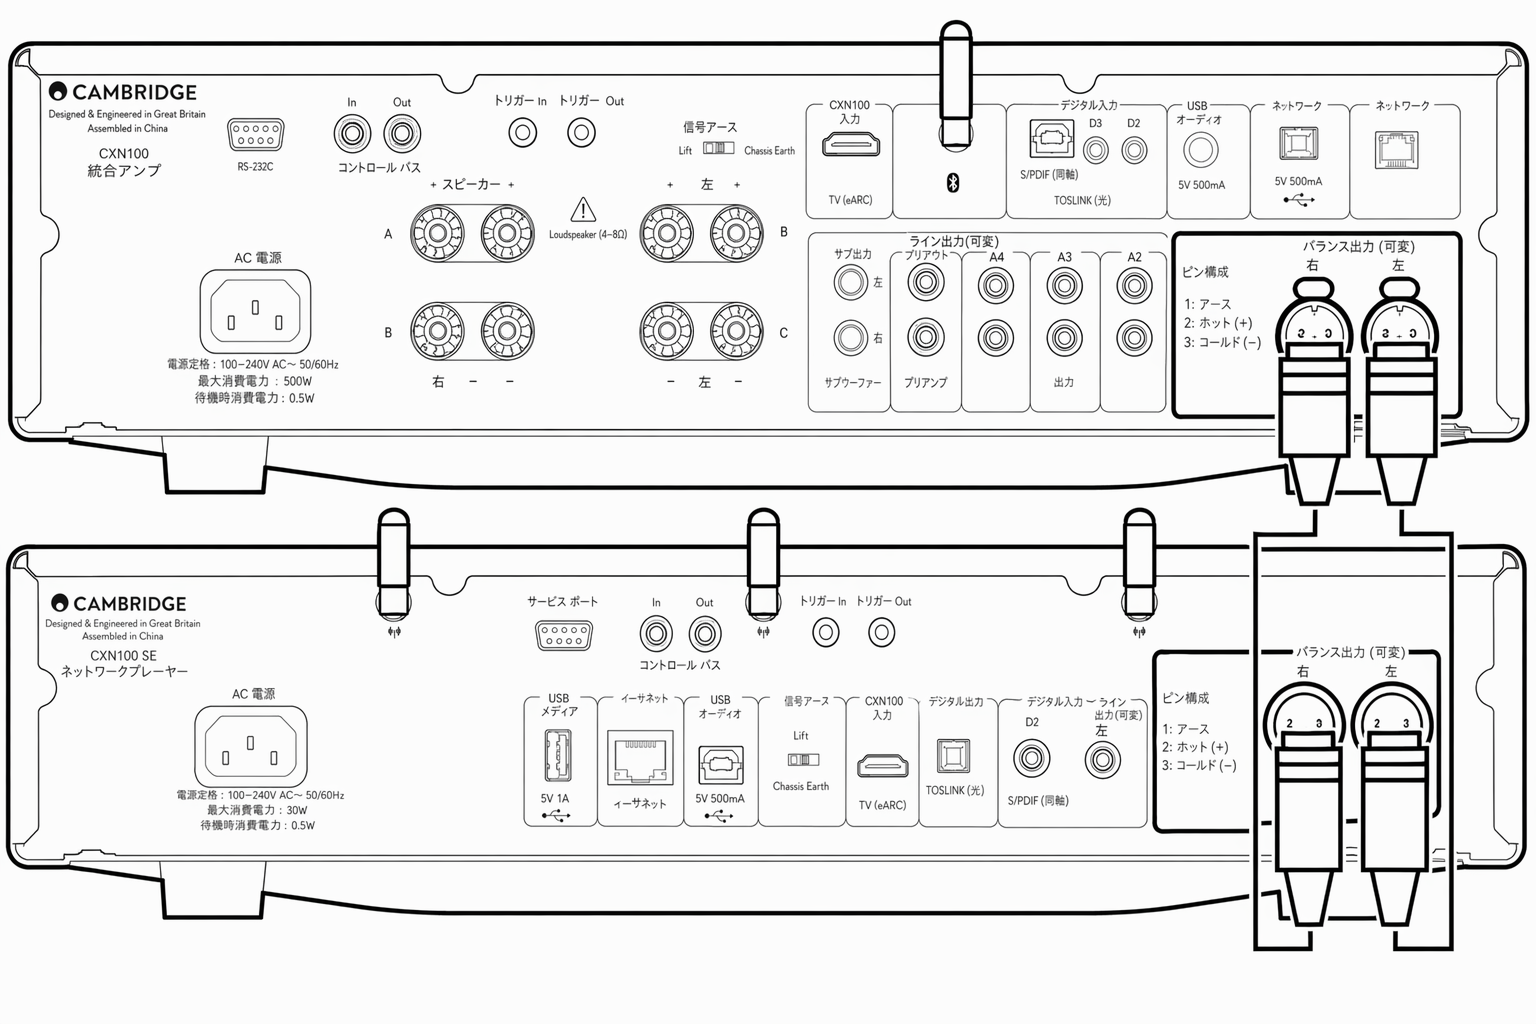
デジタル接続Digital Connections
EXN100 には、2 種類のデジタル接続方法があります。注記: EXN100 のいずれかのデジタル出力を使用する場合、デジタル信号は EXN100 内の DAC を経由せず、デジタル出力に接続された機器(例:EXA)で処理されます。
There are two digital connection options for the EXN100. Note: If using either of the digital outputs of the EXN100, the digital signal will bypass the DAC in EXN100 and will instead be processed by the unit connected to the digital output, E.g., EXA
デジタル同軸出力 デジタル同軸接続は CD プレーヤーやアンプで一般的に使用されており、帯域幅が広いため推奨されます。
Digital Coaxial Output Digital Coaxial connections are commonly used with CD players and amplifiers and are recommended for use as they have a higher bandwidth.
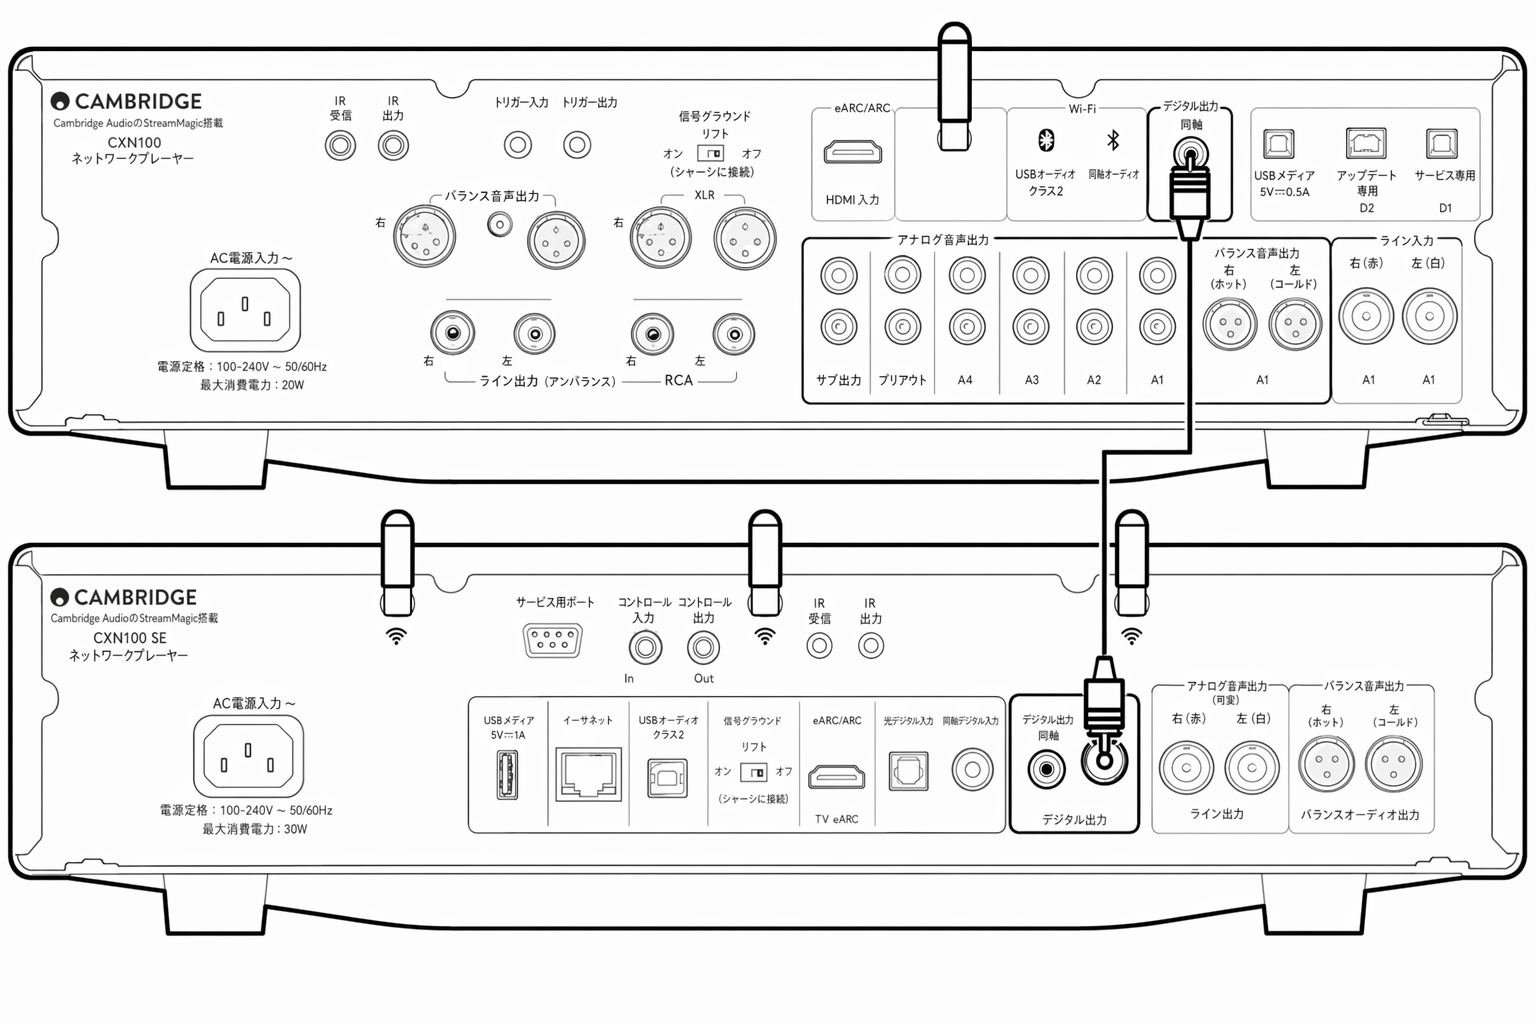
TOSLINK 光出力 同軸ケーブルより帯域幅は狭いものの、TOSLINK 光接続はテレビ、DVD プレーヤー、A/V 機器で一般的に使用されています。
TOSLINK Optical Output Whilst having lower bandwidth than coaxial cables, TOSLINK Optical connections are commonly found on televisions, DVD players and A/V units.
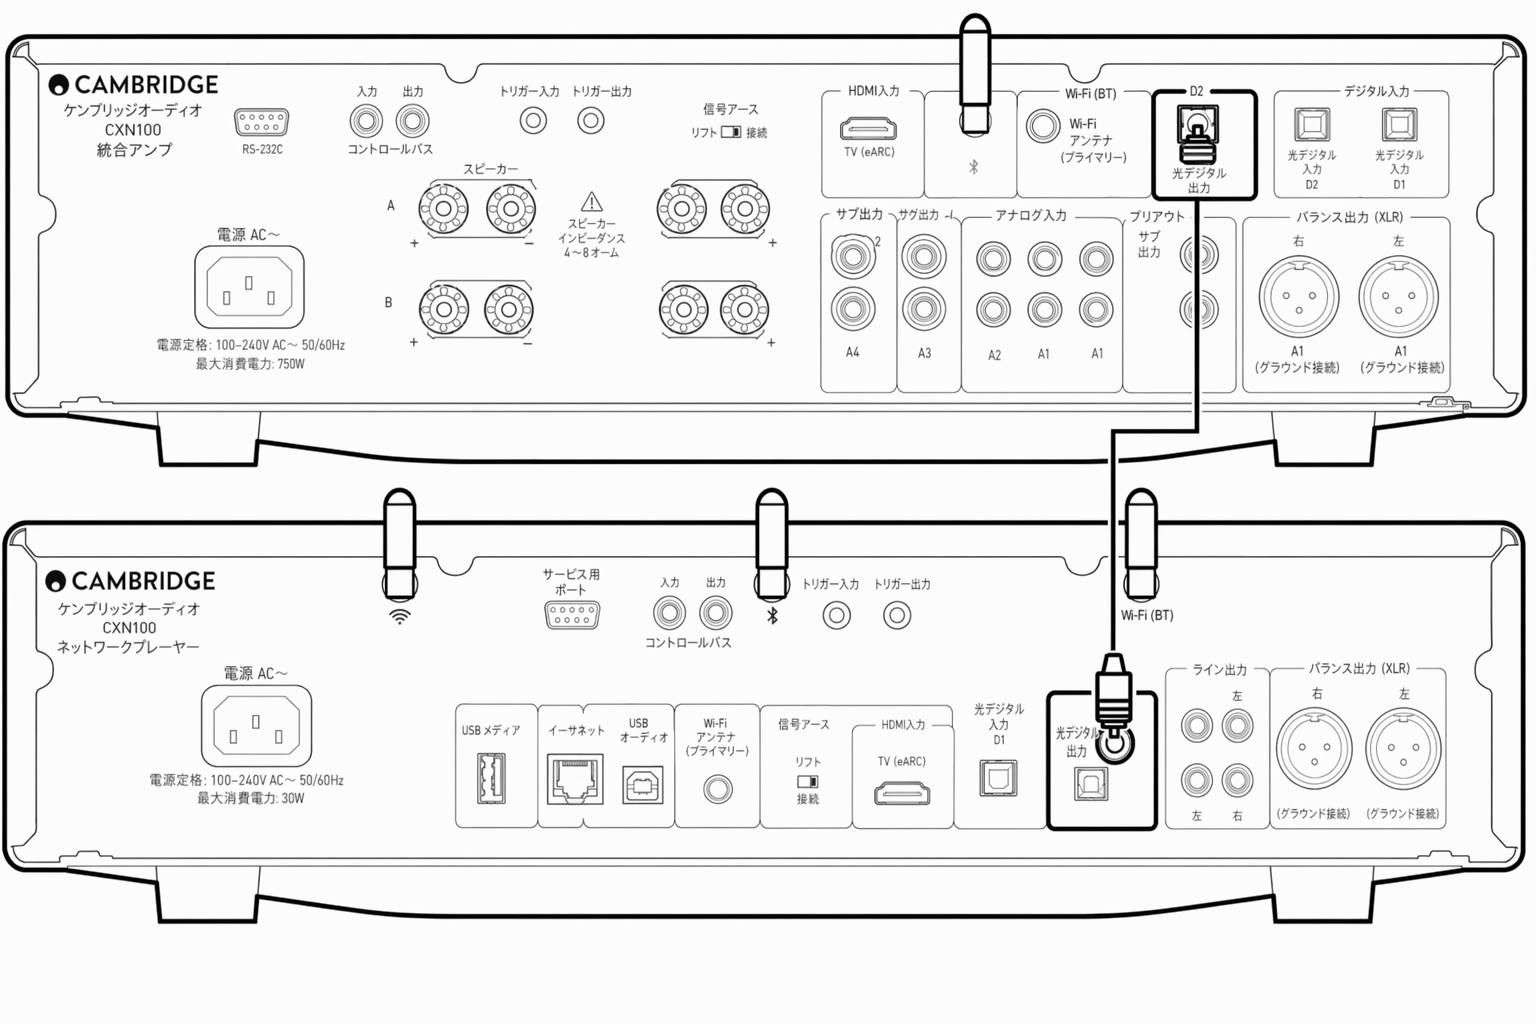
コントロールバスControl Bus
コントロールバスを使用すると、他の EX シリーズ機器を操作できます。付属のコントロールバスケーブルを使用して EXN100 を接続する場合は、次の図を参照してください。
The Control Bus lets you control your other EX series units. See the following diagrams when connecting the EXN100 using the provided Control Bus cable.
コントロールバスの追加機能として、StreamMagic アプリを使用できます。StreamMagic アプリを使うと、EXN100 経由で他の EX シリーズ機器を操作できます。
Another added feature with Control Bus is the use of the StreamMagic app. You can use the StreamMagic app to control other EX series units via the EXN100.
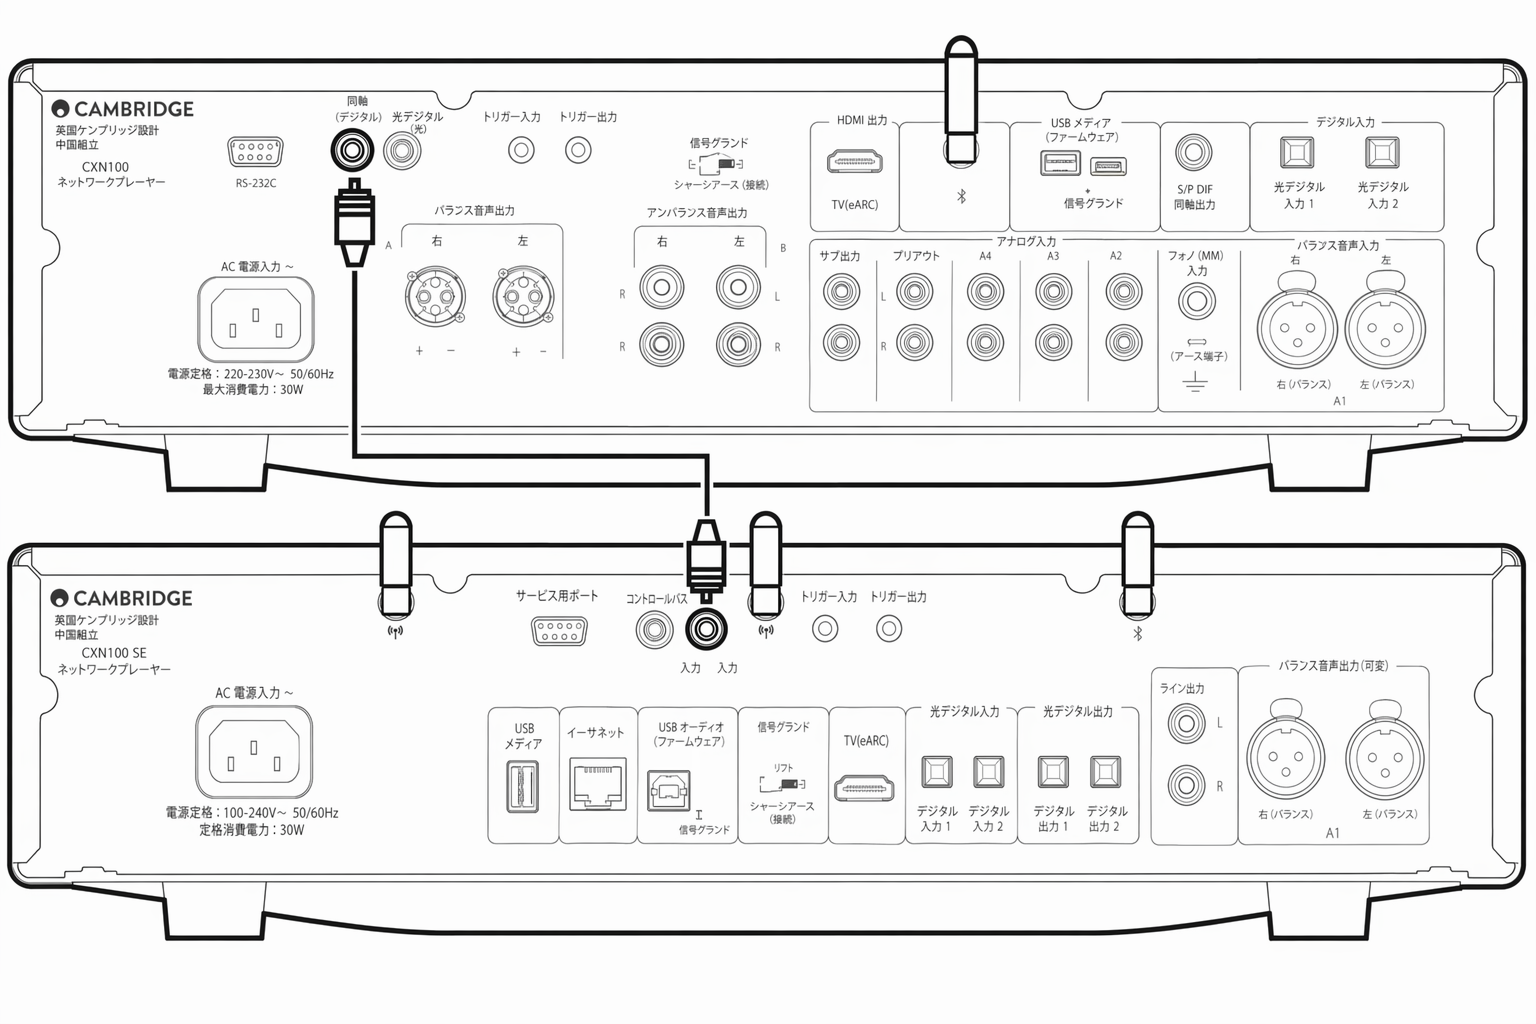
EXN100 と EXA(StreamMagic アプリ経由)EXN100 with EXA (via StreamMagic app)
アプリで EXN100 の電源をオン/オフすると、EXA の電源もオン/オフします。アプリで EXA の音量を調整することもできます。EXN100 の Control Bus Out を EXA の Control Bus In に接続します。
When using the app to turn the EXN100 on/off, this will also turn the EXA on/off. The app can also be used to control the volume of the EXA. Connect the EXN100 Control Bus Out to EXA Control Bus In.
アプリで EXA の音量を調整する場合は、アプリのデバイス設定で「Pre-amp」モードを無効にし、「Control Bus」を「Amplifier」に設定してください。
If you wish to control the volume of your EXA via the app, ensure that the 'Pre-amp' mode is disabled and 'Control Bus' has been set to 'Amplifier' in the app device settings.
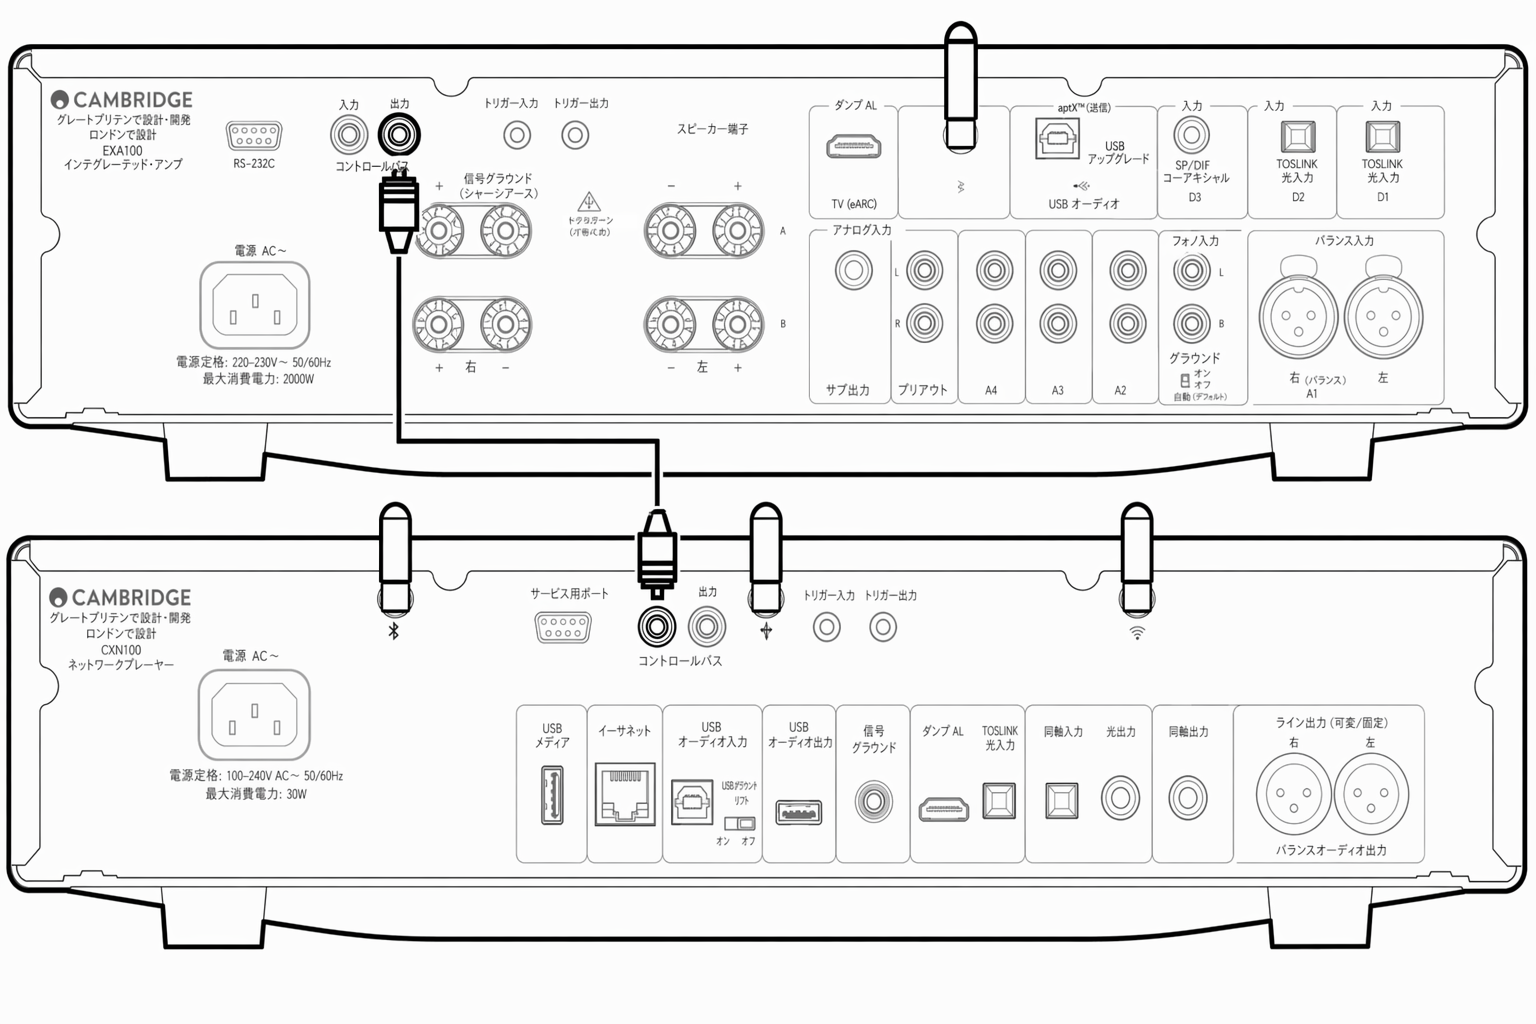
EXA と EXN100EXA with EXN100
注記: StreamMagic アプリを使用せずに EXA を操作する場合の接続方法です。
Note : Without using the StreamMagic app to control the EXA.
EXA の電源をオン/オフすると、EXN の電源もオン/オフします。EXA の Control Bus Out を EXN In に接続します。
When turning the EXA on/off, this will also turn the EXN on/off. Connect the EXA control bus out to EXN in.
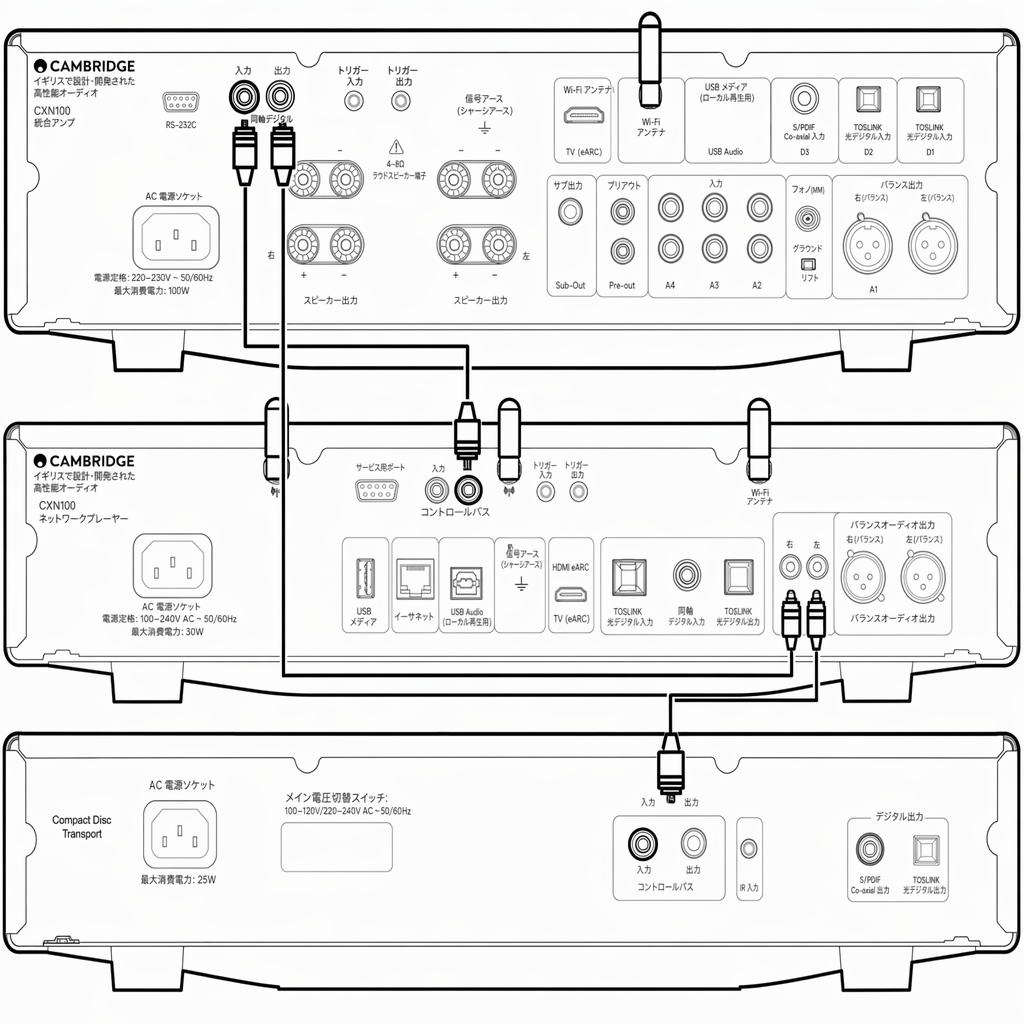
EXA、EXN100、CXCEXA with EXN100 and CXC
EXN の電源をオン/オフすると、EXA と CXC の電源もオン/オフします。
When turning the EXN on/off, this will turn the EXA and CXC on/off.
3 台の EX 機器をすべて使用する場合は、EXN の Control Bus Out を EXA の Control Bus In に接続します。次に、EXA の Control Bus Out を CXC の Control Bus In に接続します。
With all three EX devices, connect the EXN Control Bus out to EXA Control Bus in. Then connect the EXA Control Bus out to CXC Control Bus in.
注記: CXC の Control Bus Out から EXN の Control Bus In へループバックしないでください。
Note : Do not loop back from the CXC Control Bus out to the EXN Control Bus in.
EXN をアプリに接続したら、StreamMagic アプリの EXN デバイス設定で「Control Bus」も有効にし、「Amplifier」に設定する必要があります。
Control Bus will also need to be enabled and set to 'Amplifier' within the EXN device settings in the StreamMagic app once the app has been connected to the EXN.
注記: EXA、EXN、CXC にはすべて、Auto Power Down(APD)機能があります。APD が有効で、いずれかの機器の電源がオンになっているものの非アクティブな場合、設定した APD 時間が経過すると、その機器は自動的に電源がオフになります。これにより、コントロールバス接続を介して、接続されている他のすべての機器の電源もオフになります。機器を自動的にスタンバイ状態にしたくない場合は、各機器で APD 機能を無効にすることをお勧めします。
Note: The EXA, EXN and CXC all have an Auto Power Down (APD) function. If APD is enabled and one of the devices is switched on but inactive, the device will automatically power down after the selected APD time. This will then switch off all the other connected devices, due to the Control Bus connection. If you don't want the devices to go into standby automatically, we would recommend disabling the APD feature on each device.
ネットワークへの接続Connecting to a network
重要な注記: ネットワークプレーヤーを、Wi-Fi または Ethernet 経由で、できるだけ常時インターネットに接続しておくことが非常に重要です。これにより、重要なセキュリティプロトコルおよびサードパーティーとの互換性に対応するため、本機が定期的に更新されるようにします。
Important Note: It is vitally important that your Network Player remains connected to an internet network as often as possible, either via Wi-Fi or Ethernet. This will ensure that the unit is regularly updated to meet essential security protocols, third party compatibility.
ファームウェアのアップグレードを強く推奨します。安定性を高め、パフォーマンスを向上させ、より快適なユーザー体験のための新機能を追加します。
Firmware upgrading is highly recommended. It enhances stability, improves performance, and adds new features for a better user experience.
注記: 本プレーヤーはキャプティブポータルネットワークに対応していません。可能な限り、電力線アダプターや Wi-Fi シグナルブースター/エクステンダーの使用は避けてください。これらはネットワーク接続の信頼性を損なう可能性があります。
Note: Your player is not compatible with captive portal networks. Where possible, avoid the use of powerline adapters and Wi-Fi signal boosters/extenders, as these can disrupt the reliability of the network connection.
有線ネットワークへの接続Connecting to a Wired Network
- 本機とルーターをネットワークケーブルで接続します。Connect a network cable between your device and your router.
- 本機がネットワークに自動接続されます。Your device will now automatically connect to the network.
無線ネットワークへの接続Connecting to a wireless network
iOS の場合:
iOS :
- 付属の 2 本の Wi-Fi アンテナを本機の背面に接続し、無線ルーターの通信範囲内にあることを確認します。次に、本機の電源を入れます。注記: 初めて本機を設定する場合、または工場出荷時設定にリセットした後に設定する場合は、本機の電源を入れた後、まず画面上の指示に従って使用する言語を選択する必要があります。Connect both of the supplied Wi-Fi antennas to the rear of the unit, and ensure that it's in range of your wireless router. Then power on your unit. Note : If you are setting up your device for the first time or after a factory reset, you will first need to follow the on screen instructions to select your preferred language after powering on your unit.
- iOS デバイスの Wi-Fi 設定を開き、「SETUP NEW AIRPLAY SPEAKER」でネットワークプレーヤーの名前を選択します。注記: 一部の iOS デバイスでは「AirPlay Speaker」オプションが表示されません。この場合も、ネットワークプレーヤーの名前を選択してください。Go to the Wi-Fi settings on your iOS device and under ‘SETUP NEW AIRPLAY SPEAKER’ select the name of your Network Player. Note : Some iOS devices won't show an option for 'AirPlay Speaker'. In this instance still select the name of your Network Player.
- 接続したら、Apple App Store から StreamMagic アプリをダウンロードしてインストールし、本機の設定を完了します。Once connected, complete unit setup by downloading and installing the StreamMagic app from the Apple App store.
Android の場合:
Android :
- 付属の 2 本の Wi-Fi アンテナを本機の背面に接続し、無線ルーターの通信範囲内にあることを確認します。次に、本機の電源を入れます。注記: 初めて本機を設定する場合、または工場出荷時設定にリセットした後に設定する場合は、本機の電源を入れた後、まず画面上の指示に従って使用する言語を選択する必要があります。Connect both of the supplied Wi-Fi antennas to the rear of the unit, and ensure that it's in range of your wireless router. Then power on your unit. Note : If you are setting up your device for the first time or after a factory reset, you will first need to follow the on screen instructions to select your preferred language after powering on your unit.
- Google Play ストアから StreamMagic アプリをダウンロードしてインストールします。Download and install the StreamMagic app from the Google Play store.
- StreamMagic アプリを開き、「Connect」を選択します。Open the StreamMagic app and select ‘Connect’.
- 「Choose a device」で「Set up a new device」を選択し、次にネットワークプレーヤーの名前を選択します。Under Choose a device select 'Set up a new device' and then select the name of your Network Player.
- 「Wireless Connection」を選択し、次に「Continue」を選択します。Select ‘Wireless Connection’ and then 'Continue'.
- Android デバイスに、通信範囲内で利用可能なすべての Wi-Fi デバイスが表示されます。ネットワークプレーヤーの名前を選択します。Your Android device will now show all available Wi-Fi devices in range. Select the name of your Network Player.
- 接続すると、Wi-Fi ネットワークのパスワードを入力するよう求められます。パスワードを入力し、「Continue」を選択します。Once connected, you will be prompted to enter your Wi-Fi network password. Enter the password and select 'Continue'.
- これで本機が Wi-Fi ネットワークに接続されます。接続には最大 1 分かかる場合があります。Your device will now connect to your Wi-Fi network, this may take up to a minute.
- 接続したら、StreamMagic アプリで本機の初期設定を完了します。Once connected, complete the initial setup of your unit within the StreamMagic app.
StreamMagic アプリ - セットアップStreamMagic app - Setup
本プレーヤーはネットワークに接続されているため、本製品の入力に接続された機器の音声を聴けるだけでなく、ホームネットワーク上やインターネットから、さまざまなソースの音楽をストリーミング再生することもできます。
Your player is network connected, not only can you listen to devices connected to the inputs on the product but you can also stream music from many different sources both on your home network and from the internet.
本プレーヤーをセットアップするには、まず Apple App Store または Google Play ストアから StreamMagic アプリをダウンロードしてください。
To set up your player, please first download the StreamMagic app from the Apple app store or Google Play store.


セットアップSet up
- 本プレーヤーの電源を入れ、画面上の指示に従って使用する言語を選択します。Switch on your player and follow the on screen instructions to select your preferred language.
- StreamMagic アプリを開き、表示される指示に従ってネットワーク上で本プレーヤーのセットアップを完了します。このプロセスでは、保留中の新しいアップデートも適用されます。Open the StreamMagic app and follow the instructions provided to complete setting up your player on your network. This process will also apply any new updates that may be pending.
注記: セットアップ中に本プレーヤーに名前を付けるよう求められます。本プレーヤー固有の名前にしてください。これにより、ストリーミングサービスやスマートホームサービスを使用するときに見つけやすくなります。
Note: During the set up process you will be asked to give your player a name, please make sure this is unique to your player. This will make it easier to find when using streaming and smart home services.
本プレーヤーをホームネットワークに接続すると、インターネットラジオ、ストリーミングサービス、ネットワークドライブ、USB ドライブなどを含むソースを完全に操作できるようになります。
Once your player is connected to your home network you'll have full control of your sources, including internet radio, streaming services, network and USB drives and more.
StreamMagic アプリの詳細については、次の URL をご覧ください: https://www.cambridgeaudio.com/gbr/en/products/streammagic
For more information on our StreamMagic app, please visit: https://www.cambridgeaudio.com/gbr/en/products/streammagic
Google Home / Google CastGoogle Home / Google Cast
本プレーヤーは Google Cast に対応しており、Google Home に組み込むことができます。本プレーヤーをセットアップするには、スマートフォンまたはタブレットに Google Home アプリをダウンロードしてください。
Your player features Google Cast and can be incorporated in to your Google Home. To set up your player, download the Google Home app on your smart phone or tablet.
本プレーヤーには Google Cast が内蔵されているため、スマートフォンがリモコンになります。普段お使いのアプリで Cast ボタンをタップするだけで、スマートフォン、タブレット、またはノートパソコンから本プレーヤーへ音楽、ポッドキャスト、プレイリストをストリーミングできます。
With Google Cast built in to your player, your phone becomes your remote. Simply tap the Cast button from apps you already know and love to stream music, podcasts and playlists from your phone, tablet or laptop to your player.
Google CastGoogle Cast
スマートフォンがリモコンになります
Your phone is your remote
- 普段お使いのアプリで Cast ボタンをタップするだけです。新たなログインやダウンロードは必要ありません。Simply tap the Cast button from apps you already know and love. No new logins or downloads required.
- 家のどこからでも、スマートフォンを使って検索、再生、一時停止、音量の調整ができます。Use your phone to search, play, pause and turn up the volume from anywhere in the home.
- ストリーミング中も、ソーシャルメディアをスクロールしたり、テキストメッセージを送信したり、電話に出たりするなど、スマートフォンを他の用途に使い続けることができます。While you’re streaming, you can keep using your phone for other things – scroll through social media, send a text, and even accept calls.
- Google Cast 対応スピーカーでマルチルームキャストを使用すれば、家中で音楽を楽しめます。Enjoy music throughout your house when you use multi-room casting with Google Cast-enabled speakers.
- 「Hey Google」と話しかけるだけで、本プレーヤーにキャストできます。Just say “Hey Google” to cast to your player
無制限のエンターテインメントを、あなたのペースで
Unlimited entertainment, all on your schedule
- 数百のアプリに対応しており、新しいアプリも常に追加されています。Works with hundreds of apps and new apps are being added all the time.
- Pandora、Spotify、Youtube Music などの人気音楽サービスから、何百万もの楽曲を選べます。Choose from millions of songs from popular music services like Pandora, Spotify, and Youtube Music.
注記:StreamMagic アプリで初めて本プレーヤーをセットアップするとき、または工場出荷時設定にリセットした後は、Google Cast 機能を有効にするために表示される Google の利用規約に同意してください。
Note : When first setting up your Player via the StreamMagic app or after a factory reset, please ensure that you accept Google's terms and conditions when prompted to enable Google Cast functionality.
Android、Google Play、および Google Cast 対応ロゴは、Google Inc. の商標です。
Android, Google Play and the Google Cast-enabled logo are trademarks of Google Inc.
一部の地域では、Google Cast 対応の全機能を利用できない場合があります。
Full Google Cast-enabled features may not be available in some territories.
インターネットラジオInternet radio
StreamMagic アプリの「Radio」タブで、さまざまなインターネットラジオ局を閲覧して再生できます。また、お気に入りのインターネットラジオ局やその他のメディアを最大 99 件まで、本プレーヤーのプリセットとして登録できます。登録したプリセットは StreamMagic アプリで呼び出せます。本プレーヤーにリモコンが付属している場合は、限られた数のプリセットをリモコンで呼び出すこともできます。
You can browse and play a wide variety of Internet Radio stations in the StreamMagic app Radio tab. You can also assign up to 99 of your favourite Internet Radio stations and other media as presets on your player, which can then be recalled using the StreamMagic app. A limited amount of presets can be recalled via the remote control if your player includes one.
StreamMagic アプリで検索してプリセットに登録する方法:You can search and assign a preset via the StreamMagic app:
- StreamMagic アプリで「Radio」タブに移動します。Within the StreamMagic app navigate to the Radio tab.
- ページ上部の「Search for Radio」検索タブを使用するか、「URL」を選択して「Custom URL」リンクを入力します。Use the Search for Radio search tab at the top of the page or enter a Custom URL link by selecting URL.
- 保存したい放送局を見つけたら、それを選択すると、「Play now」または「Add to presets」のオプションが表示されます。Once you have located the station you wish to store, select and you will be prompted with the option to Play now or Add to presets .
- 放送局を、本プレーヤーの 1-99 のプリセットの中から希望するものに追加します。Add station to the desired preset for your player between 1-99.
- 選択したプリセットに放送局が保存されたことを知らせる確認が表示されます。You will then receive confirmation that the station is saved to the chosen preset.
注記:Custom URL のストリームが、次のいずれかの対応ファイル形式であることを確認してください:ALAC、WAV、FLAC、AIFF、DSD (x256)、WMA、MP3、AAC、HE AAC AAC+、OGG Vorbis。
Note : Please ensure that the custom URL stream is one of the following supported file types: ALAC, WAV, FLAC, AIFF, DSD (x256), WMA, MP3, AAC, HE AAC AAC+, OGG Vorbis.
プリセットを削除する(iOS):To remove a preset (iOS):
- StreamMagic アプリで「Home」タブに移動します。Within the StreamMagic app navigate to the Home tab.
- ページ下部までスクロールし、本プレーヤーの「Presets」を見つけて、「EDIT」を選択します。Scroll to the bottom of the page where you find your player's Presets , and select EDIT .
- プリセットから放送局を削除するには、赤い円形アイコンをタップしてから「Delete」を押します。To remove a station from preset, tap the red circle icon and then press Delete .
プリセットを削除する(Android):To remove a preset (Android):
- StreamMagic アプリで「Home」タブに移動します。Within the StreamMagic app navigate to the Home tab.
- ページ下部までスクロールし、本プレーヤーの「Presets」を見つけて、「EDIT」を選択します。Scroll to the bottom of the page where you find your players Presets , and select EDIT .
- 削除したい放送局をタップします。Tap on the station you wish to remove.
注記:本プレーヤーにリモコンが付属している場合は、放送局の再生中にリモコンの数字ボタンを長押しして、プリセットを登録することもできます。
Note : You may also assign a preset using a remote control if your player includes one, by pressing and holding a number on the remote whilst a station is playing.
BluetoothBluetooth
Bluetooth ソースを使用すると、本プレーヤーはほとんどのスマートフォン、タブレット、ノートパソコンから Bluetooth オーディオをワイヤレスで受信できます。
The Bluetooth source allows your player to receive wireless Bluetooth audio from most phones, tablets and laptops.
ペアリング
Pairing
選択したメディアソースから高音質の音楽をストリーミングするには、まずそのソースを本プレーヤーとペアリングする必要があります。
To begin streaming high-quality music from your chosen media source it will first need to be paired with your player.
- StreamMagic アプリで「Home」タブに移動します。Within the StreamMagic App navigate to the Home tab.
- ソースの「Edit」オプションを使用して、Bluetooth ソースを追加します。Use the “Edit” option of the source to add the Bluetooth source.
- 「Home」タブに戻り、Bluetooth ソースを選択します。Return to the Home tab and select the Bluetooth source.
- モバイルデバイスまたはノートパソコンの Bluetooth 設定を開きます。Open your mobile device or laptop's Bluetooth settings.
- 利用可能なデバイスのリストから本プレーヤーを選択します。Select your player from the list of available devices.
- これでデバイスが本プレーヤーに接続されます。Your device should now connect to your player.
ペアリングが完了すると、本プレーヤーで Bluetooth ソースを選択し、以前に接続したデバイスのリストから本プレーヤーを選択することで、いつでも本プレーヤーに接続できるようになります。
Once paired you should be able to connect to your player at any time by selecting the Bluetooth source on your player and then choosing your player from the list of previously connected devices.
注記:
Note :
Bluetooth ソースが選択されている間のみ、Bluetooth デバイスを本プレーヤーに接続できます。
Your Bluetooth device can only be connected to your player while the Bluetooth source is selected.
AirPlayAirPlay
AirPlay は、iPhone、iPad、HomePod、または Apple TV から、タップするか Siri に話しかけるだけで、どの部屋にあるホームオーディオシステムやスピーカーも操作できるように設計された Apple のテクノロジーです。リビングルームとキッチンで同時に曲を再生したり、どの部屋の音量を調整したりする操作を、すべて同期して行えます。
AirPlay is an Apple technology designed to control home audio systems and speakers in any room — with a tap or by just asking Siri — right from iPhone, iPad, HomePod, or Apple TV. Play a song in the living room and kitchen at the same time or adjust the volume in any room, all in sync.
本プレーヤーを設置したら、iPhone または iPad を使って、いくつかの簡単な手順で Apple Home アプリに追加します。
After installing your player, add it to the Apple Home app with a few simple steps using your iPhone or iPad
iPhone または iPad で AirPlay を使用する方法How to use AirPlay from iPhone or iPad
1. 本プレーヤーがネットワークに接続されていることを確認します。
1. Ensure your player is connected to your network.
2. AirPlay で再生したいアプリを開きます。
2. Open the app that you want to AirPlay from.


3. ボタンをタップします。
3. Tap or .
4. AirPlay デバイスとして本プレーヤーを選択します。
4. Select your player as your AirPlay device.
コントロールセンターから AirPlay を使用する方法How to use AirPlay from Control Center
コントロールセンターからデバイスのオーディオを切り替える方法:
To switch the audio on your device from Control Center:
デバイスの画面右上から下にスワイプして、コントロールセンターを開きます。右上隅をタッチしたままにして、本プレーヤーを選択します。
Swipe down from the top right side of the screen on your device to open Control Center. Touch and hold in the upper-right corner, then select your player.
本製品は AirPlay 2 に対応しており、iOS 11.4 以降が必要です。
This product supports AirPlay 2 and requires iOS 11.4 or later.
Apple および AirPlay は、米国およびその他の国で登録された Apple Inc. の商標です。
Apple and AirPlay are trademarks of Apple Inc., registered in the U.S. and other countries.
Works with Apple バッジを使用することは、アクセサリがバッジに示されたテクノロジー専用に設計され、Apple の性能基準を満たすことを開発者によって認証されていることを意味します。
Use of the Works with Apple badge means that an accessory has been designed to work specifically with the technology identified in the badge and has been certified by the developer to meet Apple performance standards.
内蔵ストリーミングサービスBuilt-in streaming services
本プレーヤーには、次のストリーミングサービスが内蔵されています。
Your player has the following built-in streaming services:
- Spotify ConnectSpotify Connect
- TIDALTIDAL
- QobuzQobuz
- DeezerDeezer
注記:ストリーミングに使用するデバイス(スマートフォン、タブレット、コンピューターなど)が本プレーヤーと同じ Wi-Fi ネットワークに接続されていることが重要です。これにより、各機器が相互に通信できます。
Note : It is essential that the device you are streaming from (smartphone, tablet, computer, etc.) is on the same Wi-Fi network as your player, to ensure that the units can communicate with each other.
Spotify ConnectSpotify Connect
スマートフォン、タブレット、またはコンピューターを Spotify のリモコンとして使用できます。
Use your phone, tablet or computer as a remote control for Spotify.
詳細は spotify.com/connect を参照してください。
Go to spotify.com/connect to learn more.
TIDAL(Connect)TIDAL (Connect)
1. TIDAL アプリを開き、本プレーヤーにストリーミングしたいプレイリスト、アルバム、曲などを選択します。
1. Open the TIDAL app and choose the playlist, album, song, etc. that you wish to stream to your player.
2. TIDAL 内の「Sound Output devices」アイコンを選択し、リストから本プレーヤーを選択します。
2. Select the Sound Output devices icon within TIDAL and select your player from the list.
3. TIDAL Connect で、選択したコンテンツが本プレーヤーにストリーミングされます。
3. TIDAL Connect should now be streaming your chosen content to your player.
詳細は tidal.com/connect を参照してください。
Go to tidal.com/connect to learn more
TIDAL(StreamMagic 経由)TIDAL (via StreamMagic)
1. StreamMagic アプリを開き、「Library」タブに移動してから、TIDAL を選択します。
1. Open the StreamMagic app and navigate to the Library tab, and then select TIDAL.
注記:指示が表示されたら、TIDAL アカウントにサインインしてください。これは、アカウントを StreamMagic アプリにリンクするため、初回の使用時にのみ必要です。
Note : Please ensure that you sign into your TIDAL account when prompted to do so. This will only be required on the first instance of use to link the account to the StreamMagic app.
2. 本プレーヤーにストリーミングしたいプレイリスト、アルバム、曲などを選択します。
2. Choose the playlist, album, song, etc. that you wish to stream to your player.
3. これで、TIDAL から選択したコンテンツが本プレーヤーにストリーミングされます。
3. TIDAL should now be streaming your chosen content to your player.
Qobuz(Google Cast 経由)Qobuz (via Google Cast)
1. Qobuz アプリを開き、本プレーヤーにストリーミングしたいプレイリスト、アルバム、曲などを選択します。
1. Open the Qobuz app and choose the playlist, album, song, etc. that you wish to stream to your player.
2. Qobuz 内の「Google Cast」アイコンを選択し、Qobuz Connect リストから本プレーヤーを選択します。
2. Select the Google Cast icon within Qobuz and select your player from the Qobuz Connect list.
3. Qobuz で選択したコンテンツが本プレーヤーにキャストされます。
3. Qobuz should now be casting your chosen content to your player.
Qobuz(StreamMagic 経由)Qobuz (via StreamMagic)
1. StreamMagic アプリを開き、「Library」タブに移動してから、Qobuz を選択します。
1. Open the StreamMagic app and navigate to the Library tab, and then select Qobuz.
注記:指示が表示されたら、Qobuz アカウントにサインインしてください。これは、アカウントを StreamMagic アプリにリンクするため、初回の使用時にのみ必要です。
Note : Please ensure that you sign into your Qobuz account when prompted to do so. This will only be required on the first instance of use to link the account to the StreamMagic app.
2. 本プレーヤーにストリーミングしたいプレイリスト、アルバム、曲などを選択します。
2. Choose the playlist, album, song, etc. that you wish to stream to your player.
3. これで、Qobuz から選択したコンテンツが本プレーヤーにストリーミングされます。
3. Qobuz should now be streaming your chosen content to your player.
Deezer(Google Cast 経由)Deezer (via Google Cast)
1. Deezer アプリを開き、本プレーヤーにストリーミングしたいプレイリスト、アルバム、曲などを選択します。
1. Open the Deezer app and choose the playlist, album, song, etc. that you wish to stream to your player.
2. Deezer 内のスピーカーアイコンを選択し、「Google Cast」を選択します。リストから本プレーヤーを選択します。
2. Select the speaker icon within Deezer, then select 'Google Cast'. Select your player from the list.
3. Deezer で選択したコンテンツが本プレーヤーにキャストされます。
3. Deezer should now be casting your chosen content to your player.
Deezer(StreamMagic 経由)*Deezer (via StreamMagic)*
1. StreamMagic アプリを開き、「Library」タブに移動してから、Deezer を選択します。
1. Open the StreamMagic app and navigate to the Library tab, and then select Deezer.
注記:指示が表示されたら、Deezer アカウントにサインインしてください。これは、アカウントを StreamMagic アプリにリンクするため、初回の使用時にのみ必要です。
Note : Please ensure that you sign into your Deezer account when prompted to do so. This will only be required on the first instance of use to link the account to the StreamMagic app.
2. 本プレーヤーにストリーミングしたいプレイリスト、アルバム、曲などを選択します。
2. Choose the playlist, album, song, etc. that you wish to stream to your player.
3. Deezer から選択したコンテンツが本プレーヤーにストリーミングされます。
3. Deezer should now be streaming your chosen content to your player.
*Deezer は、ファームウェアバージョン 129-b-004 以降および StreamMagic アプリバージョン 2.9.0 以降を使用している場合にのみ、StreamMagic アプリ内で利用できます。
*Deezer is only available within the StreamMagic app when running firmware version 129-b-004 or later and StreamMagic app version 2.9.0 or later.
USB オーディオUSB Audio
重要な注記:本機を初めてセットアップする前に、USB オーディオ接続が取り外されていることを確認してください。ファームウェアの更新を適用した後で、USB オーディオを再接続できます。
Important note: Before setting up your device for the first time, please make sure that the USB Audio connection is unplugged. USB Audio can be re-connected once any firmware updates are applied.
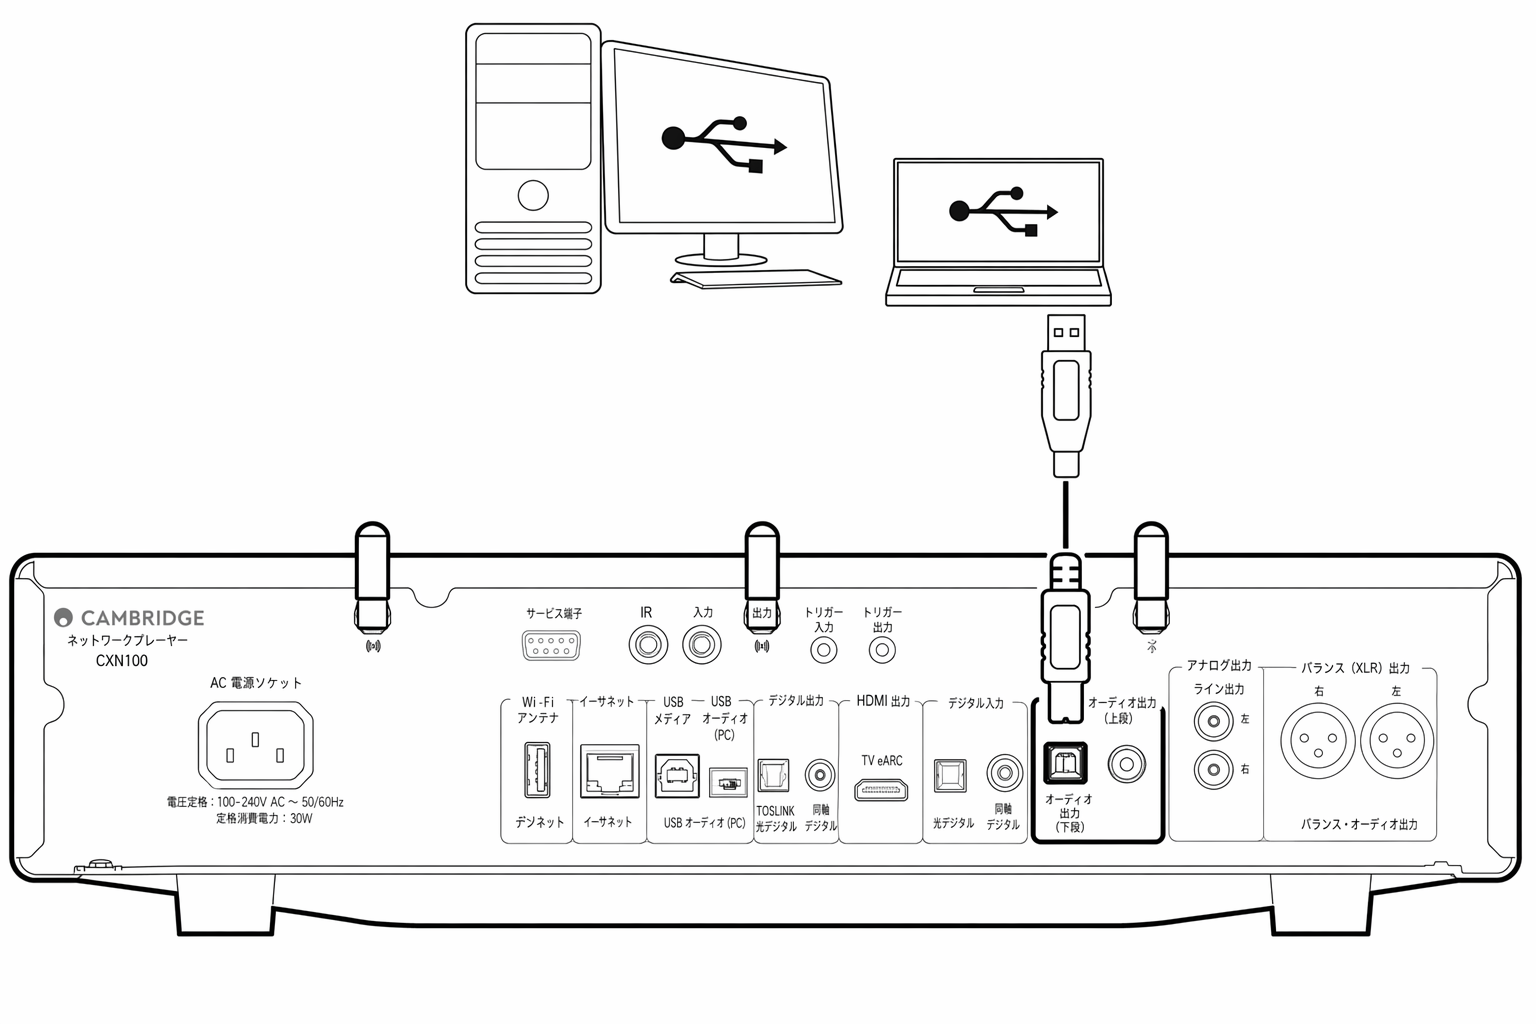
PC のセットアップPC Setup
注記:PC を Network Player に接続する前に、必要な Cambridge Audio Windows 2.0 USB ドライバーを PC に必ずインストールしてください。最新の USB オーディオドライバーに関する情報はこちら、最新ドライバーのダウンロードリンクはこちらから確認できます。
Note : Before connecting your PC to the Network Player, ensure you install the required Cambridge Audio Windows 2.0 USB driver on your PC. Please find information on the most recent USB Audio driver here , and a link to download the latest driver here .
1. 本機を PC に接続します。
1. Connect your device to your PC.
- 正しいドライバーをインストールしたら、USB オーディオケーブル(Type A to Type B)を使用して、本機の USB オーディオ入力を PC の USB ポートに接続します。After installing the correct driver, using a USB Audio cable (Type A to Type B), connect the USB Audio In on your device to a USB port on the PC.
2. USB オーディオソースを選択します。
2. Select the USB Audio source.
- これは、本機前面のソースセレクターを使用するか、「Home」タブに移動し、StreamMagic アプリの「Sources」セクションで USB オーディオを選択して行います。This can be done using the source selector on the front of the device, or by going to the Home tab and then selecting USB Audio within the Sources section of the StreamMagic app.
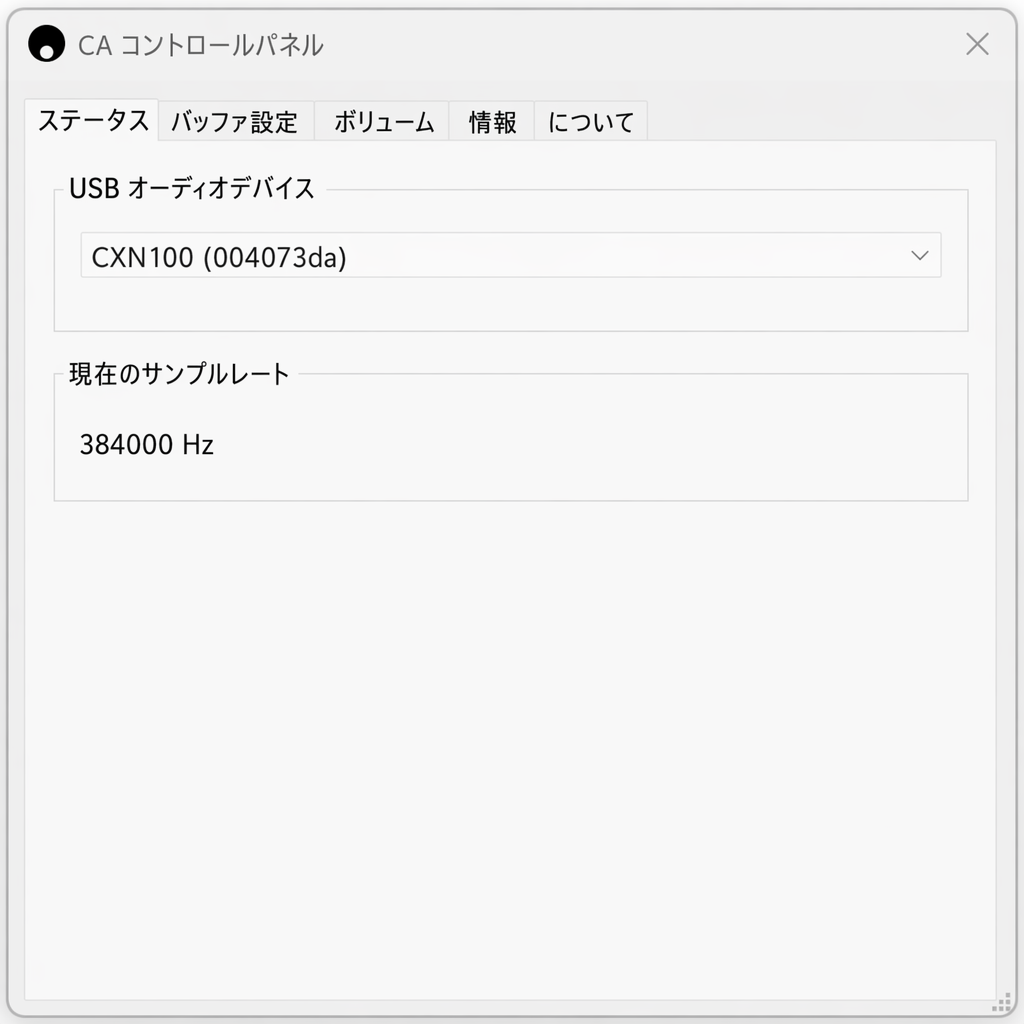
3. Windows タスクバーにインストールされている CA Control Panel を開きます。ここには、接続されている Cambridge Audio USB オーディオデバイスと現在のサンプリングレートが表示されます。
3. Navigate to the CA Control Panel which should now be installed in your Windows taskbar. This will show any connected Cambridge Audio USB Audio device and current sample rate.
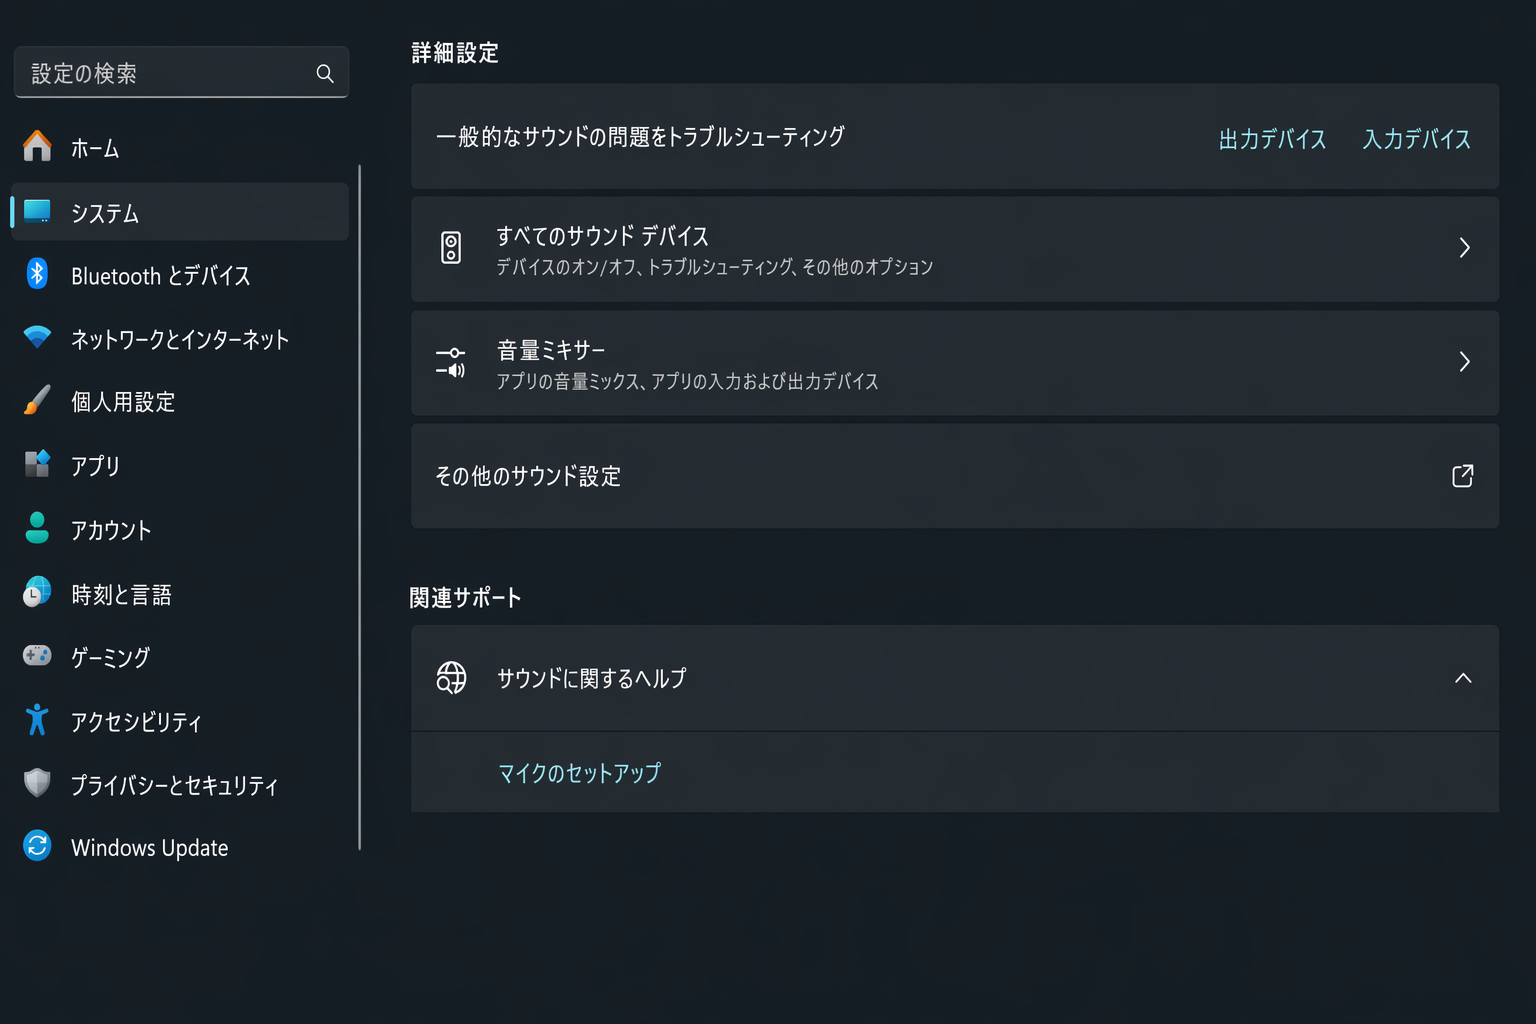
4. PC で、Settings > System > Sound に移動します。ドロップダウンメニューから Network Player を出力デバイスとして選択します。
4. On your PC, navigate to Settings > System > Sound . Select your Network Player as your output device from the drop-down menu.
5. 同じウィンドウの右側にある「Related Settings」で「Sound Control Panel」を選択します。または、下にスクロールして「More Sound Settings」を選択します。
5. Within this same window under Related Settings on the right-hand side, select Sound Control Panel . Alternatively, scroll down and select More Sound Settings .
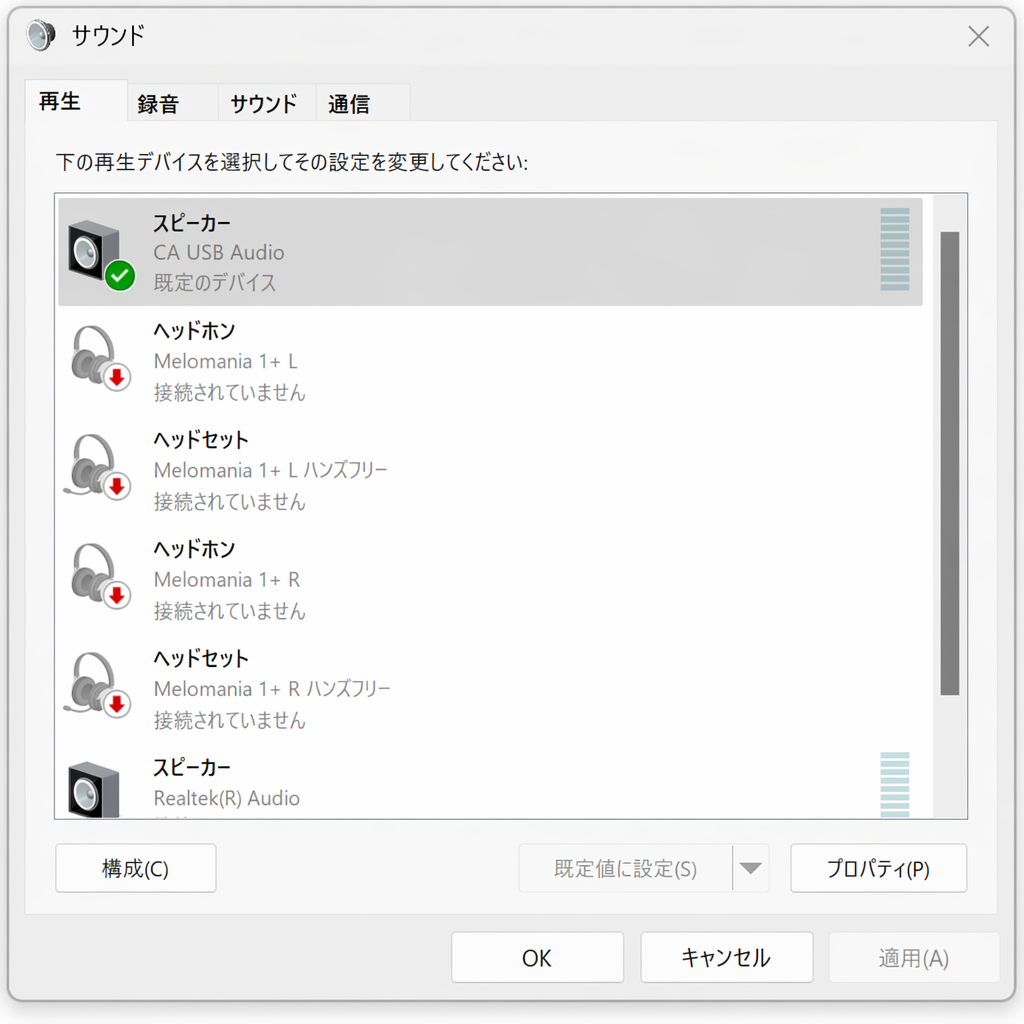
6. 「Playback」タブで、本機がデフォルトの出力デバイスになっていることを確認し、「Properties」を選択します。
6. On the Playback tab, ensure that the device is the default output device, then select Properties .
7. 「Speaker Properties」で、「Advanced」タブに移動します。希望するビット深度とサンプリングレートを選択します。(この手順は任意です。)
7. Within Speaker Properties , navigate to the Advanced tab. Select the desired bit depth and sample rate preference. (This step is optional.)
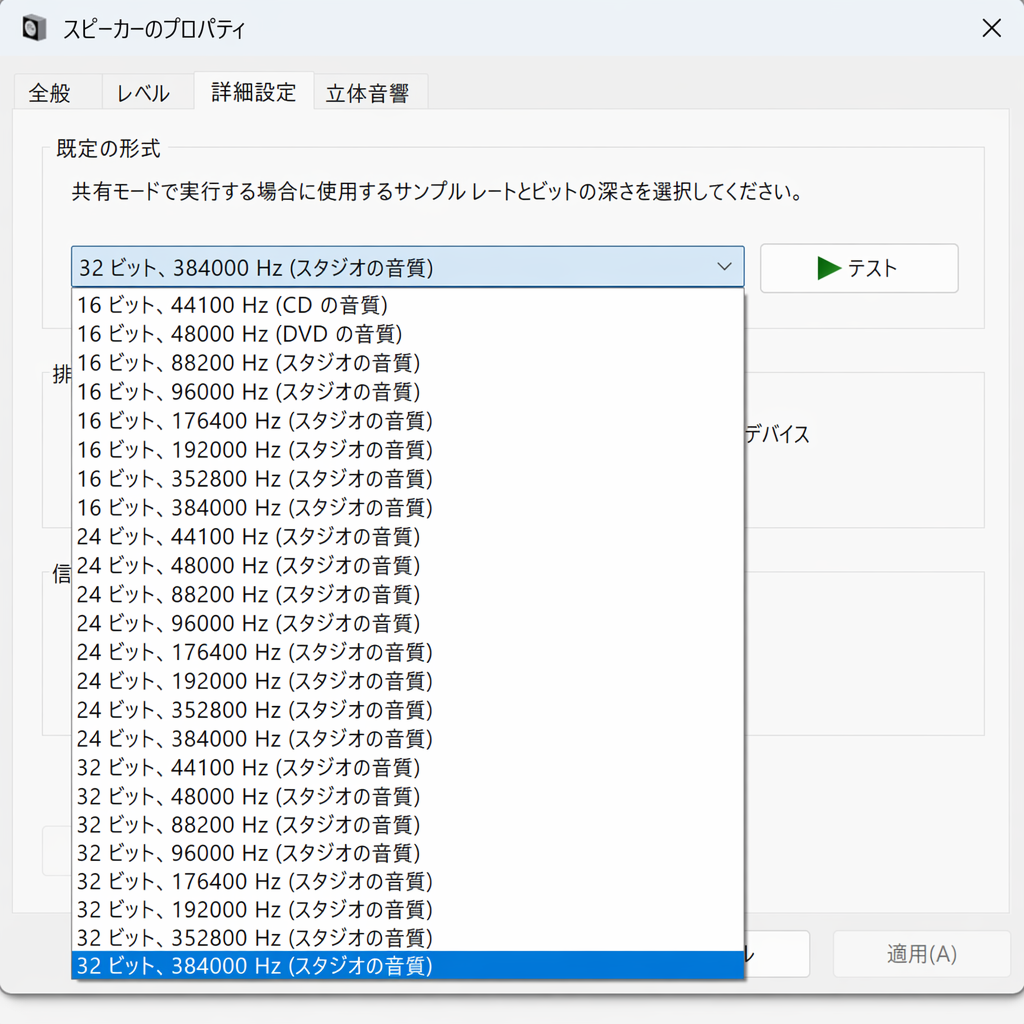
注記: Windows のバージョンによっては、384kHz を超えるサンプリングレートでの再生に対応していません。問題が発生した場合は、Windows の既定の再生フォーマットを 384kHz 以下に設定してから、ネットワークプレーヤーを再起動してください。
Note : Not all Windows versions support playback at sample rates greater than 384kHz. If you experience issues please set the default Windows playback format to 384kHz or lower, then restart your Network Player.
8. PC の出力音声がネットワークプレーヤーから再生されます。
8. Your PC’s output will now playback via your Network Player.
Mac のセットアップMac Setup
注記: Mac では追加のドライバーは不要です。
Note : No extra drivers are required when using a Mac.
1. 本機を Mac に接続します。
1. Connect your device to your Mac.
- USB オーディオケーブル(Type A から Type B)を使用して、本機の USB オーディオ入力と Mac の USB ポートを接続します。Using a USB Audio cable (Type A to Type B), connect the USB Audio In on your device to a USB port on the Mac.
注記: USB Type A ポートを備えていない Mac をお使いの場合は、USB Type C(Thunderbolt 3)から USB Type B の接続も使用できます。
Note : If using a Mac without a USB Type A port, you may also use USB Type C (Thunderbolt 3) to USB Type B connection.
2. USB オーディオソースを選択します。
2. Select the USB Audio source.
- 本機前面のソースセレクターを使用するか、StreamMagic アプリの「Home」タブに移動して「Sources」セクションから「USB Audio」を選択します。This can be done using the source selector on the front of the device, or by going to the Home tab and then selecting USB Audio within the Sources section of the StreamMagic app.
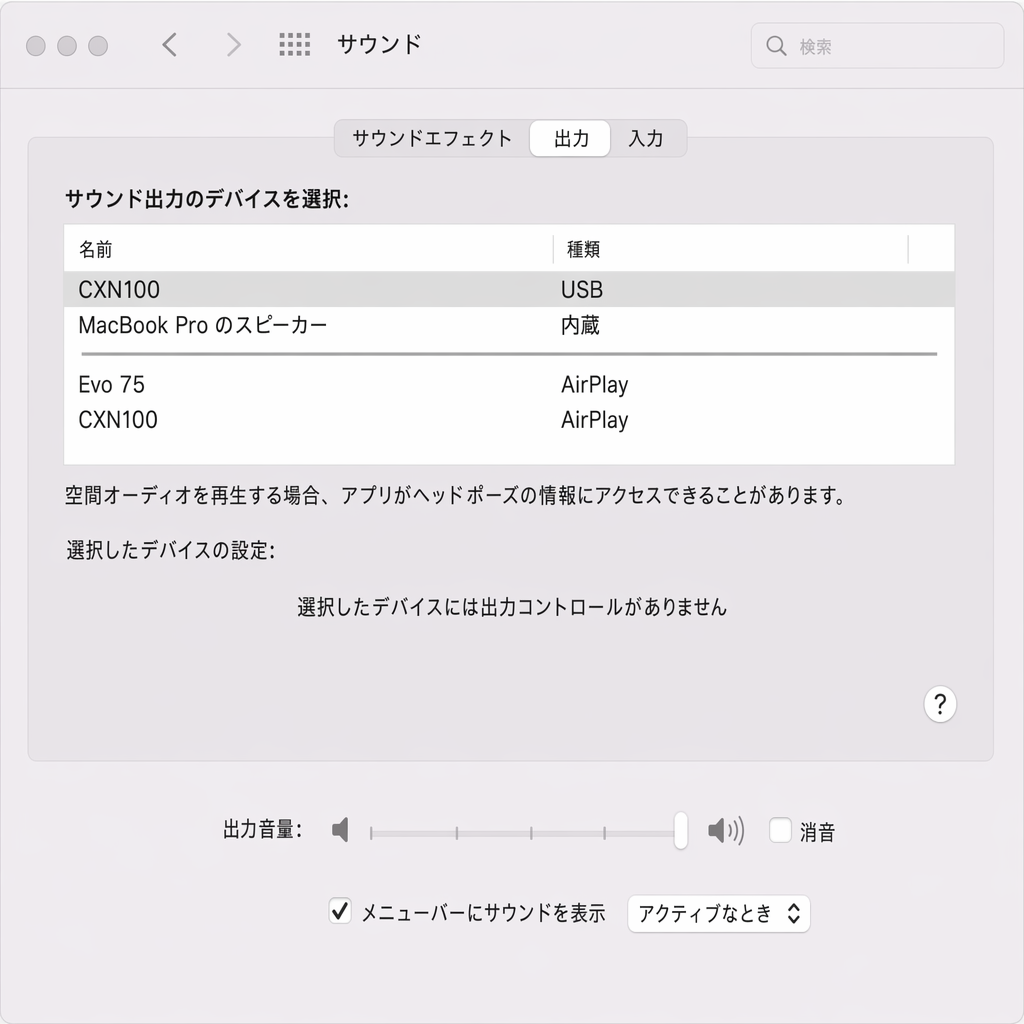
3. Mac の「System Preferences」で「Sound」設定を開きます。出力サウンドデバイスとしてネットワークプレーヤーを選択します。
3. Within the System Preferences of the Mac, locate the Sound settings. Select your Network Player as the output sound device.
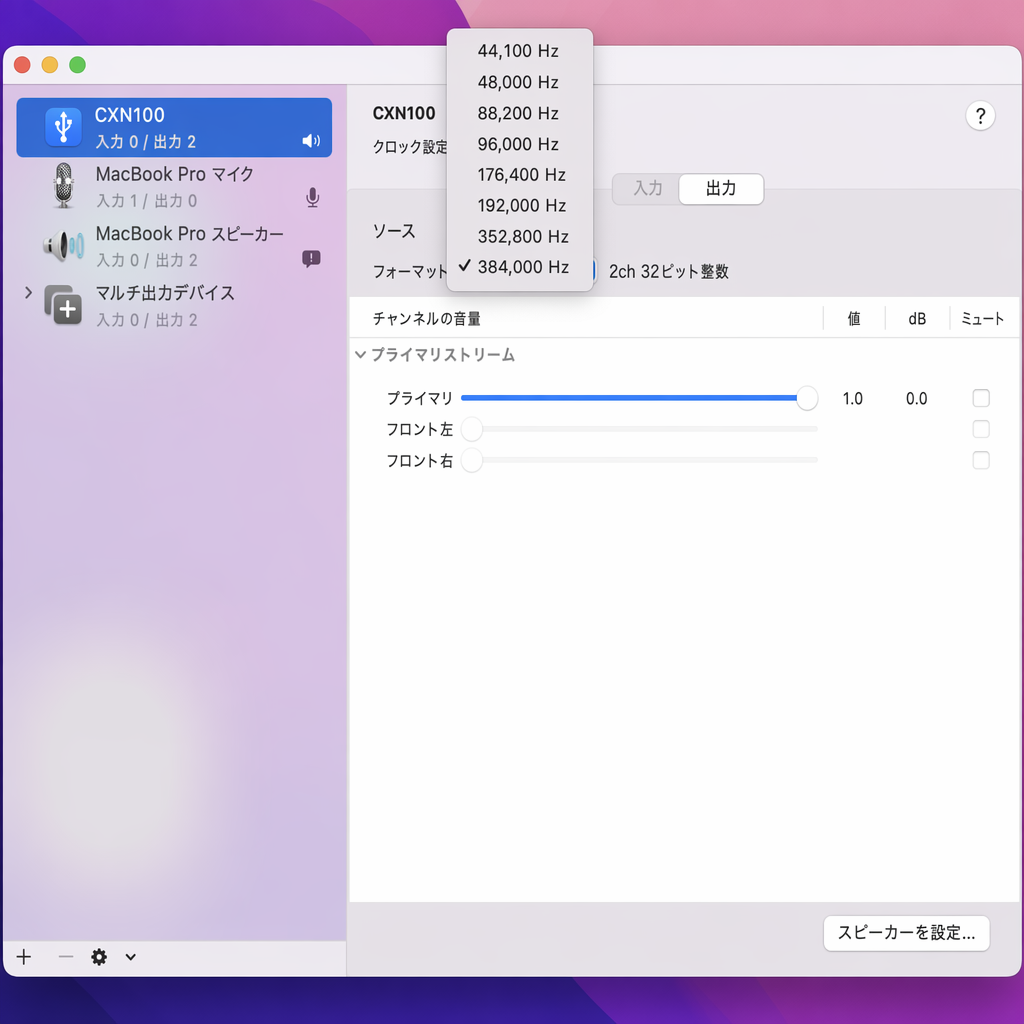
4. Mac で「Applications」>「Utilities」>「Audio MIDI Setup」に移動します。左側の列で本機を出力サウンドデバイスとして選択し、ドロップダウンオプションから希望するビット深度とサンプルレートを選択します。
4. On the Mac navigate to Applications > Utilities > Audio MIDI Setup . Select the device as the output sound device on the left column, and then using the drop-down options select the desired bit depth and sample rate preference.
注記: この手順は任意です。
Note : This step is optional.
5. Mac の出力音声がネットワークプレーヤーから再生されます。
5. Your Mac’s output will now playback via your Network Player.
USB メディアUSB Media
本プレーヤーの背面にある USB メディア入力に、USB SSD、USB HDD、またはフラッシュドライブを接続して再生できます。接続後は、次の形式に対応します:ALAC、WAV、FLAC、AIFF、DSD、WMA、MP3、AAC、HE AAC、AAC+、OGG Vorbis。
You may connect a USB SSD, USB HDD or flash drive to your player via the USB Media input located on the rear of the unit for playback. Once connected, the following formats are supported: ALAC, WAV, FLAC, AIFF, DSD, WMA, MP3, AAC, HE AAC, AAC+, OGG Vorbis
注記: 本プレーヤーは、USB 入力に接続された大容量ハードドライブを読み取ります。ただし、一部の大容量ドライブでは、専用の電源を使用する必要があります。
Note : your player will read large capacity hard drives connected to the USB input. However, some larger capacity drives will require you to use their own power supply.
本プレーヤーは、FAT32、exFAT、NTFS、Ext4 でフォーマットされた USB ハードドライブにのみ対応します。
Your player only supports USB hard drives which are formatted to FAT32, exFAT, NTFS and Ext4.
本プレーヤーの主な用途はネットワーク音楽プレーヤーです。USB ポートは USB メモリを手軽に接続するためのものです。そのため、すべての USB HDD との互換性を保証できません。
The primary function of your player is as a network music player. The USB ports are intended for convenient connection of USB thumb drives. As such, we cannot guarantee compatibility with all USB HDD’s.
USB メディアの再生(StreamMagic アプリ経由)USB Media Playback (via StreamMagic app)
1. リアパネルの USB 入力に、USB SSD、HDD、またはフラッシュドライブを接続します。
1.Connect a USB SSD, HDD or flash drive to rear panel USB Input.
2. StreamMagic アプリの「Library」タブに移動します。
2.Navigate to the Library tab of the StreamMagic app.
3. 「USB Drives」から USB メディア機器を選び、開きます。
3.Under USB Drives, locate your USB Media device and open.
4. トラックを選択すると、「PLAY FROM HERE」、「PLAY TRACK NOW」、「PLAY TRACK NEXT」、または「QUEUE TRACK」を選択できます。
4.Upon selecting a track you will have the option to ‘PLAY FROM HERE’, ‘PLAY TRACK NOW’, ‘PLAY TRACK NEXT’ or ‘QUEUE TRACK’.
再生オプション:
Playback Options:
PLAY FROM HERE ― アルバム/フォルダーをこの位置から再生します。
PLAY FROM HERE – Playback of album/folder will begin from this point onwards.
PLAY TRACK NOW ― 選択したトラックをすぐに再生します。
PLAY TRACK NOW – Selected track will playback immediately.
PLAY TRACK NEXT ― 選択したトラックをキューに追加し、次に再生します。
PLAY TRACK NEXT – Selected track will be added to queue and playback next.
QUEUE TRACK ― 選択したトラックを再生キューに追加します。
QUEUE TRACK – Selected track will be added to playback queue.
ローカルのデジタル音楽ライブラリをストリーミングするStreaming your local digital music collection
本プレーヤーは、さまざまな物理ソースのコンテンツを再生できます。本節では、ローカルに保存したデジタル音楽コレクションにアクセスして再生するために必要な手順を説明します。「ローカル保存」とは、PC、Mac、またはネットワーク接続ストレージデバイス(NAS)に保存されているデジタル音楽ファイルを指します。
Your player can play content from many different physical sources and this section will explain what you need to do to access and play your locally stored digital music collection. ‘Locally Stored’ means the digital music files you have on your PC , Mac or Network Attached Storage devices ( NAS ).
ローカルコンテンツをストリーミングするには、ネットワーク上で次のハードウェアおよびソフトウェアが稼働している必要があります。
To stream local content, you will need the following hardware and software running in your network:
1. Cambridge Audio のネットワークプレーヤー。
1. Your Cambridge Audio Network Player.
2. StreamMagic アプリを実行できるスマートフォンやタブレットなどのモバイルデバイス、または本体前面の操作部からコレクションにアクセスする方法。
2. A mobile device such as a smartphone or tablet on which you can run the StreamMagic app, or by accessing your collection via the front panel controls.
3. 対応するデジタル音楽ファイルを保存したハードドライブ、コンピューター、または NAS。
3. A hard drive, computer or NAS containing your compatible digital music files.
4. 稼働中の UPnP 音楽サーバーまたはメディアサーバー。
4. An active UPnP music or media server.
5. UPnP サービスを許可するよう設定されたルーター。
5. A router which is configured to allow the UPnP service.
注記: 上記の項目は正しく接続および設定されている必要があります。また、使用するサーバー、NAS、コンピューターなどによって設定方法が異なるため、環境ごとに違いがある点に注意してください。これを支援するため、最小限の手間で利用を開始できるベストプラクティスガイドを作成しました。こちらから参照できます。
Note: The above items must be correctly connected and configured, and it is important to note that depending on the server, NAS, computer, etc. you’re using, this will differ from setup to setup. To help you with this we have created best practice guide which should get you up and running with minimal fuss and effort. This can be found here .
MQA(Master Quality Authenticated)MQA (Master Quality Authenticated)
本プレーヤーには MQA テクノロジーが搭載されており、MQA オーディオファイルやストリームを再生して、オリジナルマスター録音のサウンドを再現できます。
Your player includes MQA technology, which enables you to play back MQA audio files and streams, delivering the sound of the original master recording.
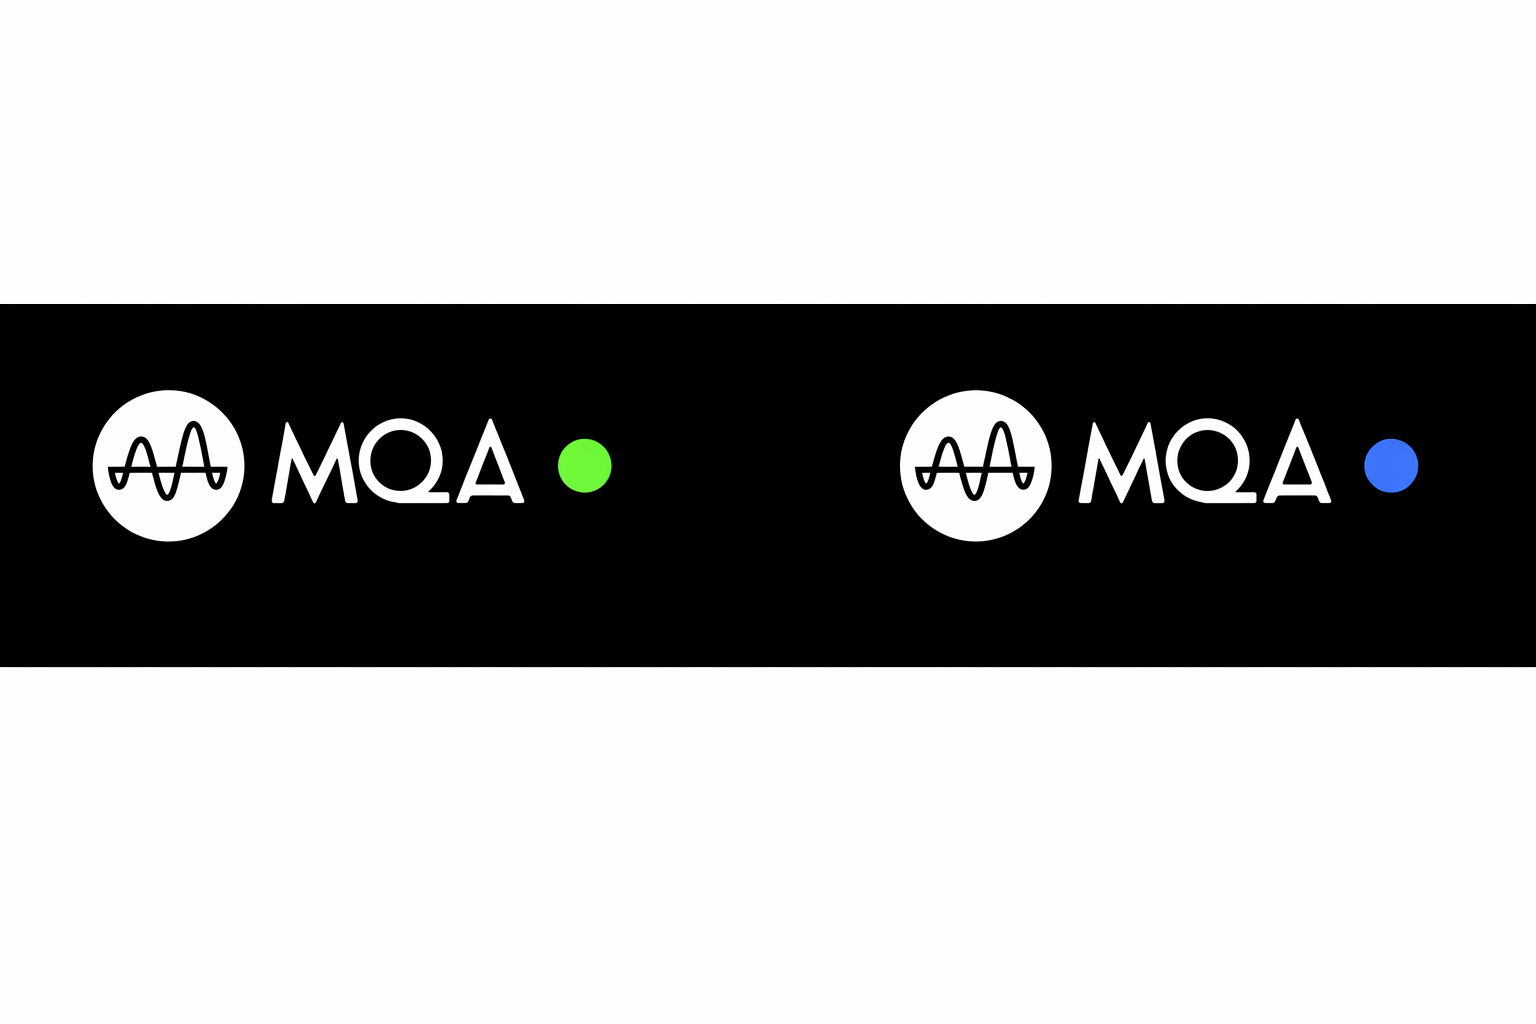
フロントパネルには、緑または青の MQA 表示がされます。これは、本体が MQA ストリームまたはファイルをデコードして再生していることを示します。また、ソース素材と同一の音であることを保証するため、その来歴を示します。青の MQA 表示は、アーティスト/プロデューサーがスタジオで承認した、または著作権所有者によって検証された MQA Studio ファイルを再生していることを示します。
The front panel will display MQA green or blue to indicate that the unit is decoding and playing an MQA stream or file, and denotes provenance to ensure that the sound is identical to that of the source material. It displays MQA blue to indicate it is playing an MQA Studio file, which has either been approved in the studio by the artist/producer or has been verified by the copyright owner.
設定Settings
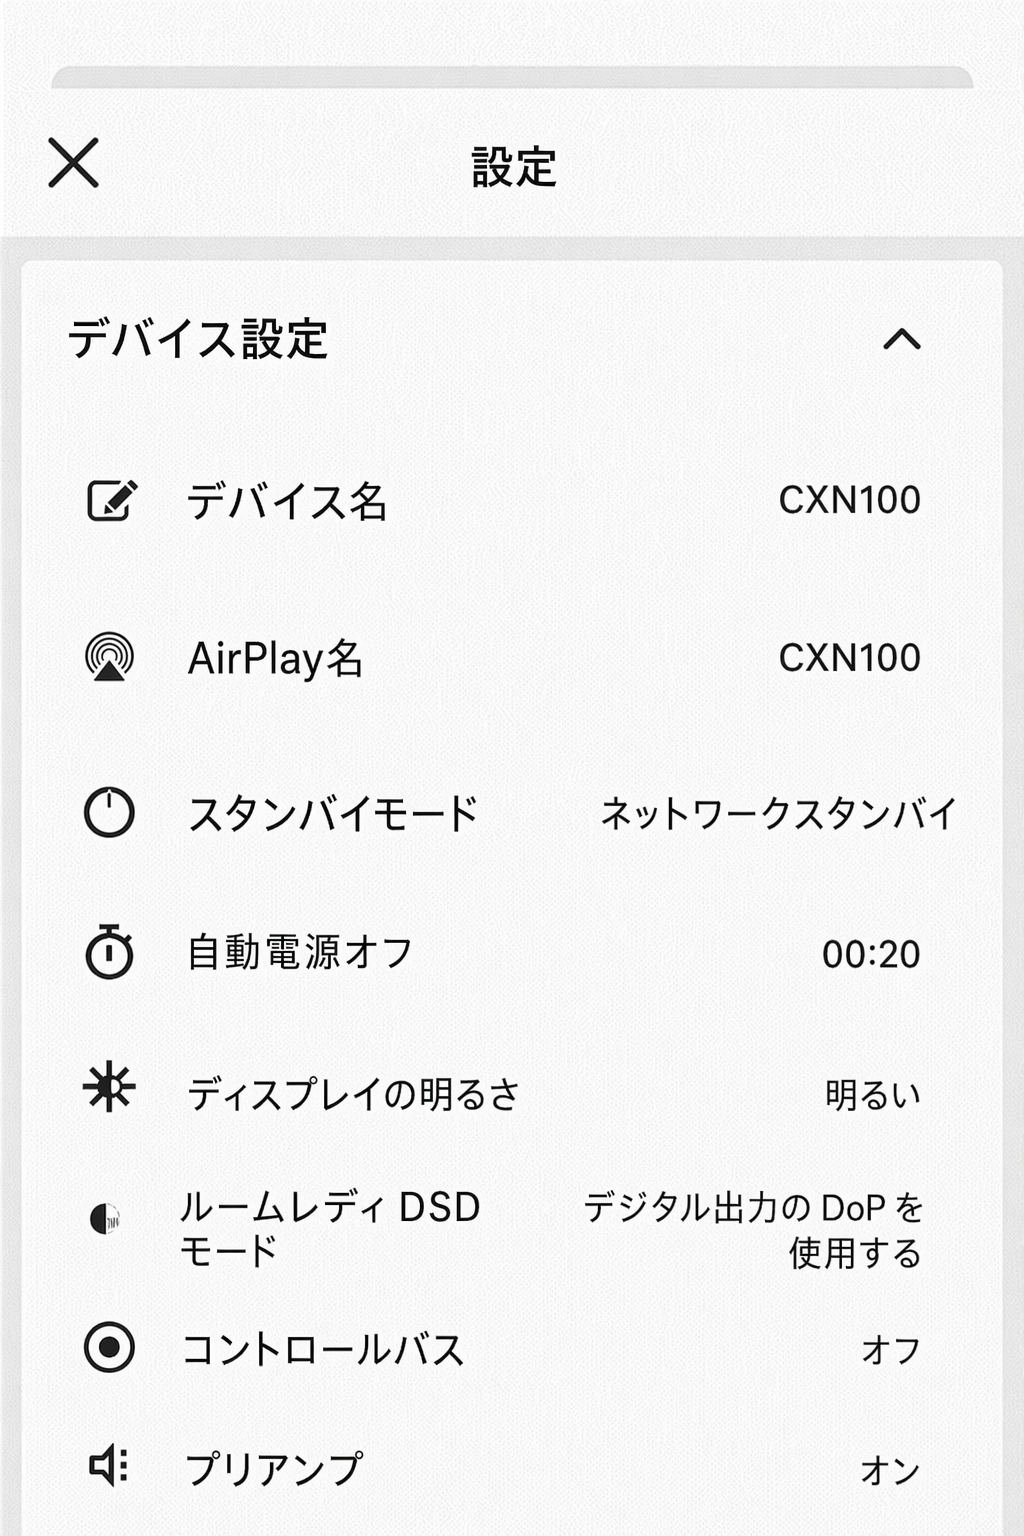
デバイス名Device Name
Spotify、Chromecast built-in、TIDAL Connect などのサービスを使用する際に、StreamMagic アプリやホームネットワーク上で表示される本プレーヤーの名称です。
This is how your player will appear in your StreamMagic app and on your home network when using services like Spotify, Chromecast built- in and TIDAL Connect.
本プレーヤーに固有の名前を設定すると、ストリーミングサービスやスマートホームサービスを使用する際に識別しやすくなります。
Giving your player a unique name makes it easier to distinguish when using streaming and smart home services.
AirPlay 名AirPlay Name
AirPlay または Apple Home アプリを使用する際に表示される本プレーヤーの名称です。
This is how your player will appear when using AirPlay or the Apple Home app.
スタンバイモードStandby Mode
本プレーヤーが使用するスタンバイモードの種類を選択します。
This selects what type of standby mode your player will use.
「Network Standby」では、スタンバイ中も StreamMagic アプリやその他のネットワークサービスから本プレーヤーを操作できます。
Network Standby means your player will still be controllable by the StreamMagic app and other network services while in standby.
「ECO」モードを選択すると、スタンバイ中の消費電力をさらに抑えられますが、電源を入れるには本体前面またはリモコンを使用する必要があります。スタンバイ中は、アプリやその他のネットワークサービスから本プレーヤーを操作できません。
If ECO mode is chosen, your player will use even less power in standby but will need to be switched on either by the front panel or the remote control. It will not be controllable via the app or other network services while in standby.
自動電源オフAutomatic Power Down
本プレーヤーが非アクティブな状態でスタンバイに切り替わるまでの待機時間を設定します。
This sets how long your player will wait while inactive before switching to standby.
ディスプレイの明るさDisplay Brightness
本プレーヤーのディスプレイの明るさを設定します。「Off」に設定すると、何らかの変更を行った後、ディスプレイは数秒間表示され、その後消灯します。Roon
This sets the brightness of your player’s display. If set to ‘Off’ the display will show for a few seconds after any change and then switch off.Roon
Ready DSDReady DSD
Roon による DSD コンテンツの提供方式を選択できます。
This will allow you to choose how Roon provides DSD content.
Use DoP for digital output ― DoP 形式のネイティブ DSD に対応する機器の場合。Use PCM for digital output ― ネイティブ DSD に対応しない機器の場合。
Use DoP for digital output – If your device does support native DSD in DoP format. Use PCM for digital output – If your device doesn’t support native DSD.
コントロールバスControl Bus
本機がコントロールバスコネクターで Cambridge Audio 製アンプに接続されている場合、音量コマンドを直接アンプへ送信できます。詳細は本マニュアルの「接続方法」セクション内の「コントロールバス」を参照してください。
If your device is connected to a Cambridge Audio amplifier using a control bus connector, volume commands can be sent directly to the amplifier. For more information, please refer to the Getting Connected section of this manual under ‘Control Bus’ here.
プリアンプPre-Amp
プリアンプモードが有効な場合、本機のアナログ出力の音量をアプリまたはロータリーダイヤルで調整できます。
With Pre-Amp mode enabled, the volume of the device's analogue outputs can be controlled using the app or rotary dial.
注記: プリアンプモードと音量調整は、アナログ出力で接続している場合のみ有効化できます。
Note: Pre-Amp mode and volume control can only be enabled when connected via the analogue outputs.
音量上限Volume Limit
AirPlay、Spotify、TIDAL Connect、Google Cast などの他のストリーミングサービスで設定できる最大音量を設定します。フロントパネル、リモコン、StreamMagic アプリの音量操作は、この設定を上書きできます。
This sets the maximum volume that other streaming services like AirPlay, Spotify, TIDAL Connect and Google Cast and set. The front panel, remote control and StreamMagic app volume controls can override this setting.
アーリーアップデートEarly Update
「On」に設定すると、一般公開前の最新ファームウェアを試用できます。
Setting this to ‘On’ will let you try out the latest firmware ahead of general release.
ファームウェアFirmware
本プレーヤー用の新しいファームウェアを確認し、利用可能な場合は適用します。
This will check for and apply any new firmware available for your player.
Info 画面でも新しいアップデートを確認でき、以下の手順で本機のファームウェアを手動で更新できます。
You can also check for new updates on the info screen and manually update the unit’s firmware by following the steps below:
- フロントパネルの「i」(Info)ボタンを長押しします。Hold down the ‘i’ (Info) button on the front panel
- ディスプレイの指示に従い、「play/pause」ボタンを押して新しいファームウェアを確認します。新しいファームウェアバージョンが利用可能な場合は、更新が適用されます。As instructed on the display, press the ‘play/pause’ button to check for new firmware. The new firmware version will now update if there is one available.
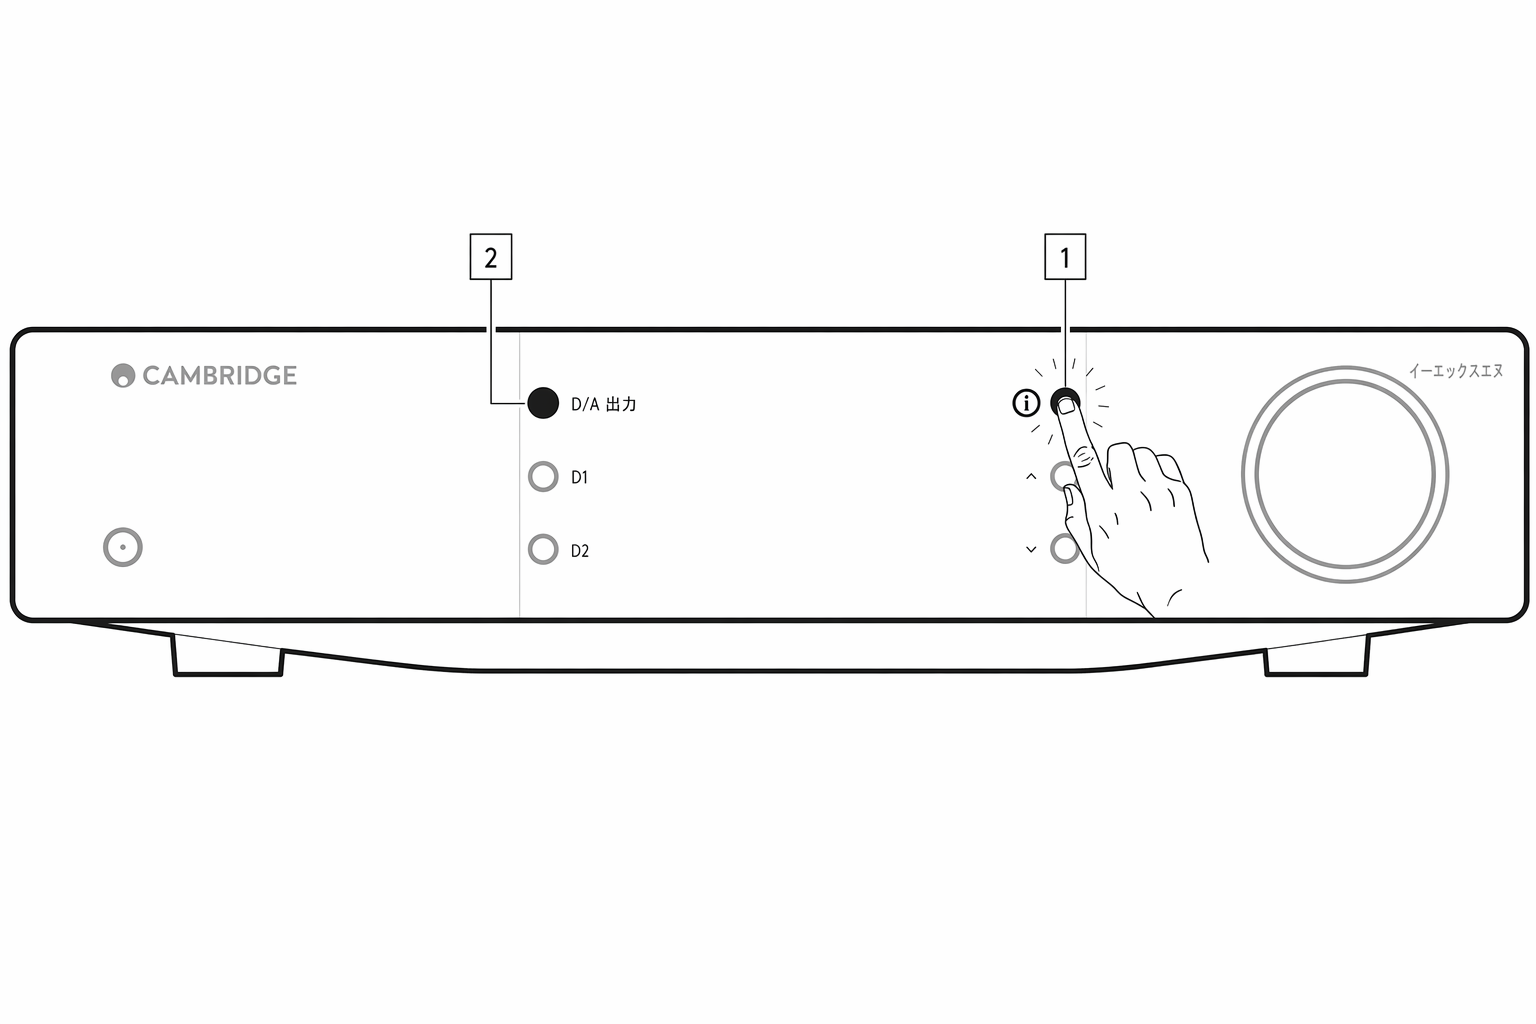
ネットワークスタンバイのまま一晩放置すると、本プレーヤーが新しいアップデートを確認し、適用します。
When left in network standby overnight your player will check and apply any new updates.
注記: ファームウェアアップデートを実行するには、ネットワークプレーヤーがインターネットに接続されている必要があります。最適なパフォーマンスを維持するため、ネットワークプレーヤーは接続したままにしてください。
Note: Your network player must be connected to the internet to carry out firmware updates. You should keep your network player connected to ensure optimal performance.
再起動Restart
本機が再起動し、ネットワークおよびアプリとの接続が一時的に切断されます。
This will restart your device and it will briefly lose connection with your network and the app.
工場出荷時リセットFactory Reset
本プレーヤーを工場出荷時の設定に戻します。
This will return your player to its factory settings.
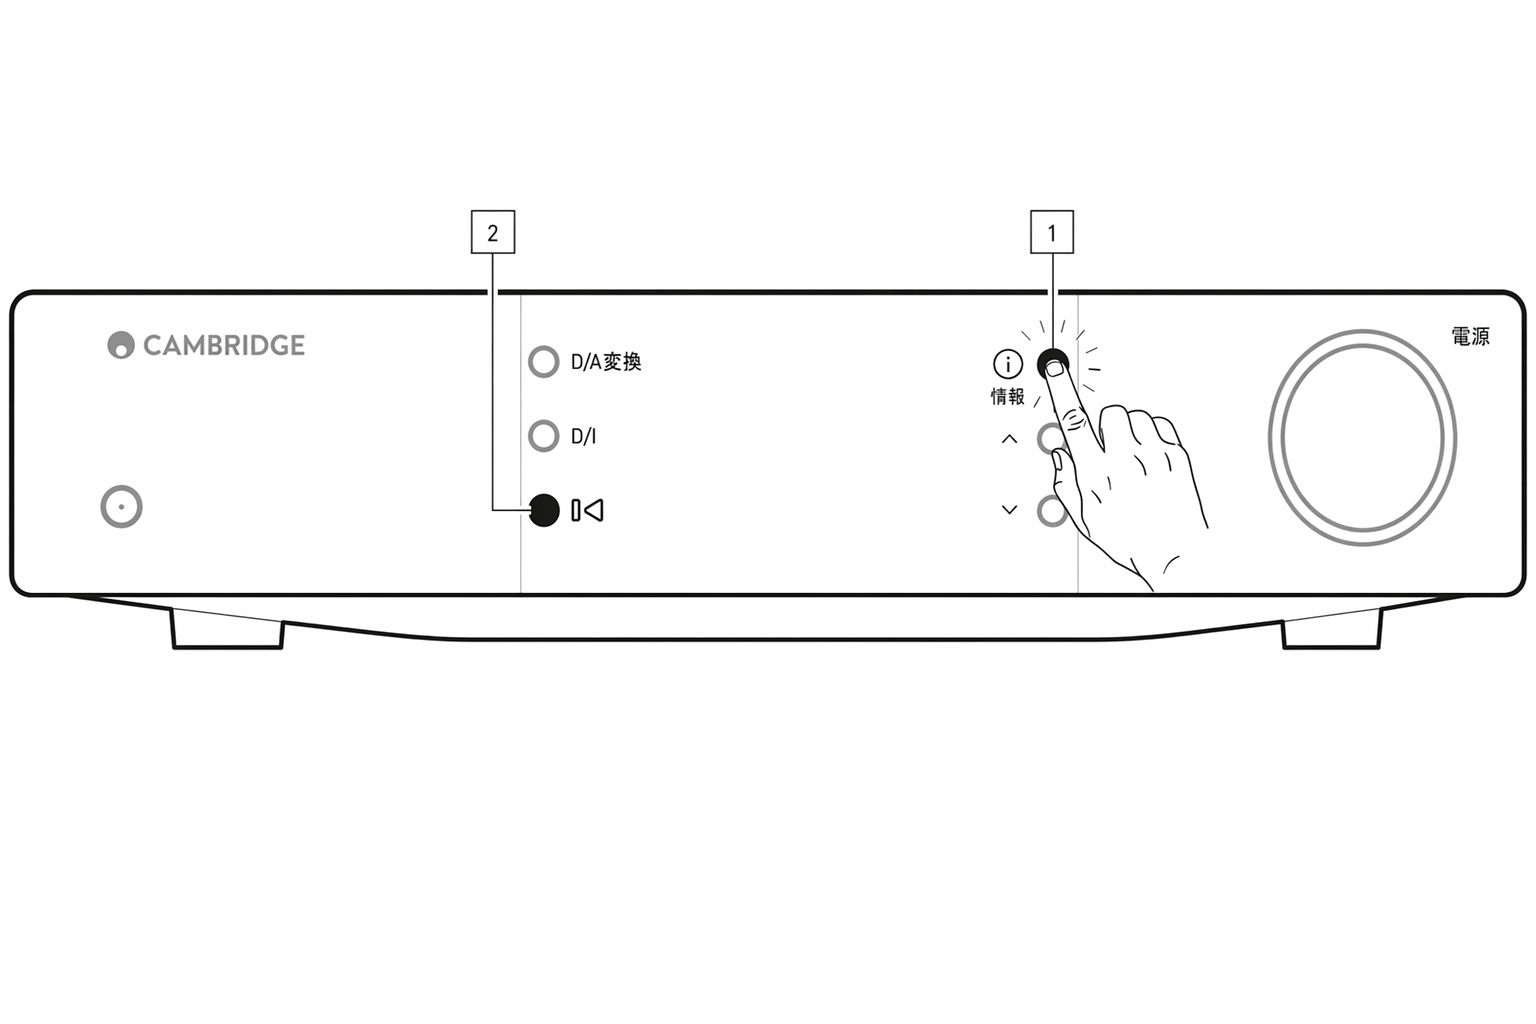
Info 画面から以下の手順でも実行できます。
You can also do this from the info screen by following the steps below:
- フロントパネルの「i」(Info)ボタンを長押しします。Hold down the ‘i’ (Info) button on the front panel.
- ディスプレイの指示に従い、「reverse skip」ボタンを長押しして工場出荷時リセットを実行します。As instructed on the display, hold down the ‘reverse skip’ button to perform the factory reset.
Info 画面Info screen
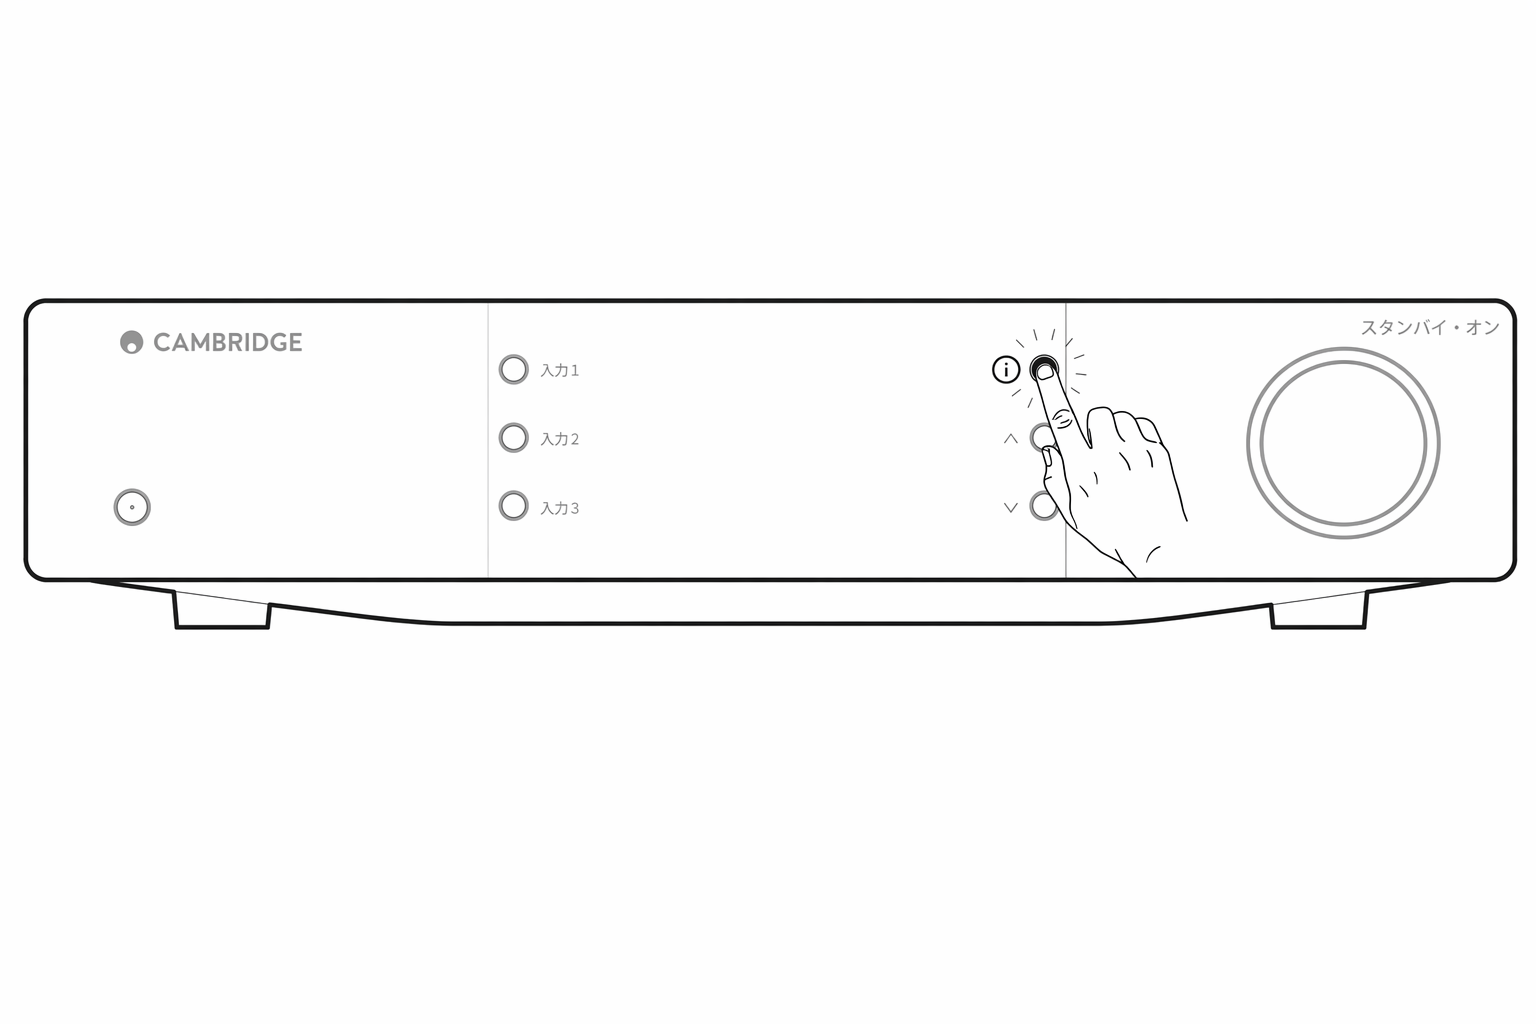
Info 画面には、本プレーヤーに関する便利な情報が表示されます。また、本プレーヤーの問題解決に役立つ操作も実行できます。
The info screen shows useful information about your player, it also allows you to carry out some actions to help resolve problems with your player.

Info 画面にアクセスするには、フロントパネルのボタンを 2 秒間長押しします。
To access the info screen, hold the button on the front panel for 2 seconds.
技術仕様Technical specifications
D/A コンバーター(DAC) ESS ES9028Q2M
D/A converters ESS ES9028Q2M
THD @ 1kHz 0dBFs < 0.0005 %
THD @ 1kHz 0dBFs < 0.0005 %
THD @ 20kHz 0dBFs < 0.0005 %
THD @ 20kHz 0dBFs < 0.0005 %
周波数特性 20Hz〜20kHz ±0.1dB
Frequency response 20Hz-20kHz +/- 0.1dB
S/N 比(REF 1W) > 120dB
Signal to noise ratio (REF 1W) > 120dB
クロストーク @ 1kHz < −120dB
Crosstalk @ 1kHz < -120dB
デジタル出力
Digital outputs
S/PDIF 同軸 16/24 ビット、32〜192kHz
S/PDIF Coaxial 16/24-bit, 32-192kHz
TOSLINK 光 16/24 ビット、32〜96kHz
TOSLINK Optical 16/24-bit, 32-96kHz
オーディオフォーマット WAV(非圧縮 PCM 16-32 bit 32-768kHz)、FLAC(ロスレス圧縮 PCM 16-32 bit 32-768kHz)、Apple Lossless(ALAC)(ロスレス圧縮 PCM 16-24 bit 32-192kHz)、AIFF(非圧縮 PCM 16-32 bit 32-768kHz)、Microsoft® Windows Media TM Audio(WMA 9 Standard)32-320kbps、MP3(CBR または VBR)16-320kbps、AAC、HE AAC および AAC+(CBR または VBR)16-320kbps、OGG Vorbis 32-320kbps。ネイティブ DSD64 から DSD512 に対応します。
AUDIO FORMATS WAV containing uncompressed, PCM 16-32 bit 32-768kHz, FLAC containing losslessly compressed, PCM 16-32 bit 32-768kHz, Apple Lossless (ALAC) containing losslessly compressed PCM 16-24 bit 32-192kHz, AIFF containing uncompressed, PCM 16-32 bit 32-768kHz, Microsoft® Windows Media TM Audio (WMA 9 Standard) 32-320kbps, MP3 (CBR or VBR) 16-320kbps, AAC, HE AAC and AAC+, (CBR or VBR) 16-320kbps, OGG Vorbis 32-320kbps. Native DSD64 to DSD512 support.
ストリーミングプロトコル RTSP(Real Time Streaming Protocol)、MMS(Microsoft Media Server Protocol)、HTTP(Hyper Text Transfer Protocol)。
Streaming protocols RTSP (Real Time Streaming Protocol), MMS (Microsoft Media Server Protocol), HTTP (Hyper Text Transfer Protocol).
Bluetooth 5.0 A2DP/AVRCP、SBC、aptX、aptX HD コーデックに対応
Bluetooth 5.0 A2DP/AVRCP supporting SBC, aptX and aptX HD codecs
接続性 UPnP、ローカル USB メディア、AirPlay、Google Cast、インターネットラジオ、Spotify Connect、TIDAL、Qobuz、Deezer、Roon Ready。
Connectivity UPnP, Local USB media, Airplay , Google Cast , Internet Radio, Spotify Connect, TIDAL, Qobuz, Deezer, Roon Ready.
プレイリスト ASX(Microsoft® プレイリスト形式)、M3U、PLS
Playlist ASX (Microsoft® playlist format) M3U, PLS
Wi-Fi IEEE 802.11 b/g/n または AC(2.4GHz および 5GHz)
Wi-Fi IEEE 802.11 b/g/n or AC (2.4GHz and 5GHz)
Wi-Fi 暗号化 WEP、WPA、WPA2
Wi-Fi encryption WEP, WPA, WPA2
Ethernet IEEE 802.3、10 Base-T または 100 Base-T
Ethernet IEEE 802.3, 10 Base-T or 100 Base-T
USB 1 x USB 2.0(電流制限 1A)
USB 1 x USB 2.0 current limited to 1A
ファイルシステム FAT32、NTFS、Ext4、ExFAT
File systems FAT32, NTFS, Ext4, ExFAT
電源入力電圧 100-240 VAC(スイッチモード)スタンバイ消費電力
Mains inlet voltage 100-240 VAC (switch mode) standby consumption
ECO モード <0.5W
ECO Mode <0.5W
ネットワークスタンバイモード >2W
Network Standby Mode >2W
最大消費電力 30W
Max power consumption 30W
寸法 89 x 430 x 325mm (3.5 x 16.9 x 12.8")
Dimensions 89 x 430 x 325mm (3.5 x 16.9 x 12.8")
重量 4.15kg (9.1Ibs)
Weight 4.15kg (9.1Ibs)
ソース品質マトリクスSource quality matrix
| ソースSOURCE | 配信方式DELIVERY METHOD | 最大解像度MAXIMUM RESOLUTION |
|---|---|---|
| Spotify ConnectSpotify Connect | モバイル/デスクトップアプリMobile/Desktop App | 320kbps320kbps |
| Spotify AirPlaySpotify AirPlay | モバイル/デスクトップアプリMobile/Desktop App | 320kbps320kbps |
| Spotify ChromecastSpotify Chromecast | モバイル/デスクトップアプリMobile/Desktop App | 320kbps320kbps |
| Spotify BluetoothSpotify Bluetooth | モバイル/デスクトップアプリMobile/Desktop App | aptX HDaptX HD |
| TIDAL ConnectTIDAL Connect | モバイル/デスクトップアプリMobile/Desktop App | 24bit / 192 kHz24bit / 192 kHz |
| TIDAL(StreamMagic アプリ経由)TIDAL (via StreamMagic app) | StreamMagic アプリStreamMagic App | 24bit / 192 kHz24bit / 192 kHz |
| TIDAL AirPlayTIDAL AirPlay | AirPlay 2AirPlay 2 | 16bit / 44kHz16bit / 44kHz |
| TIDAL ChromecastTIDAL Chromecast | ChromecastChromecast | 24bit / 48 kHz24bit / 48 kHz |
| TIDAL BluetoothTIDAL Bluetooth | BluetoothBluetooth | aptX HDaptX HD |
| TIDAL RoonTIDAL Roon | Roon エンドポイントRoon Endpoint | 24bit / 192 kHz24bit / 192 kHz |
| TIDAL RoonTIDAL Roon | USB Class 2USB Class 2 | 24bit / 192 kHz24bit / 192 kHz |
| TIDAL デスクトップアプリTIDAL Desktop App | USB Class 2USB Class 2 | 24bit / 192 kHz24bit / 192 kHz |
| Qobuz(StreamMagic アプリ経由)Qobuz (via StreamMagic app) | StreamMagic アプリStreamMagic App | 24bit / 192 kHz24bit / 192 kHz |
| Qobuz AirPlayQobuz AirPlay | AirPlay 2AirPlay 2 | 16bit / 44kHz16bit / 44kHz |
| Qobuz ChromecastQobuz Chromecast | ChromecastChromecast | 24bit / 48 kHz24bit / 48 kHz |
| Qobuz BluetoothQobuz Bluetooth | BluetoothBluetooth | aptX HDaptX HD |
| Qobuz RoonQobuz Roon | Roon エンドポイントRoon Endpoint | 24bit / 192 kHz24bit / 192 kHz |
| Qobuz RoonQobuz Roon | USB Class 2USB Class 2 | 24bit / 192 kHz24bit / 192 kHz |
| Qobuz デスクトップアプリQobuz Desktop App | USB Class 2USB Class 2 | 24bit / 192 kHz24bit / 192 kHz |
| サードパーティアプリ(AirPlay 経由)Third Party App (via AirPlay) | AirPlay 2AirPlay 2 | 16bit / 44kHz16bit / 44kHz |
| サードパーティアプリ(Chromecast 経由)Third Party App (via Chromecast) | ChromecastChromecast | 24bit / 48 kHz24bit / 48 kHz |
| サードパーティアプリ(Bluetooth 経由)Third Party App (via Bluetooth) | BluetoothBluetooth | aptX HDaptX HD |
トラブルシューティングTroubleshooting
ネットワークプレーヤーをネットワークに接続できない場合、次の手順で問題を解決できることがあります。
If you have trouble connecting the Network Player to your network, these steps may help to resolve the problem:
- 本マニュアルの「ネットワークへの接続」の手順に従っていることを確認してください。Ensure that you have followed the 'Connecting to a network ' steps in the manual here .
- Wi-Fi アンテナ 2 本が本体背面に確実に接続されていることを確認してください。Ensure both Wi-Fi antennas are securely connected to the rear of the unit.
- モバイルデバイスが、ネットワークプレーヤーを接続したいネットワークと同じネットワークに接続されていることを確認してください。Ensure your mobile device is connected to the same network you wish to connect your Network Player to.
- モバイルデバイスにインストールされている VPN やアンチウイルスアプリを削除してください。ネットワーク上の他の機器をアプリが認識できなくなる場合があります。Remove any VPN or Anti-Virus app you may have downloaded on your mobile device, as they can sometimes prevent the app from 'seeing' other devices on the network.
- ネットワーク構成に含まれるスイッチやエクステンダー類を取り外してください。Remove any network switches/extenders etc. that are part of your network set up.
- 本機をルーターに Ethernet ケーブルで直接接続してください。Connect the unit directly to your router via an Ethernet cable.
- 本機で工場出荷時リセットを実行し、ネットワークセットアップ手順を再度試してください。Perform a factory reset on your unit, and then attempt the network set up steps again.
- DHCP サーバーが利用可能であること、または本プレーヤーに静的 IP アドレスを設定済みであることを確認してください。静的 IP アドレスは、StreamMagic アプリの「Network」設定で本機に設定できます。Check that a DHCP server is available, or that you have configured a static IP address on your Player. You can configure a static IP address on the unit via the 'Network' settings in the StreamMagic app.
- ルーターを再起動するか、工場出荷時リセットを実行してください。Reboot and/or factory reset your router.
StreamMagic アプリがネットワークプレーヤーに接続できない場合、次の手順で問題を解決できることがあります。
If you have trouble connecting the StreamMagic app to your Network Player, these steps may help to resolve the problem:
- モバイルデバイスが、ネットワークプレーヤーを接続したいネットワークと同じネットワークに接続されていることを確認してください。Ensure your mobile device is connected to the same network you wish to connect your Network Player to.
- モバイルデバイスにインストールされている VPN やアンチウイルスアプリを削除してください。ネットワーク上の他の機器をアプリが認識できなくなる場合があります。Remove any VPN or Anti-Virus app you may have downloaded on your mobile device, as they can sometimes prevent the app from 'seeing' other devices on the network.
- StreamMagic アプリに、ネットワーク上の機器へのアクセスを許可していることを確認してください。モバイルデバイスのアプリ設定から確認できます。Ensure that you have allowed the StreamMagic app to have access to devices on your network. You can check this via your mobile devices' app settings.
- Wi-Fi アンテナ 2 本が本体背面に確実に接続されていることを確認してください。Ensure both Wi-Fi antennas are securely connected to the rear of the unit.
- デバイス上の他のアプリやソースが本機を認識できるか確認してください。認識できる場合は、デバイス上の何らかの要因が StreamMagic アプリによるネットワークプレーヤーの認識を妨げている可能性があります。Check whether other apps and sources on your device are able to 'see' the unit. If they are, this would suggest that something on your device is preventing the StreamMagic app from 'seeing' the Network Player.
- 別のモバイルデバイスに StreamMagic アプリをダウンロードしてください。Download the StreamMagic app on to another mobile device.
- ネットワーク構成に含まれるスイッチ、エクステンダー、ブースター類を取り外してください。Remove any network switches, extenders, boosters etc. that may be part of your network set up
ネットワークソースの再生中にネットワークプレーヤーで音切れが発生する場合、次の手順で問題を解決できることがあります。
If your Network Player is experiencing audio dropouts during playback from a network source, these steps may help to resolve the problem:
- Wi-Fi アンテナ 2 本が本体背面に確実に接続されていることを確認してください。Ensure both Wi-Fi antennas are securely connected to the rear of the unit.
- ネットワーク構成に含まれるスイッチ、エクステンダー、ブースター類を取り外してください。Remove any network switches, extenders, boosters etc. that may be part of your network set up.
- 本機をルーターに Ethernet ケーブルで直接接続してください。Connect the unit directly to your router via an Ethernet cable.
- ネットワークルーターをリセットしてください。Reset your network router.
- 本マニュアルの手順に従って、ネットワークプレーヤーで工場出荷時リセットを実行してください。Perform a factory reset on your Network Player by following the steps in the manual here .
ネットワークプレーヤーがネットワークには正常に接続できるものの、特定のインターネットラジオ局を再生できない場合、次のいずれかが原因として考えられます。
If your Network Player can connect to the network successfully but is unable to play particular Internet Radio stations, it may be due to one of the following causes:
- その局が現在の時間帯に放送していません(異なるタイムゾーンの可能性があります)。The station is not broadcasting at this time of the day (remember it may be in a different time zone).
- その局はすでに放送を終了しています。The station is not broadcasting anymore.
- 当社データベース内のリンクが古くなっています(次の FAQ の手順に従って、ラジオ局の追加や更新を依頼できます)。The link in our database is simply out of date. (You can request that a radio station is added or updated by following the steps in the following FAQ .)
- サーバー(多くの場合は別の国にあります)とお客様との間のインターネット接続が遅くなっています。The Internet connection between the server (often located in a different country) and you is slow.
- デバイス上で StreamMagic アプリを削除し、再インストールしてください。Try deleting and then re-installing the StreamMagic app on your device.
- ラジオのプリセットを再生している場合は、StreamMagic アプリでプリセットを削除し、再登録してください。If you are playing a radio preset, try deleting and then re-installing the preset in the StreamMagic app.
UPnP 再生で問題が発生する場合は、次の項目を確認してください。
If you have problems with UPnP playback check the following:
- 使用する UPnP サーバーソフトウェアが、アクセスしようとしているファイル形式を配信できることを確認してください。サーバーによっては FLAC を配信しないものもあります。Ensure your chosen UPnP server software can serve the file type you are trying to access. Some servers do not serve FLAC for instance.
- 本ネットワークプレーヤーで再生できるのは DRM 非適用ファイルのみです。DRM 制御のかかったファイルは EXN100 では再生できません。This Network Player can only play non-DRM files. Files that have DRM controls cannot be played by the EXN100.
- 24 ビットの WAV または FLAC コンテンツを再生する場合、帯域幅を考慮すると、安定動作のために有線 Ethernet 接続が推奨されます。If attempting to play 24-bit WAV or FLAC content, note a wired Ethernet connection is normally preferred for reliable operation due to bandwidth considerations
- ネットワークプレーヤーが、アクセスしようとしているファイル形式を再生できることを確認してください。現在、WMA、AAC、HE AAC、AAC+、MP3、OGG Vorbis、FLAC、WAV、ALAC、AIFF の再生に対応しています。Check the Network Player can play back the file type you are trying to access. WMA, AAC, HE AAC, AAC+, MP3, OGG Vorbis, FLAC, WAV, ALAC, AIFF can currently be played.
- PC または NAS ドライブが、ネットワークプレーヤーと同じネットワークに接続されていることを確認してください。Ensure your PC/NAS drive are connected to the same network as your Network Player.
- ネットワークプレーヤー用の PC/NAS ドライブの設定手順に従っていることを確認してください。詳細は次の FAQ を参照してください。Ensure you have followed the required steps for PC/NAS drive configuration with a Network Player. You can find out more about this in the following FAQ .
USB メディア再生で問題が発生する場合は、次の項目を確認してください。
If you have problems with USB Media playback check the following:
- ネットワークプレーヤーが、アクセスしようとしているファイル形式を再生できることを確認してください。現在、WMA、AAC、HE AAC、AAC+、MP3、OGG Vorbis、FLAC、WAV、ALAC、AIFF の再生に対応しています。Check the Network Player can play back the file type you are trying to access. WMA, AAC, HE AAC, AAC+, MP3, OGG Vorbis, FLAC, WAV, ALAC, AIFF can currently be played.
- 本ネットワークプレーヤーで再生できるのは DRM 非適用ファイルのみです。DRM 制御のかかったファイルは EXN100 では再生できません。USB ソケットから給電する機器を接続する場合は、必要電流が 1A を超えないことを確認してください。This Network Player can only play non-DRM files. Files that have DRM controls cannot be played by the EXN100. Check that your device does not require more than 1A if it is powered from the USB socket itself.
- 機器が FAT32/NTFS/exFAT/Ext4 のいずれかでフォーマットされていることを確認してください。Check your device is formatted in FAT32/NTFS/exFAT/Ext4 format.
- USB メディアの整理方法は、コンテンツ閲覧時にネットワークプレーヤーが動的にスキャンする内部データベースのサイズに影響します。アーティストごとにフォルダを作成し、その中にアルバムごとのサブフォルダを作ってトラックを格納することを推奨します。1 つのフォルダに数千曲を入れると、プレーヤーのメディア閲覧が徐々に遅くなります。The way you organise your USB media can affect the size of the internal database the Network Player needs to scan dynamically as you browse content. It is good practice to create folders for Artists, within which should be a sub folder for each album containing the tracks for that album. Libraries with thousands of tracks in one folder will progressively slow down the Player's media browsing.
Bluetooth デバイスをネットワークプレーヤーに接続できない場合は、次の項目を確認してください。
If you have problems connecting a Bluetooth device to the Network Player, check the following:
- アプリまたはフロントパネルのソースセレクターで、Bluetooth ソースを選択してください。Bluetooth ソースを選択していない場合、本プレーヤーに Bluetooth デバイスをペアリングできません。Ensure the Bluetooth source has been selected via the app or the front panel source selector. You will be unable to pair a Bluetooth device to the Player unless the Bluetooth source has been selected.
- 付属の Bluetooth アンテナが本プレーヤーの背面に接続されていることを確認してください。Ensure the supplied Bluetooth antenna has been connected to the rear of the Player.
- お使いの機器が、すでに別の Bluetooth スピーカーやヘッドホンに接続されていないことを確認してください。Ensure your device is not already connected to another Bluetooth speaker/headphones.
- 本プレーヤーがすでに別の Bluetooth デバイスに接続されていないことを確認してください。Ensure the Player is not already connected to another Bluetooth device.
音が出ない:
There is no sound:
- 本機がスタンバイモードになっていないことを確認してください。Ensure the unit is not in Standby mode.
- アンプ/DAC が正しく接続されていることを確認してください。Check that your amplifier/DAC is properly connected.
- スピーカーがアンプに正しく接続されていることを確認してください。Check that your speakers are properly connected to the amplifier.
- 接続先のアンプ/DAC がミュートモードになっていないことを確認してください。Check that your connected amplifier/DAC is not in mute mode.
- プリアンプモードが有効な場合、本プレーヤーがミュートモードになっていないことを確認してください。If Pre-Amp mode has been enabled, ensure the Player is not in mute mode.
- アプリまたはフロントパネルのソースセレクターで、正しいソースが選択されていることを確認してください。Ensure the correct source has been selected via the app or the front panel source selector.
Mac/PC を USB オーディオ入力に接続しても音が出ない場合:
There is no audio when connecting a Mac/PC to the USB Audio input:
- 本マニュアルの「USB オーディオ」セクションの手順をすべて実施していることを確認してください。Ensure that all the steps within the USB Audio section of the manual have been followed.
- アプリまたはフロントパネルのソースセレクターで、USB オーディオソースが選択されていることを確認してください。PC/Mac が USB A to B ケーブルで USB オーディオ入力に接続されていることを確認してください。Ensure that the USB Audio source has been selected via the app or the front panel source selector. Ensure that your PC/Mac is connected to the USB Audio input with a USB A to B cable.
- PC を接続する場合は、正しい USB ドライバーがダウンロードされていることを確認してください。ドライバーは https://www.cambridgeaudio.com/gbr/en/driver-updates から入手できます。If you are connecting a PC, make sure that the correct USB driver is downloaded. The driver is available from https://www.cambridgeaudio.com/gbr/en/driver-updates.
eARC 入力に接続したテレビから音が出ない場合:
There is no sound from a TV connected to the eARC input:
- こちらのサポートサイトにあるトラブルシューティングガイドの手順に従ってください。Follow the steps in the troubleshooting guide on our support site here .
安全上の注意Safety Instructions
Click here to view
よくある質問Frequently asked questions
EXN100 がネットワークに接続されていないとき、接続した USB HD からファイルを再生できますか?Can I play files from a connected USB HD when the EXN100 is not connected to a network?
接続した USB HD からローカルファイルを再生するには StreamMagic アプリが必要なため、これはできません。なお、EXN100 は常にネットワークに接続しておくことを強く推奨します。
This is not possible as the use of the StreamMagic app is required to be able to play local files from a connected USB HD. Please note that it is strongly recommended that the EXN100 is connected to a network at all times.
EXN100 にはリモコンが付属していますか?Does the EXN100 come with a remote control?
いいえ、EXN100 には専用のリモコンがなく、リモコンは付属していません。本機は StreamMagic アプリから完全に操作でき、設定も調整できます。
No, the EXN100 does not have its own remote control and does not come with one included. The unit can be fully controlled, and the settings can be adjusted via the StreamMagic app.
本機でリモコンを使用したい場合は、EX シリーズのリモコンが EXN100 に対応しており、弊社ウェブサイトから購入できます。
If you wish to use a remote control with your device, the EX series remote control is compatible with the EXN100 and can be purchased from our website.
フロントパネルからインターネットラジオやストリーミングサービスなどの機能にアクセスできますか?Can I access features such as Internet Radio and streaming services via the front panel?
EXN100 のフロントパネルからはサービスや機能にアクセスできません。StreamMagic アプリから多くの機能にアクセスできるほか、TIDAL、Spotify などの統合サービスには、それぞれのアプリからアクセスできます。
It is not possible to access services and features via the front panel of the EXN100. You will be able to access many features via the StreamMagic app, as well as integrated services such as TIDAL, Spotify etc. via their respective apps.
EXN100 の音量を変更するにはどうすればよいですか?How do I change the volume of the EXN100?
StreamMagic アプリのデバイス設定で Pre-Amp モードを有効にすると、本機のアナログ出力の音量をアプリまたはロータリーダイヤルで調整できます。
With Pre-Amp mode enabled within the StreamMagic app device settings, the volume of the device's analogue outputs can be controlled using the app or rotary dial.
注記:Pre-Amp モードと音量コントロールは、アナログ出力で接続している場合にのみ有効にできます。
Note : Pre-Amp mode and volume control can only be enabled when connected via the analogue outputs.
EXN100 を動作させるには、付属の Wi-Fi アンテナを 2 本とも接続する必要がありますか?Do I need to connect both of the supplied Wi-Fi antennas for the EXN100 to work?
はい、EXN100 をネットワークにワイヤレスで接続する場合は、Wi-Fi 機能を最大限に利用し、可能な限り強いワイヤレスネットワーク接続を確保するため、付属のアンテナを 2 本とも接続する必要があります。
Yes, if you are connecting your EXN100 to your network wirelessly, you will need to connect both of the supplied antennas to enable full Wi-Fi functionality and the strongest possible wireless network connection.
また、Bluetooth 機能は、アンテナの 1 本を Bluetooth のマークが付いたポートに接続した場合にのみ使用できます。
Bluetooth functionality will also only be possible when one of the antennas is connected to the port with the Bluetooth symbol.
EXN100 の複数の出力を同時に使用できますか?Can I use more than one of the EXN100’s outputs at once?
はい、EXN100 を 1 台の機器にのみ接続する場合は、デジタル出力でもアナログ出力でも、任意の出力を使用できます。ただし、EXN100 を一度に複数の機器に接続したい場合は、すべての出力が常に有効なため、最大 4 台の機器に接続して同時に再生できます。
Yes, If you wish to connect the EXN100 to one single device, you can use any output, digital or analogue, that you wish. If, however, you would like to connect the EXN100 to more than one device at a time, you can connect up to four devices and play simultaneously, as all outputs remain active at all times.
なお、EXN100 経由で音量を操作したい場合は、StreamMagic アプリで Pre-Amp モードを有効にする必要があります。音量コントロールはデジタル出力には適用されません。
Please note that if you wish to control the volume via the EXN100, you will need to enable Pre-Amp mode in the StreamMagic app. Volume control does not apply to the digital outputs,
使用していないときに EXN100 の電源が切れるのを防ぐには、どうすればよいですか?How do I stop the EXN100 from powering down when not in use?
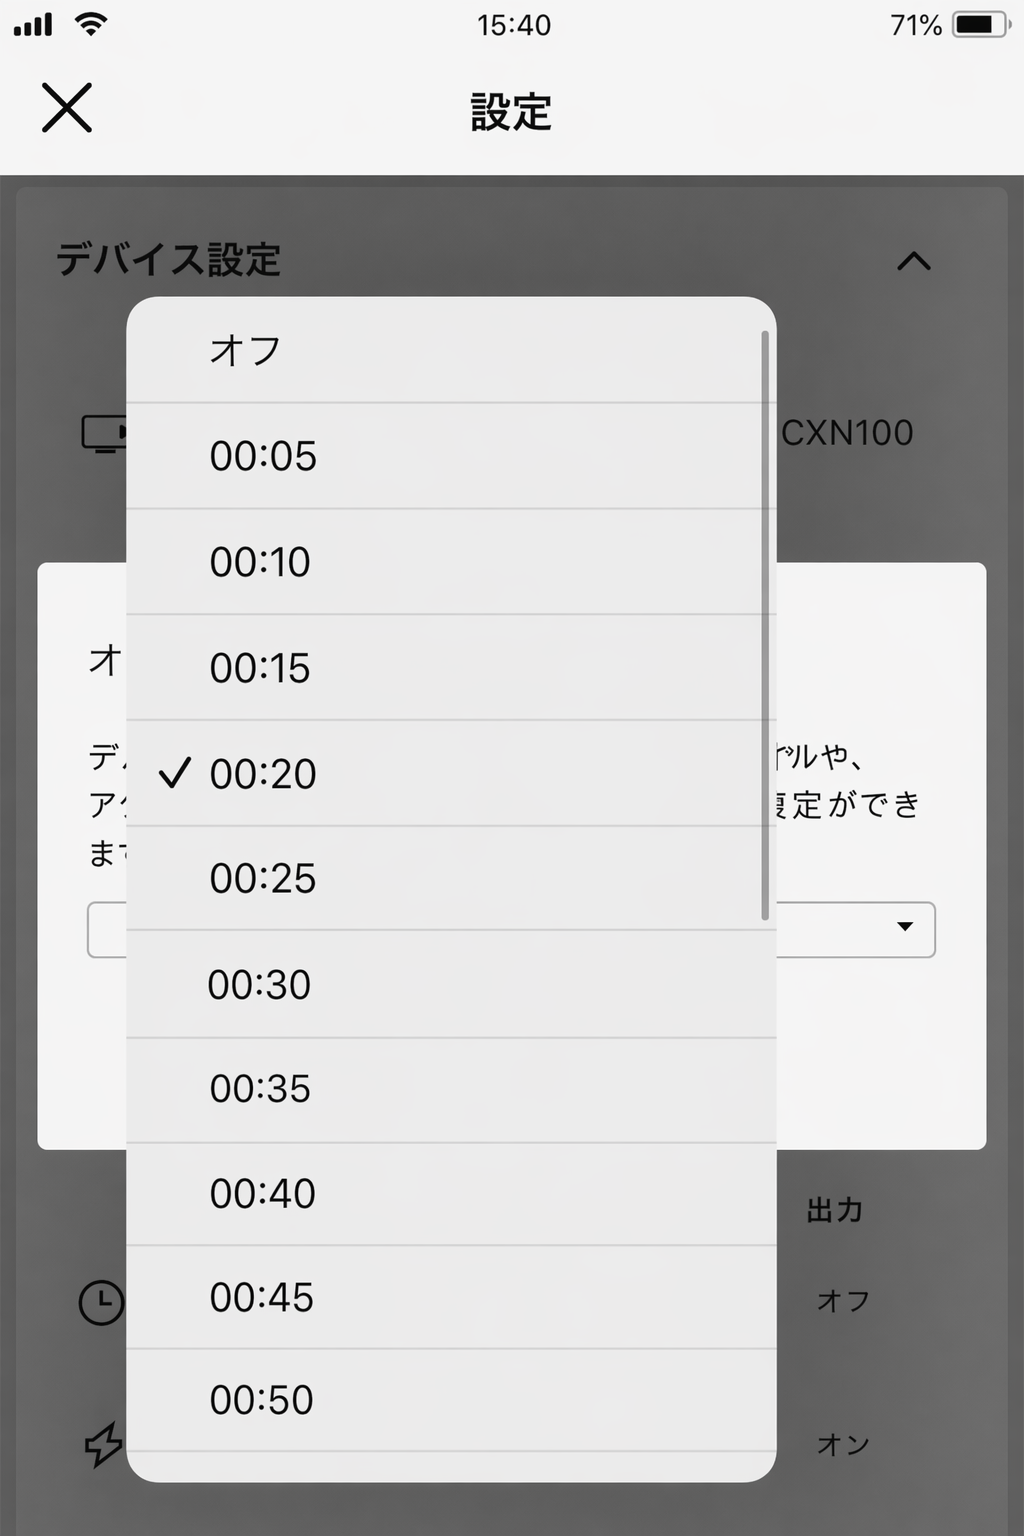
EXN100 は 20 分間操作がないと、自動的にスタンバイモードに切り替わります。この Automatic Power-Down(APD)機能は、StreamMagic アプリのデバイス設定から無効にできます。
The EXN100 will automatically switch to standby mode after 20 minutes of inactivity. This Automatic Power-Down (APD) feature can be disabled, by navigating to the device settings within the StreamMagic app.
「Automatic Power-Down」を選択すると、この機能を無効にするか、APD が作動するまでの時間を変更できます。
You can either disable this feature or edit the length of time it takes for APD to be triggered, by selecting ‘Automatic Power-Down’.
EXN100 はどの USB HD に対応していますか?What USB HDs will the EXN100 support?
EXN100 の主な機能はネットワーク音楽プレーヤーであり、USB ポートは USB HDD および SSD を手軽に接続するためのものです。そのため、すべての USB HDD および SSD との互換性を保証できません。
The primary function of the EXN100 is as a network music player and the USB port is intended for convenient connection of USB HDDs and SSDs. As such, we cannot guarantee compatibility with all USB HDDs and SSDs.
EXN100 は USB メディア入力に接続された大容量ハードドライブを読み込みます。ただし、一部の大容量ドライブでは、本プレーヤーの USB ポートからドライブの動作に十分な電力を供給できないため、専用の電源が必要になる場合があります。
The EXN100 will read large capacity hard drives connected to the USB Media input. Some larger capacity drives, however, may require their own power supply, as the player's USB port may not provide enough power for the drive to function.
EXN100 は、FAT32、exFAT、NTFS、Ext4 でフォーマットされた USB ハードドライブに対応します。
The EXN100 will support USB hard drives which are formatted to FAT32, exFAT, NTFS and Ext4.