
取扱説明書
MXN10
はじめにIntroduction
本ガイドは、本製品の設置と使用をできるだけ簡単に行えるよう作成されています。本書の情報は、発行時点で正確であることを入念に確認しています。ただし、Cambridge Audio は継続的な改善を方針としているため、設計および仕様は予告なく変更される場合があります。
This guide is designed to make installing and using this product as easy as possible. Information in this document has been carefully checked for accuracy at the time of publishing; however, Cambridge Audio’s policy is one of continuous improvement, therefore design and specifications are subject to change without prior notice.
本書には、著作権で保護された専有情報が含まれています。すべての権利は留保されています。製造元の事前の書面による許可なしに、本マニュアルのいかなる部分も、機械的、電子的、その他の手段によって、いかなる形式でも複製することはできません。すべての商標および登録商標は、それぞれの所有者に帰属します。
This document contains proprietary information protected by copyright. All rights are reserved. No part of this manual may be reproduced by any mechanical, electronic or other means, in any form, without prior written permission of the manufacturer. All trademarks and registered trademarks are the property of their respective owners.
Bluetooth® のワードマークおよびロゴは、Bluetooth SIG, Inc. が所有する登録商標です。Audio Partnership Plc によるこれらのマークの使用はライセンスに基づいています。その他の商標および商号は、それぞれの所有者に帰属します。
The Bluetooth® word mark and logos are registered trademarks owned by the Bluetooth SIG, Inc. and any use of such marks by Audio Partnership Plc is under license. Other trademarks and trade names are those of their respective owners.
Qualcomm は Qualcomm Incorporated の商標であり、米国およびその他の国で登録されています。許可を得て使用しています。
Qualcomm is a trademark of Qualcomm Incorporated, registered in the United States and other countries, used with permission.
aptX は Qualcomm Technologies International, Ltd. の商標であり、米国およびその他の国で登録されています。許可を得て使用しています。Qualcomm aptX は Qualcomm Technologies International, Ltd. の製品です。
aptX is a trademark of Qualcomm Technologies International, Ltd., registered in the United States and other countries, used with permission. Qualcomm aptX is a product of Qualcomm Technologies International, Ltd.
StreamMagic は Audio Partnership Plc の商標であり、欧州共同体およびその他の国で登録されています。
StreamMagic is a trademark of Audio Partnership Plc and is registered in the European Community and other countries.
本製品には、GNU Public License バージョン 2 および GNU Lesser Public License バージョン 2.1 に基づいてライセンスされたソフトウェアが含まれています。このソフトウェアのソースコードは、http://gpl.stream-magic.com/ から入手できます。
This product contains software licensed under version 2 of the GNU Public License and version 2.1 of the GNU Lesser Public License. The source code for this software is available from: http://gpl.stream-magic.com/
本製品には、Microsoft Corporation が所有し、Microsoft Licensing GP からライセンスを受けた技術が含まれています。該当する場合、Microsoft Corporation および/または Microsoft Licensing, GP からのライセンスなしに、本製品外でこの技術を使用または配布することは禁止されています。
This product includes technology owned by Microsoft Corporation and under a licence from Microsoft Licensing GP. Use or distribution of such technology outside of this product is prohibited without a license from Microsoft Corporation and/or Microsoft Licensing, GP as applicable.
Spotify ソフトウェアには、www.spotify.com/connect/third-party-licenses に掲載されている第三者ライセンスが適用されます。
The Spotify software is subject to third party licenses found here: www.spotify.com/connect/third-party-licenses .
本製品は AirPlay 2 に対応しており、iOS 11.4 以降が必要です。
This product support AirPlay 2 and requires iOS 11.4 or later.
Apple および AirPlay は、米国およびその他の国で登録された Apple Inc. の商標です。
Apple and AirPlay are trademarks of Apple Inc., registered in the U.S. and other countries.
Works with Apple バッジは、バッジで示される技術と連携するよう設計され、Apple のパフォーマンス基準を満たすことを開発者が認定したアクセサリーであることを示します。
Use of the Works with Apple badge means that an accessory has been designed to work specifically with the technology identified in the badge and has been certified by the developer to meet Apple performance standards.
Android、Google Play、Chromecast built-in ロゴは、Google Inc. の商標です。
Android, Google Play and the Chromecast built-in logo are trademarks of Google Inc.
TIDAL および TIDAL のロゴは、欧州連合およびその他の国における Aspiro AB の登録商標です。
TIDAL and TIDAL logo are registered trademark of Aspiro AB in the European Union and other countries.
MQA および Sound Wave Device は、MQA Limited の登録商標です © 2016。
MQA and the Sound Wave Device are registered trade marks of MQA Limited © 2016.
© Copyright Cambridge Audio Ltd
© Copyright Cambridge Audio Ltd
今後の製品、ソフトウェアアップデート、限定オファーに関する最新情報を受け取るには、https://www.cambridgeaudio.com/register で製品を登録してください。
For upcoming news on future products, software updates and exclusive offers, make sure you register your product at https://www.cambridgeaudio.com/register
このマニュアル内の画像の一部は、元の PDF から自動生成されたものです。自動処理の都合上、製品の細部や配線図などが実際と異なる場合があります。正確な形状・寸法・配線は、実機および製品ページの写真、同梱の正規マニュアル(英語版)をあわせてご確認ください。
MXN10 の付属品What's included with the MXN10?
MXN10 の箱には、以下が同梱されています。
Inside the box of your MXN10 you will receive:
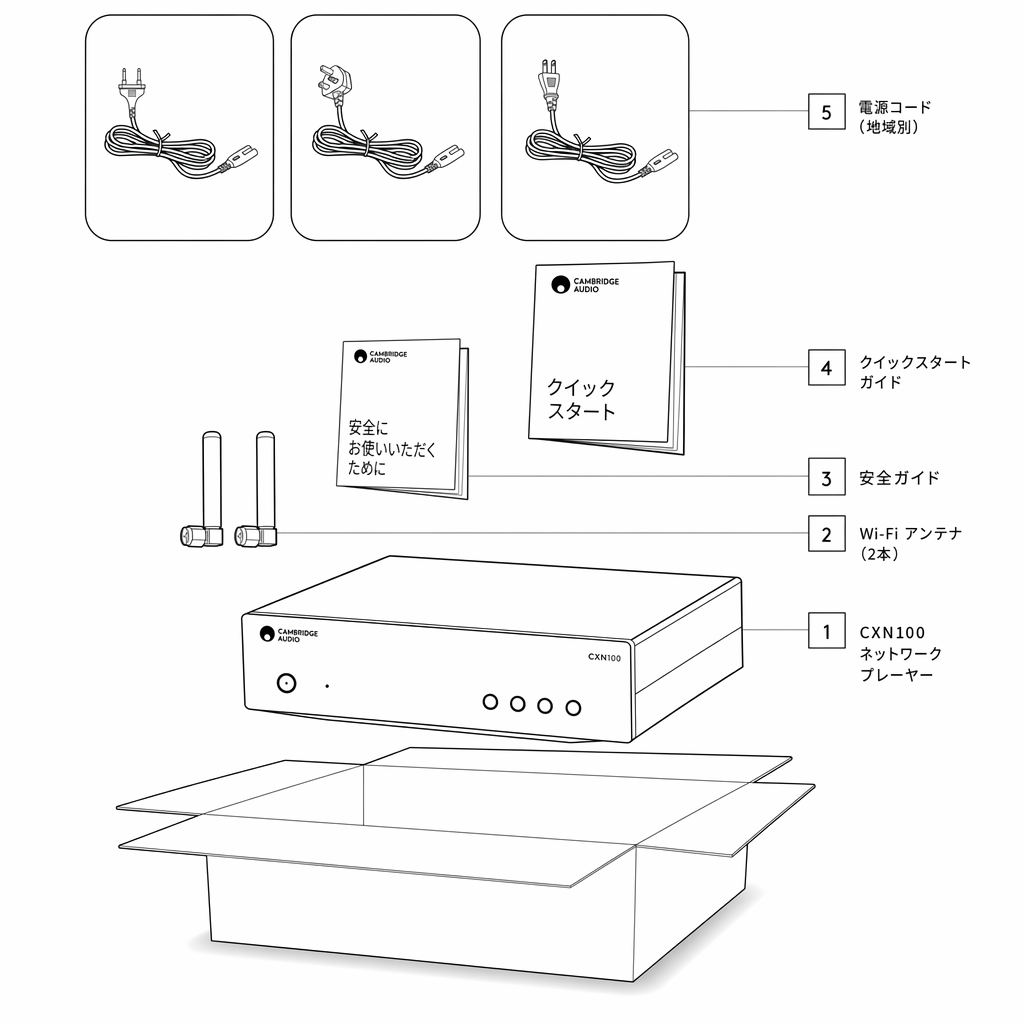
- MXN10 プレーヤー本体MXN10 player
- Wi-Fi / Bluetooth アンテナ (x2)WiFi/BT Antenna (x2)
- 安全ガイドSafety Guide
- クイックスタートガイドQuick start guide
- 地域別電源コードRegional mains lead
フロントパネルの操作部Front panel controls

1. 電源ボタン
1. Power button
本体をスタンバイモード(電源 LED が暗く点灯)とオン(電源 LED が明るく点灯)の間で切り替えます。スタンバイモードは低消費電力モード(0.5 Watts)です。これは Eco モード使用時にのみ実現できます。本体を使用しないときは、スタンバイモードにしておいてください。
Switches the unit between Standby Mode (indicated by dim power LED) and On (indicated by bright power LED). Standby Mode is a low power mode (0.5 Watts) – This can only be achieved when using Eco mode. The unit should be left in Standby Mode when not in use.
2. ネットワーク状態 LED
2. Network state LED
色と点滅状態の説明については、LED の説明ページをご参照ください。
See LED Descriptions page for descriptions of the colours and flashing states
3. プリセットボタン
3. Preset buttons
プリセットの呼び出しと保存に使用します。プリセットとして保存できる内容について詳しくは、StreamMagic アプリの Home タブにある Presets セクションをご参照ください。
Used to access and store presets, for more information on what can be stored as a preset please see the Presets section on the Home tab in the StreamMagic app.
再生中のメディアをプリセットとして保存できる場合は、プリセットボタンを長押しするとプリセットが保存されます。
If the currently playing media can be stored as a preset, long pressing the preset button will store the preset
LED の説明LED descriptions
LED の色LED Colour
| モードMode | 色Colour |
|---|---|
| 起動中 白 - ゆっくり点滅Booting White - Slowly flashing | |
| ネットワークに接続中 白 - 速く点滅Connecting to network White - Quickly flashing | |
| ネットワーク接続完了 白 - 点灯Network connected White - On | |
| ネットワーク設定モード ティール - ゆっくり点滅Network setup mode Teal - Slowly flashing | |
| 追加の設定が必要 ティール - 点灯Further setup required Teal - On | |
| ソフトウェア更新中 白 / ティール - ゆっくり点滅Software updating White / Teal - Slowly flashing | |
| インターネット接続なし オレンジ - 点灯No internet connection Orange - On | |
| 工場出荷時設定にリセット中 赤 - 速く点滅Resetting factory defaults Red - Quickly flashing |
リアパネルの接続部Rear panel connections
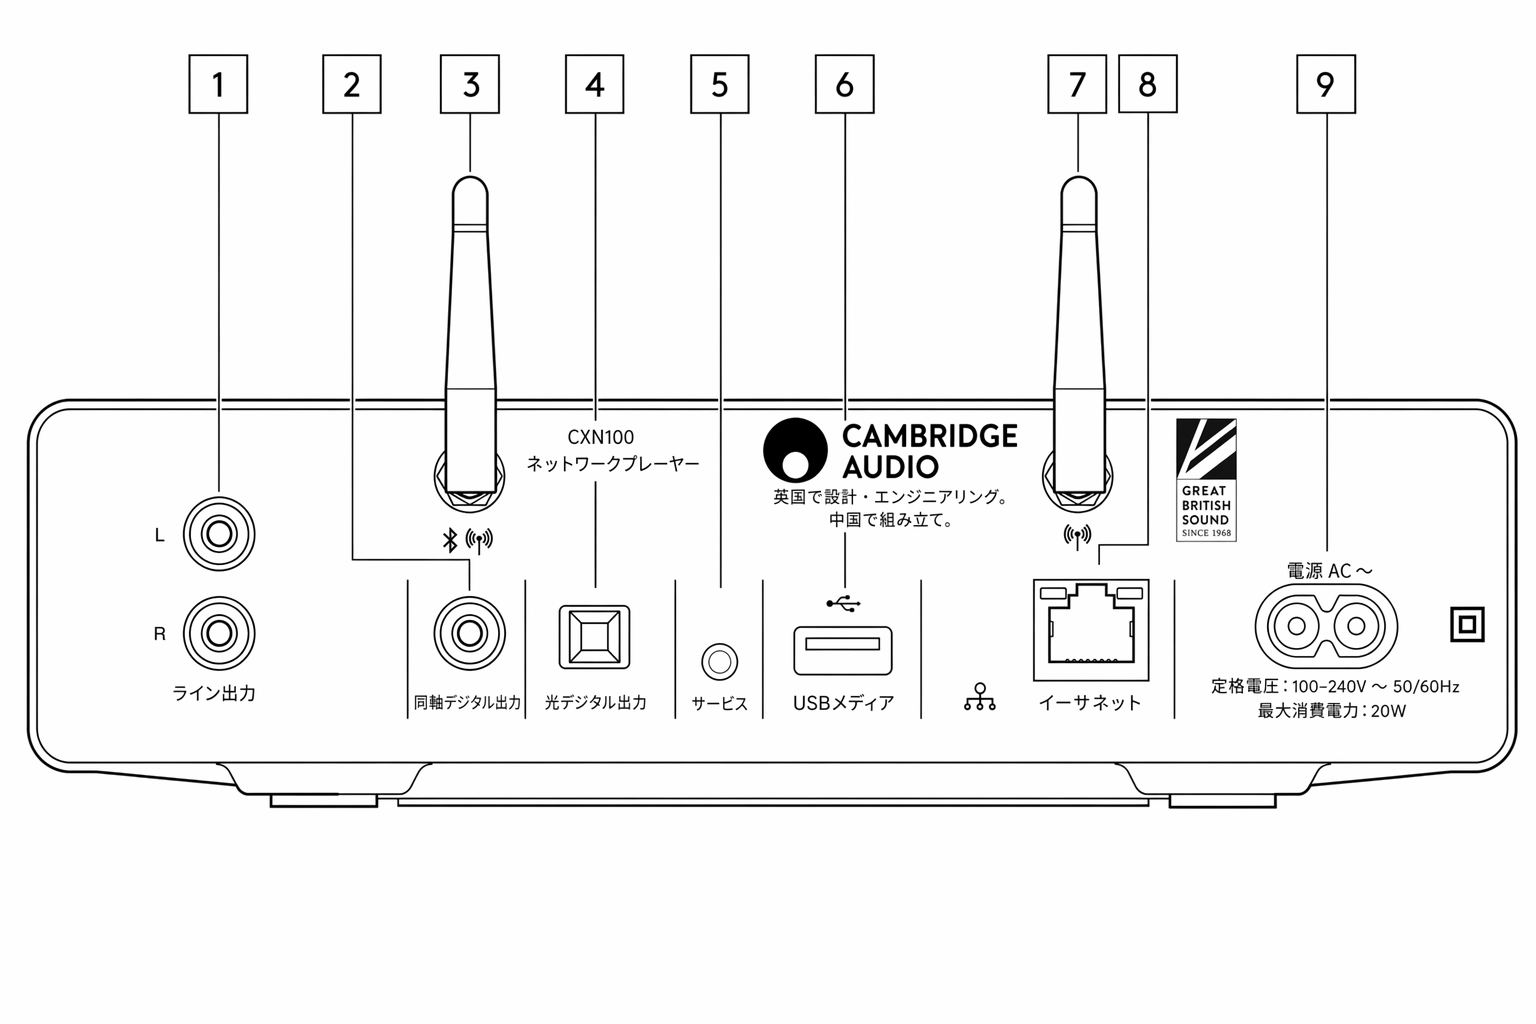
1. ライン出力
1. Line output.
プリメインアンプ、プリアンプ、または録音機器に信号を供給するためのアナログ出力です。
Analogue output used to provide a signal to an integrated amplifier, pre-amp or recording device.
2. S/PDIF 同軸デジタル出力
2. S/P DIF coaxial digital output .
3. Wi-Fi および Bluetooth アンテナ
3. WiFi and Bluetooth antenna
ご使用の前に、両方のアンテナをしっかり接続してください。
Ensure both antennas are connected securely before use.
4. TOSLINK デジタル出力
4. TOSLINK digital output.
5. サービスポート
5. Service port.
サービス専用ポートです。破損の原因となるため、ここには何も接続しないでください。
For servicing use only. Do not connect anything here as it may result in damage.
6. USB ソケット
6. USB Sockets
USB HD / フラッシュディスク用の接続です。USB ポートは Apple モバイル機器の接続用ではなく、充電を含め、いかなる機能もサポートしていません。
Connection for USB HD/flash disk, the USB ports are not intended for connection to Apple mobile devices, no functionality, charging or otherwise, is supported.
7. Wi-Fi アンテナ
7. WiFi antenna
8. Ethernet
8. Ethernet
MXN10 をルーターに直接接続する際に使用します。
Use to connect the MXN10 directly to a router.
9. AC 電源ソケット
9. AC Power Socket
アンプへの接続をすべて完了したら、AC 電源ケーブルを適切な電源コンセントに差し込み、電源を入れます。
Once you have completed all connections to the amplifier, plug the AC power cable into an appropriate mains socket then switch on.
接続するGetting connected
基本的な接続
Basic connections
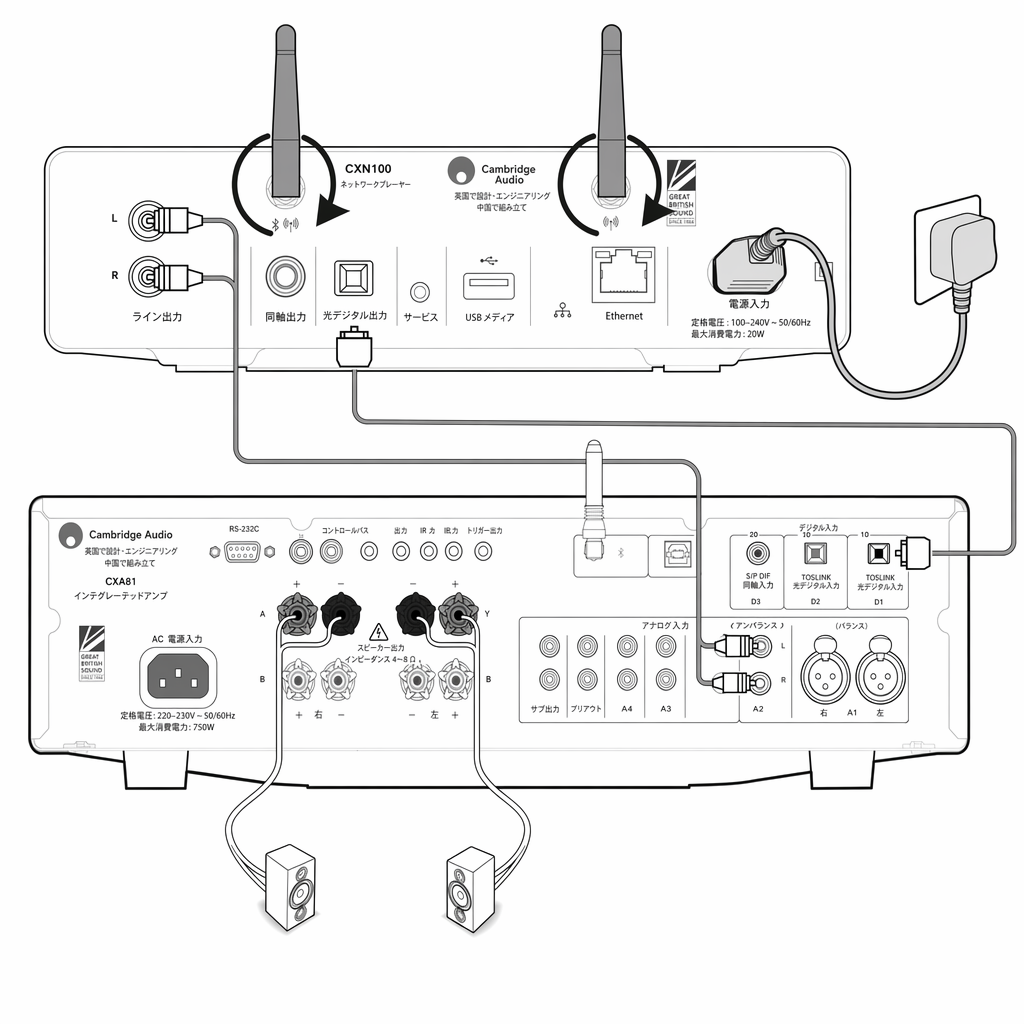
下の図は、MXN10 とアンプの基本的な接続を示しています。
The diagram below shows the basic connection of your MXN10 to an amplifier.
Wi-Fi に接続する
Connecting to WiFi
重要:MXN10 を Wi-Fi または Ethernet で、可能な限り常時インターネットに接続しておくことが非常に重要です。これにより、本機が重要なセキュリティプロトコル、サードパーティとの互換性、最新のソフトウェア要件を満たすよう、定期的に更新されます。
Important Note: It is vitally important that your MXN10 remains connected to an internet network as often as possible, either via Wi-Fi or Ethernet. This will ensure that the unit is regularly updated to meet essential security protocols, third party compatibility and the latest software requirements.
Cambridge Audio が提供する定期的なファームウェアアップデートを適用しない場合、製品保証が無効になり、時間の経過とともに本機に重大な問題が発生する可能性があります。必ず本機を最新のファームウェアバージョンに更新してください。MXN10 の最新ファームウェアバージョンに関する情報は、こちらでご確認いただけます。
Failure to maintain your device with regular firmware updates as provided by Cambridge Audio will void the product warranty and is likely to cause major issues to the unit in time. Please ensure that your unit is updated to the most current firmware version. Information on the latest firmware version for the MXN10 can be found here .
注:MXN10 はキャプティブポータル方式のネットワークには対応していません。MXN10 は 2.4GHz / 5GHz の Wi-Fi ネットワークに接続できます。
Note : The MXN10 is not compatible with captive portal networks. The MXN10 can connect to 2.4GHz/5GHz WiFi networks
有線ネットワークに接続する
Connecting to a wired network
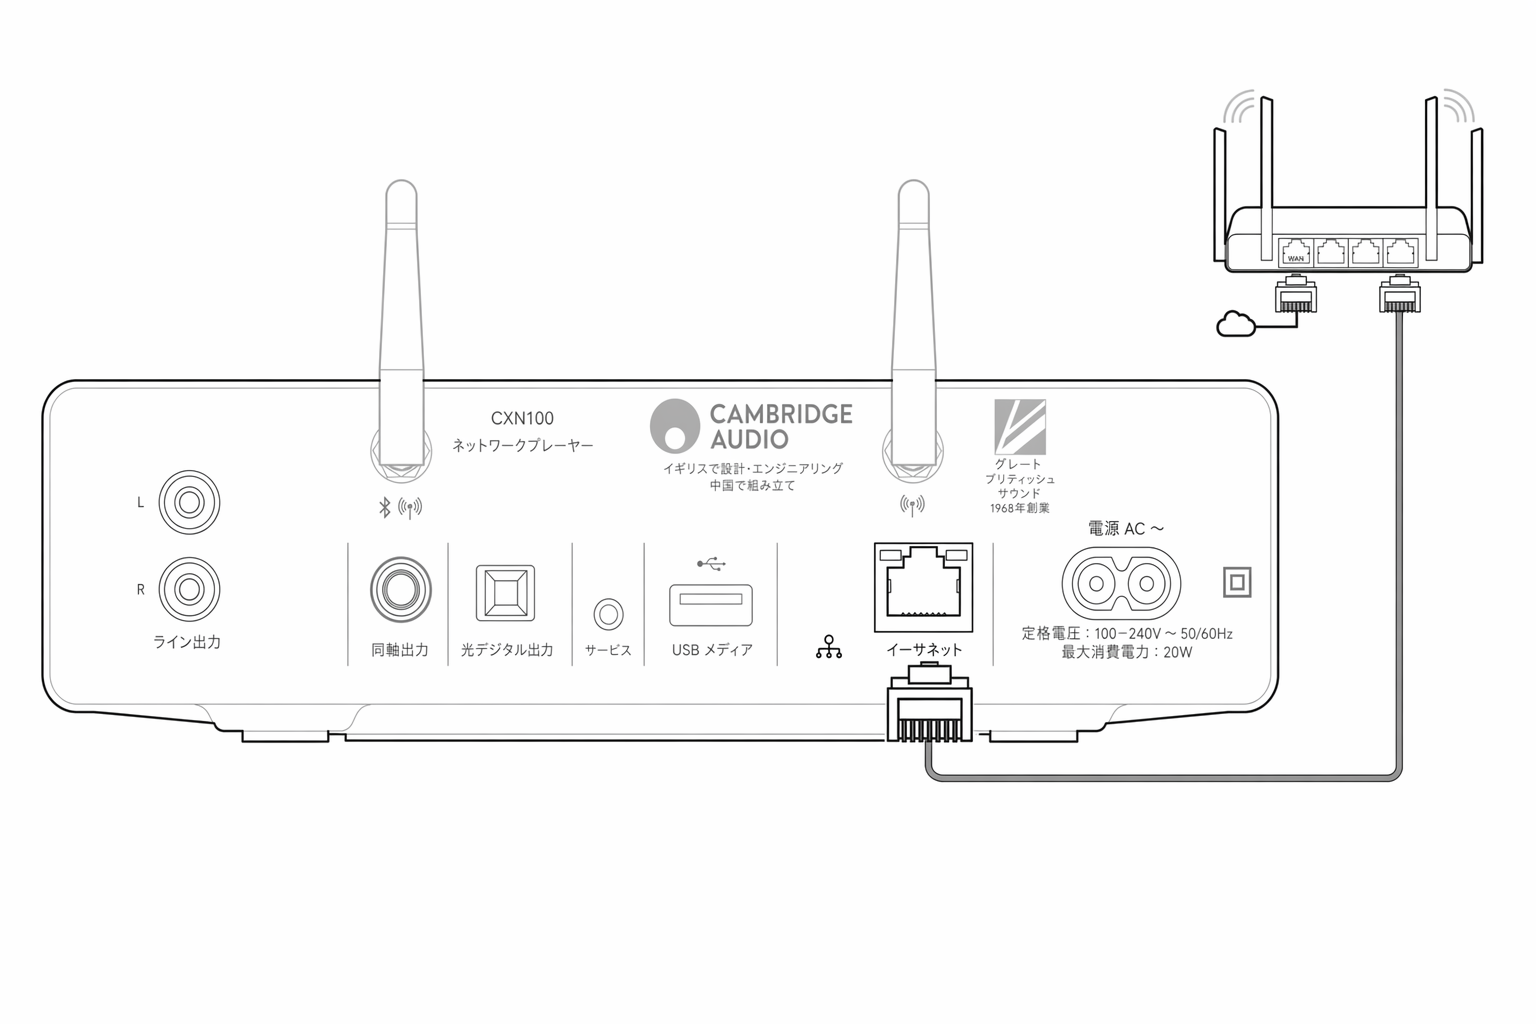
- ネットワークケーブル(カテゴリー 5 / 5E のストレート Ethernet ケーブル)で MXN10 とルーターを接続します。Connect a network cable (Category 5/5E straight-through Ethernet cable) between the MXN10 and your router.
- MXN10 が自動的にネットワークに接続します。Your MXN10 will now automatically connect to the network.
無線ネットワークに接続する
Connecting to a wireless network
iOS の場合:
iOS :
- MXN10 が無線ルーターの通信範囲内にあることを確認し、本機の電源を入れます。Ensure that your MXN 10 is in range of your wireless router, and then power on your unit.
- iOS デバイスの Wi-Fi 設定を開き、「SETUP NEW AIRPLAY SPEAKER」から「MXN10」を選択します。Go to the Wi-Fi settings on your iOS device and under ‘SETUP NEW AIRPLAY SPEAKER’ select 'MXN10'.
- 接続が完了したら、Apple App Store から StreamMagic アプリをダウンロードしてインストールし、セットアップを完了してください。Once connected, to complete unit setup download and install the StreamMagic app from the Apple App store.
Android の場合:
Android :
- MXN10 が無線ルーターの通信範囲内にあることを確認してから、本機の電源を入れます。Ensure that your MXN10 is in range of your wireless router, and then power on your unit.
- Google Play ストアから StreamMagic アプリをダウンロードしてインストールします。Download and install the StreamMagic app from the Google Play store.
- StreamMagic アプリを開き、「Connect」を選択します。Open the StreamMagic app and select ‘Connect’.
- Choose a device で「Set up a new device」を選び、続けて MXN10 を選択します。Under Choose a device select 'Set up a new device' and then select the MXN10.
- 「Wireless Connection」を選択し、次に「Continue」を選択します。Select ‘Wireless Connection’ and then 'Continue'.
- Android デバイスに、通信範囲内で利用可能なすべての Wi-Fi デバイスが表示されます。「Setup:MXN10」を選択します。Your Android device will now show all available Wi-Fi devices in range. Select 'Setup:MXN10'.
- 接続すると、Wi-Fi ネットワークのパスワードの入力を求められます。パスワードを入力し、「Continue」を選択します。Once connected, you will be prompted to enter your Wi-Fi network password. Enter the password and select 'Continue'.
- これで MXN10 が Wi-Fi ネットワークに接続されます。接続には最大 1 分かかる場合があります。Your MXN10 will now connect to your Wi-Fi network, this may take up to a minute.
- 接続したら、StreamMagic アプリで本機の初期セットアップを完了します。Once connected, complete the initial setup of your unit within the StreamMagic app.
StreamMagic アプリ - セットアップStreamMagic app - Setup
本プレーヤーはネットワーク接続に対応しています。本機の入力端子に接続した機器を再生できるだけでなく、ホームネットワークやインターネット上のさまざまなソースから音楽をストリーミング再生できます。
Your player is network connected, not only can you listen to devices connected to the inputs on the product but you can also stream music from many different sources both on your home network and from the internet.
プレーヤーをセットアップするには、まず Apple App Store または Google Play ストアから StreamMagic アプリをダウンロードしてください。
To set up your player, please first download the StreamMagic app from the Apple app store or Google Play store.


セットアップSet up
- プレーヤーの電源を入れます。Switch on your player.
- StreamMagic アプリを開き、指示に従ってプレーヤーのネットワーク設定を完了します。この手順では、保留中の新しいアップデートも適用されます。Open the StreamMagic app and follow the instructions provided to complete setting up your player on your network. This process will also apply any new updates that may be pending.
注:セットアップ中にプレーヤーの名前を付けるよう求められます。他と重複しない独自の名前を付けてください。ストリーミングやスマートホームサービスを使う際に、プレーヤーを識別しやすくなります。
Note: During the set up process you will be asked to give your player a name, please make sure this is unique to your player. This will make it easier to find when using streaming and smart home services.
プレーヤーをホームネットワークに接続すると、インターネットラジオ、ストリーミングサービス、ネットワークドライブや USB ドライブなど、各種ソースをすべて操作できるようになります。
Once your player is connected to your home network you'll have full control of your sources, including internet radio, streaming services, network and USB drives and more.
StreamMagic アプリについて詳しくは、次のサイトをご参照ください: https://www.cambridgeaudio.com/products/streammagic
For more information on our StreamMagic app, please visit: https://www.cambridgeaudio.com/products/streammagic
Google Home / Chromecast built-inGoogle Home / Chromecast built-in
本プレーヤーはネットワーク接続に対応しています。本機の入力端子に接続した機器を再生できるだけでなく、ホームネットワークやインターネット上のさまざまなソースから音楽をストリーミング再生できます。
Your player is network connected, not only can you listen to devices connected to the inputs on the product but you can also stream music from many different sources both on your home network and from the internet.
本プレーヤーは Chromecast built-in に対応しており、Google Home に組み込めます。プレーヤーをセットアップするには、スマートフォンまたはタブレットに Google Home アプリをダウンロードしてください。
Your player features Chromecast built-in and can be incorporated in to your Google Home. To set up your player, download the Google Home app on your smart phone or tablet.
Chromecast built-in により、お手持ちのスマートフォンがリモコン代わりになります。普段お使いのアプリの Cast ボタンをタップするだけで、スマートフォン、タブレット、ノート PC から音楽・ポッドキャスト・プレイリストをプレーヤーへストリーミング再生できます。
With Chromecast built into your player, your phone becomes your remote. Simply tap the Cast button from apps you already know and love to stream music, podcasts and playlists from your phone, tablet or laptop to your player.
Chromecast built-inChromecast built-in
スマートフォンがリモコンになります
Your phone is your remote
- 普段お使いのアプリで Cast ボタンをタップするだけです。新たなログインやダウンロードは必要ありません。Simply tap the Cast button from apps you already know and love. No new logins or downloads required.
- 家のどこにいても、スマートフォンで検索、再生、一時停止、音量を上げる操作ができます。Use your phone to search, play, pause and turn up the volume from anywhere in the home.
- ストリーミング中も、ソーシャルメディアを閲覧したり、テキストメッセージを送信したり、電話を受けたりするなど、スマートフォンを別の用途に使い続けることができます。While you’re streaming, you can keep using your phone for other things – scroll through social media, send a text, and even accept calls.
- Chromecast 対応スピーカーを使ったマルチルームキャストで、家中で音楽を楽しめます。Enjoy music throughout your house when you use multi-room casting with Chromecast-enabled speakers.
- 「Hey Google」と話しかけるだけで、プレーヤーにキャストできます。Just say “Hey Google” to cast to your player
あなたのペースで楽しめる、無限のエンターテインメント
Unlimited entertainment, all on your schedule
- 何百ものアプリに対応し、常に新しいアプリが追加されています。Works with hundreds of apps and new apps are being added all the time.
- Pandora、Spotify、Youtube Music などの人気音楽サービスから、何百万曲もの楽曲を選べます。Choose from millions of songs from popular music services like Pandora, Spotify, and Youtube Music.
注:StreamMagic アプリで初めてプレーヤーをセットアップするとき、または工場出荷時設定にリセットした後は、Chromecast 機能を有効にするため、表示されたら Google の利用規約に同意してください。
Note : When first setting up your Player via the StreamMagic app or after a factory reset, please ensure that you accept Google's terms and conditions when prompted to enable Chromecast functionality.
Android、Google Play、Chromecast built-in ロゴは、Google Inc. の商標です。
Android, Google Play and the Chromecast built-in logo are trademarks of Google Inc.
Chromecast built-in のすべての機能は、一部の地域では利用できない場合があります。
Full Chromecast built-in features may not be available in some territories.
インターネットラジオInternet radio
StreamMagic アプリの Radio タブでは、さまざまなインターネットラジオ局を検索・再生できます。また、お気に入りのインターネットラジオ局やその他のメディアをプレーヤーのプリセットとして最大 99 件まで登録でき、StreamMagic アプリから呼び出せます。リモコン付属モデルでは、一部のプリセットはリモコンからも呼び出せます。
You can browse and play a wide variety of Internet Radio stations in the StreamMagic app Radio tab. You can also assign up to 99 of your favourite Internet Radio stations and other media as presets on your player, which can then be recalled using the StreamMagic app. A limited amount of presets can be recalled via the remote control if your player includes one.
StreamMagic アプリでプリセットを検索・登録する手順:You can search and assign a preset via the StreamMagic app:
- StreamMagic アプリで Radio タブを開きます。Within the StreamMagic app navigate to the Radio tab.
- ページ上部の Search for Radio 検索タブを使うか、URL を選択して Custom URL リンクを入力します。Use the Search for Radio search tab at the top of the page or enter a Custom URL link by selecting URL.
- 保存したい放送局を見つけたら選択すると、Play now(今すぐ再生)または Add to presets(プリセットに追加)の選択肢が表示されます。Once you have located the station you wish to store, select and you will be prompted with the option to Play now or Add to presets .
- 放送局を、プレーヤーの 1-99 のプリセットのうち希望するものに追加します。Add station to the desired preset for your player between 1-99.
- 選択したプリセットに放送局が保存されたことを示す確認メッセージが表示されます。You will then receive confirmation that the station is saved to the chosen preset.
注:Custom URL ストリームが、次の対応ファイル形式のいずれかであることを確認してください:ALAC、WAV、FLAC、AIFF、DSD (x256)、WMA、MP3、AAC、HE AAC AAC+、OGG Vorbis。
Note : Please ensure that the custom URL stream is one of the following supported file types: ALAC, WAV, FLAC, AIFF, DSD (x256), WMA, MP3, AAC, HE AAC AAC+, OGG Vorbis.
プリセットを削除する手順(iOS):To remove a preset (iOS):
- StreamMagic アプリで Home タブを開きます。Within the StreamMagic app navigate to the Home tab.
- ページの下部までスクロールし、プレーヤーの Presets が表示されたら、EDIT を選択します。Scroll to the bottom of the page where you find your player's Presets , and select EDIT .
- プリセットから放送局を削除するには、赤い丸のアイコンをタップし、Delete を押します。To remove a station from preset, tap the red circle icon and then press Delete .
プリセットを削除する手順(Android):To remove a preset (Android):
- StreamMagic アプリで Home タブを開きます。Within the StreamMagic app navigate to the Home tab.
- ページの下部までスクロールし、プレーヤーの Presets が表示されたら、EDIT を選択します。Scroll to the bottom of the page where you find your players Presets , and select EDIT .
- 削除したい放送局をタップします。Tap on the station you wish to remove.
注:リモコン付属モデルでは、放送局の再生中にリモコンの数字ボタンを長押しすることで、プリセットに登録することもできます。
Note : You may also assign a preset using a remote control if your player includes one, by pressing and holding a number on the remote whilst a station is playing.
AirPlayAirPlay
AirPlay は、家庭内のオーディオシステムやスピーカーをどの部屋からでもコントロールできる Apple の技術です。iPhone、iPad、HomePod、Apple TV からタップ、または Siri への呼びかけだけで操作できます。リビングとキッチンで同じ曲を同時に再生したり、どの部屋でも音量を一斉に調節したりできます。
AirPlay is an Apple technology designed to control home audio systems and speakers in any room — with a tap or by just asking Siri — right from iPhone, iPad, HomePod, or Apple TV. Play a song in the living room and kitchen at the same time or adjust the volume in any room, all in sync.
プレーヤーを設置したら、iPhone や iPad を使って数ステップで Apple Home アプリに追加してください。
After installing your player, add it to the Apple Home app with a few simple steps using your iPhone or iPad
iPhone や iPad から AirPlay を使う方法How to use AirPlay from iPhone or iPad
1. プレーヤーがネットワークに接続されていることを確認します。
1. Ensure your player is connected to your network.
2. AirPlay で再生したいアプリを開きます。
2. Open the app that you want to AirPlay from.


3. または をタップします。
3. Tap or .
4. AirPlay 機器としてお使いのプレーヤーを選択します。
4. Select your player as your AirPlay device.
コントロールセンターから AirPlay を使う方法How to use AirPlay from Control Center
コントロールセンターからデバイスのオーディオを切り替える手順:
To switch the audio on your device from Control Center:
デバイスの画面右上から下にスワイプしてコントロールセンターを開きます。右上のエリアを長押しし、お使いのプレーヤーを選択します。
Swipe down from the top right side of the screen on your device to open Control Center. Touch and hold in the upper-right corner, then select your player.
本製品は AirPlay 2 に対応しており、iOS 11.4 以降が必要です。
This product supports AirPlay 2 and requires iOS 11.4 or later.
Apple および AirPlay は、米国およびその他の国で登録された Apple Inc. の商標です。
Apple and AirPlay are trademarks of Apple Inc., registered in the U.S. and other countries.
Works with Apple バッジは、バッジで示される技術と連携するよう設計され、Apple のパフォーマンス基準を満たすことを開発者が認定したアクセサリーであることを示します。
Use of the Works with Apple badge means that an accessory has been designed to work specifically with the technology identified in the badge and has been certified by the developer to meet Apple performance standards.
内蔵ストリーミングサービスBuilt-in streaming services
本プレーヤーには、以下のストリーミングサービスが内蔵されています。
Your player has the following built-in streaming services:
- Spotify ConnectSpotify Connect
- TIDALTIDAL
- QobuzQobuz
- DeezerDeezer
注:ストリーミング元の機器(スマートフォン、タブレット、パソコンなど)は、機器同士が通信できるよう、プレーヤーと同じ Wi-Fi ネットワークに接続している必要があります。
Note : It is essential that the device you are streaming from (smartphone, tablet, computer, etc.) is on the same Wi-Fi network as your player, to ensure that the units can communicate with each other.
Spotify ConnectSpotify Connect
スマートフォン、タブレット、パソコンを Spotify のリモコンとして使用します。
Use your phone, tablet or computer as a remote control for Spotify.
詳しくは spotify.com/connect をご参照ください。
Go to spotify.com/connect to learn more.
TIDAL(Connect)TIDAL (Connect)
1. TIDAL アプリを開き、プレーヤーでストリーミング再生したいプレイリスト、アルバム、楽曲などを選びます。
1. Open the TIDAL app and choose the playlist, album, song, etc. that you wish to stream to your player.
2. TIDAL 内の Sound Output devices アイコンを選択し、一覧からお使いのプレーヤーを選びます。
2. Select the Sound Output devices icon within TIDAL and select your player from the list.
3. TIDAL Connect が、選択したコンテンツをプレーヤーにストリーミング再生します。
3. TIDAL Connect should now be streaming your chosen content to your player.
詳しくは tidal.com/connect をご参照ください。
Go to tidal.com/connect to learn more
TIDAL(StreamMagic 経由)TIDAL (via StreamMagic)
1. StreamMagic アプリを開き、Library タブに移動して TIDAL を選択します。
1. Open the StreamMagic app and navigate to the Library tab, and then select TIDAL.
注:TIDAL アカウントへのサインインを求められた場合は必ずサインインしてください。アカウントと StreamMagic アプリを連携させるため、初回のみ必要です。
Note : Please ensure that you sign into your TIDAL account when prompted to do so. This will only be required on the first instance of use to link the account to the StreamMagic app.
2. プレーヤーでストリーミング再生したいプレイリスト、アルバム、楽曲などを選びます。
2. Choose the playlist, album, song, etc. that you wish to stream to your player.
3. TIDAL が、選択したコンテンツをプレーヤーにストリーミング再生します。
3. TIDAL should now be streaming your chosen content to your player.
Qobuz(Google Cast 経由)Qobuz (via Google Cast)
1. Qobuz アプリを開き、プレーヤーでストリーミング再生したいプレイリスト、アルバム、楽曲などを選びます。
1. Open the Qobuz app and choose the playlist, album, song, etc. that you wish to stream to your player.
2. Qobuz 内の Google Cast アイコンを選択し、Qobuz Connect の一覧からお使いのプレーヤーを選びます。
2. Select the Google Cast icon within Qobuz and select your player from the Qobuz Connect list.
3. これで、Qobuz により、選択したコンテンツがプレーヤーにキャストされます。
3. Qobuz should now be casting your chosen content to your player.
Qobuz(StreamMagic 経由)Qobuz (via StreamMagic)
1. StreamMagic アプリを開き、Library タブに移動して Qobuz を選択します。
1. Open the StreamMagic app and navigate to the Library tab, and then select Qobuz.
注:サインインを求められたら、Qobuz アカウントに必ずサインインしてください。これは、StreamMagic アプリにアカウントをリンクするため、初回の使用時にのみ必要です。
Note : Please ensure that you sign into your Qobuz account when prompted to do so. This will only be required on the first instance of use to link the account to the StreamMagic app.
2. プレーヤーにストリーミングしたいプレイリスト、アルバム、楽曲などを選択します。
2. Choose the playlist, album, song, etc. that you wish to stream to your player.
3. これで、Qobuz により、選択したコンテンツがプレーヤーにストリーミングされます。
3. Qobuz should now be streaming your chosen content to your player.
Deezer(Google Cast 経由)Deezer (via Google Cast)
1. Deezer アプリを開き、プレーヤーにストリーミングしたいプレイリスト、アルバム、楽曲などを選択します。
1. Open the Deezer app and choose the playlist, album, song, etc. that you wish to stream to your player.
2. Deezer 内のスピーカーアイコンを選択し、次に「Google Cast」を選択します。リストからお使いのプレーヤーを選択します。
2. Select the speaker icon within Deezer, then select 'Google Cast'. Select your player from the list.
3. これで、Deezer により、選択したコンテンツがプレーヤーにキャストされます。
3. Deezer should now be casting your chosen content to your player.
Deezer(StreamMagic 経由)*Deezer (via StreamMagic)*
1. StreamMagic アプリを開き、Library タブに移動して Deezer を選択します。
1. Open the StreamMagic app and navigate to the Library tab, and then select Deezer.
注:サインインを求められたら、Deezer アカウントに必ずサインインしてください。これは、StreamMagic アプリにアカウントをリンクするため、初回の使用時にのみ必要です。
Note : Please ensure that you sign into your Deezer account when prompted to do so. This will only be required on the first instance of use to link the account to the StreamMagic app.
2. プレーヤーにストリーミングしたいプレイリスト、アルバム、楽曲などを選択します。
2. Choose the playlist, album, song, etc. that you wish to stream to your player.
3. これで、Deezer により、選択したコンテンツがプレーヤーにストリーミングされます。
3. Deezer should now be streaming your chosen content to your player.
*Deezer は、ファームウェアバージョン 129-b-004 以降および StreamMagic アプリバージョン 2.9.0 以降でのみ、StreamMagic アプリ内で利用できます。
*Deezer is only available within the StreamMagic app when running firmware version 129-b-004 or later and StreamMagic app version 2.9.0 or later.
BluetoothBluetooth
Bluetooth ソースを使用すると、プレーヤーはほとんどのスマートフォン、タブレット、ノートパソコンから Bluetooth オーディオをワイヤレスで受信できます。
The Bluetooth source allows your player to receive wireless Bluetooth audio from most phones, tablets and laptops.
ペアリング
Pairing
選択したメディアソースから高品質な音楽をストリーミングするには、まずそのメディアソースをプレーヤーとペアリングする必要があります。
To begin streaming high-quality music from your chosen media source it will first need to be paired with your player.
- StreamMagic アプリで Home タブを開きます。Within the StreamMagic App navigate to the Home tab.
- ソースの「Edit」オプションを使用して、Bluetooth ソースを追加します。Use the “Edit” option of the source to add the Bluetooth source.
- Home タブに戻り、Bluetooth ソースを選択します。Return to the Home tab and select the Bluetooth source.
- モバイルデバイスまたはノートパソコンの Bluetooth 設定を開きます。Open your mobile device or laptop's Bluetooth settings.
- 利用可能なデバイスのリストからプレーヤーを選択します。Select your player from the list of available devices.
- これで、デバイスがプレーヤーに接続されます。Your device should now connect to your player.
ペアリングすると、プレーヤーで Bluetooth ソースを選択し、以前に接続したデバイスのリストからプレーヤーを選択することで、いつでもプレーヤーに接続できるようになります。
Once paired you should be able to connect to your player at any time by selecting the Bluetooth source on your player and then choosing your player from the list of previously connected devices.
注:
Note :
Bluetooth デバイスをプレーヤーに接続できるのは、Bluetooth ソースが選択されている間のみです。
Your Bluetooth device can only be connected to your player while the Bluetooth source is selected.
USB メディアUSB Media
本体背面にある USB メディア入力を介して、USB SSD、USB HDD、またはフラッシュドライブをプレーヤーに接続して再生できます。接続すると、以下の形式に対応します:ALAC、WAV、FLAC、AIFF、DSD (x512)、WMA、MP3、AAC、HE AAC、AAC+、OGG Vorbis。
You may connect a USB SSD, USB HDD or flash drive to your player via the USB Media inputs located on the rear of the unit for playback. Once connected the following formats are supported: ALAC, WAV, FLAC, AIFF, DSD (x512), WMA, MP3, AAC, HE AAC, AAC+, OGG Vorbis
注:プレーヤーは、USB 入力に接続された大容量ハードドライブを読み取ります。ただし、より大容量のドライブの中には、専用電源を使用する必要があるものがあります。
Note: your player will read large capacity hard drives connected to their USB inputs. However, some larger capacity drives will require you to use their own power supply.
プレーヤーは、FAT32、exFAT、NTFS でフォーマットされた USB ハードドライブにのみ対応しています。
Your player only supports USB hard drives which are formatted to FAT32, exFAT and NTFS.
プレーヤーの主な用途は、ネットワークミュージックプレーヤーとしての使用です。USB ポートは、USB フラッシュドライブを手軽に接続するためのものです。そのため、すべての USB HDD との互換性を保証することはできません。
The primary function of your player is as a network music player. The USB ports are intended for convenient connection of USB thumb drives. As such, we cannot guarantee compatibility with all USB HDD’s.
USB メディアの再生(StreamMagic アプリ経由)
USB Media Playback (via StreamMagic app)
1. 背面パネルの USB Input に USB SSD、HDD、またはフラッシュドライブを接続します。
1.Connect USB SSD, HDD or flash drive to rear panel USB Input.
2. StreamMagic アプリの Library タブを開きます。
2.Navigate to the Library tab of the StreamMagic app.
3. USB Drives 内で該当の USB メディア機器を探し、開きます。
3.Under USB Drives, locate your USB Media device and open.
4. トラックを選択すると、「PLAY FROM HERE」、「PLAY TRACK NOW」、「PLAY TRACK NEXT」、または「QUEUE TRACK」のいずれかを選択できます。
4.Upon selecting a track you will have the option to ‘PLAY FROM HERE’, ‘PLAY TRACK NOW’, ‘PLAY TRACK NEXT’ or ‘QUEUE TRACK’.
ローカルに保存したデジタル音楽コレクションのストリーミングStreaming Your Local Digital Music Collection
プレーヤーは、さまざまな物理ソースからのコンテンツを再生できます。このセクションでは、ローカルに保存したデジタル音楽コレクションにアクセスして再生する方法を説明します。「ローカルに保存」とは、PC、Mac、またはネットワーク接続ストレージデバイス(NAS)に保存されているデジタル音楽ファイルを指します。
Your player can play content from many different physical sources and this section will explain what you need to do to access and play your locally stored digital music collection. ‘Locally Stored’ means the digital music files you have on your PC, Mac or Network Attached Storage devices (NAS).
ローカルコンテンツをストリーミングするには、ネットワーク上で以下のハードウェアとソフトウェアが動作している必要があります:
To stream local content, you will need the following hardware and software running in your network:
1. Cambridge Audio のネットワークプレーヤー。
1. Your Cambridge Audio Network Player.
2. StreamMagic アプリを実行できるスマートフォンやタブレットなどのモバイルデバイス。
2. A mobile device such as a smartphone or tablet on which you can run the StreamMagic app.
3. 互換性のあるデジタル音楽ファイルを保存したハードドライブ、コンピューター、または NAS。
3. A hard drive, computer or NAS containing your compatible digital music files.
4. 稼働中の UPnP 音楽 / メディアサーバー。
4. An active UPnP music or media server.
5. UPnP サービスを許可するよう設定されたルーター。
5. A router which is configured to allow the UPnP service.
注:上記の項目は正しく接続および設定されている必要があります。また、使用するサーバー、NAS、コンピューターなどによって、設定方法が異なる点にご注意ください。できるだけ手間をかけずに使用を開始できるよう、ベストプラクティスガイドを作成しました。こちらからご覧いただけます。
Note: The above items must be correctly connected and configured, and it is important to note that depending on the server, NAS, computer, etc. you’re using this will differ from setup to setup. To help you with this we have created best practice guide which should get you up and running with minimal fuss and effort. This can be found here .
設定Settings
デバイス名Device Name
StreamMagic アプリやホームネットワーク上で、Spotify、Chromecast built-in、TIDAL Connect などのサービスを使用する際に、プレーヤーが表示される名前です。
This is how your player will appear in your StreamMagic app and on your home network when using services like Spotify, Chromecast built-in and TIDAL Connect.
プレーヤーに固有の名前を付けると、ストリーミングサービスやスマートホームサービスを使用する際に、プレーヤーを識別しやすくなります。
Giving your player a unique name makes it easier to distinguish when using streaming and smart home services.
AirPlay 名AirPlay Name
AirPlay または Apple Home アプリを使用する際に、プレーヤーが表示される名前です。
This is how your player will appear when using AirPlay or the Apple Home app.
スタンバイモードStandby Mode
プレーヤーが使用するスタンバイモードの種類を選択します。
This selects what type of standby mode your player will use.
Network Standby を選択すると、スタンバイ中もプレーヤーを StreamMagic アプリやその他のネットワークサービスから操作できます。
Network Standby means your player will still be controllable by the StreamMagic app and other network services.
Eco モードを選択すると、スタンバイ時の消費電力はさらに少なくなりますが、フロントパネルまたはリモコンで電源を入れる必要があります。
If Eco mode is chosen your player will use even less power in standby but will need to be switched on either by the front panel or the remote control.
自動電源オフAutomatic Power Down
プレーヤーが操作されない状態になってからスタンバイに切り替わるまでの時間を設定します。
This sets how long your player will wait while inactive before switching in to standby.
Roon Ready DSDRoon Ready DSD
Roon が DSD コンテンツをどの形式で提供するかを選択できます。
This will allow you to choose how Roon provides DSD content.
Use DoP for digital output – お使いの機器が DoP 形式のネイティブ DSD に対応している場合。
Use DoP for digital output – If your device does support native DSD in DoP format.
Use PCM for digital output – お使いの機器がネイティブ DSD に対応していない場合。
Use PCM for digital output – If your device doesn’t support native DSD.
プリアンプPre-Amp
Pre-Amp モードを有効にすると、アプリを使って機器のライン出力の音量を調整できます。
With Pre-Amp mode enabled the volume of the device's line output can be controlled using the app.
注:Pre-Amp モードと音量調整は、ファームウェアバージョン 132-b-007 以降でのみ使用できます。
Note : Pre-amp mode and volume control is only available with firmware version 132-b-007 or later.
音量上限Volume Limit
これは、AirPlay 2、Spotify、TIDAL Connect、Chromecast built-in などの他のストリーミングサービスで設定できる最大音量を設定します。StreamMagic アプリの音量コントロールでは、この設定を上書きできます。
This sets the maximum volume that other streaming services like AirPlay 2, Spotify, TIDAL Connect and Chromecast built-in can set. The StreamMagic app volume controls can override this setting.
早期アップデートEarly Update
これを「On」に設定すると、一般リリースに先立って最新のファームウェアを試すことができます。
Setting this to ‘On’ will let you try out the latest firmware ahead of general release.
詳しい情報や新機能については、FAQ をご覧ください。
For more information and to find out what's new visit our FAQ .
ファームウェアFirmware
プレーヤーで利用可能な新しいファームウェアを確認し、適用します。
This will check for and apply any new firmware available for your player.
プレーヤーを夜間にネットワークスタンバイにしておくと、新しいアップデートを確認して適用します。
When left in network standby overnight your player will check and apply any new updates.
工場出荷時リセットFactory Reset
プレーヤーを工場出荷時の設定に戻します。
This will return your player to its factory settings.
以下の手順で手動でリセットすることもできます。
You can also do this manually by following the steps below:
- 電源ケーブルを取り外します。Remove the mains power lead
- スタンバイボタンを押したまま、電源ケーブルを再接続します。Hold the standby button while re-applying the power lead
- 工場出荷時設定へのリセット処理が完了するまで、LED が赤色に点滅します。The LED will flash red while the factory reset process completes
- プレーヤーが再起動します。The player will reboot
注:ファームウェアを更新するには、ネットワークプレーヤーがインターネットに接続されている必要があります。最適なパフォーマンスを確保するため、ネットワークプレーヤーは接続したままにすることをおすすめします。
Note: Your network player must be connected to the internet to carry out firmware updates. It is recommended that you keep your network player connected to ensure optimal performance.
技術仕様Technical Specifications
入力:Ethernet、USB ホスト(マスストレージ)、Wi-Fi、Bluetooth
Inputs Ethernet, USB host (mass storage), Wi-Fi, Bluetooth
出力:ライン出力(アンバランス)、デジタル出力(同軸および光)
Outputs Line out (unbalanced), Digital out (Coax and Optical)
DAC:ESS Sabre ES9033Q
DAC ESS Sabre ES9033Q
周波数特性:20Hz〜70kHz ±1dB
Frequency response 20Hz – 70kHz +/-1dB
THD+N(0dBFS、1kHz、20kHz 帯域):<0.001%
THD+N 0dBFS, 1khz, 20k BW <0.001%
SN 比(20kHz 帯域):>110dB
S/N Ratio (20k BW) >110dB
RCA 出力レベル:2Vrms ±10%
RCA output level 2Vrms +/-10%
RCA 出力インピーダンス:500Ω
RCA output Impedance 500Ohm
Ethernet:IEEE 802.3 10 Base-T または 100 Base-T
Ethernet IEEE 802.3 10 Base-T or 100 Base-T
Wi-Fi:Wi-Fi 5 デュアルバンド 2.4 / 5GHz、WPA2 / WPA2-PSK
Wi-Fi Wi-Fi 5 dual band 2.4/5gHz WPA2/WPA2-PSK
Bluetooth:5.0 A2DP / AVRCP、SBC および AAC に対応
Bluetooth 5.0 A2DP/AVRCP supporting SBC and AAC
互換性:UPnP、ローカル USB メディア、Chromecast built-in、Spotify Connect、TIDAL、Qobuz、Deezer、RoonReady、Airplay2
Compatibility UPnP, Local USB media, Chromecast built-in, Spotify Connect, TIDAL, Qobuz, Deezer, RoonReady, Airplay2
オーディオ形式:ALAC、WAV、FLAC、AIFF、DSD(x512)、WMA、MP3、AAC、HE AAC、AAC+、OGG Vorbis、HLS/DASH、.m3u、.pls プレイリスト
Audio formats ALAC, WAV, FLAC, AIFF, DSD (x512), WMA, MP3, AAC, HE AAC, AAC+, OGG Vorbis, HLS/DASH, .m3u, .pls playlists
USB ファイルシステム対応:FAT32、NTFS、ext3 / 4、exFAT
USB File system support FAT32, NTFS, ext3/4, ExFAT
ハイレゾ対応:最大 768kHz / 32bit PCM、最大 DSD512
Hi-res support Up to 768KHz 32bit PCM, up to DSD512
デジタル同軸および光出力は、最大 192kHz 32bit、最大 DSD64 に対応します。
Digital Coax and Optical outputs support a maximum of 192kHz 32bit, up to DSD64
電源電圧:100〜240V〜 50 / 60Hz
Mains Voltage 100-240V ~50/60Hz
最大消費電力:20W
Max Power consumption 20W
スタンバイ時消費電力:<0.5W
Standby power consumption <0.5W
寸法(高さ × 幅 × 奥行):52 × 215 × 191mm
Dimensions (H x W x D) 52 x 215 x 191mm
質量:3kg
Weight 3kg
トラブルシューティングTroubleshooting
MXN10 をネットワークに接続できない場合は、以下の手順で問題を解決できる可能性があります:
If you have trouble connecting the MXN10 to your network, these steps may help to resolve the problem:
- 付属の Wi-Fi アンテナ 2 本がしっかり接続されていることを確認してください。Ensure that both of the supplied Wi-Fi antennas are securely connected.
- 同じネットワークを使用して、接続されたコンピューターからインターネットにアクセスできること(つまり、Web を閲覧できること)を確認してください。Confirm that a connected computer can access the Internet (i.e. can browse the web) using the same network.
- 暗号化された Wi-Fi ネットワークを使用している場合は、正しいキーまたはパスフレーズを入力したことを確認してください。テキスト形式のキーでは大文字と小文字が区別されることに注意してください。If you have an encrypted Wi-Fi network, check that you have entered the correct key or passphrase. Remember that text-format keys are case-sensitive.
MXN10 をネットワークに正常に接続できるものの、特定のインターネットラジオ局を再生できない場合は、次のいずれかが原因である可能性があります:
If your MXN10 can connect to the network successfully but is unable to play particular Internet Radio stations, it may be due to one of the following causes:
- その局がこの時間帯に放送していない(別のタイムゾーンにある可能性があることに注意してください)。The station is not broadcasting at this time of the day (remember it may be located in a different time zone).
- その局が許可されている同時リスナー数の上限に達しています。The station has reached the maximum allowed number of simultaneous listeners.
- その局はすでに放送を終了しています。The station is not broadcasting anymore.
- サーバー(別の国にあることが多い)とお使いの機器との間のインターネット接続が遅すぎます。The Internet connection between the server (often located in a different country) and you is too slow.
StreamMagic アプリを MXN10 に接続できない場合は、以下の手順で問題を解決できる可能性があります:
If you have trouble connecting the StreamMagic app to the MXN10, these steps may help to resolve the problem:
- 付属の Wi-Fi アンテナ 2 本がしっかり接続されていることを確認してください。Ensure that both of the supplied Wi-Fi antennas are securely connected.
- モバイルデバイスと MXN10 が同じネットワークに接続されていることを確認してください。Ensure that your mobile device and the MXN10 are connected to the same network.
- モバイルデバイスのアプリ設定で、StreamMagic アプリによるネットワーク上のデバイスへのアクセスを許可していることを確認してください。Ensure that you have allowed the StreamMagic app to have access to devices on your network, via your mobile devices' app settings.
- モバイルデバイスにダウンロードした VPN またはウイルス対策アプリによって、StreamMagic アプリが MXN10 を「認識」できなくなっていないか確認してください。Check whether any VPN or Anti-Virus app downloaded on to your mobile device may be preventing the StreamMagic app from 'seeing' the MXN10.
UPnP 再生で問題が起きたときは、以下をご確認ください。
If you have problems with UPnP playback check the following:
- 選択した UPnP サーバーソフトウェアが、アクセスしようとしているファイル形式の配信に対応していることを確認してください。たとえば、FLAC を配信できないサーバーもあります。Ensure your chosen UPnP server software is capable of serving the file type you are trying to access. Some servers do not serve FLAC for instance.
- MXN10 では DRM のないファイルのみ再生できます。DRM による制御が施されたファイルは MXN10 で再生できません。一部のサーバーでは、Microsoft PlaysForSure を認証して復号してから MXN10 にコンテンツを配信できる場合がありますが、この処理はサーバーの機能だけに依存するため、保証されません。The MXN10 can only play non DRM files. Files that have DRM controls cannot be played by the MXN10. Some servers may be able to authorise and de-crypt Microsoft PlaysForSure before then serving the content to the MXN10, but this operation is not guaranteed as it is purely a function of the server.
- 24-bit WAV または FLAC コンテンツを再生する場合、帯域幅の問題により、安定して動作させるには通常、有線 Ethernet 接続が必要です。If attempting to play 24-bit WAV or FLAC content a wired Ethernet connection is normally required for reliable operation due to bandwidth considerations.
- アクセスしようとしているファイル形式を MXN10 が再生できることを確認してください。Check that the MXN10 is capable of playing back the file type you are trying to access.
USB メディアの再生で問題が起きたときは、以下をご確認ください。
If you have problems with USB Media playback check the following:
- アクセスしようとしているファイル形式を MXN10 が再生できることを確認してください。Check that the MXN10 is capable of playing back the file type you are trying to access.
- USB Media では、MXN10 で DRM のないファイルのみ再生できます。DRM による制御が施されたファイルは再生できません。For USB Media, the MXN10 can only play non DRM files. Files that have DRM controls cannot be played.
- デバイスが USB ソケットから給電される場合、そのデバイスが 1A を超える電流を必要としないことを確認してください。Check that your device does not require more than 1A if it is powered from the USB socket itself.
- デバイスのフォーマットが MXN10 に対応していることを確認してください。Check your device format is supported by the MXN10.
- USB メディアの整理方法は、MXN10 がコンテンツをどれだけ効率よく参照できるかに影響します。アーティスト用のフォルダーを作成し、その中にアルバムごとのサブフォルダーを作り、各アルバムのトラックを入れることをお勧めします。1 つのフォルダーに数千のトラックがあるライブラリでは、MXN10 のメディア参照速度が徐々に低下します。The way you organise your USB media affects how efficiently the MXN10 can browse the content. A good practice is to create folders for Artists within which you should have subfolders for each Album which then contain the tracks for that Album. Libraries with thousands of tracks in one folder will progressively slow down the MXN10's media browsing.
電源が入らない場合:
There is no power:
- AC 電源コードがしっかり接続されていることを確認してください。Ensure the AC power cord is connected securely.
- プラグが壁面コンセントに完全に差し込まれ、スイッチがオンになっていることを確認してください。Ensure the plug is fully inserted into the wall socket and is switched on.
- 電源プラグまたはアダプターのヒューズを確認してください。Check fuse in the mains plug or adaptor.
よくあるご質問(FAQ)Frequently Asked Questions (FAQ)
MXN10 にはプリアンプ機能または音量調整機能がありますか?Does the MXN10 have pre-amp or volume control?
はい、アナログ出力で接続している場合は、MXN の音量を調整できます。デジタル出力で接続している場合は、Pre-amp mode と音量調整は使用できません。
Yes, it is possible to control the volume of your MXN when connected via the analogue outputs. Pre-amp mode and volume control is not possible when connected via the digital outputs.
アナログ出力で接続し、StreamMagic アプリのデバイス設定で Pre-amp mode を有効にすると、アプリから MNXN の音量を調整できます。
When connected via the analogue outputs and with Pre-amp mode enabled in the StreamMagic app device settings, you can control the volume of your MNXN via the app.
注:Pre-amp mode と音量調整は、ファームウェアバージョン 132-b-007 以降でのみ使用できます。
Note : Pre-amp mode and volume control is only available with firmware version 132-b-007 or later.
MXN10 にはリモコンがありますか?Does the MXN10 have a remote control?
MXN10 にリモコンはありません。本体は StreamMagic アプリで操作し、設定を調整できます。
The MXN10 does not have a remote control. The unit can be controlled and the settings can be adjusted via the StreamMagic app.
MXN10 は MQA コンテンツに対応していますか?Can the MXN10 support MQA content?
MXN10 は MQA でエンコードされたコンテンツを受信できますが、MXN10 には MQA ファイルを展開するための MQA デコーダーが内蔵されていないため、TIDAL Connect 経由で MQA ファイルを完全に再生することはできません。
Although the MXN10 can receive MQA encoded content, it is not possible for the device to playback full MQA files via TIDAL Connect, because the MXN10 does not have an MQA decoder built in to unfold the MQA files.
Full MQA Decoder を搭載するにはハードウェアの変更が必要になるため、MXN10 に MQA 対応を統合する予定はありません。
There are no plans to integrate MQA support into the MXN10, as this would require a hardware modification to install a Full MQA Decoder.
DacMagic 200M で MQA パススルーを使用するよう MXN10 を設定するにはどうすればよいですか?How do I set up my MXN10 with a DacMagic 200M for MQA passthrough?
MXN10 は MQA でエンコードされたコンテンツを受信できますが、MXN10 には MQA ファイルを展開するための MQA デコーダーが内蔵されていないため、TIDAL Connect 経由で MQA ファイルを完全に再生することはできません。
Although the MXN10 can receive MQA encoded content, it is not possible for the device to playback full MQA files via TIDAL Connect, because the MXN10 does not have an MQA decoder built in to unfold the MQA files.
ただし、MXN10 の DAC をバイパスし、DacMagic 200M などの MQA に対応した外部 DAC で MQA ファイルを処理することは可能です。これにより、DacMagic 200M で MQA ファイルの完全な展開を行うことができ、MXN10 を使って MQA ファイルを操作し、キューに追加することもできます。
It is, however, possible to bypass the DAC in the MXN10, and have the MQA file processed by an external DAC that supports MQA, such as the DacMagic 200M . This will allow the full unfold of the MQA file to take place in the DacMagic 200M, and you will still be able to control and queue your MQA files via the MXN10.
以下の手順に従って設定してください:
Please follow the below instructions on how to how to set this up:
1. MXN10 のいずれかのデジタル出力(S/PDIF 同軸または TOSLINK 光)を、対応する DacMagic 200M のデジタル入力(D1 または D2)に接続します。
1. Connect either of the Digital Outputs (SP/DIF Coaxial or Toslink Optical) of the MXN10 to the corresponding DacMagic 200M Digital Input (D1 or D2).
2. DacMagic 200M のバランス出力またはアンバランス出力をアンプに接続します。
2. Connect the Balanced or Unbalanced Output of DacMagic 200M to your amplifier.
3. DacMagic 200M で該当する D1 / D2 入力を選択します。
3. Select the relevant D1/D2 Input on your DacMagic 200M.
4. スマートフォンまたはタブレットで TIDAL アプリの「Settings」を開き、ストリーミング品質が「Master」に設定されていることを確認します。
4. Open the TIDAL app 'Settings' on your smartphone or tablet, and confirm that the streaming quality is set to ‘Master’.
5. TIDAL Connect メニューで MXN10 を出力機器として選択します。
5. Select the MXN10 within the TIDAL Connect menu as your output device.
6. MQA ファイルの処理が DacMagic 200M にパススルーされ、DacMagic 200M の該当する LED ランプで MQA 再生が示されるはずです。
6. Processing of the MQA files will now be passed through to the DacMagic 200M, and MQA playback should be indicated on the DacMagic 200M by the relevant LED light.
MXN10 の複数の出力を同時に使用できますか?Can I use more than one of the MXN10’s outputs at once?
MXN10 を 1 台の機器に接続する場合は、デジタル出力でもアナログ出力でも、任意の出力を使用できます。
If you wish to connect the MXN10 to one single device, you can use any output, digital or analogue, that you wish.
ただし、MXN10 を同時に複数の機器へ接続する場合は、すべての出力が常に有効であるため、最大 3 台の機器を接続して同時に再生できます。
If, however, you would like to connect the MXN10 to more than one device at a time, you can connect up to three devices and play simultaneously, as all outputs remain active at all times.
MXN10 で音量を調整したい場合は、アプリで Pre-Amp mode を有効にする必要があります。
Please note that you will need to enable Pre-Amp mode in the app, if you wish to control the volume via the MXN10.
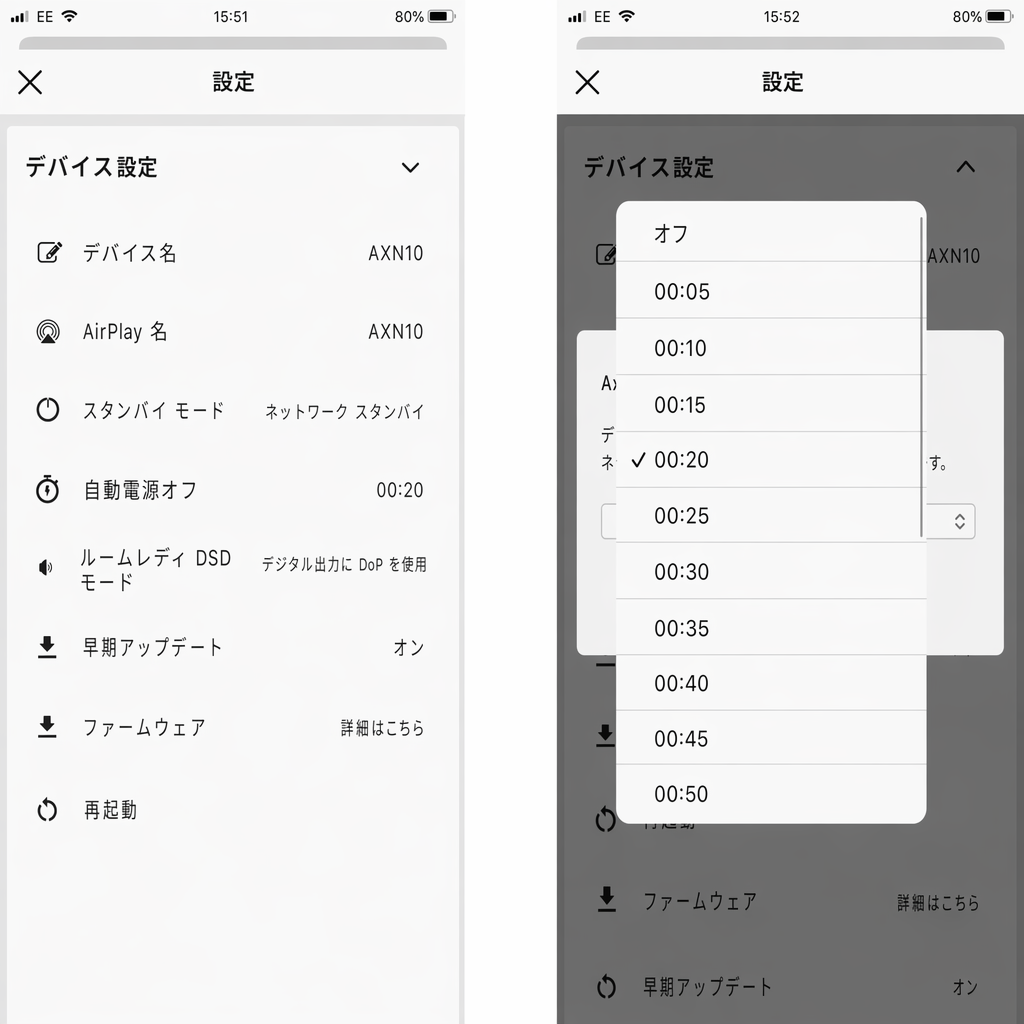
使用していないときに MXN10 の電源が切れないようにするにはどうすればよいですか?How do I stop the MXN10 from powering down when not in use?
MXN10 は、操作がない状態が 20 分間続くと自動的にスタンバイモードに切り替わります。この Automatic Power-Down(APD)機能は、StreamMagic アプリ内のデバイス設定に移動して無効にできます。
The MXN10 will automatically switch to standby mode after 20 minutes of inactivity. This Automatic Power-Down (APD) feature can be disabled, by navigating to the device settings within the StreamMagic app.
「Automatic Power-Down」を選択すると、この機能を無効にするか、APD が作動するまでの時間を変更できます。
You can either disable this feature, or edit the length of time it takes for APD to be triggered, by selecting ‘Automatic Power-Down’.
MXN10 はどの USB HD に対応していますか?What USB HDs will the MXN10 support?
MXN10 の主な機能はネットワークミュージックプレーヤーであり、USB ポートは USB HDD および SSD を手軽に接続するためのものです。そのため、すべての USB HDD および SSD との互換性を保証することはできません。
The primary function of the MXN10 is as a network music player and the USB port is intended for convenient connection of USB HDDs and SSDs. As such, we can not guarantee compatibility with all USB HDDs and SSDs.
MXN10 は、USB Media 入力に接続された大容量ハードドライブを読み取ります。ただし、大容量のドライブの中には、プレーヤーの USB ポートからドライブの動作に十分な電力が供給されないため、専用の電源が必要になるものがあります。
The MXN10 will read large capacity hard drives connected to the USB Media input. Some larger capacity drives, however, may require their own power supply, as the player's USB port may not provide enough power for the drive to function.
MXN10 は、FAT32、exFAT、NTFS でフォーマットされた USB ハードドライブに対応します。
The MXN10 will support USB hard drives which are formatted to FAT32, exFAT and NTFS.
MXN10 がネットワークに接続されていないとき、接続した USB HD のファイルを再生できますか?Can I play files from a connected USB HD when the MXN10 is not connected to a network?
StreamMagic アプリが必要なため、ネットワークに接続されていない状態で、接続した USB HD からローカルファイルを再生することはできません。
This is not possible as the use of the StreamMagic app is required to be able to play local files from a connected USB HD.
なお、MXN10 は常にネットワークに接続しておくことを強くお勧めします。
Please note that it is strongly recommended that the MXN10 is connected to a network at all times.
MXN10 の背面にあるサービスポートは何に使用しますか?What is the Service port on the back of the MXN10 for?
MXN10 背面のサービスポートは、Cambridge Audio 認定サービスセンターおよび販売店がサービス作業のみに使用することを目的としています。
The service port on the back of the MXN10 is intended for servicing use only by Cambridge Audio authorised service centres and dealers.
本体が損傷するおそれがあるため、サービスポートには機器を接続しないでください。
Please do not connect any devices to the service port, as this may result in damage to the unit.
MXN10 を動作させるには、両方のアンテナを接続する必要がありますか?Do I need to connect both Antennas for the MXN10 to work?
はい、MXN10 をワイヤレスでネットワークに接続する場合は、Wi-Fi 機能を十分に利用し、可能な限り強力な無線ネットワーク接続を得るため、付属のアンテナを 2 本とも接続する必要があります。
Yes, if you are connecting your MXN10 to your network wirelessly, you will need to connect both of the supplied antennas to enable full Wi-Fi functionality and the strongest possible wireless network connection.
Bluetooth 機能も、いずれか一方のアンテナを Bluetooth の記号が付いたポートに接続した場合にのみ使用できます。
Bluetooth functionality will also only be possible when one of the antennas is connected to the port with the Bluetooth symbol.