
取扱説明書
MXW70
はじめにIntroduction
最終更新日: 2025年5月16日 05:04。リビジョン #10022
Last updated: May 16, 2025 05:04. Revision #10022
本ガイドは、本製品の設置と使用をできるだけ簡単に行えるよう作成しています。本書の情報は印刷時点で正確性を慎重に確認しています。ただし、Cambridge Audio は継続的な改善を方針としており、デザインおよび仕様は予告なく変更される場合があります。
This guide is designed to make installing and using this product as easy as possible. Information in this document has been carefully checked for accuracy at the time of printing; however, Cambridge Audio’s policy is one of continuous improvement, therefore design and specifications are subject to change without prior notice.
本書は著作権で保護された独自情報を含みます。無断転載を禁じます。本マニュアルのいかなる部分も、製造元の事前の書面による許可なく、機械的・電子的その他の手段や形式で複製することを禁じます。すべての商標および登録商標は、それぞれの所有者に帰属します。
This document contains proprietary information protected by copyright. All rights reserved. No part of this manual may be reproduced by any mechanical, electronic or other means, in any form, without prior written permission of the manufacturer. All trademarks and registered trademarks are the property of their respective owners.
©Copyright Cambridge Audio Ltd 2025.
©Copyright Cambridge Audio Ltd 2025.
今後の製品、ソフトウェアアップデート、限定オファーに関する最新情報を受け取るには、https://www.cambridgeaudio.com/register で製品を登録してください。
For upcoming news on future products, software updates and exclusive offers, make sure you register your product at https://www.cambridgeaudio.com/register
このマニュアル内の画像の一部は、元の PDF から自動生成されたものです。自動処理の都合上、製品の細部や配線図などが実際と異なる場合があります。正確な形状・寸法・配線は、実機および製品ページの写真、同梱の正規マニュアル(英語版)をあわせてご確認ください。
MXW70 の付属品What’s included with the MXW70?
MXW70 の箱には以下が同梱されています:Inside the box of your MXW70 you will receive:
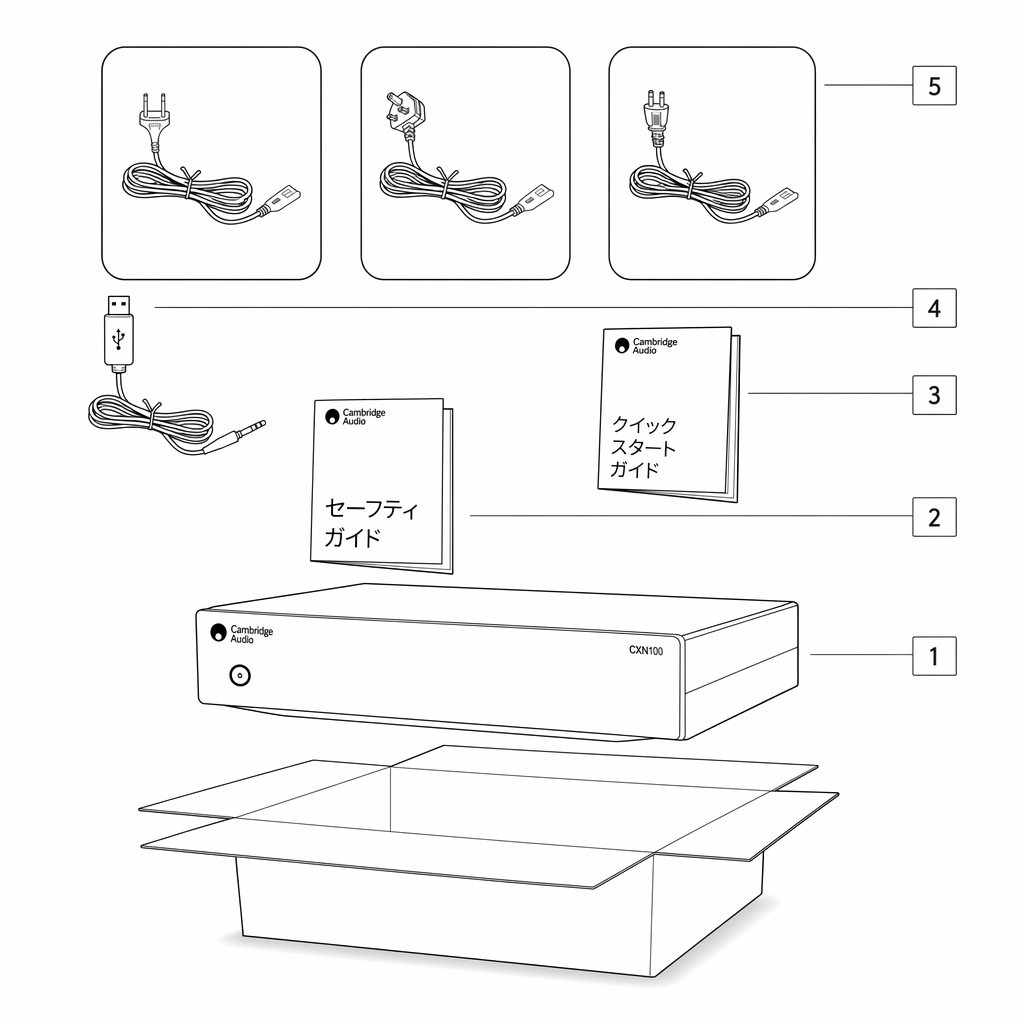
1. MXW70 パワーアンプ 2. クイックスタートガイド 3. 安全ガイド 4. トリガー入力ケーブル 5. UK 電源コード(MXW70 を購入した国による) EU 電源コード(MXW70 を購入した国による) CU 電源コード(MXW70 を購入した国による) JP 電源コード(MXW70 を購入した国による)
1. MXW70 Power Amplifier 2. Quick start guide 3. Safety guide 4. Trigger in Cable 5. UK power cord (Depending on which country the MXW70 was purchased in) EU power cord (Depending on which country the MXW70 was purchased in) CU power cord (Depending on which country the MXW70 was purchased in) JP power cord (Depending on which country the MXW70 was purchased in)
フロントパネルFront panel
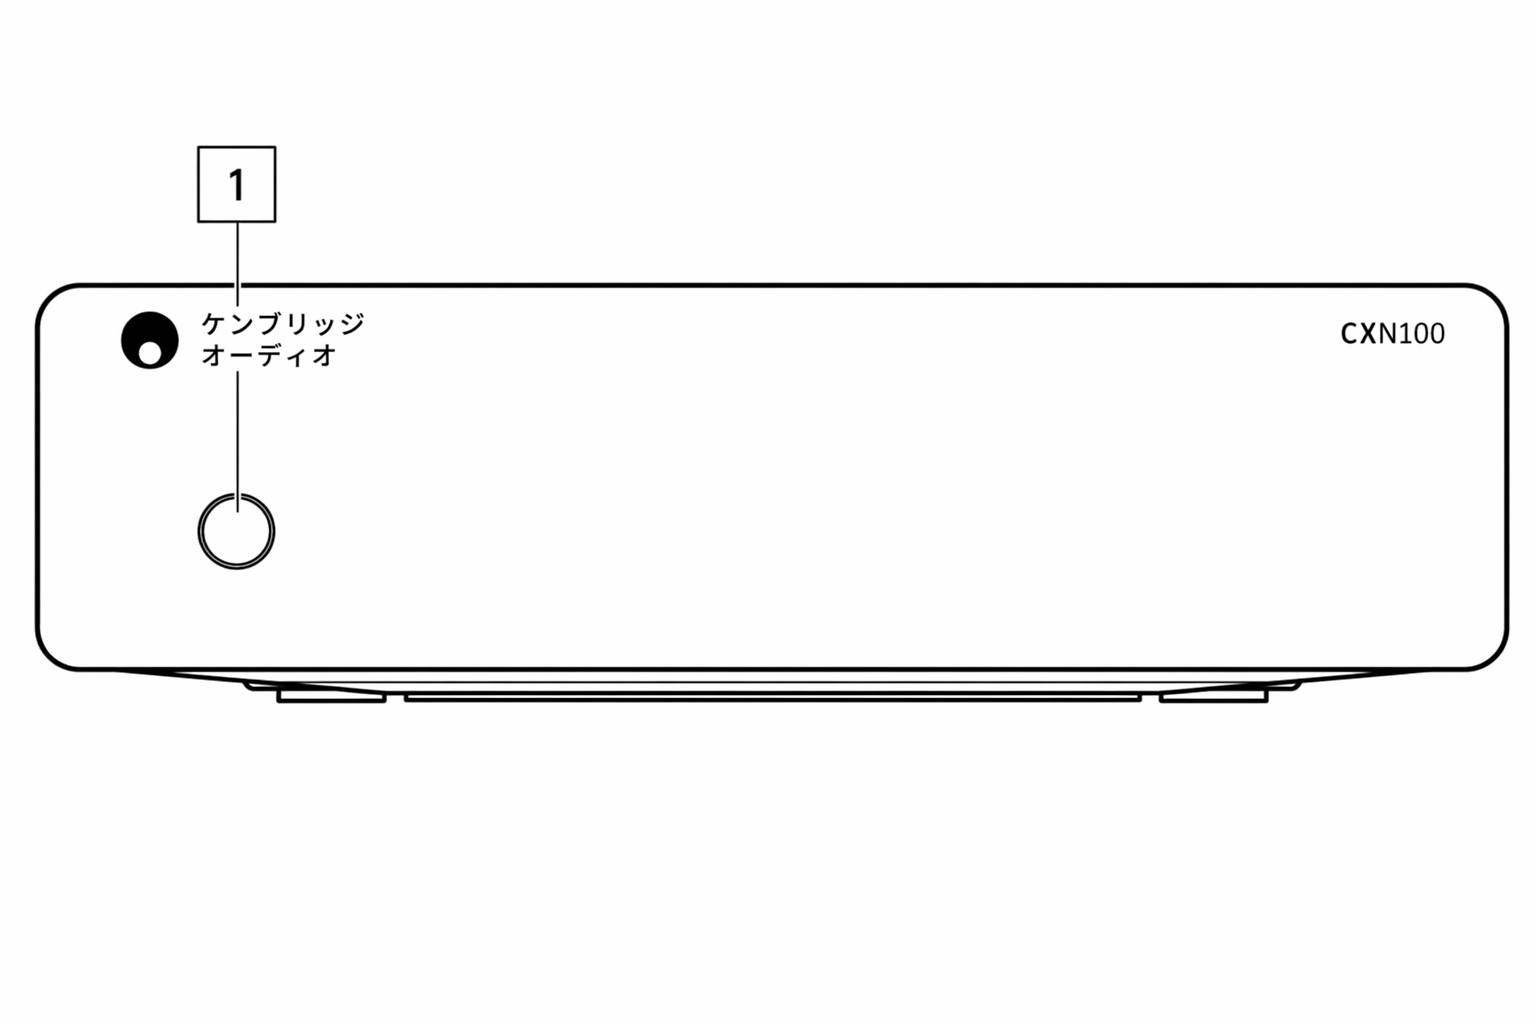
1. 電源ボタン 本機をスタンバイモード(電源 LED が暗く点灯)とオン(電源 LED が明るく点灯)の間で切り替えます。スタンバイモードは低消費電力モード(0.5 Watts)です。使用しないときは、本機をスタンバイモードのままにしてください。自動電源オフ(APD)
1. Power button Switches the unit between Standby Mode (indicated by dim power LED) and On (indicated by bright power LED). Standby Mode is a low power mode (0.5 Watts) – The unit should be left in Standby Mode when not in use. AUTO POWER DOWN (APD)
本製品は 20 分間操作がないと自動的にスタンバイモードへ切り替わります。この機能を有効または無効にする方法については、本マニュアルの「Auto Power Down (APD)」セクションを参照してください。
The product will automatically switch to standby mode after inactivity of 20 minutes. To enable or disable this function, Refer to the “Auto Power Down (APD)' section of this manual for more information.
リアパネルの接続Rear panel connections
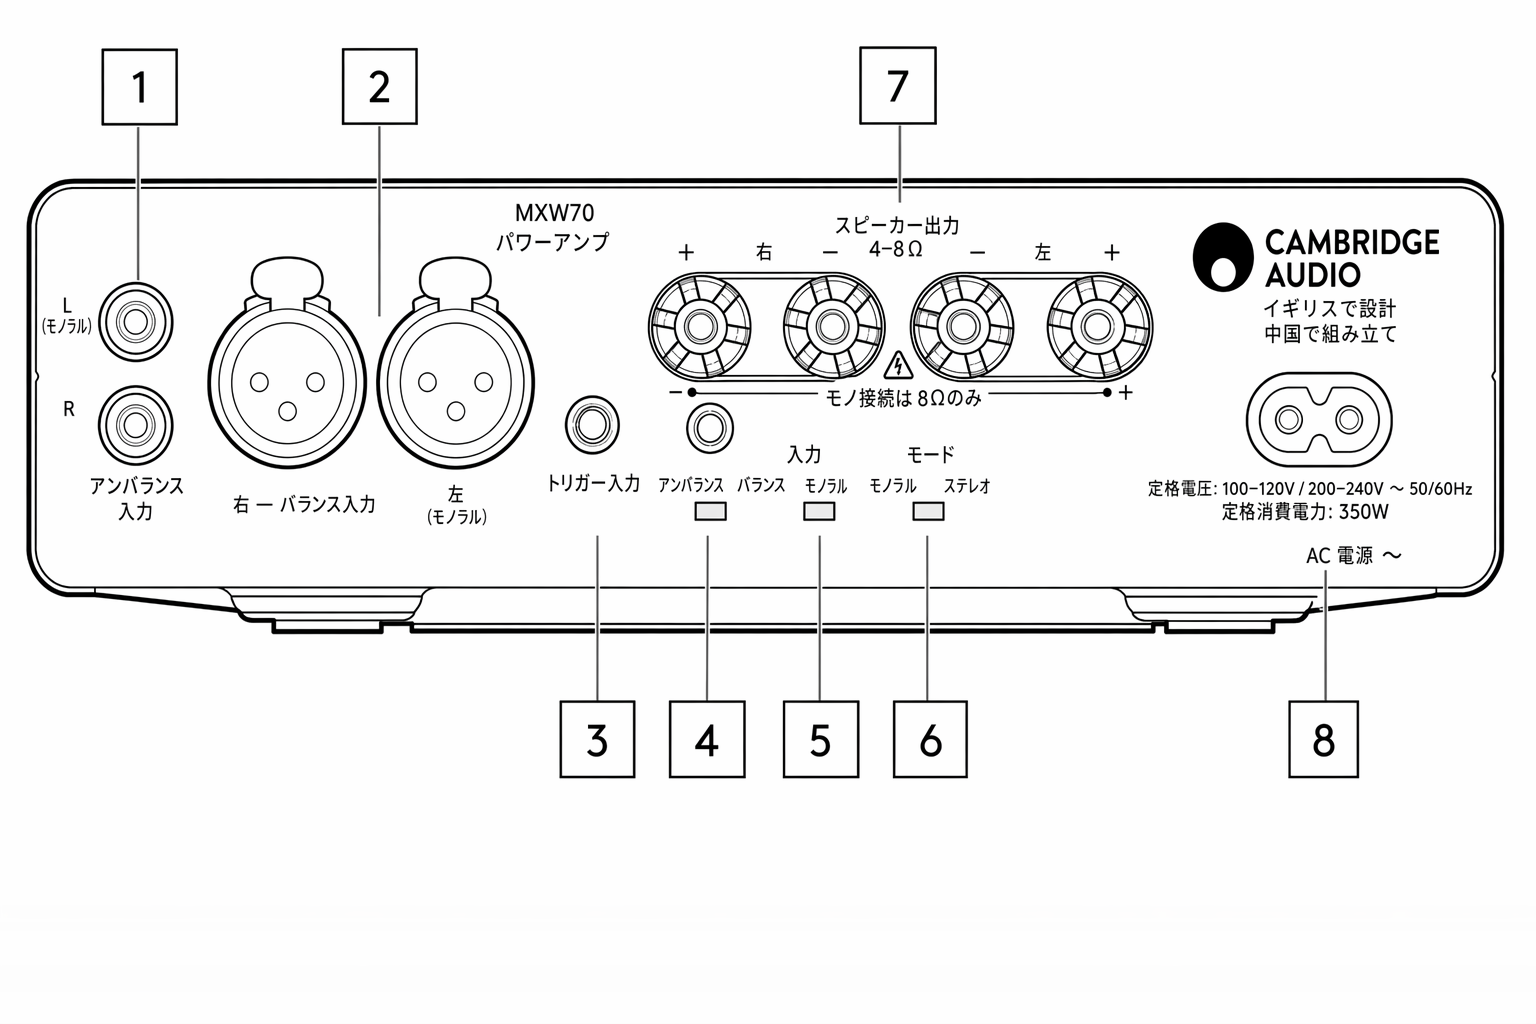
1. アンバランス入力。RCA 入力はアンバランスです。注: モノラルモードでは、左(モノラル)チャンネルのみを接続する必要があります。Mode スイッチは「Mono」モードに設定してください。詳しくは本マニュアルの「Mono connection」セクションを参照してください。
1. Unbalanced input. RCA input is unbalanced. Note: in mono mode, only the left (mono) channel needs to be connected, the Mode switch must be set to the “Mono” mode, Refer to the 'Mono connection' section of this manual for more information.
2. バランス入力 バランス XLR 接続に使用します。XLR 出力に対応する他の機器と使用する場合、ケーブル内のノイズや干渉を抑えられるため、長距離(>2m)の接続にはバランス接続を推奨します。注: Mono モードでは、左(モノラル)チャンネルのみを接続する必要があります。Mode スイッチは「Mono」モードに設定してください。
2. Balanced Input For use with balanced XLR connections. The balanced connection is recommended for long distances (>2m) as it helps reject noise and interference in the cable when used with other equipment that supports XLR out . Note: in Mono mode, only the left (mono) channel needs to be connected, the Mode switch must be set to the “Mono” mode.
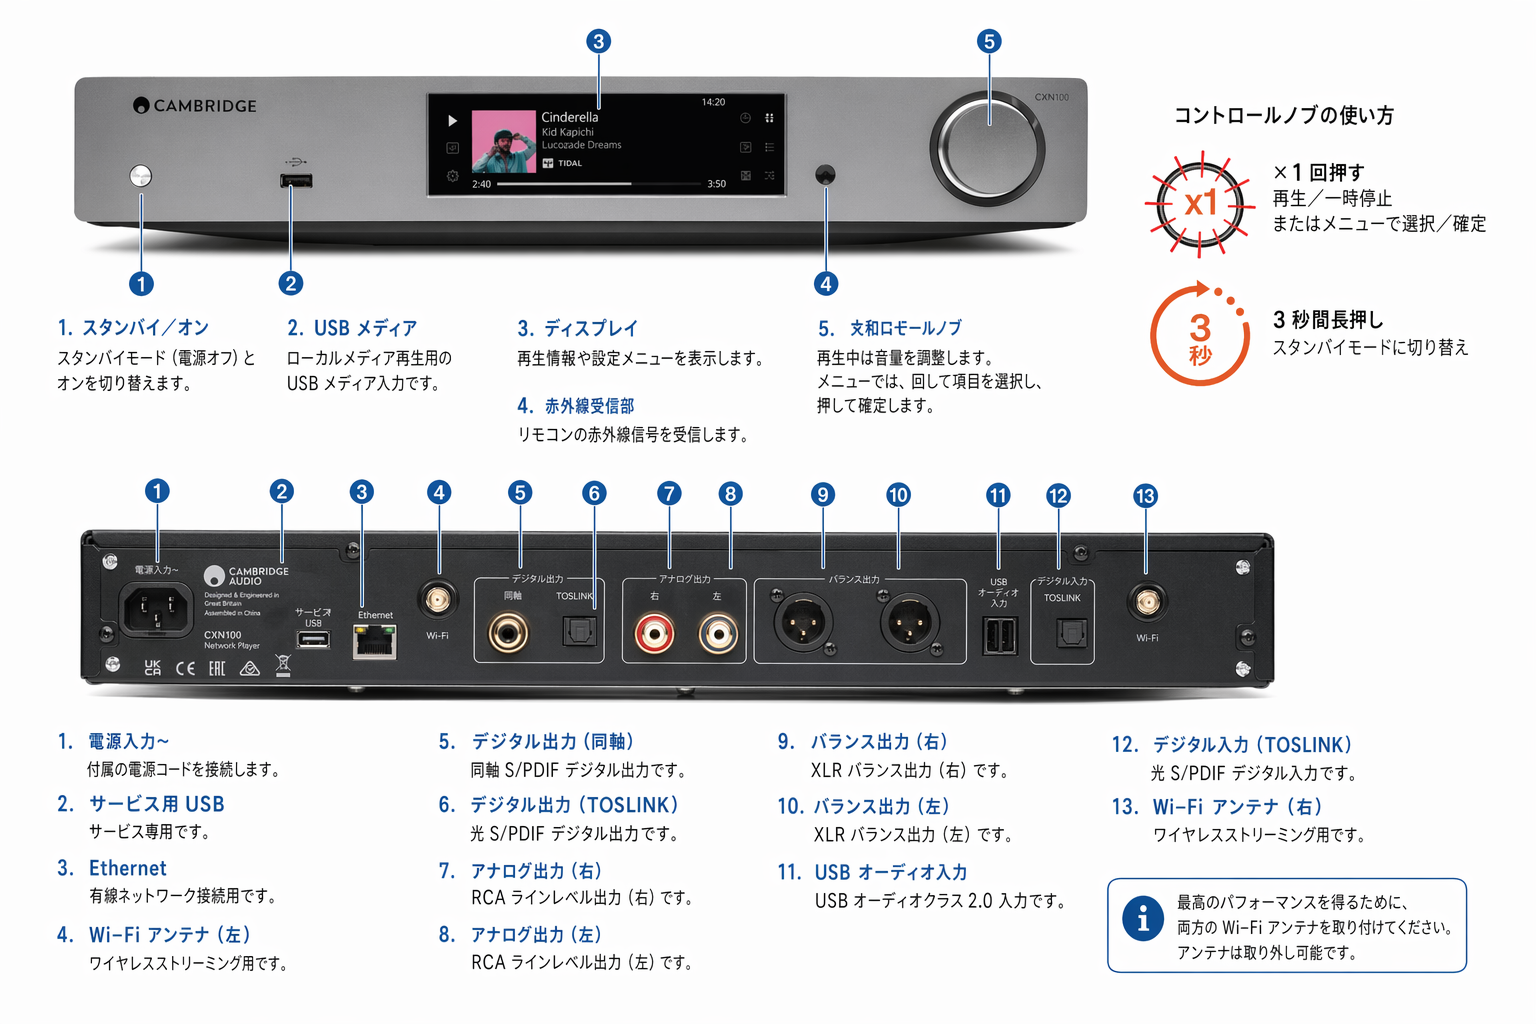
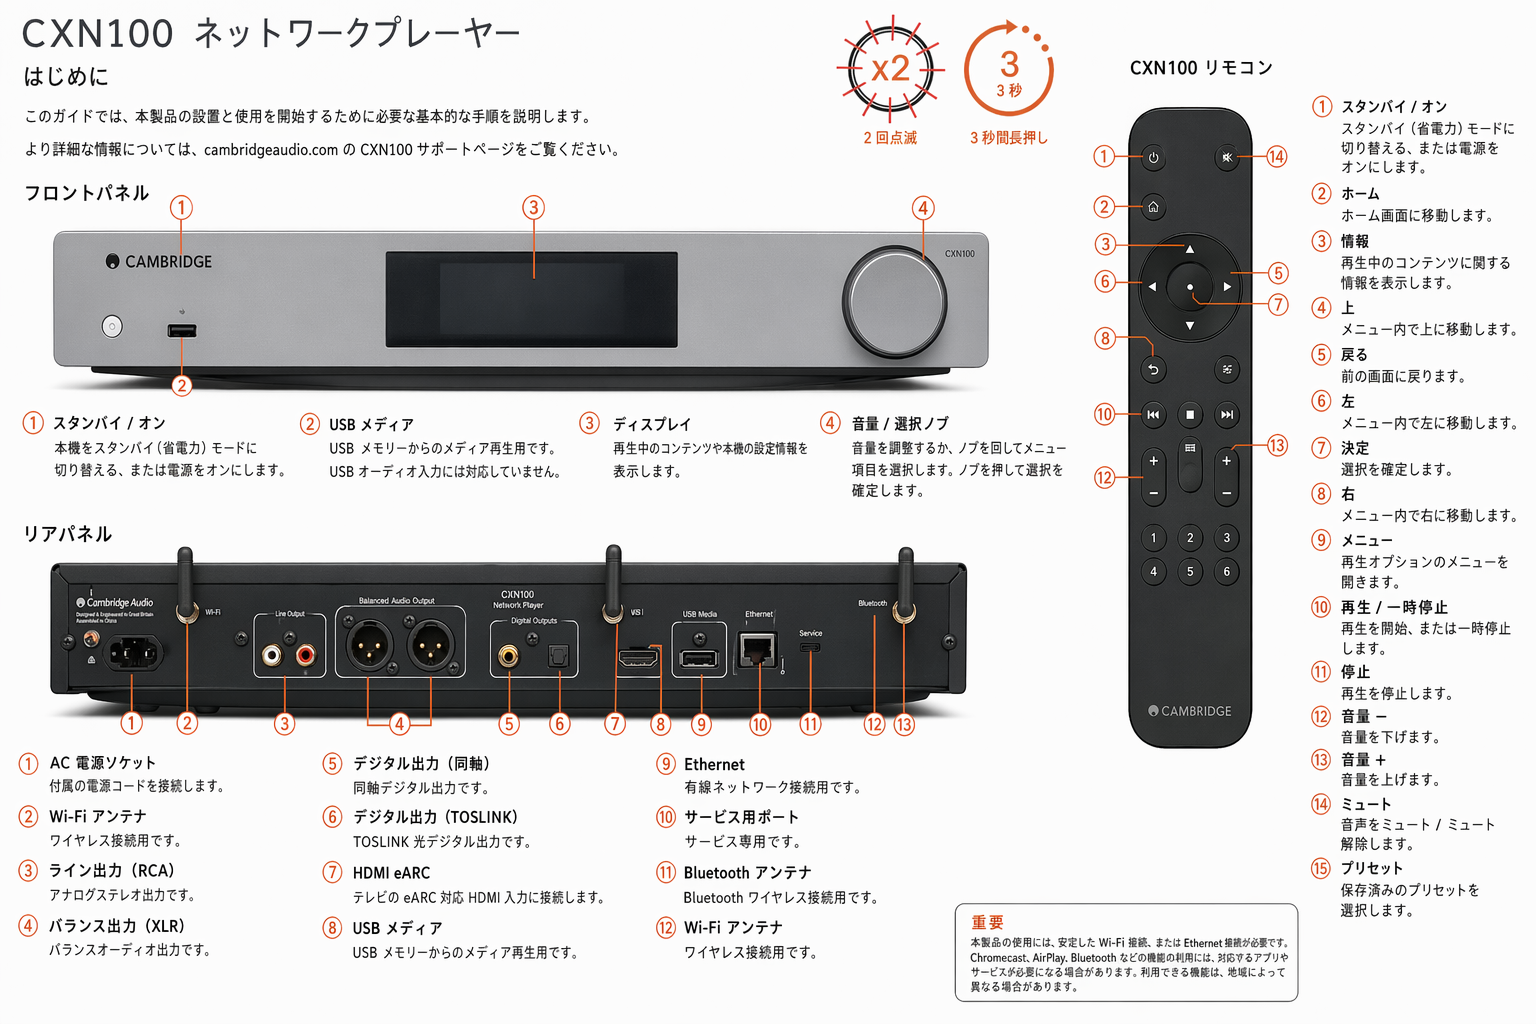
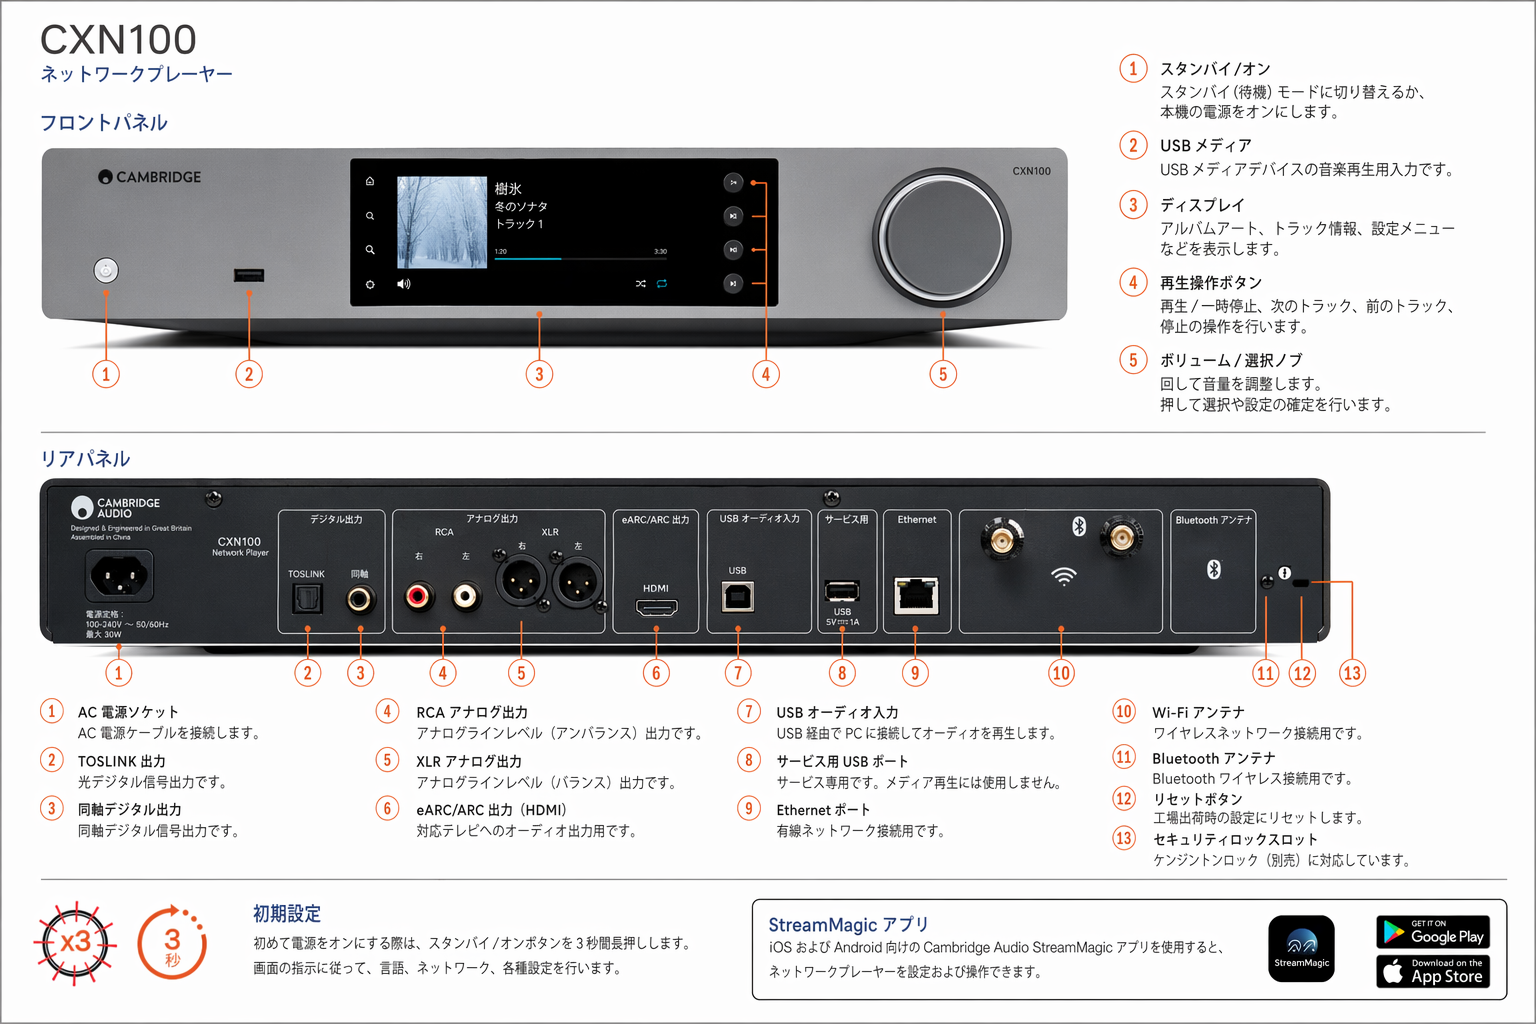
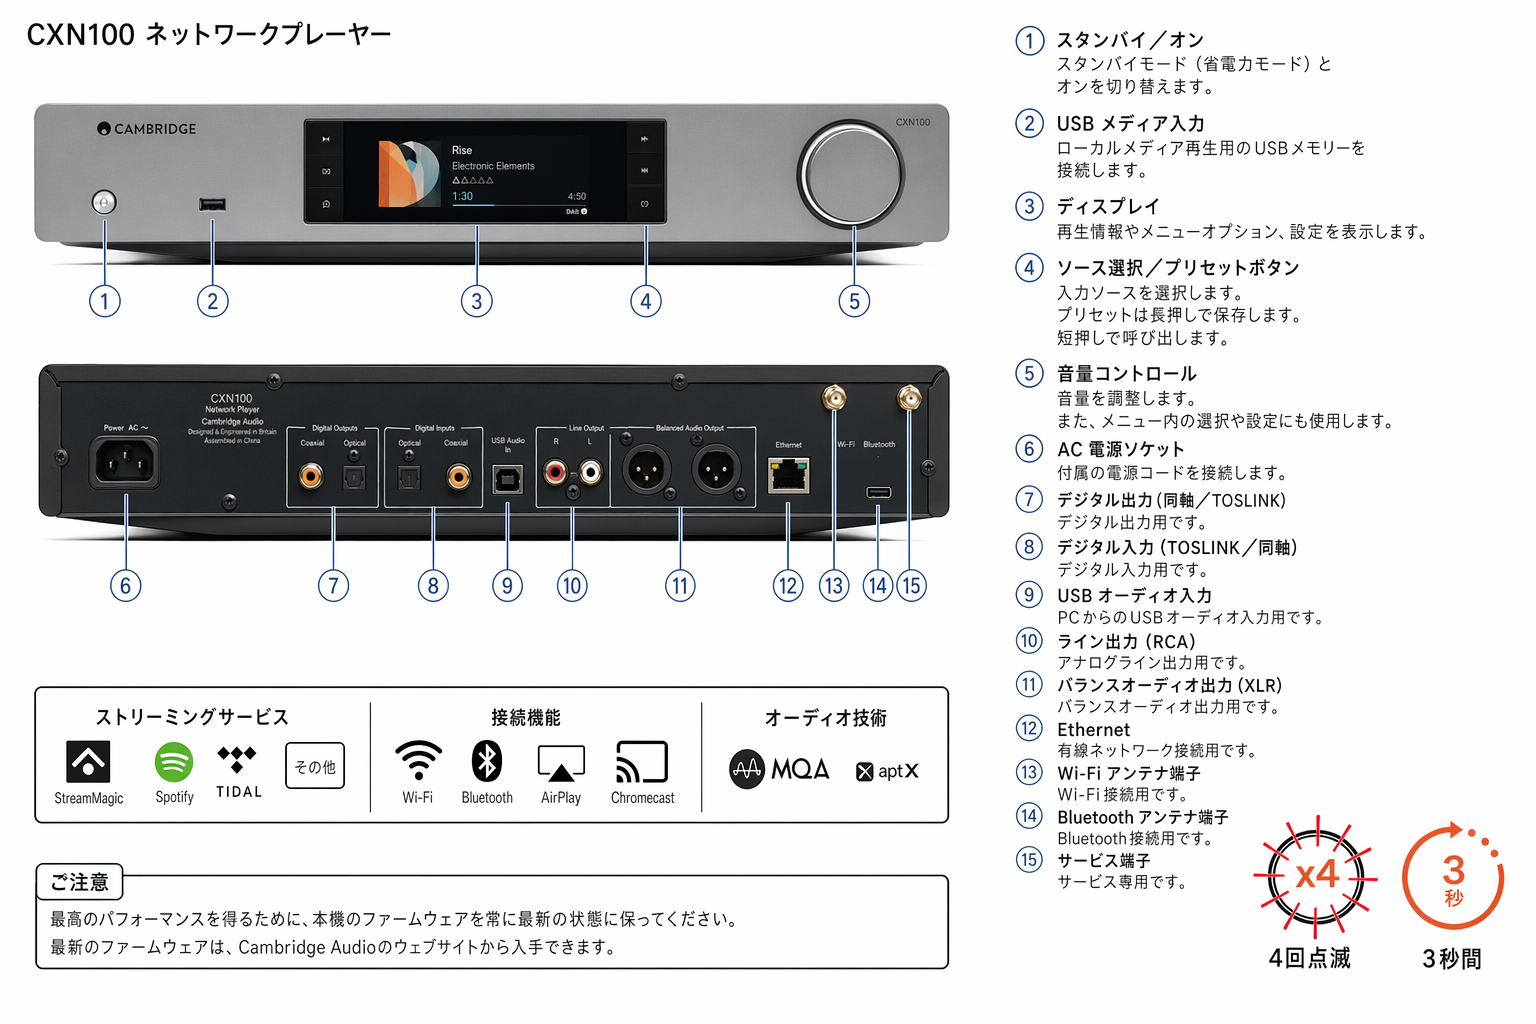
3. トリガー入力 MXW70 は、オーディオ機器またはホームオートメーション機器のトリガー制御出力に接続して、MXW70 の電源状態を制御できます。入力レベルは 12V である必要があります。
3. Trigger in The MXW70 can be connected to the trigger control output of audio or home automation equipment to control the power state of the MXW70. The input level should be 12V.
4. トリガーループ トリガーループは Trigger in からの 12V を伝達し、2 台目の MXW70 または別の機器の電源を入れるために使用できます。詳しくは本マニュアルの「Power syncing」セクションを参照してください。
4. Trigger loop The trigger loop will transfer the 12V from the Trigger in, this can be used to turn on a second MXW70 or another device. Refer to the 'Power syncing' section of this manual for more information.
5. アンバランス / バランス入力ソーススイッチ - ソースがバランス XLR 入力とアンバランス RCA 入力のどちらに接続されているかに応じて選択します。
5. Unbalanced/Balanced input source switch - Select depending on whether a source is connected to the balanced XLR or unbalanced RCA input.
注: 正しい入力を選択しないと、アンプから音が出ません。たとえば、ソースをバランス入力に接続している場合は、「Balanced」スイッチが選択されていることを確認してください。
Note: There will be no sound from the amp if the correct input isn’t selected. If a source is connected to the balanced input, for example, ensure that the balanced switch has been selected.
6. スピーカー出力 Mode スイッチ(Mono/Stereo)Mode スイッチで Mono モードと Stereo モードを切り替えます。
6. Speaker-output Mode switch (Mono/Stereo) the Mode switch toggles the Mono or Stereo mode.
7. スピーカー端子 注: バナナプラグを使用する場合は、プラグを差し込む前にスピーカー端子を完全に締め込んでください。
7. SPEAKER TERMINALS Note: When using a banana plug, make sure the speaker terminals are completely tightened before inserting the plug.
ステレオモードの場合
In Stereo mode
左チャンネルのスピーカーのケーブルを左側のプラス端子とマイナス端子に、右チャンネルのスピーカーのケーブルを右側のプラス端子とマイナス端子に接続します。赤い端子がプラス出力、黒い端子がマイナス出力です。
Connect the wires from your left channel loudspeaker to the left positive and negative terminals and the wires from the right channel loudspeaker to the right positive and negative terminals. The red terminal is the positive output and the black terminal is the negative output.
はみ出したケーブルの素線がスピーカー出力同士を短絡させないよう注意してください。確実な電気接続を確保するため、スピーカー端子は完全に締め込んでください。ネジ端子が緩んでいると音質に影響する場合があります。
Care should be taken to ensure no stray strands of wire short the speaker outputs together. Please ensure that the loudspeaker terminals have been tightened completely to provide a good electrical connection. It is possible for the sound quality to be affected if the screw terminals are loose.
モノラルモードの場合
In Mono mode
注: 「Left」の赤い端子がプラス出力、「Right」の赤い端子がマイナス出力です。
NOTE: the red terminal of the “Left” is the positive output, the red terminal of the “Right” is the negative output.
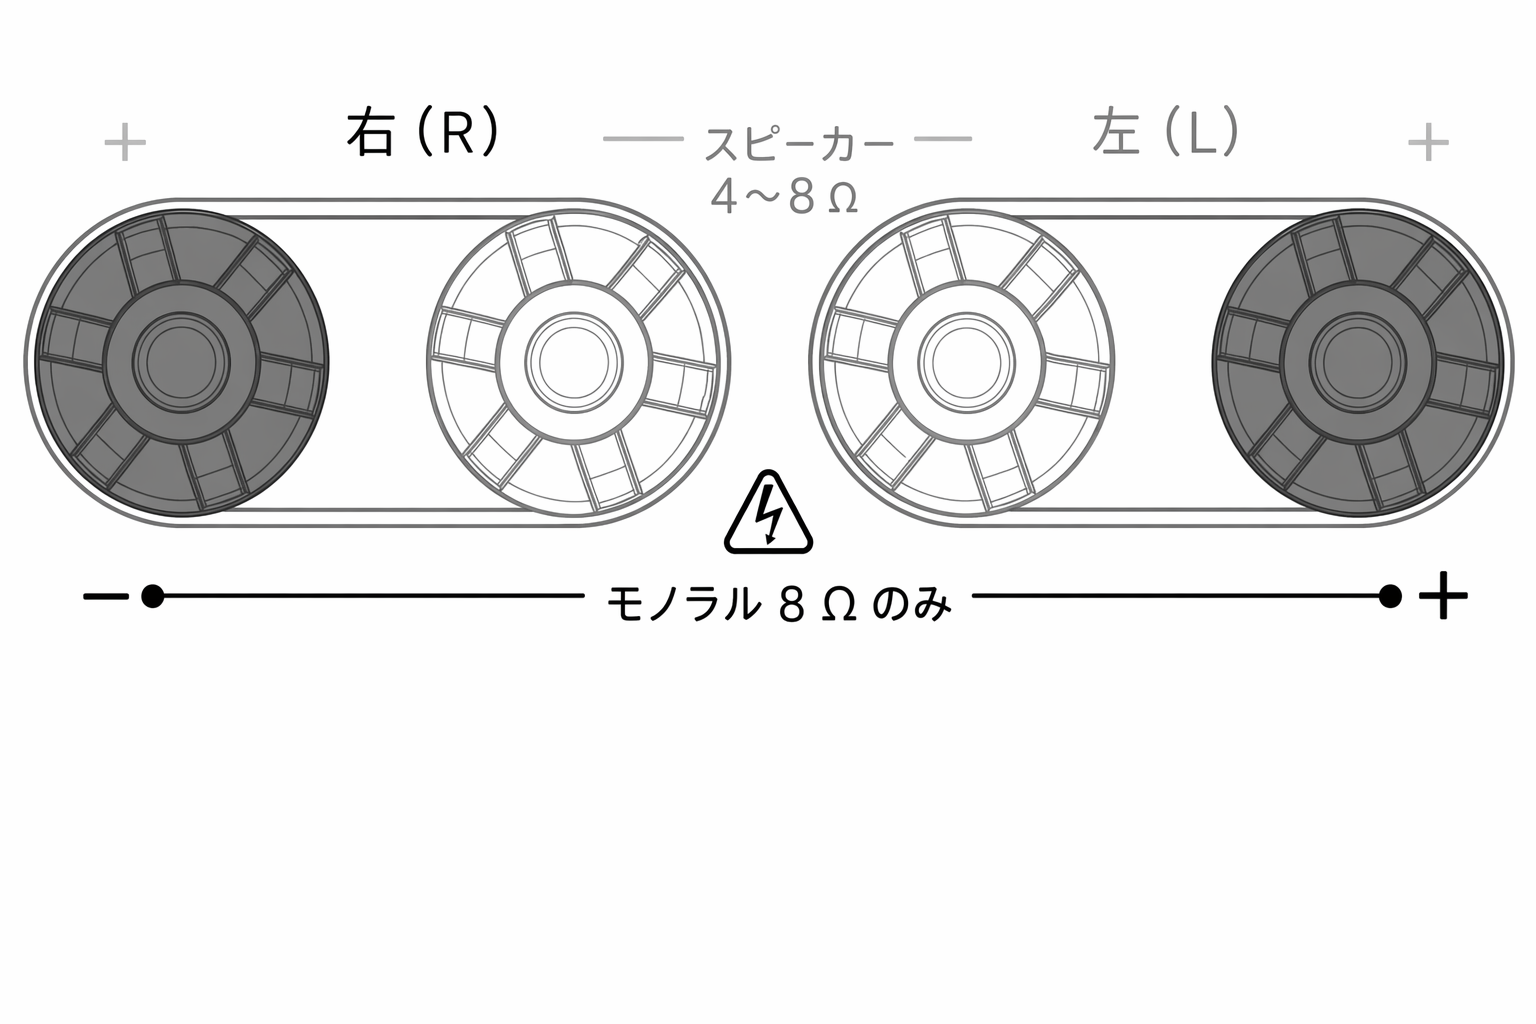
8. AC 電源ソケット アンプへのすべての接続が完了したら、AC 電源ケーブルを適切な電源コンセントに差し込み、電源を入れてください。これでアンプを使用できます。
8. AC POWER SOCKET Once you have completed all connections to the amplifier, plug the AC power cable into an appropriate mains socket then switch on. Your amplifier is now ready for use.
接続方法Getting connected
スピーカー
LOUDSPEAKERS
お使いのスピーカーのインピーダンスを確認してください。ステレオモードでは、インピーダンスが 4~8 Ohms のタイプを使用できます。モノラルモードでは 8ohm のスピーカーのみ対応しています。
Check the impedance of your speakers. You can use types with an impedance of between 4 and 8 Ohms in stereo mode. Only 8ohm loudspeaker is supported in mono mode.
赤色のスピーカー端子がプラス(+)、黒色のスピーカー端子がマイナス(-)です。各スピーカーコネクターで正しい極性が維持されていることを確認してください。そうしないと、音が弱くなり、低音の少ない「位相のずれた」音になることがあります。
The red coloured speaker terminals are positive (+) and the black speaker terminals are negative (-). Make sure the correct polarity is maintained at each speaker connector or the sound can become weak and “phasey” with little bass.
注: Mono モードでは、「Left」の赤い端子がプラス出力、「Right」の赤い端子がマイナス出力です。詳しくは本マニュアルの「Mono connection」セクションを参照してください。
Note: in the Mono mode, the red terminal of the “Left” is the positive output, the red terminal of the “Right” is the negative output.. refer to the 'Mono connection' section of this manual for more information.
裸線での接続
USING BARE WIRE CONNECTIONS
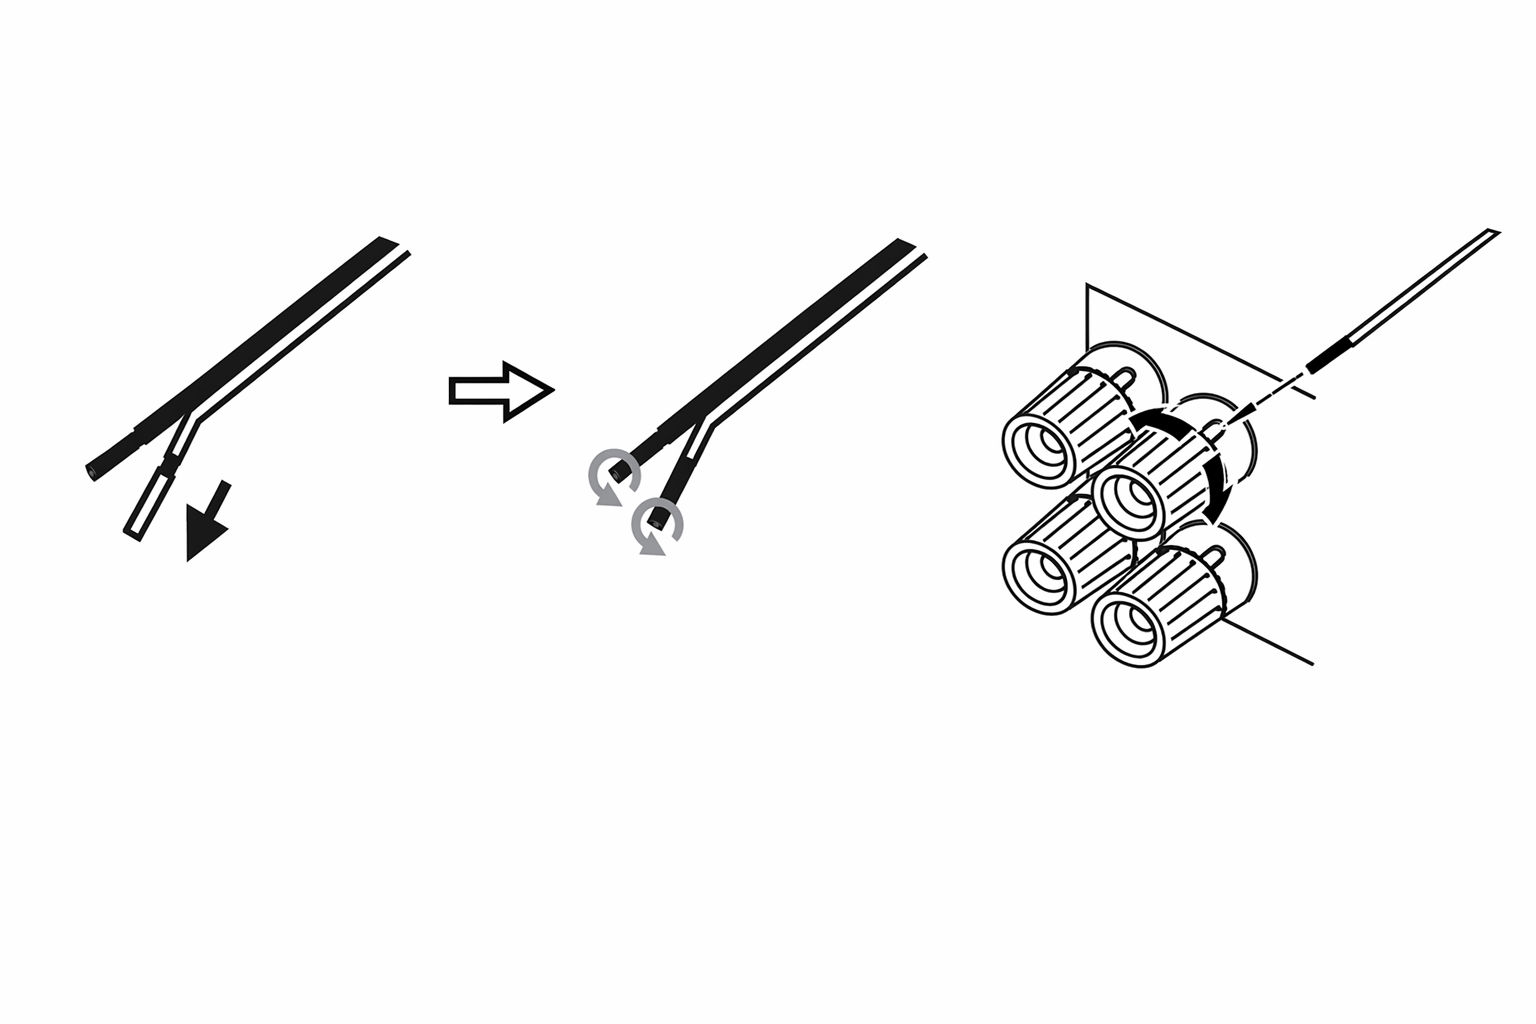
スピーカーコードの外側の被覆を約 10mm(3/8”)以下剥いて、接続用に準備します。10mm を超えると短絡するおそれがあります。素線がばらけないよう、ワイヤーをしっかり撚り合わせてください。スピーカー端子を緩め、スピーカーケーブルを差し込み、端子を締めてケーブルを固定します。
Prepare the speaker cords for connection by stripping off approximately 10mm (3/8”) or less of the outer insulation. More than 10mm could cause a short circuit. Twist the wires tightly together so there are no loose ends. Unscrew the speaker terminal, insert the speaker cable, tighten the terminal and secure the cable.
注: すべての接続には標準のスピーカーケーブルを使用します。
Note: All connections are made using standard loudspeaker cable.
バナナプラグでの接続
USING BANANA PLUGS
当社の製品では、確実な接続を確立し、不要なノイズや干渉の原因となるワイヤーの素線のはみ出しがないようにするため、バナナプラグの使用を推奨します。
We recommend using Banana plugs with our units to establish a secure connection and ensure there are no loose strands of wire that may cause unwanted noise or interference.
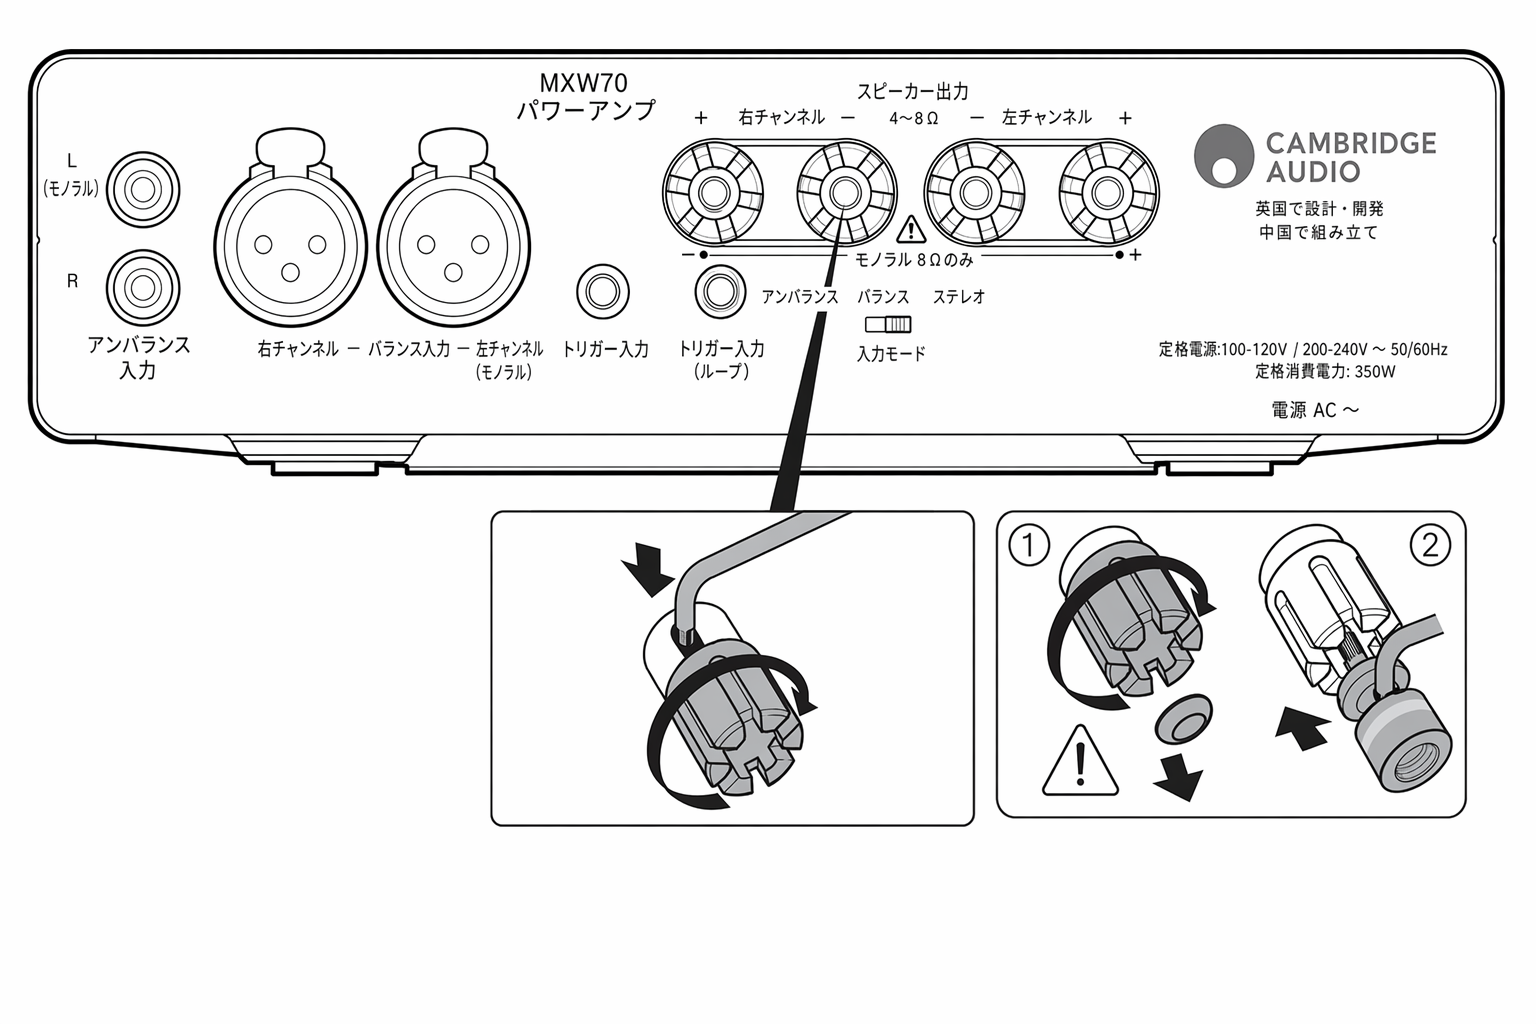
ケーブルの外側の被覆を剥き、下図のようにワイヤーを撚り合わせたら、バナナプラグに確実に接続し、過度な力を加えずにプラグを可能な限り奥まで押し込んでください。
Once you have stripped the outer insulation of the cable and twisted the wires as indicated below, securely connect these to your banana plugs and push the plug in as far as possible without applying excessive force.
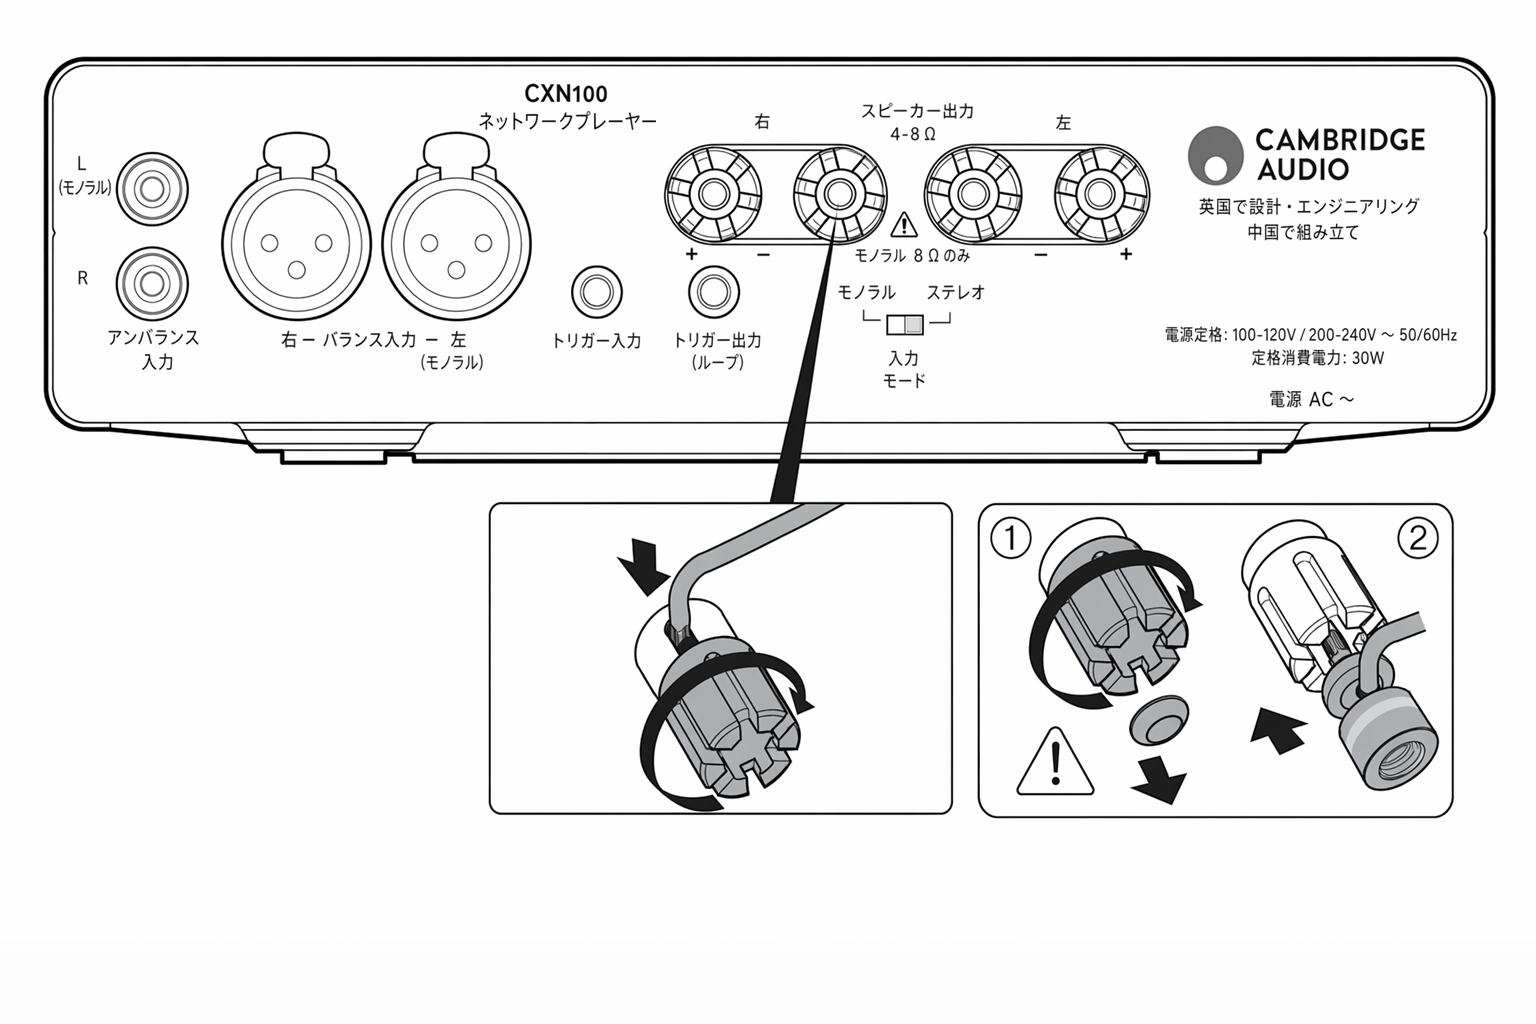
注: バナナプラグを使用する場合は、スピーカー端子を完全に締め込んでから端子の「pip」を外し、その後バナナプラグを差し込んでください。
Note: When using a banana plug, make sure the speaker terminals are completely tightened before removing the "pip" from them, and then insert the banana plugs
ステレオ接続
STEREO CONNECTIONS
アナログ入力は、プリアンプまたはインテグレーテッドアンプの Pre-Outs に接続します。下図はプリアンプからの基本的な接続を示しています。
The analogue inputs are to be connected to the Pre-Outs of a Preamplifier or Integrated amp. The diagrams below show the basic connection from a Preamplifier.
アンバランス入力
Unbalanced input
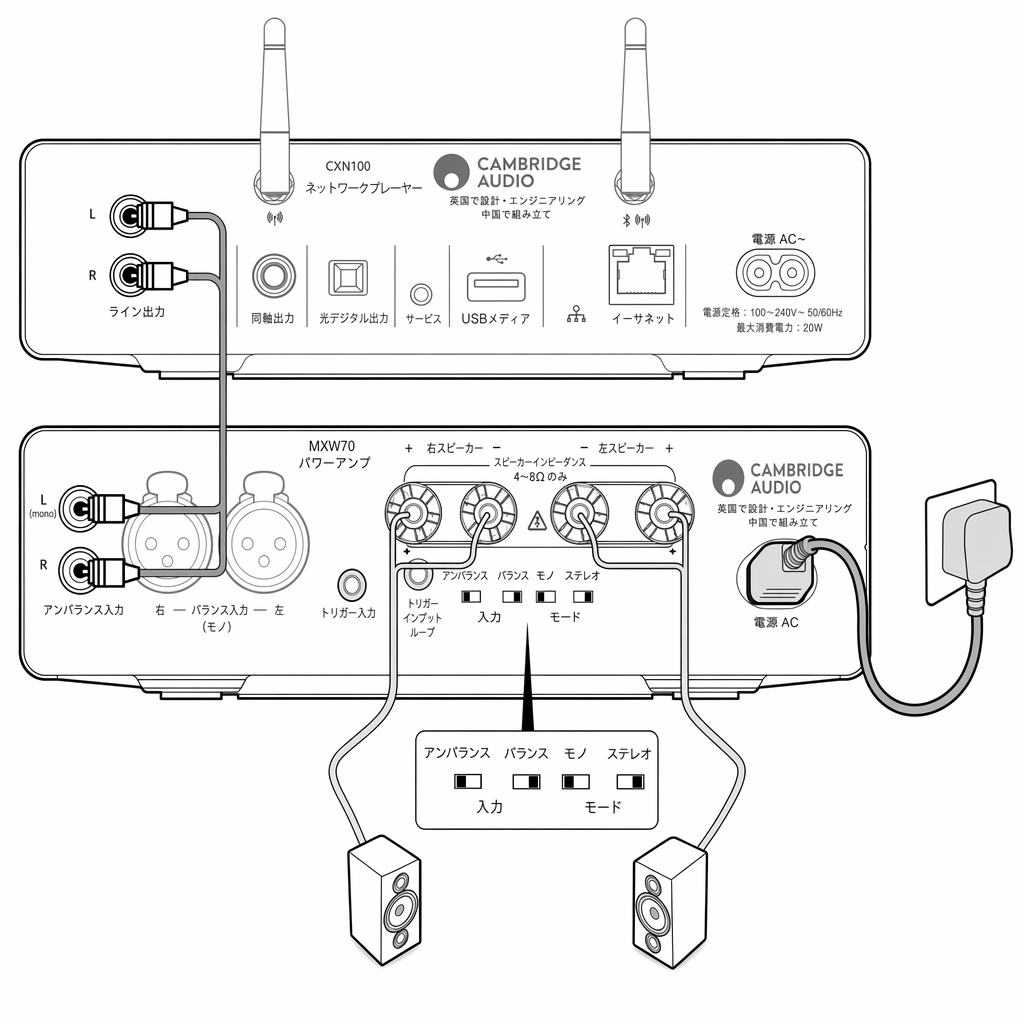
RCA ケーブルを使用すると、MXW70 へのアンバランスのアナログ接続が可能になります。RCA ケーブルを使用する場合は、MXW70 の「Unbalanced」スイッチが選択されていることを確認してください。
Using RCA cables will enable an unbalanced analogue connection to your MXW70. If using RCA cables, ensure the ‘Unbalanced’ switch on your MXW70 is selected.
バランス入力
Balanced input
XLR ケーブルを使用すると、MXW70 へのバランスのアナログ接続が可能になります。特にケーブルが長い場合、RCA のアンバランス接続と比べてよりクリーンな信号経路が得られます。ただし、短いケーブル長で使用した場合に得られる音質向上の度合いは主観的です。
Using XLR cables will enable a balanced analogue connection to your MXW70. This will provide a cleaner signal path compared to an RCA unbalanced connection, especially over longer cable lengths, however the increase in audio quality they provide is subjective when used over shorter lengths.
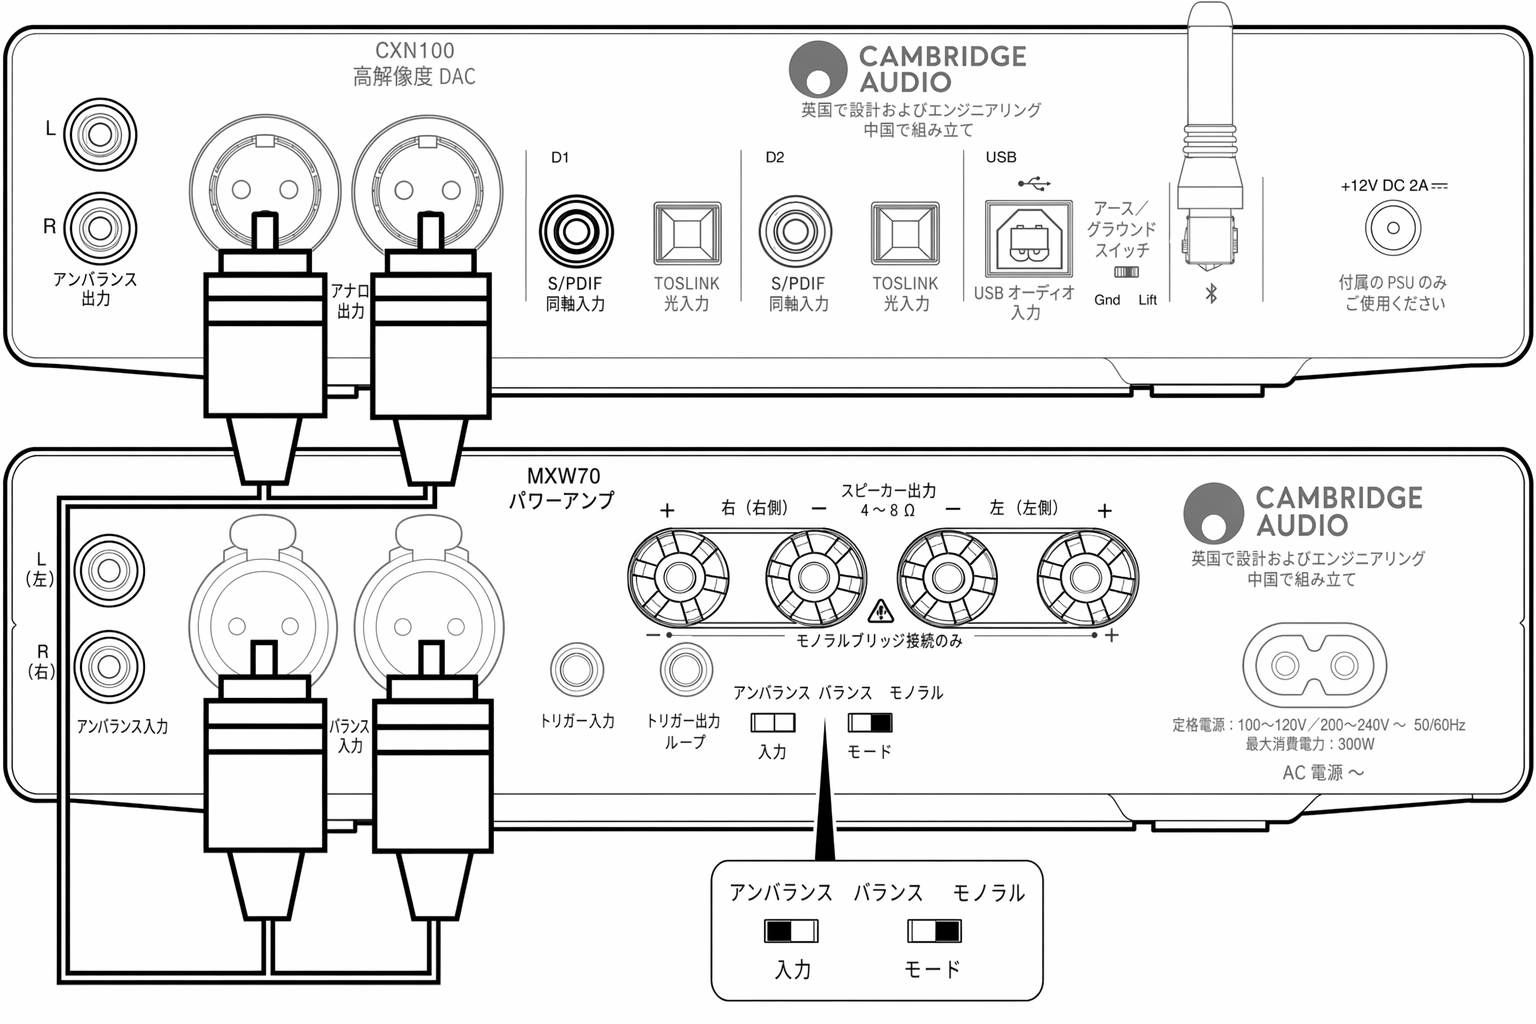
XLR ケーブルを使用する場合は、MXW70 の「Balanced」スイッチが選択されていることを確認してください。
If using XLR cables, ensure the ‘Balanced’ switch on your MXW70 is selected.
電源連動Power syncing
トリガー入力
TRIGGER IN
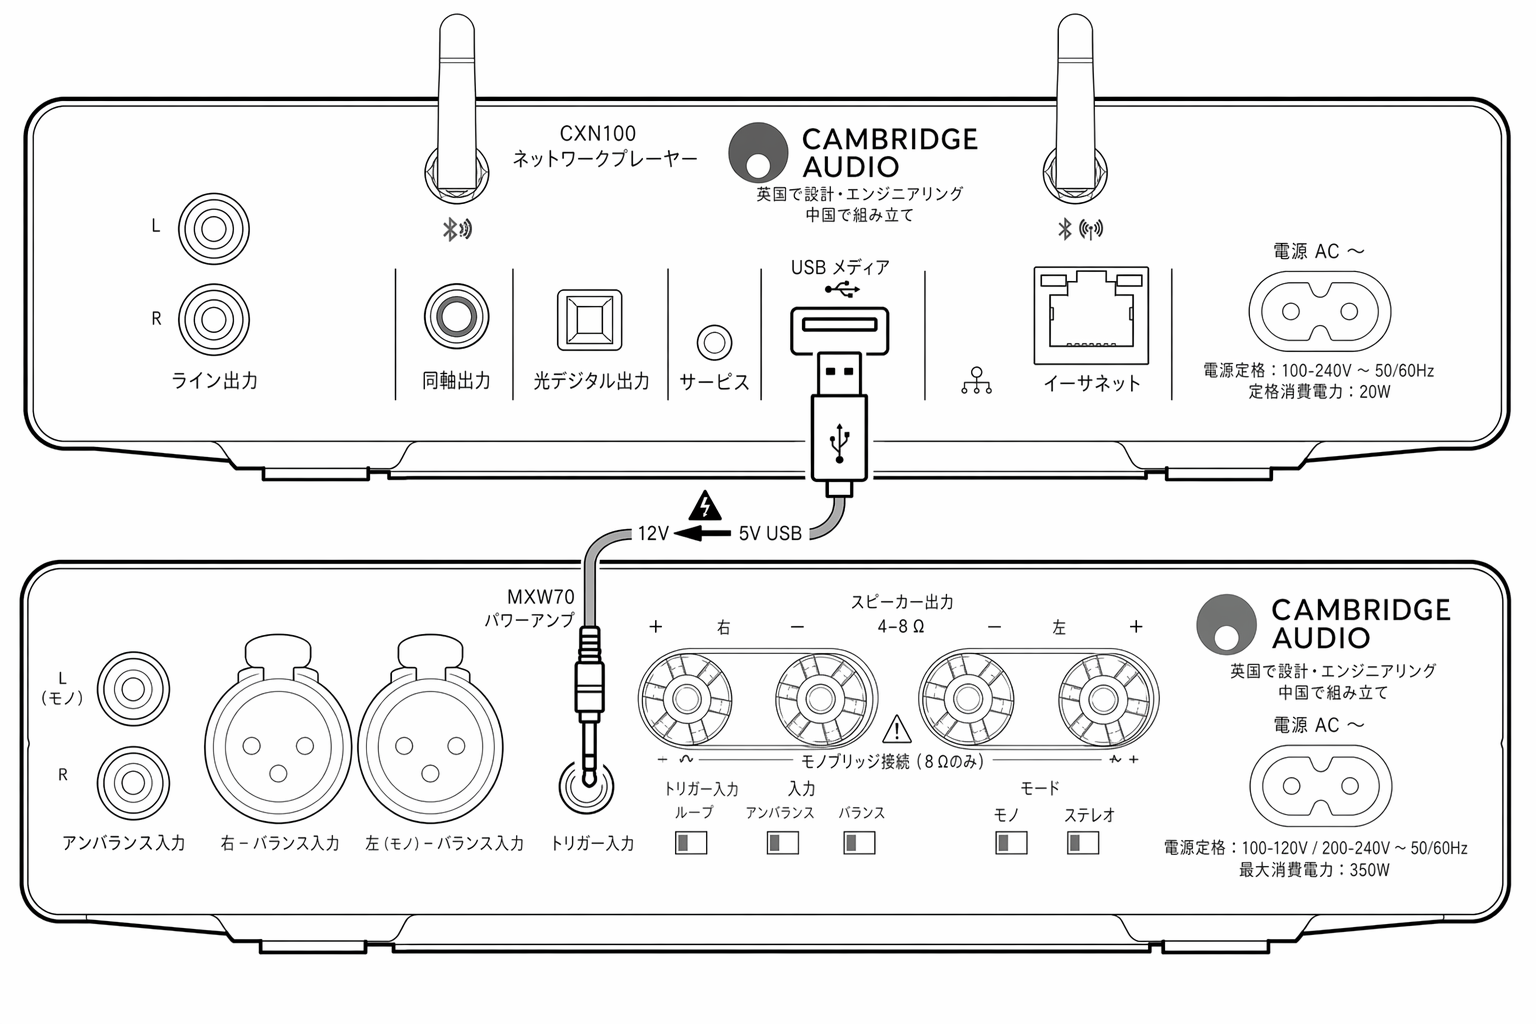
MXW70 には、任意のオーディオ製品の USB A ポートに接続するトリガー入力ケーブルが付属しており、MXW70 の電源オン/スタンバイを同期できます。製品の電源をオン/オフすると、MXW70 も電源オン/オフになります。下図は、MXN10 と MXW70 の間でトリガー入力ケーブルを使用する方法を示しています。
The MXW70 is supplied with a Trigger in cable that connects to any audio product’s USB A port, allowing MXW70 to synchronize power on/standby. When you turn your product On/Off, the MXW70 will also power on/off. The diagram below shows how to use Trigger in cable between the MXN10 and MXW70.
トリガー入力ループ
TRIGGER IN LOOP
トリガーループはトリガー入力からの 12V を通過させるため、2 台目の MXW をオンにするために使用できます。この目的には、標準の 3.5mm ジャックケーブル(モノラルまたはステレオ)を使用できます。
The trigger loop will pass the 12V from the Trigger in, so this can be used to turn on the second MXW. A standard 3.5mm jack cable (mono or stereo) can be used for the purpose.
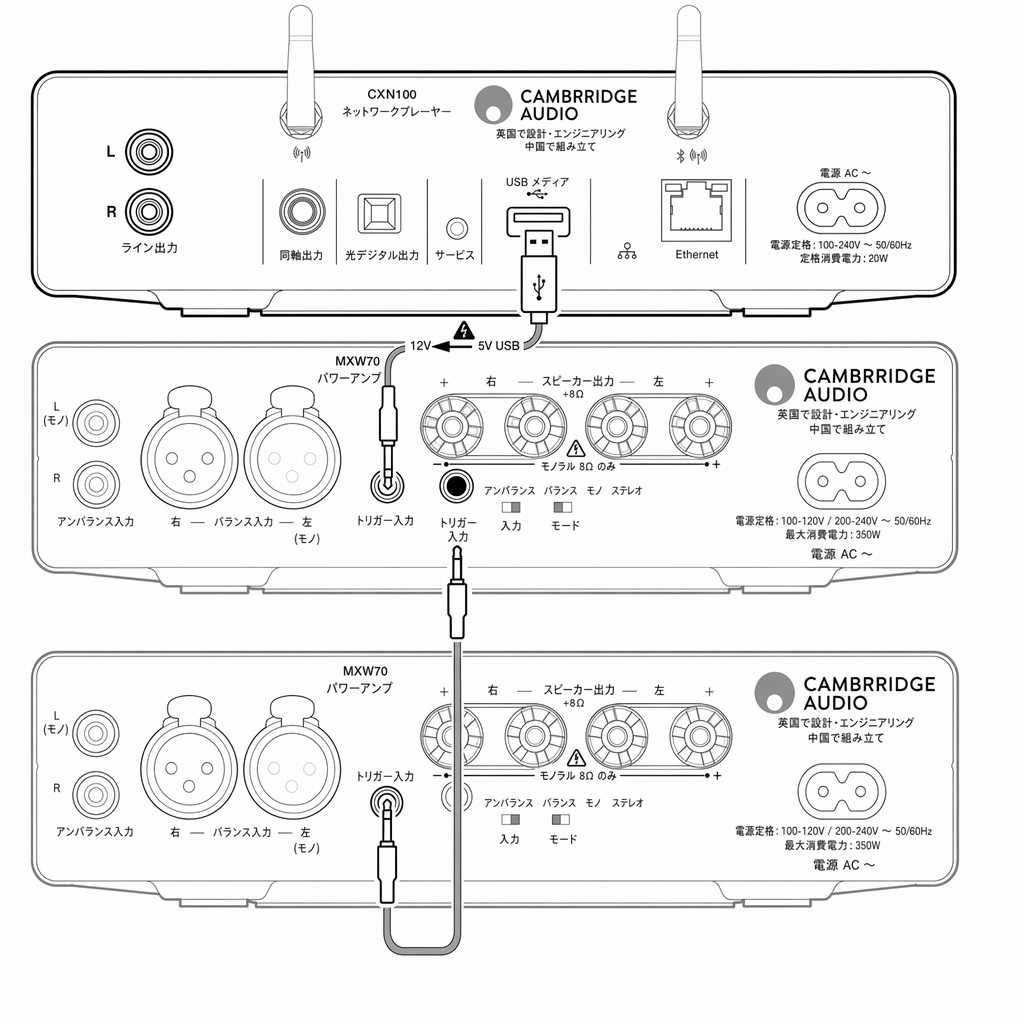
注: Trigger In Loop は Trigger Out 接続とは異なります。MXW70 は Trigger In Loop で 12V を生成しません。Trigger In Loop を使用するには、Trigger In に接続された外部ソースが必要です。
NOTE: Trigger In Loop is different from a Trigger Out connection. MXW70 does not generate 12V on Trigger In Loop. An external source connected to Trigger In is required to use Trigger In Loop

トリガー入力ケーブルについては、他のポートへの接続を避けてください。接続すると本機が損傷する可能性があります。
For the trigger in cable, avoid connecting to any other ports, as it can damage the unit.
モノラル接続Mono connection
モノラルモードでは、1 台のパワーアンプで左スピーカーを、別のパワーアンプで右スピーカーを駆動できます。
Mono mode allows you to drive the left speaker by one power amplifier and the right speaker by another power amplifier.

パワーアンプは、pre-amp(variable output)モードの製品で制御する必要があります。そうしないと、最大音量で出力され、スピーカーを損傷するおそれがあります。
Power Amplifiers must be controlled by a product in pre-amp (variable output) mode. Otherwise you risk maximum volume output which may damage your speakers.
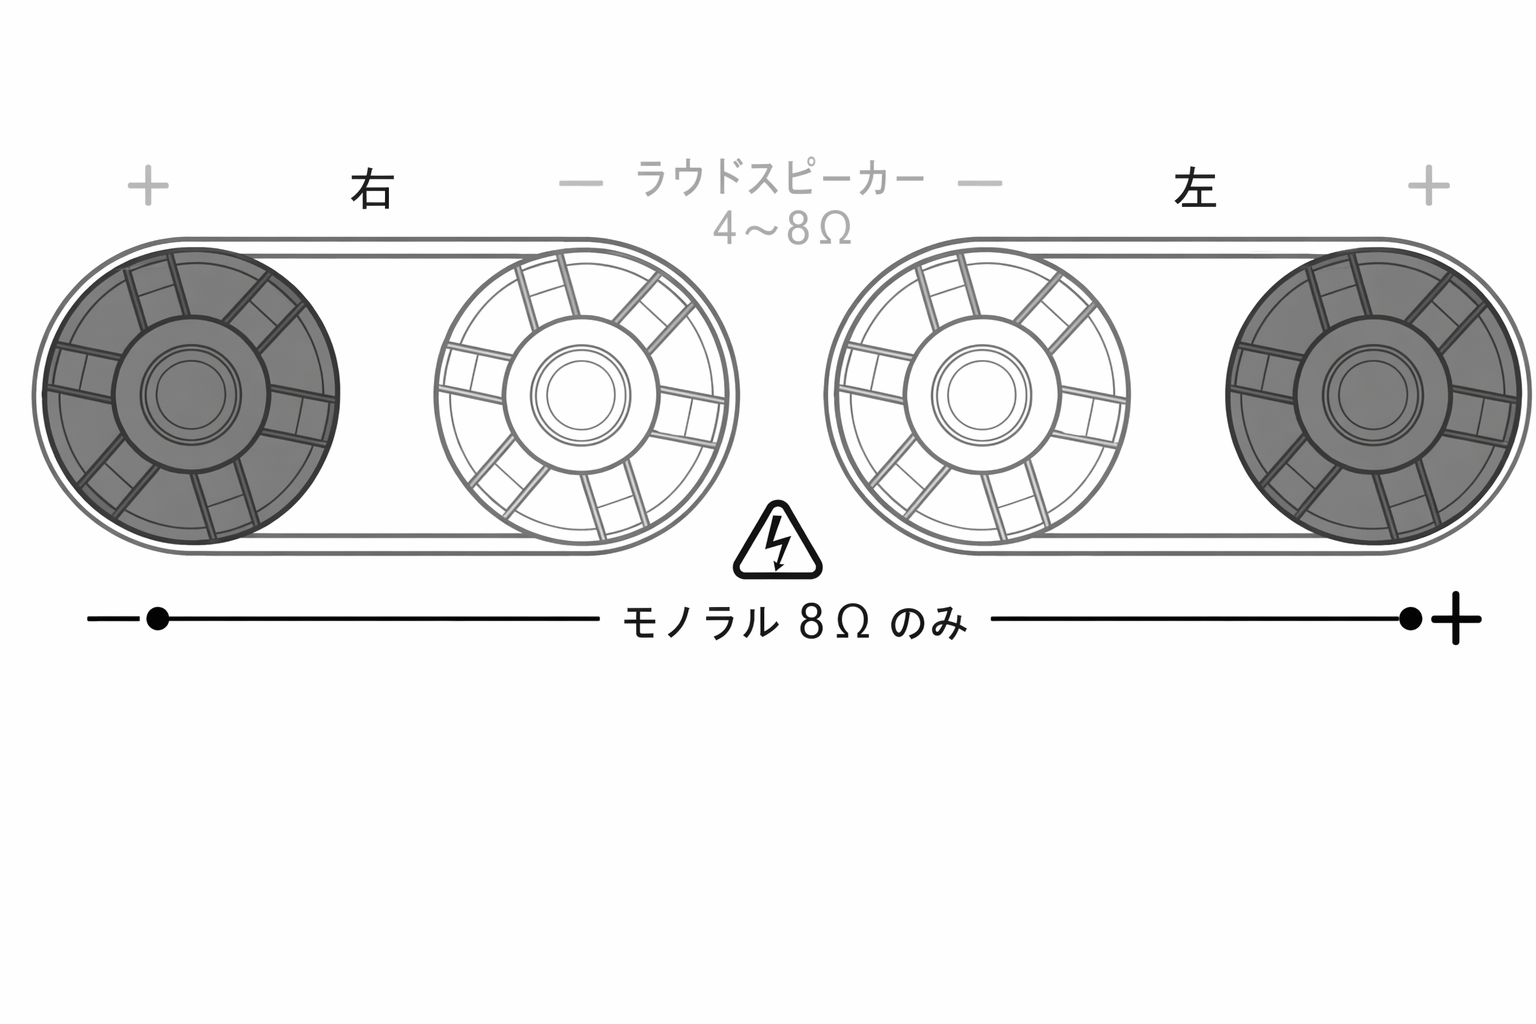
モノラルモードでのアンバランス接続 1. 下図は、MXN10 にアンバランス接続した 2 台の MXW70 を駆動する方法を示しています。2. Mono モードでは 8ohm のみ対応し、「Right」の赤い端子がマイナス出力になります。3. 音量が同期して上昇/下降するよう、StreamMagic アプリで Pre-Amp モードをオンにしてください。4. Mode スイッチを Mono モードに設定し、「Unbalanced」スイッチが選択されていることを確認してください。
Unbalanced connection in mono mode 1.The diagram below shows how to drive a pair of MXW70's connected to a MXN10 using an unbalanced connection. 2. In the Mono mode, only 8ohm is supported and the red terminal of the “Right” is the negative output. 3. Turn on the Pre-Amp mode in the StreamMagic app, to ensure the volume increases/decreases in sync. 4. Set the Mode switch in Mono mode and ensure that the unbalanced switch has been selected.
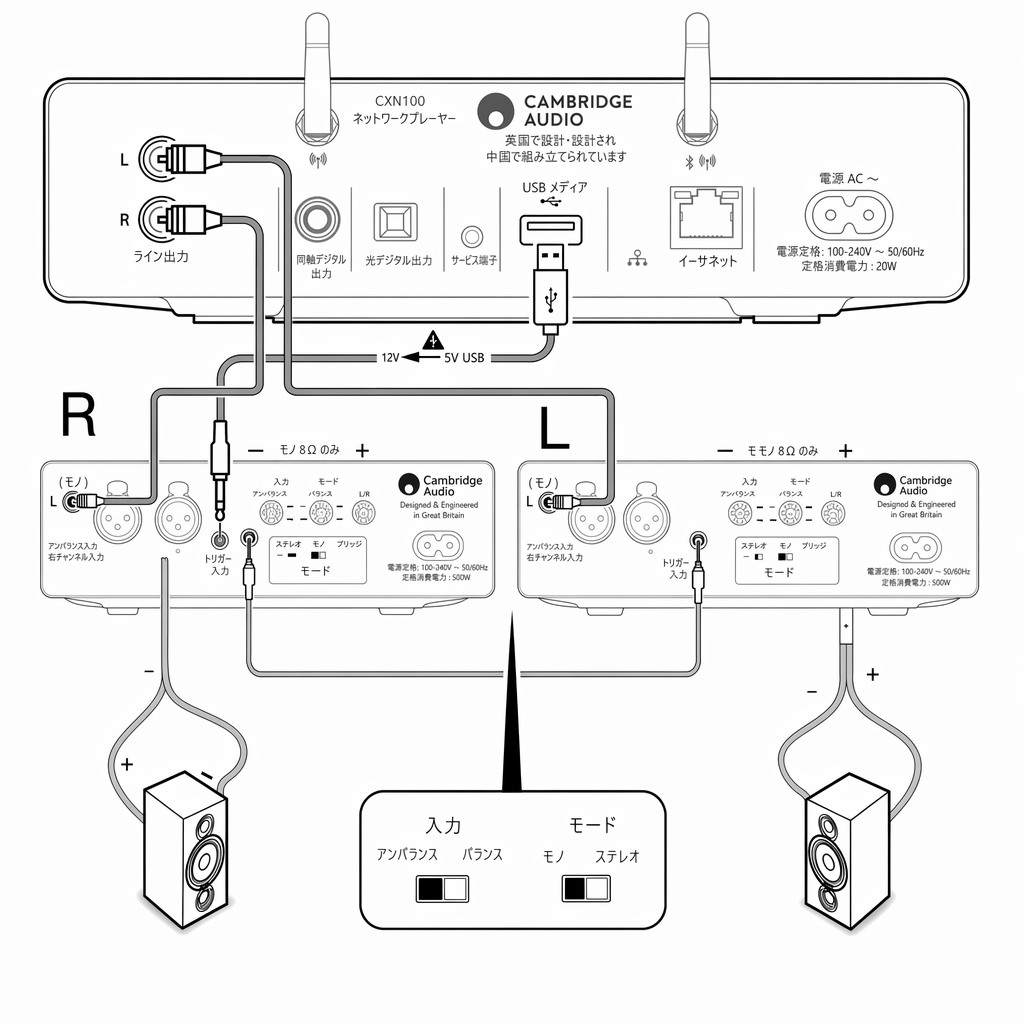
モノラルモードでのバランス接続
Balanced connection in mono mode
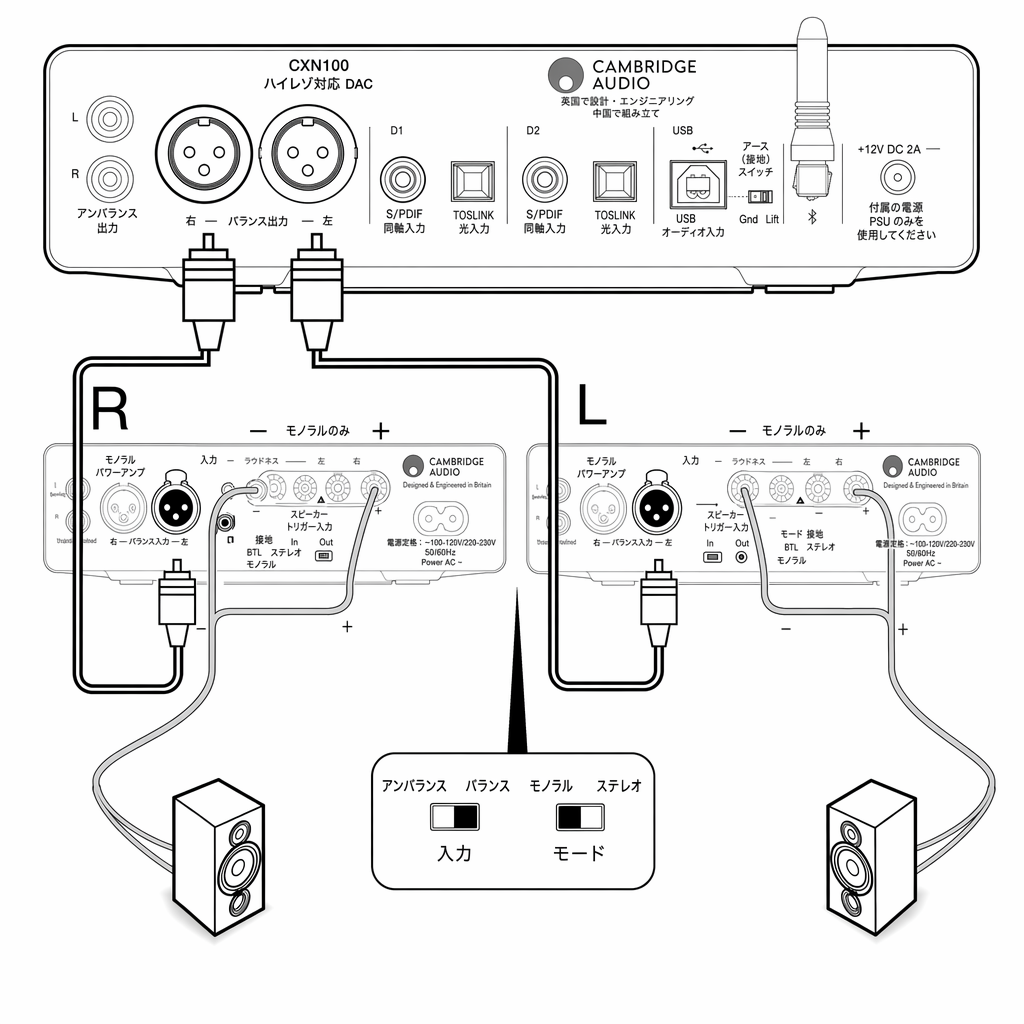
下図は、バランス接続を使用して DacMagic200M に接続された 2 台の MXW70 を駆動する方法を示しています。Mode スイッチを Mono モードにし、「Balanced」スイッチが選択されていることを確認してください。
The diagram below shows how to drive a pair of MXW70's connected to a DacMagic200M using the balanced connection. the Mode switch in Mono mode and ensure that the balanced switch has been selected.
詳細設定Advanced settings
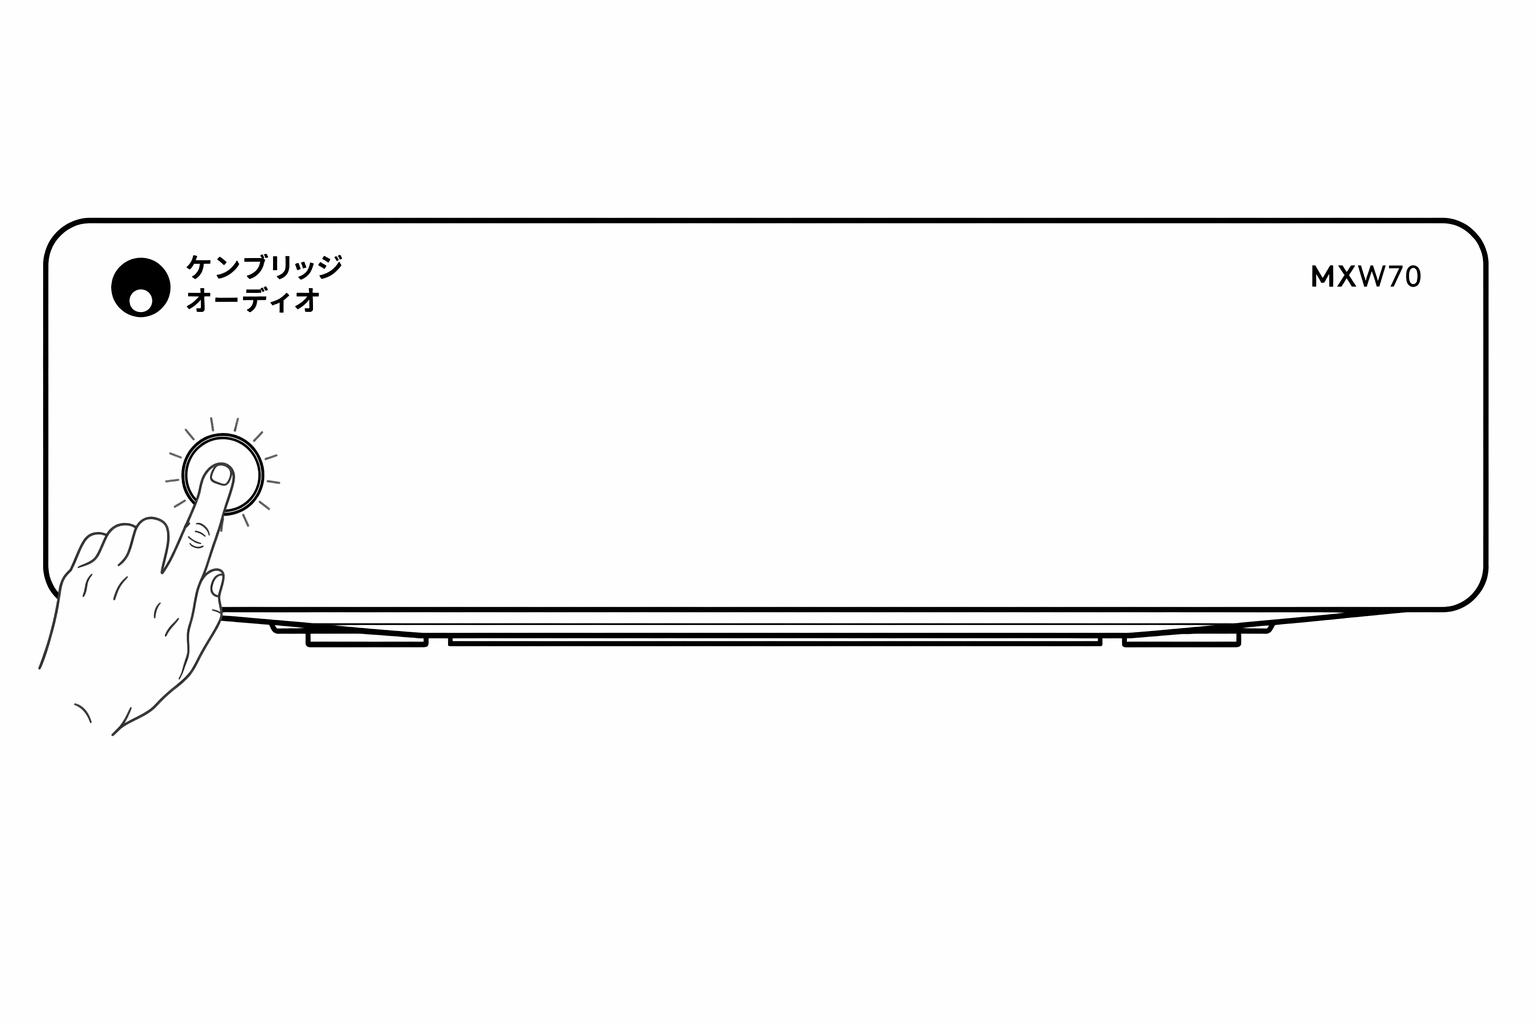
自動電源オフ(APD)
Auto Power Down (APD)
MXW70 は APD が有効な状態で出荷され、20 分間オーディオ信号が検出されないと、本機は自動的にスタンバイに切り替わります。この機能を無効または再度有効にするには、以下の手順を参照してください。
The MXW70 arrives with APD enabled, and this will automatically switch the unit to standby if no audio signal is detected for 20 minutes. To disable, or re-enable this function then please see the below instructions.
APD を無効にする
Disable APD
注: MXW70 がスタンバイ状態であることを確認してください。スタンバイ LED のみが暗く点灯していることで示されます。Standby ボタンを 5 秒間押し続けてください。LED が赤と白で交互に 5 回点滅した後、スタンバイ状態に戻ります。
Note: Please ensure that the MXW70 is in standby, which is indicated by only the standby LED being dim . Press and hold the Standby button for 5 seconds. Will blink alternately red-white LED for five times and then go back to the standby state
APD の有効化 / 工場出荷時リセットを行う
Enable APD/To perform a factory rest
注: APD リセットまたは工場出荷時リセットを行うために AC 電源を接続する前に、MXW70 の AC 電源ケーブルが抜かれていることを確認し、スタンバイ LED が消灯するまで待ってください。
Note: Please ensure the AC power cable of MXW70 is unplugged and wait for the standby LED to turn off before plugging in the AC power to perform APD reset or factory reset.
APD を有効にする(初期設定)
Enable APD (default)
AC 電源を接続する際に Standby ボタンを 5 秒間押し続けてください。LED が赤と白で交互に 5 回点滅した後、スタンバイ状態に戻ります。
Press and hold Standby button for 5 seconds while plugging in AC power Will blink alternately red-white LED for five times and then go back to the standby state
工場出荷時リセットを行うには
To perform a factory reset
AC 電源を接続する際に、LED が赤と白で交互に点滅するまで Standby ボタンを押し続けてください。* APD 機能が有効になります。
Press and hold standby button while plugging in AC power until blink alternately red-white LED. * APD function will enable.
保護回路Protection circuitry
MXW70 には、過熱、DC オフセット、クリッピング、電源異常を検出するアンプ保護回路が搭載されています。これらの異常のいずれかが検出されると、ボタンの LED が赤く点滅します。
The MXW70 includes Amplifier Protection Circuitry to detect faults with Over Temperature, DC offset, Clipping and Power supply fault. If any of these faults are detected the button LED will blink red.
ボタンを 1 回押すと保護表示が解除され、異常を取り除いた後にもう一度押すと本機が再びオンになります。
Press the button once to disable the protection indication, and press again to turn unit back on, when the fault has been removed.
DC
DC
短い赤色点滅 1 回の後、白色に点灯することで示されます。
This is indicated by 1 short red blink followed by solid white.
内部の異常によってアンプの出力が高い一定電圧(DC)になった場合、MXW70 はスピーカーを保護します。この異常はまれですが、検出することでスピーカーを損傷から保護できます。
MXW70 offers loudspeaker protection if the output of the amplifier goes to a high constant voltage (DC) because of some internal fault. This is a rare fault, although detecting it will protect your loudspeakers from damage.
この異常が発生した場合は、修理について販売店またはサポートチーム(https://www.cambridgeaudio.com/contact)にお問い合わせください。
If this fault occurs, please contact your dealer for service or our support team https://www.cambridgeaudio.com/contact
過熱
Over Temperature
短い赤色点滅 2 回の後、白色に点灯することで示されます。
This is indicated by 2 short red blinks followed by solid white
過熱は、大音量での再生、低インピーダンスのスピーカー、換気不足が組み合わさることで発生する場合があります。内部温度が高くなると、アンプは損傷を防ぐために自動的に異常モードへ切り替わります。
Over temperature can be caused by a combination of high listening levels, low impedance speakers and insufficient ventilation. If the internal temperature reaches a high level, the amplifier will automatically switch into a fault mode to protect itself from damage.
スピーカーのインピーダンスが低いと、アンプにかかる負荷が増すため、アンプの温度がより速く上昇することがあります。アンプを密閉されたキャビネットに設置すると、短時間の再生後に過熱検出が作動または再作動することがあります。
If the loudspeaker impedance is low, the temperature of the amplifier may rise faster as the amplifier is working harder. If the amplifier is mounted in a closed cabinet, the over temperature detection may activate/reactivate after a short listening time.
通常の動作を再開する前に、本機を 5 分間放置して冷ましてください。スピーカーのインピーダンスが、選択した MXW70 の動作モードに適しているか確認してください。また、必要な対流冷却を行えるよう、本機の周囲全体に少なくとも 15cm の空間があることを確認してください。内部温度がまだ安全なレベルに達していない場合、Standby ボタンを押しても本機は動作を再開しません。
Leave the unit for 5 minutes to cool down before resuming normal operation. Check if the loudspeaker impedance is suitable for the selected MXW70 operation mode, and also make sure there’s at least 15cm room all around the unit to allow the necessary convection cooling. The unit will not resume operation even when pressing the standby button if the internal temperature hasn’t reached a safe level yet.
電源異常
Power Supply Fault
短い赤色点滅 3 回の後、白色に点灯することで示されます。
This is indicated by 3 short red blinks followed by solid white.
内部電源に異常が発生するという不測の事態が起きる場合があります。これは、本機の電源が入っている状態で電源コードを抜いた場合や、突然の停電が発生した場合にも起こることがあります。
In the unlucky event that the internal power supply becomes faulty. this can also happen when removing the power cord whilst unit is on, or if there’s a sudden power outage.
問題が解消しない場合は、修理について販売店またはサポートチーム(https://www.cambridgeaudio.com/contact)にお問い合わせください。
If the issue persists, please contact your dealer for service or our support team https://www.cambridgeaudio.com/contact
クリッピング
Clipping
短い赤色点滅 4 回の後、白色に点灯することで示されます。
This is indicated by 4 short red blinks followed by solid white.
大音量の音楽のトランジェント中に時折発生する可能性があるため、本機はごく短時間の出力クリッピングを許容します。赤色のランプが速く点滅します。この場合は、音源の音量を下げることを推奨します。クリッピング状態が続く場合、本機はスピーカーの損傷を防ぐために自動的にシャットダウンします。
The unit will allow output clipping for a very short time, as this might occasionally happen during loud music transients. Red light will flash quickly. In this case it is recommended to reduce the volume of the source. If clipping condition is persistent, then the unit will automatically shutdown to prevent loudspeaker damage.
トラブルシューティングTroubleshooting
電源が入らない
There is no power
- AC 電源コードが確実に接続されていることを確認してください。Ensure the AC power cord is connected securely.
- プラグが壁のコンセントに完全に差し込まれ、スイッチがオンになっていることを確認してください。Ensure the plug is fully inserted into the wall socket and is switched on.
- 電源プラグまたはアダプターのヒューズを確認してください。Check fuse in the mains plug or adaptor.
音が出ない
There is no sound
- 本機が Standby モードになっていないことを確認してください。Make sure the unit is not in Standby mode.
- ソース機器が正しく接続されていることを確認してください。Check that source component is properly connected.
- スピーカーが正しく接続されていることを確認してください。Check that your speakers are properly connected.
- Balanced/Unbalanced スイッチで正しい入力が選択されていることを確認してください。Ensure that the correct input has been selected via the Balanced/Unbalanced switch.
- Mono/Stereo スイッチで正しいモードが選択されていることを確認してください。Ensure that the correct mode has been selected via the Mono/Stereo switch.
- 可能であれば、別のインターコネクトケーブルやスピーカーケーブルを試してください。If possible, use different interconnect cables and speaker cables.
- ソース機器の音量コントロールを確認し、ミュートになっていないことを確認してください。Check your source devices’ volume control to ensure this is not muted.
- 別のソース機器で確認してください。Check with alternative source device.
片方のチャンネルから音が出ない
There is no sound on one channel
- スピーカーの接続を確認してください。Check speaker connections.
- インターコネクトを確認してください。Check interconnects.
低音が弱い、またはステレオイメージがぼやける
There is weak bass or diffused stereo imaging
- スピーカーが逆相で配線されていないことを確認してください。Ensure that speakers are not wired out of phase.
大きなブーンという音やハム音が出る
There is a loud buzz or hum
- インターコネクトに緩みや不良がないことを確認してください。Ensure no interconnects are loose or defective.
LED スタンバイボタンが赤く点滅する
The LED standby button is flashing red
- 「保護回路」セクションのトラブルシューティング手順を確認してください。Check the ‘Protection Circuitry’ section for troubleshooting steps.
技術仕様Technical specification
最終更新日: 2025年6月10日 05:05。リビジョン #10014
Last updated: June 10, 2025 05:05. Revision #10014
連続出力:
Continuous power output:
- 2 x 70W RMS(8 Ohms)2 x 70W RMS into 8 Ohms
- 2 x 125W RMS(4 Ohms)2 x 125W RMS into 4 Ohms
- 1 x 250W RMS(8 Ohms、モノラル)1 x 250W RMS into 8 Ohms (Mono)
全高調波歪率(無加重):
THD (unweighted):
- <0.015% @ 5W/8ohm<0.015% @ 5W/8ohm
周波数特性:
Frequency Response:
- 10Hz - 30kHz (-1dB)10Hz - 30kHz (-1dB)
S/N 比(1W / 8Ω 基準):
S/N ratio (ref 1W into 8 Ohm):
- >110dB(20-20k 帯域幅)>110dB (20-20k bw)
クロストーク(1kHz):
Crosstalk @ 1kHz:
- <-82dB<-82dB
入力:
Inputs:
- バランス、アンバランス。Balanced, Unbalanced.
- 12v トリガー12v Trigger
入力感度:
Input sensitivity:
- 3.6V(モノラル XLR)、1.65V(モノラル RCA)、0.9V(ステレオ RCA)、1.9V(ステレオ XLR)3.6V (mono XLR), 1.65V (mono RCA), 0.9V (stereo RCA), 1.9V (stereo XLR)
出力:
Outputs:
- スピーカー、12v トリガーループ出力Speakers, 12v Trigger Loop out
最大消費電力:
Max power consumption:
- 300W300W
スタンバイ時消費電力:
Standby power consumption:
- <0.5W<0.5W
寸法:
Dimensions:
- 56 x 215 x 215mm56 x 215 x 215mm
重量:
Weight:
- 1.65kg1.65kg